Making first miller table |


 Colorado Prospector - Gem and mineral prospecting and mining forums > Prospecting, Mineral Collecting and Treasure Hunting Forums > Equipment - Prospecting and Lapidary
  |
Making first miller table |
 Nov 28 2012, 09:34 PM Nov 28 2012, 09:34 PM
Post
#1
|
|
|
Shovel Buster!  Group: Members Posts: 62 Joined: 31-March 12 From: Sopchoppy Fl Member No.: 42,369 |
I'm starting to put together material for a aluminum miller table. What i would like to do is glue the Alu together. I've talked with some of my airplane friends and they came up with methacrylate 7350 a Parsons product which is suppose to be self etching. Small amounts of this stuff is hard to come by because of short shelf life. I plan to use Jasco prep&prime(need input)on the glued surfaces regaurdless of what ever adhesive i use. 5200 may work and i've used a lot of it in a marine environment and also glued some of Jens favorite shoe soles(doesn't take much) back together with it.I'm just concerned with the Alu oxidizing and coming a part at the glue seam (not nice). I really don't want to put fasteners in the bed of the table if possible. Any in put good or bad i will appreciate. The metal is on the way and should be here next week. Ordered by phone from discountsteel.com (Fort Worth Tx) for a better price than on line. It beats spending a day driving to Tallahassee and not ending up with what i need. In put on bed surface also, bondo autmotive primer chaulk board paint ect. Later i'll need some help with the math on the spray bar but that can wait. I'm going to keep for anyone relatively neat notes and drawings on this if it turns out well.
Burrell 
|
 |
 
|
|
Nov 29 2012, 08:27 PM
Post
#2
|
|
|
russau Group: Members Posts: 2,841 Joined: 4-December 03 From: st.louis missouri Member No.: 43 |
as far as the bed for your Miller table, ive tried the chaulk board paint and it does work but not near as good as useing actual slate.the paint will eventually chip/scratch and need tobe redone.ive made several slate Miller tables and i used ABS plastic for the main frame and glued it together.alum. is fine,and glueing it together is fine also,although im not familiar with this adhesive you have.the spary bar only needs to put just enough water on the surface to acheive an "mirror" flat flow without ANY ripples in the water!!and its depth could be only 1/8 inch deep.feed your screened cons slowly,very slowly!and let the water do its job.i found that the best results was to limit the amount of water onto the table.i dont like useing a valve because it raises the water pressure while lowering the water flow. NOT GOOD! use the smallest bilge pump you can find.depending on the size of your table,a 500 GPH or less is best.my first table was 24"wide and 48 " long of 3/8 inch thick slate with a alum. frame and 3/4 inch metal conduit for leggs. this was to heavy to bring with me to different states so i cut my slate down smaller and made several tables.i also like useing my homade auto feeder similar to Gats design that is posted here somewhere.this allows me to set it up run the material while im doing something else. the smart thing todo is ALWAYS rerun your material at a slower water flow to check your previous run.and another thing i like todo is PRIOR to my first or any run is i clean the slate of any priviously run material or clay. now lets see what youve come up with and some results! good luck!
|
|
|
|
|
Dec 12 2012, 06:25 AM
Post
#3
|
|
|
Shovel Buster! Group: Members Posts: 62 Joined: 31-March 12 From: Sopchoppy Fl Member No.: 42,369 |
Russ
The adhesive i talked about was suppose to be self etching for alumi. Methacrylate a high grade aircraft adhisive was what a couple of the guys i know came up with. I think now since i'm not going to fly in it i'll just go ahead with 3M 5200. It's esiaer to get and i've had good results with anything i've put it on. I've also found chalk board slate online from Vermont. Its pricey but may be worth it in not having to resurface it like alum. 3/8 thick, Did you back your table with plywood or something? The auto feeder oyu made is it a dry or wet feed? It seems that classified material may work either way. I'll wait until after the first before ordering the slate. it may not get beat and banged in shipping as bad then. I'm looking forward to learning how to use it. Thanks for your input. Burrell |
|
|
|
|
Dec 12 2012, 07:46 AM
Post
#4
|
|
|
russau Group: Members Posts: 2,841 Joined: 4-December 03 From: st.louis missouri Member No.: 43 |
my base for my Miller table is made from ABS plastic.i used ABS adhesive to glue it together at certain points. the autofeeder is a wet system. only use screened material on a Miller table. useing specific gravity gets the best results.use just enough water to move the unwanted material from the gold and make sure the flow is like glass with NO disturbances.feed slow and let the water do the work.thats why i like my autofeeder (once its set up for the size/shape of the gold)so i can do other things! if i could afford a Gold Cube, id buy one! but there again the Gold Cube leaves you with material you still need to cleanup! MILLER TIME!
|
|
|
|
|
Dec 12 2012, 11:12 AM
Post
#5
|
|
 Moderator Group: Members Posts: 4,459 Joined: 25-August 09 From: way on up thar Member No.: 6,983 |
russ..... WHEN are you going to learn how to post pics?!
We've been wanting to see your cool stuff forever (here and other forums). Trust me... it's super easy to transfer them to forums if you already have the images stored on your computer. Denise and I can help! Would love to see your equip and I know others would too. -------------------- /l ,[____], l---L-OlllllllO- ()_) ()_)--o-)_) BLACK SANDS MATTER! Very Happy CP Lifetime Member CP CORE TEAM Referral Code CE213 |
|
|
|
|
Dec 12 2012, 03:49 PM
Post
#6
|
|
|
Shovel Buster! Group: Members Posts: 62 Joined: 31-March 12 From: Sopchoppy Fl Member No.: 42,369 |
I also don't know how to post photos. Not that i have a lot but a few that may be of interest to some of the members. I haven't tranfered those to the computor yet. A foot valve cage and i float my bilge pumps when i use them.
|
|
|
|
|
Dec 12 2012, 04:22 PM
Post
#7
|
|
|
russau Group: Members Posts: 2,841 Joined: 4-December 03 From: st.louis missouri Member No.: 43 |
Swizz strange you should ask! i just read a artical about doing this and our local Jr. College offers free lessons if you just register. my wife and i both are going to sign up for this!ive been shown how-2-do this several times and even wrote it down but you know how those old retired people are!:)
|
|
|
|
|
Feb 7 2013, 03:26 PM
Post
#8
|
|
|
Shovel Buster! Group: Members Posts: 62 Joined: 31-March 12 From: Sopchoppy Fl Member No.: 42,369 |
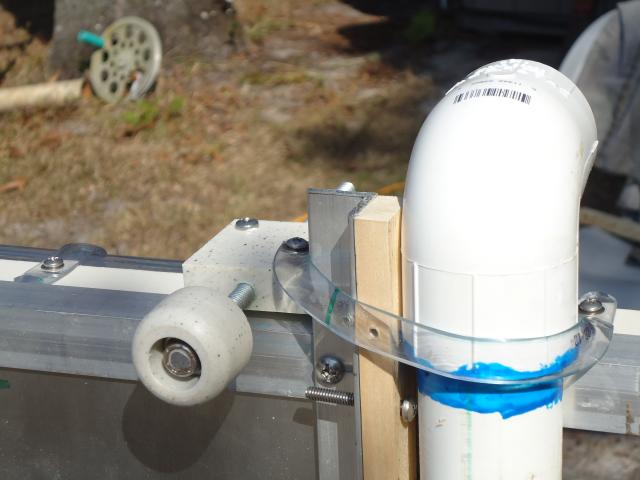
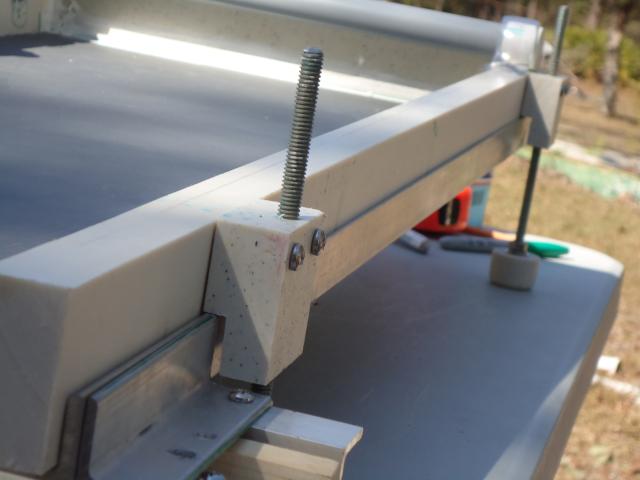
I went with slate and now have it framed in with alumium and some 1" plastic for rails. Sealed joints with 3M 5200 and excess was esay to trim off. Played with spray bar and will have work with that some more. Water wanted to roll up under the table and drip about 3/4" back. This may not happen after legs are mounted. I'm going to try and add a tailings catch troff out of pvc. Made some foot pads for adjustable legs out of same plastic with 5/16 althread. I bought the slate out of Vermont and they are proud of it. I was pleased with what i got and the shipping package banged some but would have had to be drop off of roof to have damaged the slate. Anyway still working on it. Thanks Russ for your in put.
Burrell |
|
|
|
|
Feb 8 2013, 01:46 PM
Post
#9
|
|
 Master Mucker! Group: Admin Posts: 4,149 Joined: 7-October 03 From: Colorado Member No.: 3 |
Sounds like the project is coming along very nicely Burrell. We'd love to see some pics of you guy's equipment and this particular forum is quite easy to upload pictures too.
Just below the box you type the replies into you'll see an attatchment editor, that's where you upload pics. First you will click on the browse tab which opens up a box to find the pic file on your computer, once you've located and choosen the appropriate file, then click the open tab on that box. When the little box closes you will still need to click on the upload link to then actually upload the file into the forum that you've just choosen. At this point the forum will resize the pic if needed and attatch it to the end of your post when you click add reply. Or you can manually place the pics into the text box and arrange them with descriptions if you wish to add more than one pic per post. Hope that helps with the pic upload and attatching. Give it a shot and let us know if you have questions. -------------------- CP-Owner/Administrator
www.ColoradoProspector.com IF YOU USE IT, THE GROUND PRODUCED IT! MINERS MAKE "IT" HAPPEN!! |
|
|
|
|
Feb 8 2013, 02:32 PM
Post
#10
|
|
 Master Mucker! Group: Members Posts: 1,301 Joined: 17-February 12 From: Central CO Member No.: 41,357 |
Yep, uploading attachmaent is so easy, even a Caveman can do it....
 Caveman -------------------- Caveman
Aulus Livius Maximus World Traveler, 7 Continent Walker LEVEL 3 LIFETIME MEMBER Referral Code: SE2104 |
|
|
|
|
Feb 11 2013, 08:21 PM
Post
#11
|
||
|
Shovel Buster! Group: Members Posts: 62 Joined: 31-March 12 From: Sopchoppy Fl Member No.: 42,369 |
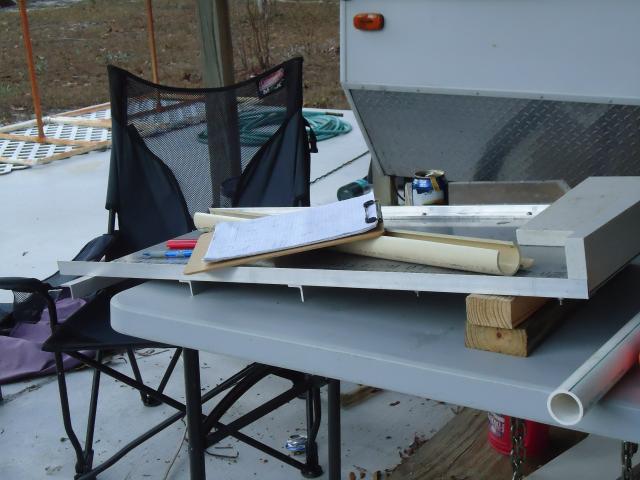
I'm not sure whats coming thru. tried to send 4 pictures. These were early DEc before deciding to go woith slate
Attached thumbnail(s)
|
|
|
|
|
|
|
Feb 11 2013, 08:40 PM
Post
#12
|
||
|
Shovel Buster! Group: Members Posts: 62 Joined: 31-March 12 From: Sopchoppy Fl Member No.: 42,369 |
anotherone
Attached thumbnail(s)
|
|
|
|
|
|
|
Feb 11 2013, 08:46 PM
Post
#13
|
|
|
Shovel Buster! Group: Members Posts: 62 Joined: 31-March 12 From: Sopchoppy Fl Member No.: 42,369 |
one at a time. this was sat afternoon. not finished but getting closer. will work on sending more at one time
|
|
|
|
|
Feb 11 2013, 08:50 PM
Post
#14
|
|
|
Shovel Buster! Group: Members Posts: 62 Joined: 31-March 12 From: Sopchoppy Fl Member No.: 42,369 |
?/?/
|
|
|
|
|
Feb 11 2013, 08:54 PM
Post
#15
|
||
|
Shovel Buster! Group: Members Posts: 62 Joined: 31-March 12 From: Sopchoppy Fl Member No.: 42,369 |
maybe
Attached thumbnail(s)
|
|
|
|
|
|
|
| Lo-Fi Version | Time is now: 29th April 2024 - 10:19 AM |