Making first miller table |


 Colorado Prospector - Gem and mineral prospecting and mining forums > Prospecting, Mineral Collecting and Treasure Hunting Forums > Equipment - Prospecting and Lapidary
Making first miller table |
 Nov 28 2012, 09:34 PM Nov 28 2012, 09:34 PM
Post
#1
|
|
|
Shovel Buster!  Group: Members Posts: 62 Joined: 31-March 12 From: Sopchoppy Fl Member No.: 42,369 |
I'm starting to put together material for a aluminum miller table. What i would like to do is glue the Alu together. I've talked with some of my airplane friends and they came up with methacrylate 7350 a Parsons product which is suppose to be self etching. Small amounts of this stuff is hard to come by because of short shelf life. I plan to use Jasco prep&prime(need input)on the glued surfaces regaurdless of what ever adhesive i use. 5200 may work and i've used a lot of it in a marine environment and also glued some of Jens favorite shoe soles(doesn't take much) back together with it.I'm just concerned with the Alu oxidizing and coming a part at the glue seam (not nice). I really don't want to put fasteners in the bed of the table if possible. Any in put good or bad i will appreciate. The metal is on the way and should be here next week. Ordered by phone from discountsteel.com (Fort Worth Tx) for a better price than on line. It beats spending a day driving to Tallahassee and not ending up with what i need. In put on bed surface also, bondo autmotive primer chaulk board paint ect. Later i'll need some help with the math on the spray bar but that can wait. I'm going to keep for anyone relatively neat notes and drawings on this if it turns out well.
Burrell 
|
 |
 
|
 |
|
Nov 29 2012, 08:27 PM
Post
#2
|
|
|
russau Group: Members Posts: 2,841 Joined: 4-December 03 From: st.louis missouri Member No.: 43 |
as far as the bed for your Miller table, ive tried the chaulk board paint and it does work but not near as good as useing actual slate.the paint will eventually chip/scratch and need tobe redone.ive made several slate Miller tables and i used ABS plastic for the main frame and glued it together.alum. is fine,and glueing it together is fine also,although im not familiar with this adhesive you have.the spary bar only needs to put just enough water on the surface to acheive an "mirror" flat flow without ANY ripples in the water!!and its depth could be only 1/8 inch deep.feed your screened cons slowly,very slowly!and let the water do its job.i found that the best results was to limit the amount of water onto the table.i dont like useing a valve because it raises the water pressure while lowering the water flow. NOT GOOD! use the smallest bilge pump you can find.depending on the size of your table,a 500 GPH or less is best.my first table was 24"wide and 48 " long of 3/8 inch thick slate with a alum. frame and 3/4 inch metal conduit for leggs. this was to heavy to bring with me to different states so i cut my slate down smaller and made several tables.i also like useing my homade auto feeder similar to Gats design that is posted here somewhere.this allows me to set it up run the material while im doing something else. the smart thing todo is ALWAYS rerun your material at a slower water flow to check your previous run.and another thing i like todo is PRIOR to my first or any run is i clean the slate of any priviously run material or clay. now lets see what youve come up with and some results! good luck!
|
|
|
|
|
Dec 12 2012, 06:25 AM
Post
#3
|
|
|
Shovel Buster! Group: Members Posts: 62 Joined: 31-March 12 From: Sopchoppy Fl Member No.: 42,369 |
Russ
The adhesive i talked about was suppose to be self etching for alumi. Methacrylate a high grade aircraft adhisive was what a couple of the guys i know came up with. I think now since i'm not going to fly in it i'll just go ahead with 3M 5200. It's esiaer to get and i've had good results with anything i've put it on. I've also found chalk board slate online from Vermont. Its pricey but may be worth it in not having to resurface it like alum. 3/8 thick, Did you back your table with plywood or something? The auto feeder oyu made is it a dry or wet feed? It seems that classified material may work either way. I'll wait until after the first before ordering the slate. it may not get beat and banged in shipping as bad then. I'm looking forward to learning how to use it. Thanks for your input. Burrell |
|
|
|
|
Dec 12 2012, 07:46 AM
Post
#4
|
|
|
russau Group: Members Posts: 2,841 Joined: 4-December 03 From: st.louis missouri Member No.: 43 |
my base for my Miller table is made from ABS plastic.i used ABS adhesive to glue it together at certain points. the autofeeder is a wet system. only use screened material on a Miller table. useing specific gravity gets the best results.use just enough water to move the unwanted material from the gold and make sure the flow is like glass with NO disturbances.feed slow and let the water do the work.thats why i like my autofeeder (once its set up for the size/shape of the gold)so i can do other things! if i could afford a Gold Cube, id buy one! but there again the Gold Cube leaves you with material you still need to cleanup! MILLER TIME!
|
|
|
|
|
Dec 12 2012, 11:12 AM
Post
#5
|
|
 Moderator Group: Members Posts: 4,459 Joined: 25-August 09 From: way on up thar Member No.: 6,983 |
russ..... WHEN are you going to learn how to post pics?!
We've been wanting to see your cool stuff forever (here and other forums). Trust me... it's super easy to transfer them to forums if you already have the images stored on your computer. Denise and I can help! Would love to see your equip and I know others would too. -------------------- /l ,[____], l---L-OlllllllO- ()_) ()_)--o-)_) BLACK SANDS MATTER! Very Happy CP Lifetime Member CP CORE TEAM Referral Code CE213 |
|
|
|
|
Dec 12 2012, 03:49 PM
Post
#6
|
|
|
Shovel Buster! Group: Members Posts: 62 Joined: 31-March 12 From: Sopchoppy Fl Member No.: 42,369 |
I also don't know how to post photos. Not that i have a lot but a few that may be of interest to some of the members. I haven't tranfered those to the computor yet. A foot valve cage and i float my bilge pumps when i use them.
|
|
|
|
|
Dec 12 2012, 04:22 PM
Post
#7
|
|
|
russau Group: Members Posts: 2,841 Joined: 4-December 03 From: st.louis missouri Member No.: 43 |
Swizz strange you should ask! i just read a artical about doing this and our local Jr. College offers free lessons if you just register. my wife and i both are going to sign up for this!ive been shown how-2-do this several times and even wrote it down but you know how those old retired people are!:)
|
|
|
|
|
Feb 7 2013, 03:26 PM
Post
#8
|
|
|
Shovel Buster! Group: Members Posts: 62 Joined: 31-March 12 From: Sopchoppy Fl Member No.: 42,369 |
I went with slate and now have it framed in with alumium and some 1" plastic for rails. Sealed joints with 3M 5200 and excess was esay to trim off. Played with spray bar and will have work with that some more. Water wanted to roll up under the table and drip about 3/4" back. This may not happen after legs are mounted. I'm going to try and add a tailings catch troff out of pvc. Made some foot pads for adjustable legs out of same plastic with 5/16 althread. I bought the slate out of Vermont and they are proud of it. I was pleased with what i got and the shipping package banged some but would have had to be drop off of roof to have damaged the slate. Anyway still working on it. Thanks Russ for your in put.
Burrell |
|
|
|
|
Feb 8 2013, 01:46 PM
Post
#9
|
|
 Master Mucker! Group: Admin Posts: 4,149 Joined: 7-October 03 From: Colorado Member No.: 3 |
Sounds like the project is coming along very nicely Burrell. We'd love to see some pics of you guy's equipment and this particular forum is quite easy to upload pictures too.
Just below the box you type the replies into you'll see an attatchment editor, that's where you upload pics. First you will click on the browse tab which opens up a box to find the pic file on your computer, once you've located and choosen the appropriate file, then click the open tab on that box. When the little box closes you will still need to click on the upload link to then actually upload the file into the forum that you've just choosen. At this point the forum will resize the pic if needed and attatch it to the end of your post when you click add reply. Or you can manually place the pics into the text box and arrange them with descriptions if you wish to add more than one pic per post. Hope that helps with the pic upload and attatching. Give it a shot and let us know if you have questions. -------------------- CP-Owner/Administrator
www.ColoradoProspector.com IF YOU USE IT, THE GROUND PRODUCED IT! MINERS MAKE "IT" HAPPEN!! |
|
|
|
|
Feb 8 2013, 02:32 PM
Post
#10
|
|
 Master Mucker! Group: Members Posts: 1,301 Joined: 17-February 12 From: Central CO Member No.: 41,357 |
Yep, uploading attachmaent is so easy, even a Caveman can do it....
 Caveman -------------------- Caveman
Aulus Livius Maximus World Traveler, 7 Continent Walker LEVEL 3 LIFETIME MEMBER Referral Code: SE2104 |
|
|
|
|
Feb 11 2013, 08:21 PM
Post
#11
|
||
|
Shovel Buster! Group: Members Posts: 62 Joined: 31-March 12 From: Sopchoppy Fl Member No.: 42,369 |
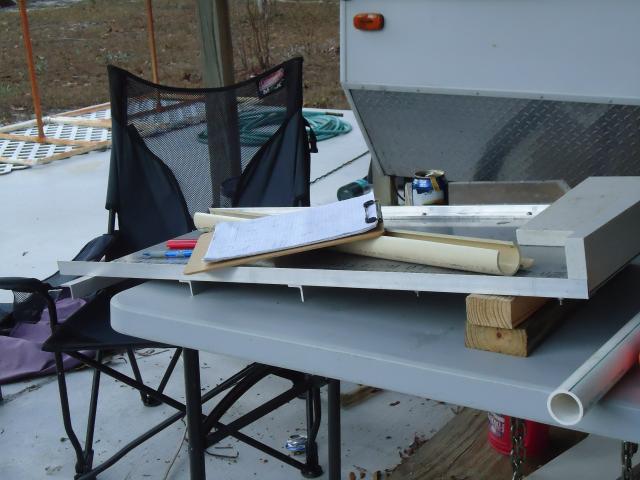
I'm not sure whats coming thru. tried to send 4 pictures. These were early DEc before deciding to go woith slate
Attached thumbnail(s)
|
|
|
|
|
|
|
Feb 11 2013, 08:40 PM
Post
#12
|
||
|
Shovel Buster! Group: Members Posts: 62 Joined: 31-March 12 From: Sopchoppy Fl Member No.: 42,369 |
anotherone
Attached thumbnail(s)
|
|
|
|
|
|
|
Feb 11 2013, 08:46 PM
Post
#13
|
|
|
Shovel Buster! Group: Members Posts: 62 Joined: 31-March 12 From: Sopchoppy Fl Member No.: 42,369 |
one at a time. this was sat afternoon. not finished but getting closer. will work on sending more at one time
|
|
|
|
|
Feb 11 2013, 08:50 PM
Post
#14
|
|
|
Shovel Buster! Group: Members Posts: 62 Joined: 31-March 12 From: Sopchoppy Fl Member No.: 42,369 |
?/?/
|
|
|
|
|
Feb 11 2013, 08:54 PM
Post
#15
|
||
|
Shovel Buster! Group: Members Posts: 62 Joined: 31-March 12 From: Sopchoppy Fl Member No.: 42,369 |
maybe
Attached thumbnail(s)
|
|
|
|
|
|
|
Feb 11 2013, 09:06 PM
Post
#16
|
||
|
Shovel Buster! Group: Members Posts: 62 Joined: 31-March 12 From: Sopchoppy Fl Member No.: 42,369 |
 02-09-13 pm 02-09-13 pm
Attached thumbnail(s)
|
|
|
|
|
|
|
Feb 12 2013, 06:59 AM
Post
#17
|
|
|
russau Group: Members Posts: 2,841 Joined: 4-December 03 From: st.louis missouri Member No.: 43 |
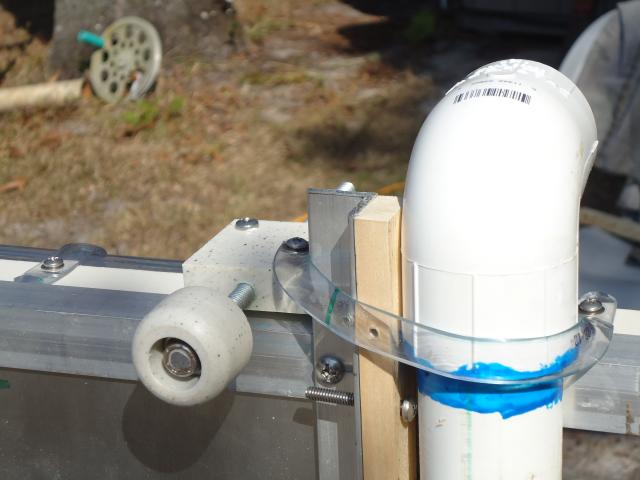
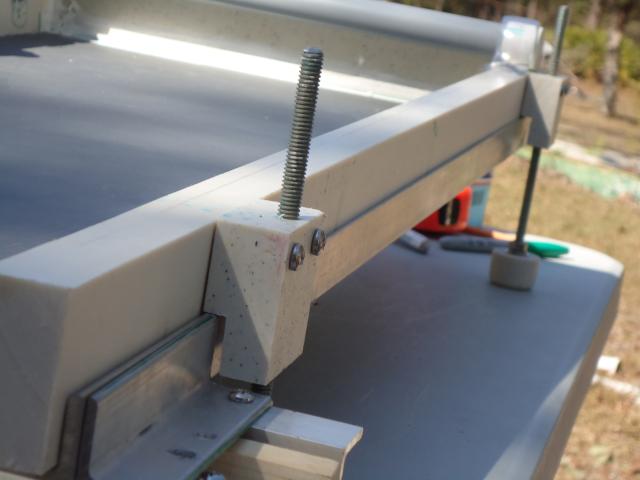
Burrell what is the material you made the frame made of? nylon/ its some sort of plastic and i really like the adjustment devices you installed! first rate!
|
|
|
|
|
Feb 12 2013, 08:11 AM
Post
#18
|
|
 Master Mucker! Group: Admin Posts: 7,208 Joined: 7-October 03 From: Colorado Member No.: 4 |
The uploader will only let you choose one image at a time. After you choose the image, make sure you click the upload button after you pick the file you want. Your project is looking great!!

-------------------- Education is the key to the future,
and participation opens the door to opportunity. Discover your prospecting independence & success! ColoradoProspector.com Owner/Webmaster Core team member ♥  |
|
|
|
|
Feb 12 2013, 11:33 AM
Post
#19
|
|
|
Shovel Buster! Group: Members Posts: 62 Joined: 31-March 12 From: Sopchoppy Fl Member No.: 42,369 |
There is 2 kinds 1 head board and leg assembly has a speckle in it. Possibly a counter top material. The rails are just white. I pulled all of this out of a trash pile years ago. I think the white stuff was packing for high end doors(6.5x55"x1") I'll start asking and see if somebody can id it. The specked had small rounded edge on both sides, counter over hang maybe.
|
|
|
|
|
Feb 15 2013, 09:16 AM
Post
#20
|
|
|
Master Mucker! Group: Members Posts: 1,301 Joined: 17-February 12 From: Central CO Member No.: 41,357 |
I'm thinking of doing this too as a project at the cabin (if I ever get the time). It looks like I can get 12"x24" piece of honed slate tile at Home Depot. Will this serve, or does it have to be chalkboard slate?
-------------------- Caveman
Aulus Livius Maximus World Traveler, 7 Continent Walker LEVEL 3 LIFETIME MEMBER Referral Code: SE2104 |
|
|
|
|
Feb 16 2013, 07:20 AM
Post
#21
|
|
|
russau Group: Members Posts: 2,841 Joined: 4-December 03 From: st.louis missouri Member No.: 43 |
itll work just fine!ill have to go by HD and see it, id like to make another table myself!
|
|
|
|
|
Feb 16 2013, 08:29 AM
Post
#22
|
|
|
Master Mucker! Group: Members Posts: 1,301 Joined: 17-February 12 From: Central CO Member No.: 41,357 |
Only available in lots by special order..... Drat! HD had my hopes up.....
I'll make a rune by the tile store though, and see what they have. -------------------- Caveman
Aulus Livius Maximus World Traveler, 7 Continent Walker LEVEL 3 LIFETIME MEMBER Referral Code: SE2104 |
|
|
|
|
Feb 16 2013, 07:21 PM
Post
#23
|
|
|
russau Group: Members Posts: 2,841 Joined: 4-December 03 From: st.louis missouri Member No.: 43 |
12 x 24 slate is the perfect size for a Miller Table. and that size is hard to find. but if the price is low enough...........
|
|
|
|
|
Feb 16 2013, 10:53 PM
Post
#24
|
|
|
Master Mucker! Group: Members Posts: 1,301 Joined: 17-February 12 From: Central CO Member No.: 41,357 |
I qill post what I find.... It will be a few days though, I'm working this weekend/
-------------------- Caveman
Aulus Livius Maximus World Traveler, 7 Continent Walker LEVEL 3 LIFETIME MEMBER Referral Code: SE2104 |
|
|
|
|
Feb 17 2013, 06:46 PM
Post
#25
|
|
|
Shovel Buster! Group: Members Posts: 62 Joined: 31-March 12 From: Sopchoppy Fl Member No.: 42,369 |
I hooked the water up to the table today. All seemed to work fine. Still not finished. It leveled out good just by watching the water run down the table. I'll get a small level this week to use in set up of table. Saw that i could do away with a couple of pieces of hose and a valve. The spray bar is high and the drips falling to the slate is causing ripples going down the table. I'll try a couple of things to make it work as is before reworking it. Water still rounded up under bottom of table at tailing end. I could also see water stacking up about 2" before running off of table. The guess at table angle is 10 degree today. It'll be toward the weekend before i can play with it some more. Will clean the rest of excess caulking off and play with spray bar. Fat n happy
|
|
|
|
|
Feb 18 2013, 06:31 AM
Post
#26
|
|
|
russau Group: Members Posts: 2,841 Joined: 4-December 03 From: st.louis missouri Member No.: 43 |
ive had this conversation before on another website. they claime that if you round over the "tailings" edge of the slate, thatll elimenate the water problem at that location. i tried that on one of my tables and it still did the same thing,but it never happered the performance of the table so i never tried that again. who cares as long as the gold is being washed clear of the waste material! and when im done running material, i ALWAYS rerun my material at a different lower water pressure to check for any finer gold that i may have missed.
|
|
|
|
|
Feb 18 2013, 09:10 AM
Post
#27
|
|
|
Master Mucker! Group: Members Posts: 1,301 Joined: 17-February 12 From: Central CO Member No.: 41,357 |
I have an I dea of pushing water up in a resevior at the top so that it spills over onto the taple face instead of dropping/spraying onto the top edge. This is similar to what the Gold Cube does, but at much lower pressure. What do you think, Russ?
-------------------- Caveman
Aulus Livius Maximus World Traveler, 7 Continent Walker LEVEL 3 LIFETIME MEMBER Referral Code: SE2104 |
|
|
|
|
Feb 19 2013, 09:56 AM
Post
#28
|
|
|
russau Group: Members Posts: 2,841 Joined: 4-December 03 From: st.louis missouri Member No.: 43 |
i have a Gold Cube and its a completely different situation/operation. i found its best to use a low as possible GPH bilge pump thats probly lower than a 500 GPH and the spray bar i use has the spray holes pointed up so it flows out of the spray bar and flows evenly to the slate and reduces any disruption of the water surface. and keep the waters depth no more than 1/8 inch deep.the finer the gold specks the slower and lower water helps drop the fine gold out and washs the scruff off.dont rush any feeding of material or youll lose fine gold.
|
|
|
|
|
Feb 19 2013, 11:34 AM
Post
#29
|
|
|
Master Mucker! Group: Members Posts: 1,301 Joined: 17-February 12 From: Central CO Member No.: 41,357 |
QUOTE (russau @ Feb 19 2013, 08:56 AM)  i have a Gold Cube and its a completely different situation/operation. i found its best to use a low as possible GPH bilge pump thats probly lower than a 500 GPH and the spray bar i use has the spray holes pointed up so it flows out of the spray bar and flows evenly to the slate and reduces any disruption of the water surface. and keep the waters depth no more than 1/8 inch deep.the finer the gold specks the slower and lower water helps drop the fine gold out and washs the scruff off.dont rush any feeding of material or youll lose fine gold. That is what I have in mind. I am going to put a 1/2" spray bar inside a 1 1/2" trough, fill the trough and have it spill over the slate no deeper than 1/8". I am also going to put the bilge pump on a voltage control so that I can vary the speed somewhat. That should keep the ripples non-existant. I will also have some varibility of angle. I'll get it built by summer and post the pics (if I find the slate). Feeding I tend to rush, so an auto-feeder will work for me. I will need some help designing an auto-feeder, and I do have some ideas about that too. Thanks for the advice - I will look for the lowest GPH bilge pump I can find (maybe a 120v aquarium pump with a varible speed controller will work too, if it can handle dirty water). Have fun! -------------------- Caveman
Aulus Livius Maximus World Traveler, 7 Continent Walker LEVEL 3 LIFETIME MEMBER Referral Code: SE2104 |
|
|
|
|
Feb 19 2013, 01:17 PM
Post
#30
|
|
|
russau Group: Members Posts: 2,841 Joined: 4-December 03 From: st.louis missouri Member No.: 43 |
autofeeders are the EZest part of it all. anything to hold your screened cons. Gat gave me the idea back at the RMMR in Idaho Springs and theres a picture of it here on this site somewhere. Gats feeder is a triangle with the one end longer (pointed) and open at that long end. make it adjustable (tilt and hight)and "T" in your water supply from your bilge pump or install another pump so you have lots of controll over all of the variables.im not worried about any fast feeding of these cons, infact the slower it feeds cons, the better fine gold recovery youll have.everytime i start up my table , i wipe off the slate to make sure its clean and free of any bubbles/dirt/left over material. let the water do the work!and the smaller the fine gold, the slower the water and the less of a tilt on the setup! its really cool to watch it do its thing! ...........thatll be a $10,000 consoltation fee! payable in smiles when your done!:)
|
|
|
|
|
Feb 19 2013, 02:57 PM
Post
#31
|
|
|
Master Mucker! Group: Members Posts: 1,301 Joined: 17-February 12 From: Central CO Member No.: 41,357 |
That would be great! I'll have to do some digging on the site to find it. When I do, I'll state where it is here...
Thanks Russ! -------------------- Caveman
Aulus Livius Maximus World Traveler, 7 Continent Walker LEVEL 3 LIFETIME MEMBER Referral Code: SE2104 |
|
|
|
|
Feb 19 2013, 03:06 PM
Post
#32
|
|
 Shovel Buster! Group: Members Posts: 130 Joined: 15-December 10 From: Castle Rock Member No.: 7,475 |
So passively watching this thread and I have questions and ideas. First is there any reason why the slate must be a continues piece why not just run two 12"x 12" tiles would a seem really make a difference. If so could you cascade from one tile to the next. Does it have to be slate? Why not run some wet / dry sand paper glued to a sheet of wood or aluminium. As for the spray bar why not run a height adjustable skim bar a few inches down from the sprayers if you want 1/8 inch of water set the bar at just under 1/8 inch and force the water under the bar, the other side should be quite smooth.
|
|
|
|
|
Feb 19 2013, 03:16 PM
Post
#33
|
|
|
Master Mucker! Group: Members Posts: 1,301 Joined: 17-February 12 From: Central CO Member No.: 41,357 |
All great ideas Andrew - that's why we call you "The Fabricator". And why we all want you on our team. I found the thread for Gat's Auto-Feeder. It's in "DIY Auotfeeder For Blue Bowl?" in the Equipment, Prospecting and Lapidary forum. Swizz started the topic.
I think the two 12x12 tiles is a great idea, and should be easy to get. I can picture what you mean by the skim bar, and I do think that is very workable without adding too much complication. I will have to get with you and draw it out. Thanks! -------------------- Caveman
Aulus Livius Maximus World Traveler, 7 Continent Walker LEVEL 3 LIFETIME MEMBER Referral Code: SE2104 |
|
|
|
|
Feb 20 2013, 06:10 AM
Post
#34
|
|
|
russau Group: Members Posts: 2,841 Joined: 4-December 03 From: st.louis missouri Member No.: 43 |
QUOTE (amorton @ Feb 19 2013, 02:06 PM) So passively watching this thread and I have questions and ideas. First is there any reason why the slate must be a continues piece why not just run two 12"x 12" tiles would a seem really make a difference. If so could you cascade from one tile to the next. Does it have to be slate? Why not run some wet / dry sand paper glued to a sheet of wood or aluminium. As for the spray bar why not run a height adjustable skim bar a few inches down from the sprayers if you want 1/8 inch of water set the bar at just under 1/8 inch and force the water under the bar, the other side should be quite smooth. well the slate needs tobe continues peice to keep from fine gold getting traped in the seem.useing the slate (12x12)in a cascadeing layout sounds interesting, if you can keep the fine gold on the upper peice of slate. otherwise the descent from the upper to the lower slate would cause a distortion in the water and would keep the fine gold moveing downhill(IMHO)...ive never tried the wet/dry sand paper idea so i cant give a somewhat educated guess on its workability.my first Miller table was a alum. sluice with blackboard spray paint. it worked but the slate worked even better. and the painted surface needed tobe repainted eventually.and on the adjustable skim bar for the spray bar. i did this also to help smooth out my water flow, but if you get the water flow working correctly from the spray bar, you wont need it. mine is still there but its up/out of the way! it can cause turbulance if its not got a smooth lower edge and the water flow isnt to much. any distortion in the water flow will cause fine gold to move around and out off your table if any of the variables is to much. i like the workings of the table called the "black magic" it uses somesort of rubber surface instead of slate. a guy i know has one and really likes it.....but he has some $$ tied up in his and i had 0$ in mine. i dont like to buy equipment unless i HAVE TO! |
|
|
|
|
Feb 20 2013, 09:40 AM
Post
#35
|
|
|
Master Mucker! Group: Members Posts: 1,301 Joined: 17-February 12 From: Central CO Member No.: 41,357 |
l's table,Just watched the youtube vid on the Black Majic table - I like the idea of slate better. I do want to see more pic's of Burrell's table. How is it coming along? Do you have it working yet? You got a great thread going, then we kinda hijacked it. Sorry about that.
We would like your opinions on this too.Thanks! -------------------- Caveman
Aulus Livius Maximus World Traveler, 7 Continent Walker LEVEL 3 LIFETIME MEMBER Referral Code: SE2104 |
|
|
|
|
Feb 20 2013, 02:42 PM
Post
#36
|
|
|
Shovel Buster! Group: Members Posts: 62 Joined: 31-March 12 From: Sopchoppy Fl Member No.: 42,369 |
Cman I'll get more pic up . I have to learn how to resize to under 4.0 for the forum. When i get to the spray bar i will probably late it directly on the bed. Thanking about sanding bottom edge of pvc fittings so there won't be much open drip space between bar and bed. With as low of water pressure that will be in spray bar this shouldn't a problem if i sand too much off of the fitings and glue will plug leaks witch may not even need patching. As is now i have a solid cap on end of spray and i'm thanking a threaded plug would be better in case trash plugs bar holes. I've also thought about using clear tubing but it has a membery in a coiled up state needs to be straight. Its still going to be a while before i can work more on the table.
|
|
|
|
|
Feb 20 2013, 03:10 PM
Post
#37
|
|
|
Master Mucker! Group: Members Posts: 1,301 Joined: 17-February 12 From: Central CO Member No.: 41,357 |
No problem, I'm glad to hear that it coming along. I just found a pice of 12"x24" piece of slate at A World of Tile. Color is "Montauk Black", and is a guaged wall/floor tile, so it is about 1/4" thick. The surface is natural finish (not honed) but very flat - no ridges. I think it will work fine as is, but I will sand it down if I have to - it won't take much. I should have it done by summer. I will start a different thread when I get it started. Thanks for the inspiration!

-------------------- Caveman
Aulus Livius Maximus World Traveler, 7 Continent Walker LEVEL 3 LIFETIME MEMBER Referral Code: SE2104 |
|
|
|
|
Feb 20 2013, 08:37 PM
Post
#38
|
|
|
russau Group: Members Posts: 2,841 Joined: 4-December 03 From: st.louis missouri Member No.: 43 |
thanks for the heads up on the tile! if there is different colors ava. green would be a real good choice because it will show any blacksand left on the slate and black will hide it and any gold thats still under the black sands. but the gold specks will "pop" on the black surface...
|
|
|
|
|
Feb 20 2013, 10:29 PM
Post
#39
|
|
|
Master Mucker! Group: Members Posts: 1,301 Joined: 17-February 12 From: Central CO Member No.: 41,357 |
QUOTE (russau @ Feb 20 2013, 07:37 PM) thanks for the heads up on the tile! if there is different colors ava. green would be a real good choice because it will show any blacksand left on the slate and black will hide it and any gold thats still under the black sands. but the gold specks will "pop" on the black surface... The color when wet is more blue/grey. Black sand shows up on it very well, and the gold in it popped right out - Yeppers, I tested it when I got it home, and I'm surprised at what I missed in the -50 concentrete. I can't wait to build the table and run it -------------------- Caveman
Aulus Livius Maximus World Traveler, 7 Continent Walker LEVEL 3 LIFETIME MEMBER Referral Code: SE2104 |
|
|
|
|
Feb 24 2013, 10:46 PM
Post
#40
|
|
|
Shovel Buster! Group: Members Posts: 62 Joined: 31-March 12 From: Sopchoppy Fl Member No.: 42,369 |
Played with the table some today. Things seem to be working out some what. Spray bar will need a lot of attention. Holes may be to small but kinda figured on that i can make them bigger. Had the by pass valve closed and quirted water all over me and our dog. She broke camp and wouldn't have anything to do with me for a while. Cman your in for a treat as you get into this project. I'm just as much in the blind as you are. I've never seen one of these other than pictures. Spray bar is to high as is. I'll put bigger holes in it but think i will still have a dripping problem. Wraped a rag around it and got water down onto the table. Adjusted the valves some and looked good. put a couple of hand full of dirt on it and it cleaned off nicely. The excess caulking at the rails needs to be cleaned better. It was causing a ripple at every piece to angle out away from the rail. May have to live with that some how. All in all happy with how its going. Didn't take pictures today but will try to get some more up soon.
|
|
|
|
|
Feb 25 2013, 05:06 AM
Post
#41
|
|
|
russau Group: Members Posts: 2,841 Joined: 4-December 03 From: st.louis missouri Member No.: 43 |
on one of my first tables i made a chamber for the spray bars water and placed a peice of sponge in there to reduce/flaten the waters flow and to help prevent any distortion of the waters surface. as long as i got that sponge saturated with water and remove all of the air from it, it worked fine. maybe try that.
|
|
|
|
|
Feb 25 2013, 07:10 AM
Post
#42
|
|
|
Shovel Buster! Group: Members Posts: 62 Joined: 31-March 12 From: Sopchoppy Fl Member No.: 42,369 |
I had thought about a sponge. I'll check with some the commercial sponge divers and see what they can come up with on hollow sponges. Its a drive over that way so it'll be a while on that. Going to play with bigger holes and make another bar to lay on the bed. The coupling housing on the fitting are close to 1/8" +- and i'm hoping get closer to calm water. I cut some elbows down on the couplings trying to shorten pipe turns in the tubing. That will work as long as i get a square cut on the tube. I added a piece of angle under and at the bottom end of table. that stopped water from rolling up under the bottom a couple of inchs. Alot to still work with.
|
|
|
|
|
Feb 25 2013, 02:44 PM
Post
#43
|
|
|
russau Group: Members Posts: 2,841 Joined: 4-December 03 From: st.louis missouri Member No.: 43 |
|
|
|
|
|
Feb 25 2013, 09:20 PM
Post
#44
|
|
|
Master Mucker! Group: Members Posts: 1,301 Joined: 17-February 12 From: Central CO Member No.: 41,357 |
QUOTE (burrell @ Feb 24 2013, 09:46 PM) Played with the table some today. Things seem to be working out some what. Spray bar will need a lot of attention. Holes may be to small but kinda figured on that i can make them bigger. Had the by pass valve closed and quirted water all over me and our dog. She broke camp and wouldn't have anything to do with me for a while. Cman your in for a treat as you get into this project. I'm just as much in the blind as you are. I've never seen one of these other than pictures. Spray bar is to high as is. I'll put bigger holes in it but think i will still have a dripping problem. Wraped a rag around it and got water down onto the table. Adjusted the valves some and looked good. put a couple of hand full of dirt on it and it cleaned off nicely. The excess caulking at the rails needs to be cleaned better. It was causing a ripple at every piece to angle out away from the rail. May have to live with that some how. All in all happy with how its going. Didn't take pictures today but will try to get some more up soon. I will probably start on mine this summer, after I get some of my chores done at the cabin. One of which is chinking it. I'll post when I start it. -------------------- Caveman
Aulus Livius Maximus World Traveler, 7 Continent Walker LEVEL 3 LIFETIME MEMBER Referral Code: SE2104 |
|
|
|
|
Feb 26 2013, 05:35 PM
Post
#45
|
|
|
russau Group: Members Posts: 2,841 Joined: 4-December 03 From: st.louis missouri Member No.: 43 |
maybe have a chinking party with a bunch of friends??? no reason you cant have some fun while doing it!
|
|
|
|
|
Feb 26 2013, 05:51 PM
Post
#46
|
|
|
Master Mucker! Group: Members Posts: 1,301 Joined: 17-February 12 From: Central CO Member No.: 41,357 |
I'm game for that... but I have to work on what Karen prioritizes. This will be my first full summer at the cabin, and ther is a lot of work and upgrades to be done to turn it into full time use. New batteries and a tracker, etc - but all of that is fuel for yet another thread. Starting the preliminaries in March. I will start that thread then.
-------------------- Caveman
Aulus Livius Maximus World Traveler, 7 Continent Walker LEVEL 3 LIFETIME MEMBER Referral Code: SE2104 |
|
|
|
|
Apr 8 2013, 07:44 PM
Post
#47
|
||
|
Shovel Buster! Group: Members Posts: 62 Joined: 31-March 12 From: Sopchoppy Fl Member No.: 42,369 |
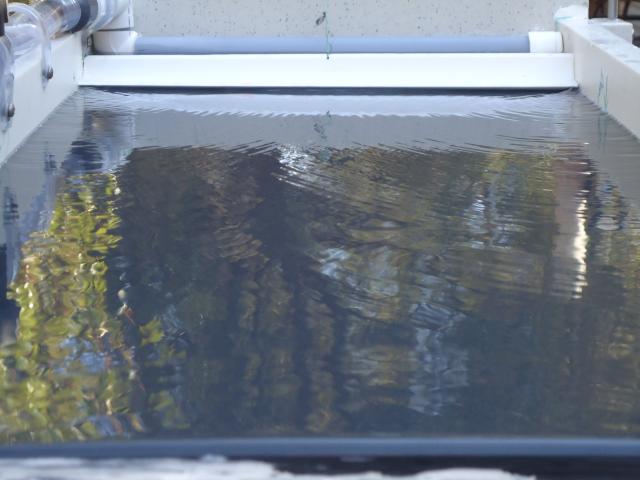
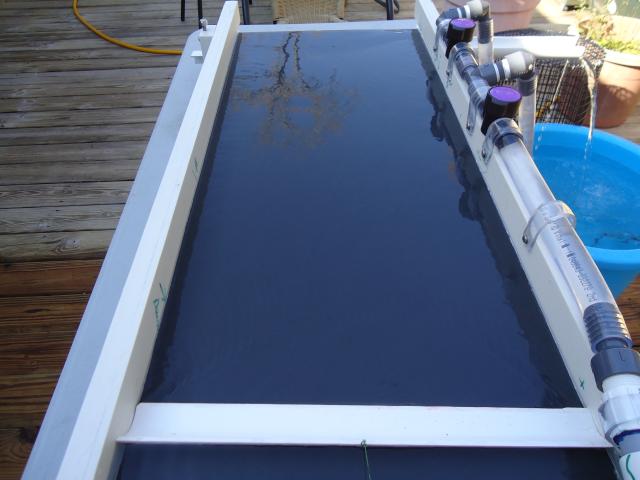
I have worked with the table a couple of times since my last posting. I do have some pictures and will try to post them later. The water flow across table is to the point that i can stat to run concentrates(maybe 3 gals.) that have alread been panned several times. I did have some leaks at the seams and added some of my space shutle caulking and cured the leaks. Switched all thread to ss due to rusting which would have wallowed out ports on adjusting blocks. Added lock nuts to the top of all 4 legs for easy adjust ment in leveling. Next will be a tailing catch bucket. What I had planned was too high for the run off troff. I will run and rerun what i have and try to get pictures of what i actualy catch. May have to put something on the table for camersa to focus on. The first trip will be the middle of may and will have some real concentrates to work with. Maybe a pic will come with this post. If it does i did a way with section of pvc to smooth water . it would work but would have to have very little slop at ends. Do have one more pic less than 4.0
Attached thumbnail(s)
|
|
|
|
|
|
|
Apr 8 2013, 08:09 PM
Post
#48
|
||
|
Shovel Buster! Group: Members Posts: 62 Joined: 31-March 12 From: Sopchoppy Fl Member No.: 42,369 |
one more basicly the same thing but from the head of the table
Attached thumbnail(s)
|
|
|
|
|
|
|
Apr 10 2013, 04:11 PM
Post
#49
|
|
|
Master Mucker! Group: Members Posts: 1,301 Joined: 17-February 12 From: Central CO Member No.: 41,357 |
Looks great!
-------------------- Caveman
Aulus Livius Maximus World Traveler, 7 Continent Walker LEVEL 3 LIFETIME MEMBER Referral Code: SE2104 |
|
|
|
|
Apr 11 2013, 05:27 AM
Post
#50
|
|
|
russau Group: Members Posts: 2,841 Joined: 4-December 03 From: st.louis missouri Member No.: 43 |
on your first picture, why was there a cresent shaped wave comeing from the headend corners?? i assume the second picture just didnt show it?? "smooth as glass" is what i try to maintain on my water surface. im interested in your recovery rate with the cresent waves.it might not be any problem with the slower flow od the water but im just interested.
|
|
|
|
|
Apr 11 2013, 04:57 PM
Post
#51
|
|
|
Shovel Buster! Group: Members Posts: 62 Joined: 31-March 12 From: Sopchoppy Fl Member No.: 42,369 |
The fittings hold the bar 1/8 +- off of table. The cresent is water stacking up behind fittings and then trying to flatten out. I had glued th cap end and the cresent is more noticable there. The 90 is just friction snug but is rounded out the out side of the 90 as they come. I didn't getting a very square cut on the 90 for the part that actually sets on the table. I have everything to put another bar together with a cap cut down to +- 1/4. I've also thought about putting 1 round head screw in each fitting to hold the fittings off of table to loose the cresent. This i will try on the bar pictured first. Russ something else that you can't see is that at every imperfection (space shuttle caulking) going down the table at slate and rail seams is a tiny ripple running out from the rail. These are tiny but with less angle and slower water almost gone. I've got both 500 & 360 pumps. The scrap pvc that is tied with power pro is gone. In the picture that is a lot of what you are seeing. Water running around end cuts and not being square across table. It would work but you would have to have almost zero tolerance on the rail ends. The cresent is still there regardless with pvc fittings. I had to go back and look at what your looking at. I'll get some more pic but will have to be close in order to try and keep tham under 4.0
|
|
|
|
|
Apr 12 2013, 04:57 AM
Post
#52
|
|
|
russau Group: Members Posts: 2,841 Joined: 4-December 03 From: st.louis missouri Member No.: 43 |
regardless it should still work as is! are your spray holes pointed down? i had some issues with the direction of the spray bar holes and ended up pointing them straight up and lowered the water pressure. the water went up and flowed over the spray bar evenly and ended that issue of the ripples in the water for me.it ended up "as smooth as glass" and the smaller the finegold you run, the slower id run the water.and rerun them cons with lower water pressure and youll be suprised. as for a cleanup tool, youll find none better!and you cant beat the price!! nice job!!
|
|
|
|
|
Apr 18 2013, 10:10 PM
Post
#53
|
|
|
Shovel Buster! Group: Members Posts: 62 Joined: 31-March 12 From: Sopchoppy Fl Member No.: 42,369 |
Russ the water holes are turned down and some what towards the head of table. I've enlarged the holes several times and seems to help with every enlargment and will enlarge more to see what happens. The holes i drilled in this bar looks like a dotted snake, not straight. I can turn the bar in any direction except in a down slope or in the up position that squirts more than i want, bigger holes may do the trick. It will work as is now but want to fiddle with a little more. I'll run the cons i have in the next week or so and see how it does. I still have to finish the tails catch system and eventually make a auto feeder. I would like to make it out of 2 part resin and plywood. I haven't readabout the use of fiber glass anywhere unless i'v just missed it. It may not work well with fine gold. anyway have some time before i get to that.
|
|
|
|
|
Apr 19 2013, 06:00 AM
Post
#54
|
|
|
russau Group: Members Posts: 2,841 Joined: 4-December 03 From: st.louis missouri Member No.: 43 |
Burrel that should work just fine! on the feeder, id suggest makeing the bottom of it in a wide "V" shape to keep the cons slipping down into the slow water flow for a even distribution of cons. i think this would help controll the flow of cons into any device your wanting to use it on. it looks like a winner to me!
|
|
|
|
|
Jun 13 2013, 06:50 PM
Post
#55
|
|
|
Shovel Buster! Group: Members Posts: 62 Joined: 31-March 12 From: Sopchoppy Fl Member No.: 42,369 |
 Played with fresh cons on the table and was amazed at how it caught really tiny specks. Ran about 2 cups of quick panned -20. Don't anything to classify any smaller right now. Dumped several +20 flakes on the table and they just simply didn't move. Spray bar still needs some attention and will get to that after the yellow flies back off some here. Really bad this year. Planning another trip in mid July. |
|
|
|
|
Jun 14 2013, 06:56 AM
Post
#56
|
|
|
russau Group: Members Posts: 2,841 Joined: 4-December 03 From: st.louis missouri Member No.: 43 |
yep i really like my Miller table and i would like to make a staionary one for just in my garage. but untill i sell/throw away some stuff, i wont have any room. i getting to the point that im not able to get out to do much anymore because of my back. no more lifting of anything heavy! you have built a nice table! enjoy it!
|
|
|
|
|
Apr 14 2014, 11:50 PM
Post
#57
|
|
|
Shovel Buster! Group: Members Posts: 62 Joined: 31-March 12 From: Sopchoppy Fl Member No.: 42,369 |
Russ i can kinda under stant your back problems, due to my on problems . Been a while on this threat but thank you for nugging me toward ABS. I got the spray bar tuned in close with bigger holes and smaller pump. Some ripples still but hard to see. I have a auto feeder drawn up with 3 discharge ports for my sized table. With the ABS i ran with GG's fluid bed spects and still have the abs to do the auto feeder. Gluing was not as neat as i would have liked it to be but once it all set up i don't thank it can be pulled apart. Drilled some bad holes in abs but glued plugs back in hole and started over and ended up with very tight tolarance. I want to make the Douglas Creek trip and will know by early to mid June if i can pull it off. My wife may ride out or i may pick her up airport Laramie. The ABS is some fun stuff to work with
|
|
|
|
 |
| Lo-Fi Version | Time is now: 21st July 2025 - 06:43 AM |