Knife Making |


 Colorado Prospector - Gem and mineral prospecting and mining forums > Miners Crafts, Goods & Classified ads > Prospector's Crafts & Creations
Knife Making |
 Jun 28 2012, 09:40 PM Jun 28 2012, 09:40 PM
Post
#1
|
|
 Moderator  Group: Members Posts: 4,459 Joined: 25-August 09 From: way on up thar Member No.: 6,983 |
Time to learn something new.
 (I blame Woody for this) (I blame Woody for this)I am going to build a custom knife... and hopefully many more after I get skilled enough. I've learned a lot through the internet and am ready to get started, I'll post my progress. Hopefully I won't screw it up too bad.  So far.... I bought a fixed-handle knife blank. The overall length is 7" and the blade length is 3-1/4". It is 1/8" thick. Good steel - 440c with a hardness of 56-58 RC so it should hold an edge really well.  This blade style is called "Western Skinner" and will make for a nice fish & bird knife when completed.  While I'm waiting for parts... I decided to practice some decorative file-work today. I plan to incorporate something like this on the Skinner. This is a vine pattern that I practiced today on a piece of leaf-spring metal that Woody gave me (also 1/8" thick). I used several different needle-files to do this work. I'm ready to try it on the real thing. 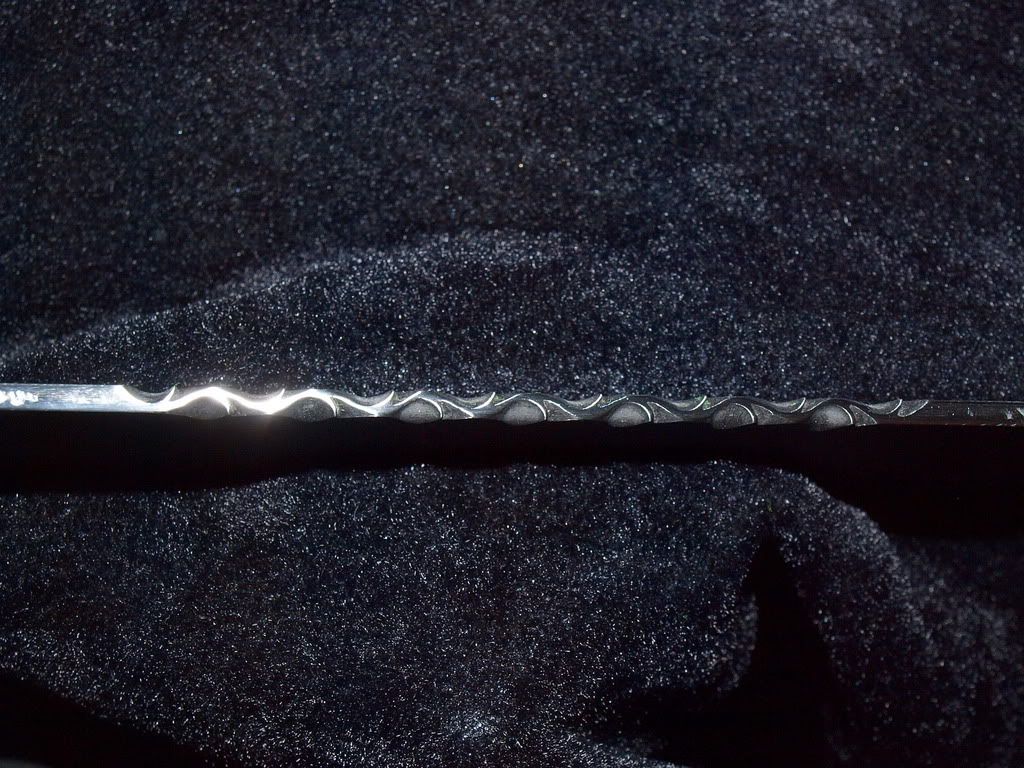 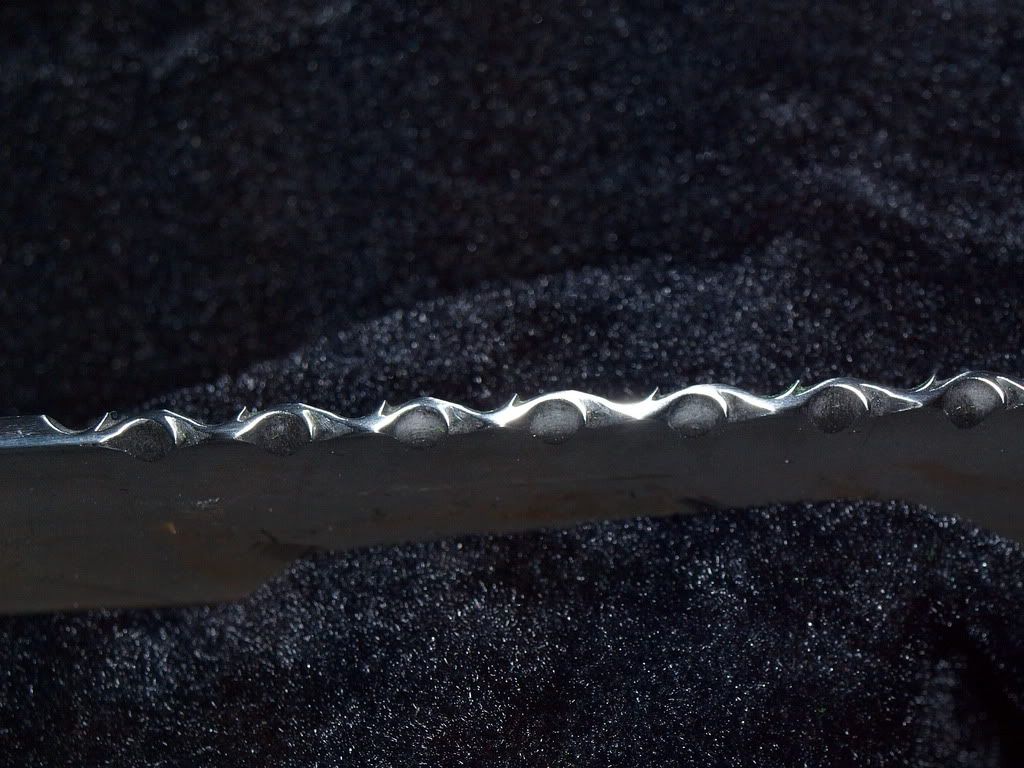
-------------------- /l ,[____], l---L-OlllllllO- ()_) ()_)--o-)_) BLACK SANDS MATTER! Very Happy CP Lifetime Member CP CORE TEAM Referral Code CE213 |
 |
 
|
 |
|
Jun 29 2012, 07:44 AM
Post
#2
|
|
 Rock Bar! Group: Members Posts: 637 Joined: 5-April 11 From: All of Colorado Member No.: 15,615 |
Chriss everything you touch seems to turn to gold, great job.
I'm going to have to give you my next girlfriend and see what you can do with her. lol. If you need some more material let me know. I'll bring some with me next time I come up. Woody. -------------------- Proud CP Lifetime Member
(currently working hard in the procurement department) |
|
|
|
|
Jun 29 2012, 03:02 PM
Post
#3
|
|
 Master Mucker! Group: Admin Posts: 7,208 Joined: 7-October 03 From: Colorado Member No.: 4 |
 Your talents never cease to amaze me Chris!! The design is amazing and looks fantastic, great job!! Your talents never cease to amaze me Chris!! The design is amazing and looks fantastic, great job!!I am so picturing that knife with Unakite from your claim! I have no doubt that you could add that to your many tallents but even a wooden handle will look awesome. -------------------- Education is the key to the future,
and participation opens the door to opportunity. Discover your prospecting independence & success! ColoradoProspector.com Owner/Webmaster Core team member ♥  |
|
|
|
|
Jun 29 2012, 09:17 PM
Post
#4
|
|
|
Moderator Group: Members Posts: 4,459 Joined: 25-August 09 From: way on up thar Member No.: 6,983 |
Thanks yous guys!
.... and don't I wish that things I touch turn to Gold, LOL.... more like  in this economy. in this economy.  It's gonna be practical handles like wood for a while, until I learn more. I also think that I'll have to eventually step up to a lapidary bandsaw (diamond) for the handle process if working with stone. It would be more efficient for that type work. Inland sells one for under $300 I think, so maybe sometime down the road. It would be good for shaping slabbed material for handles. Another thing to consider... I've been seeing some incredible examples of fine knife makers who incorporate very ornate Gold inlays into metal scribes of knives and handles. That has given me some good ideas too. I think they buy wire gold (24k)... then melt it to fill the fancy engravings. These guys are metal smiths who forge their own blades so who knows. I haven't studied that process yet... but Gold is something else that is available to me from my soil. -------------------- /l ,[____], l---L-OlllllllO- ()_) ()_)--o-)_) BLACK SANDS MATTER! Very Happy CP Lifetime Member CP CORE TEAM Referral Code CE213 |
|
|
|
|
Jun 30 2012, 12:31 PM
Post
#5
|
|
|
Moderator Group: Members Posts: 4,459 Joined: 25-August 09 From: way on up thar Member No.: 6,983 |
This is my handle-making material.
It's "Malee Burl"... which is a type of Eucalyptus tree. I picked up these matching slabs for about $10 on eBay. They are 3/8" thick so I'm going to have to plane them down a bit. 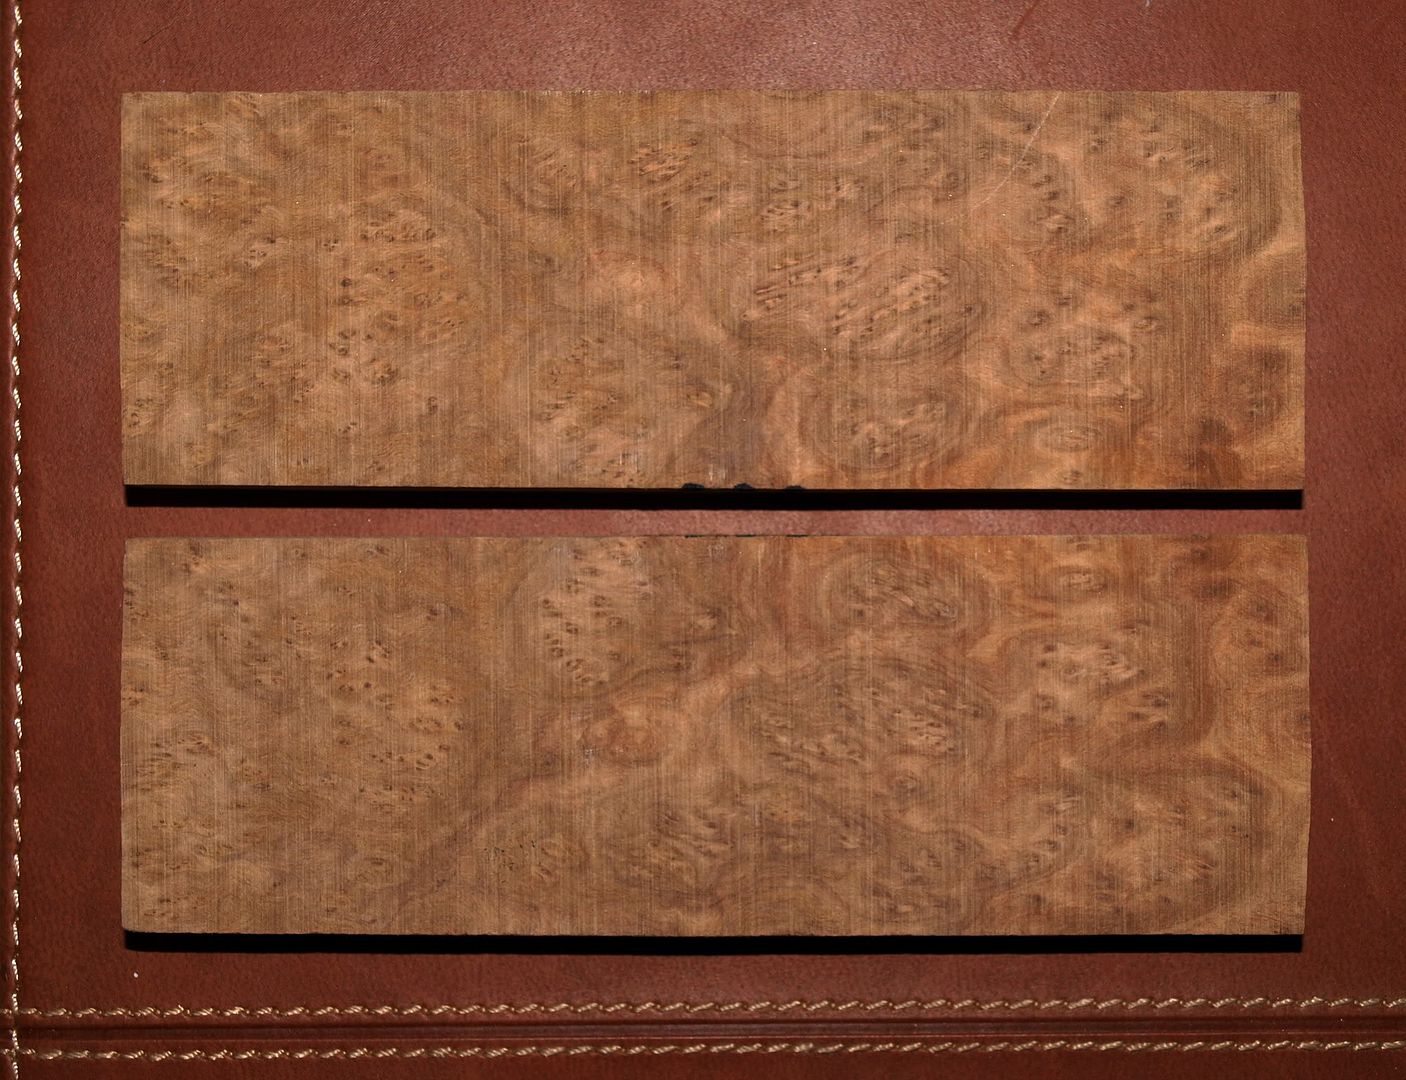 -------------------- /l ,[____], l---L-OlllllllO- ()_) ()_)--o-)_) BLACK SANDS MATTER! Very Happy CP Lifetime Member CP CORE TEAM Referral Code CE213 |
|
|
|
|
Jun 30 2012, 07:13 PM
Post
#6
|
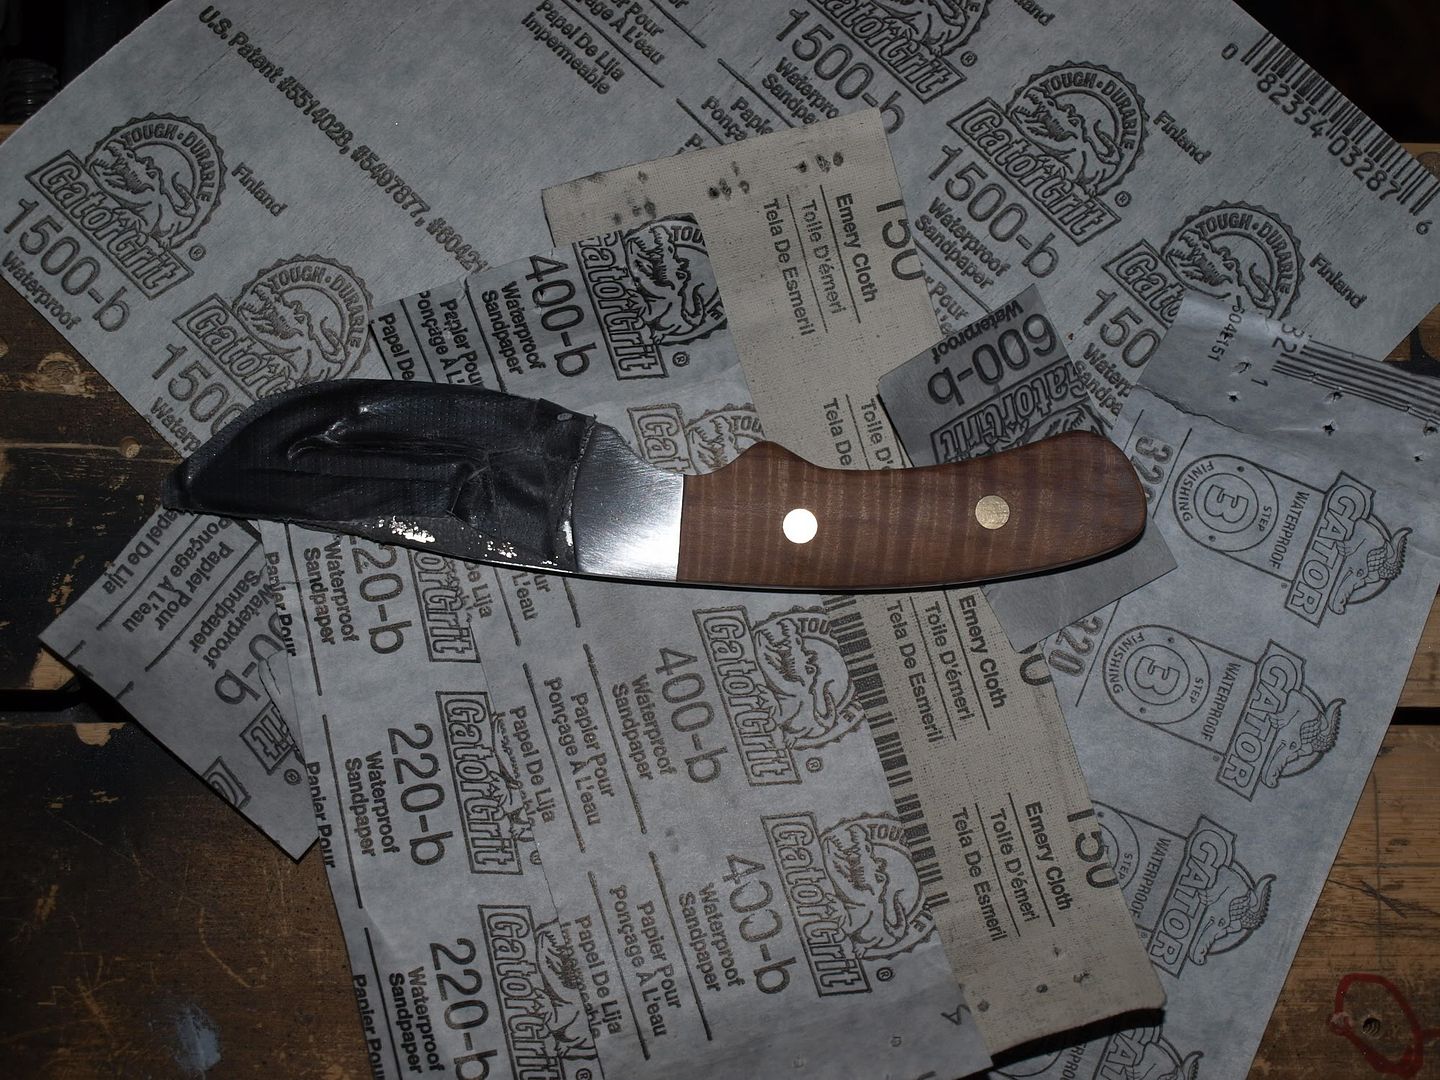
|
|
Moderator Group: Members Posts: 4,459 Joined: 25-August 09 From: way on up thar Member No.: 6,983 |
Now I'm working on the steel. Handle will come later.
I wasn't happy with the shape of the handle tang on the blank so I'm modifying it here on my bench grinder... 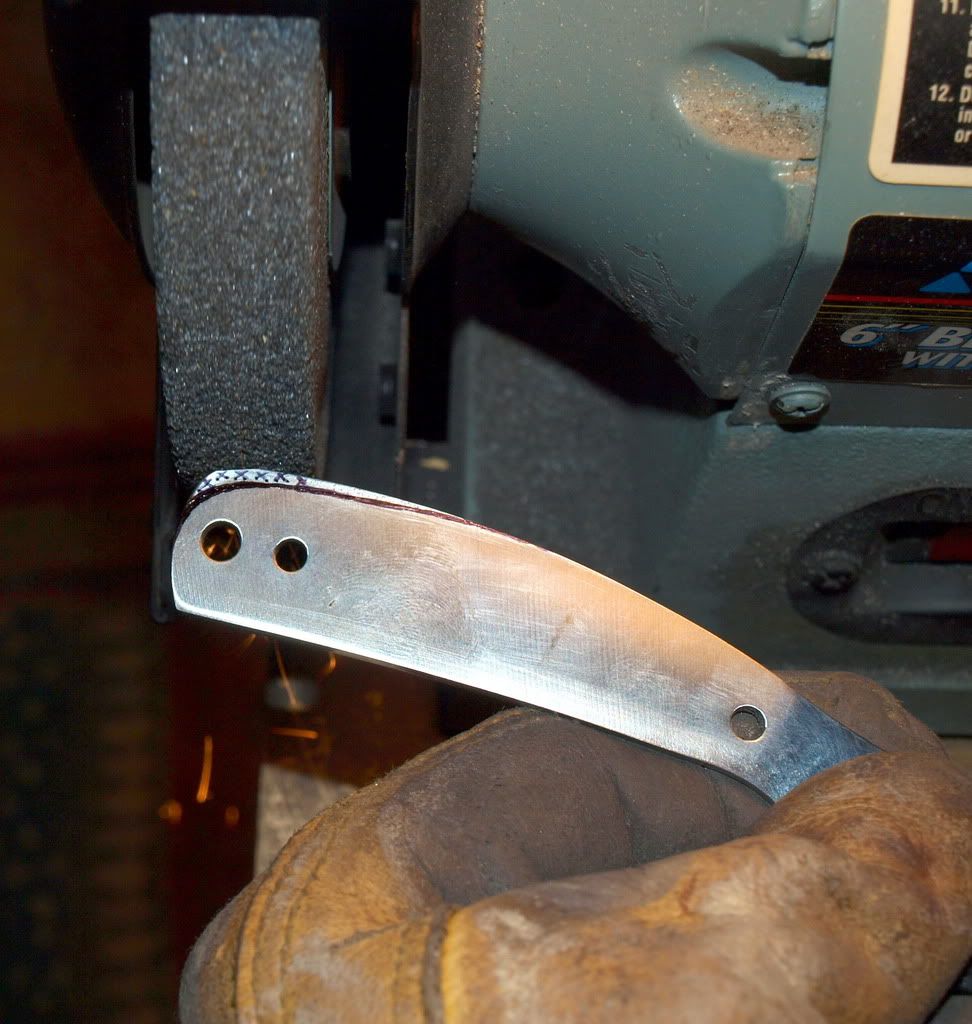 I have the shape I want. Now for the fun part! I've started to create a vine pattern which will be on the exposed portion of steel that runs through the handle (top of the tang). I'm using a few different needle-files to do this. Starting with small diameter and working my way up. I will add the thorns later with a half-moon shaped needle-file. This is the start of the vine pattern. 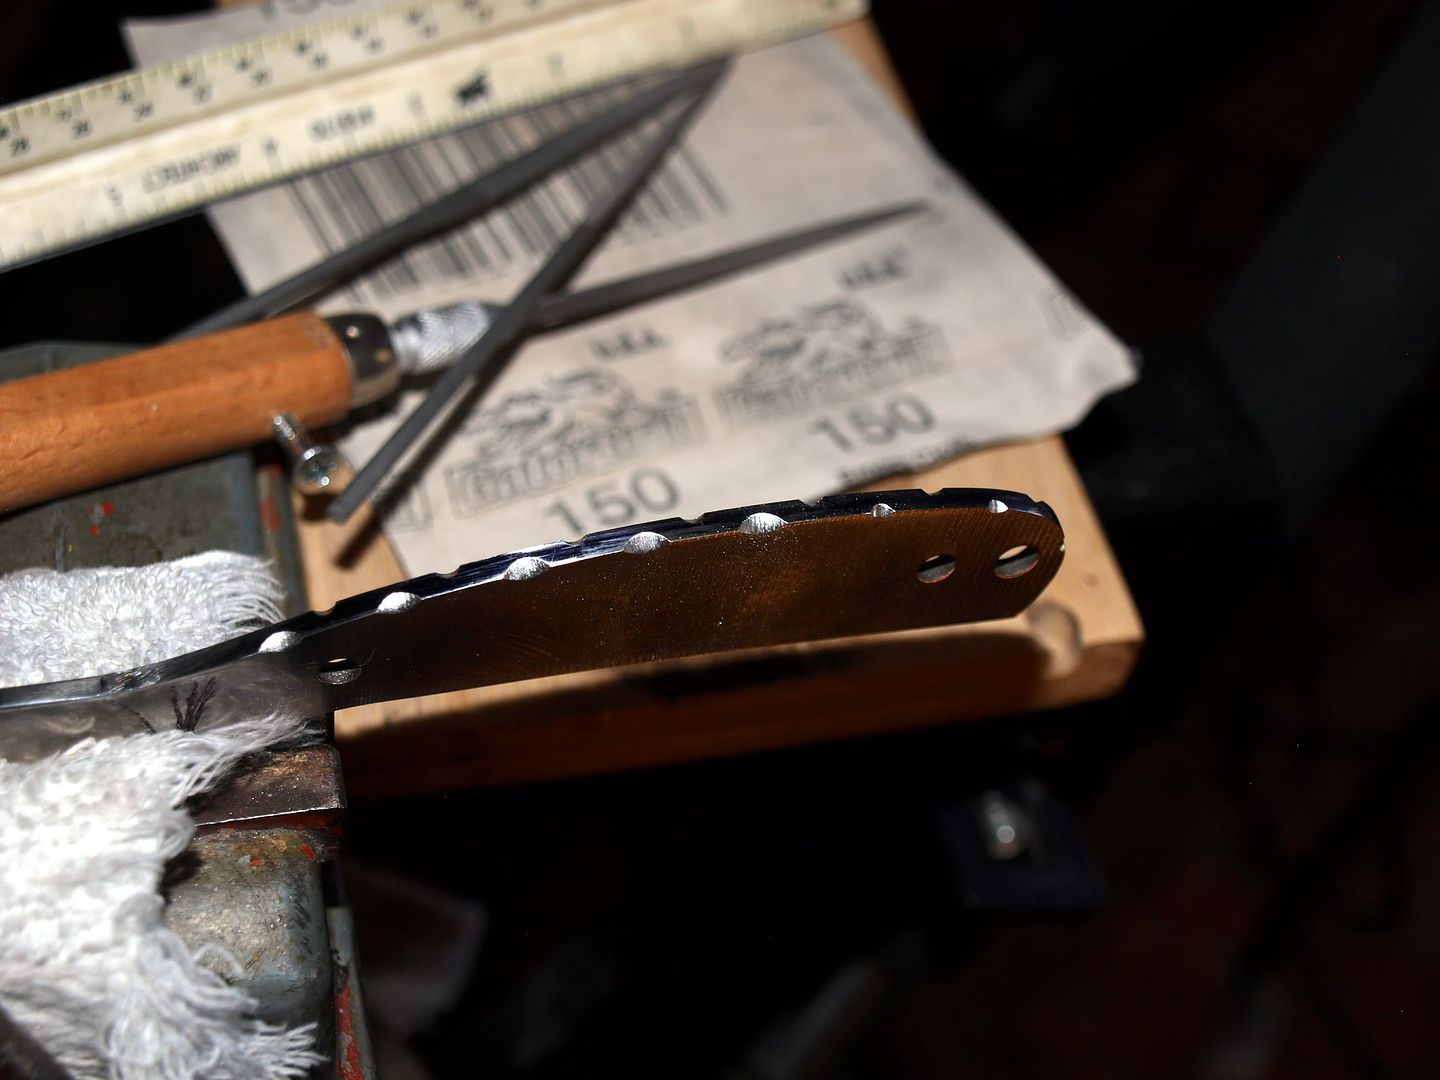
-------------------- /l ,[____], l---L-OlllllllO- ()_) ()_)--o-)_) BLACK SANDS MATTER! Very Happy CP Lifetime Member CP CORE TEAM Referral Code CE213 |
|
|
|
|
Jul 1 2012, 07:36 AM
Post
#7
|
|
|
Moderator Group: Members Posts: 4,459 Joined: 25-August 09 From: way on up thar Member No.: 6,983 |
Well.... this is as far as I got with the vine before my file finally gave up the ghost.
 Hopefully the hardware store has another needle-file of this shape and size or I'll have to buy another needle-file kit... fortunately the kits are inexpensive. 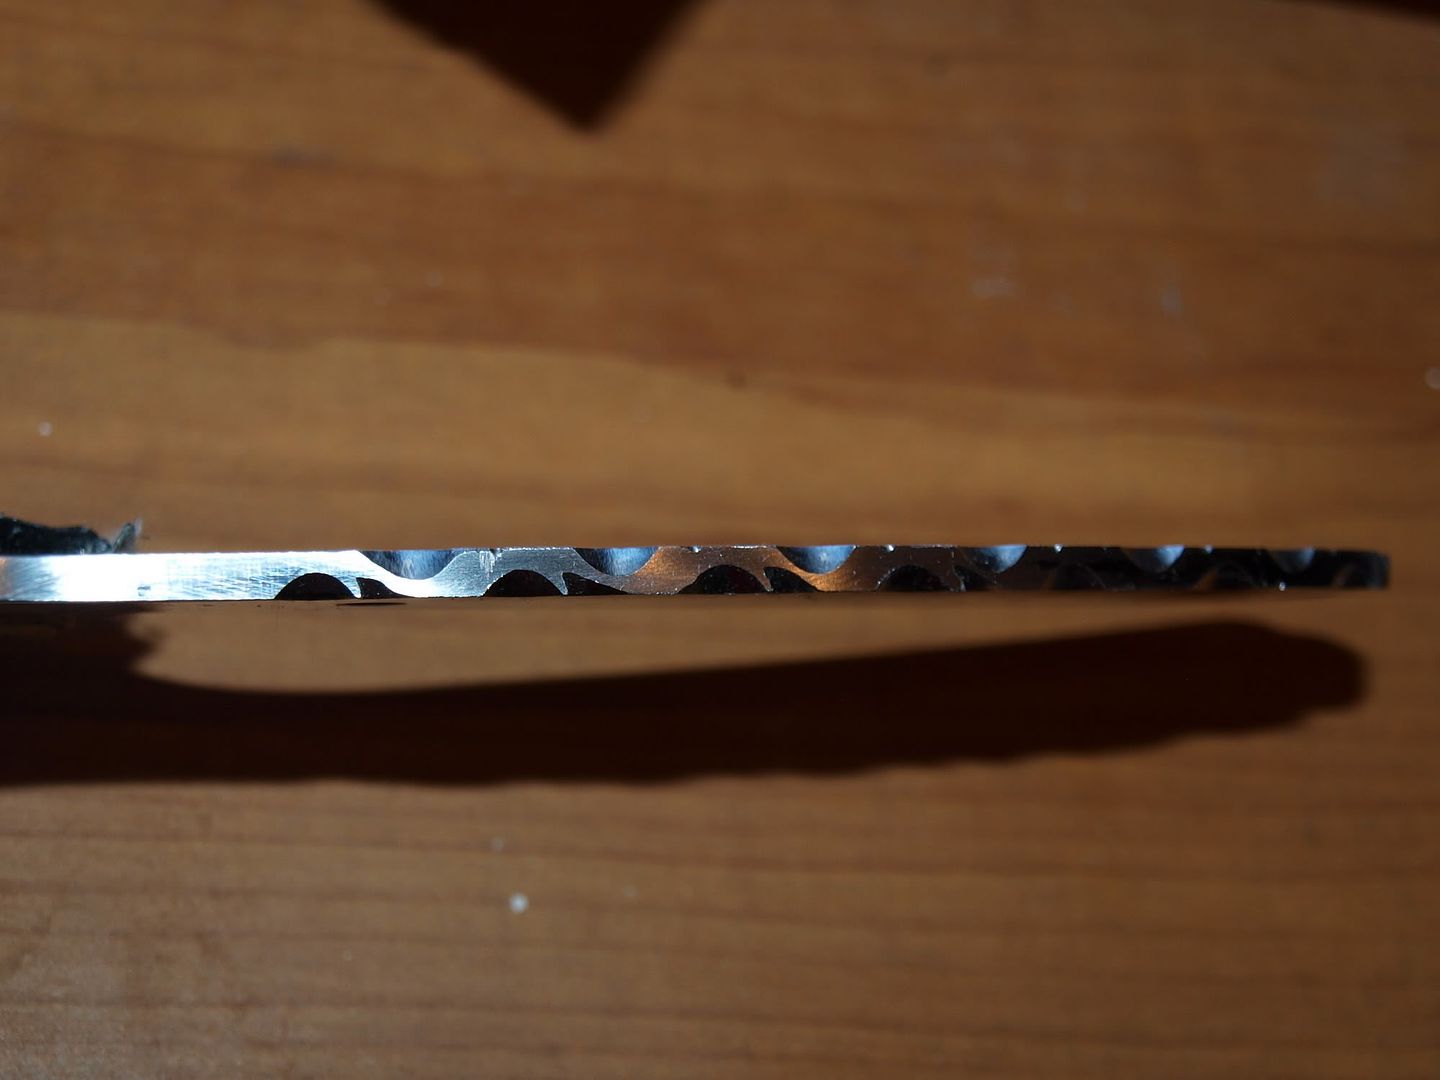
-------------------- /l ,[____], l---L-OlllllllO- ()_) ()_)--o-)_) BLACK SANDS MATTER! Very Happy CP Lifetime Member CP CORE TEAM Referral Code CE213 |
|
|
|
|
Jul 2 2012, 05:12 PM
Post
#8
|
|
|
Moderator Group: Members Posts: 4,459 Joined: 25-August 09 From: way on up thar Member No.: 6,983 |
moving right along......
almost done with the vine pattern, a little more fine-tuning.... errr, I mean "vine" tuning.  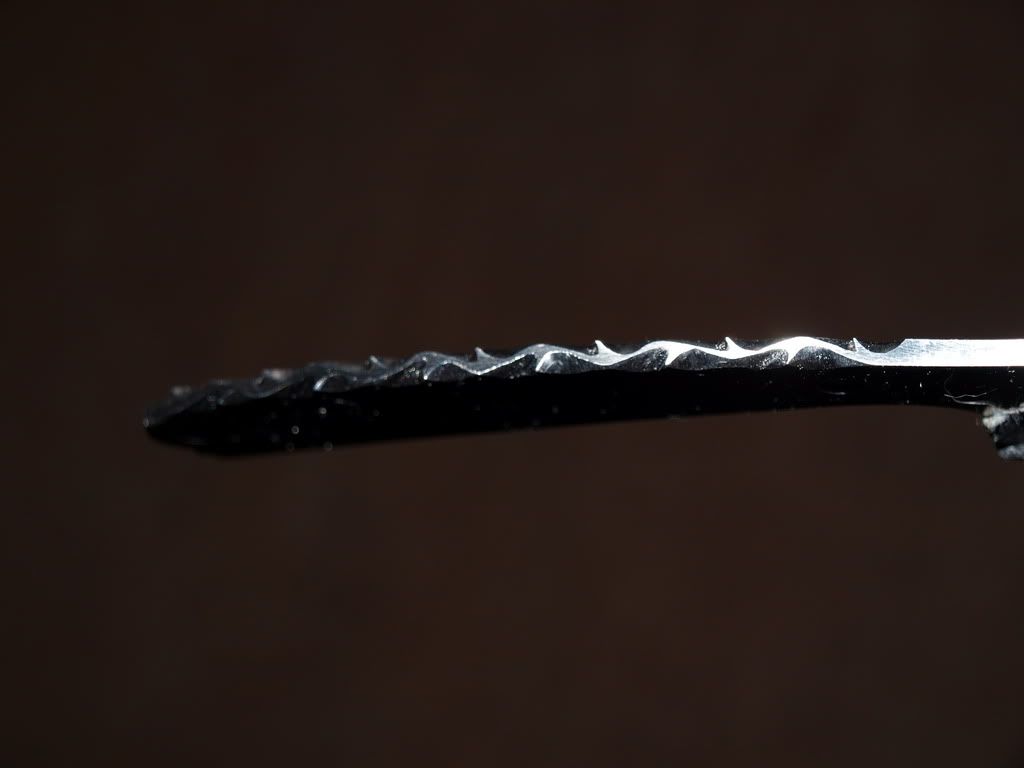
-------------------- /l ,[____], l---L-OlllllllO- ()_) ()_)--o-)_) BLACK SANDS MATTER! Very Happy CP Lifetime Member CP CORE TEAM Referral Code CE213 |
|
|
|
|
Jul 3 2012, 07:32 AM
Post
#9
|
|
|
Moderator Group: Members Posts: 4,459 Joined: 25-August 09 From: way on up thar Member No.: 6,983 |
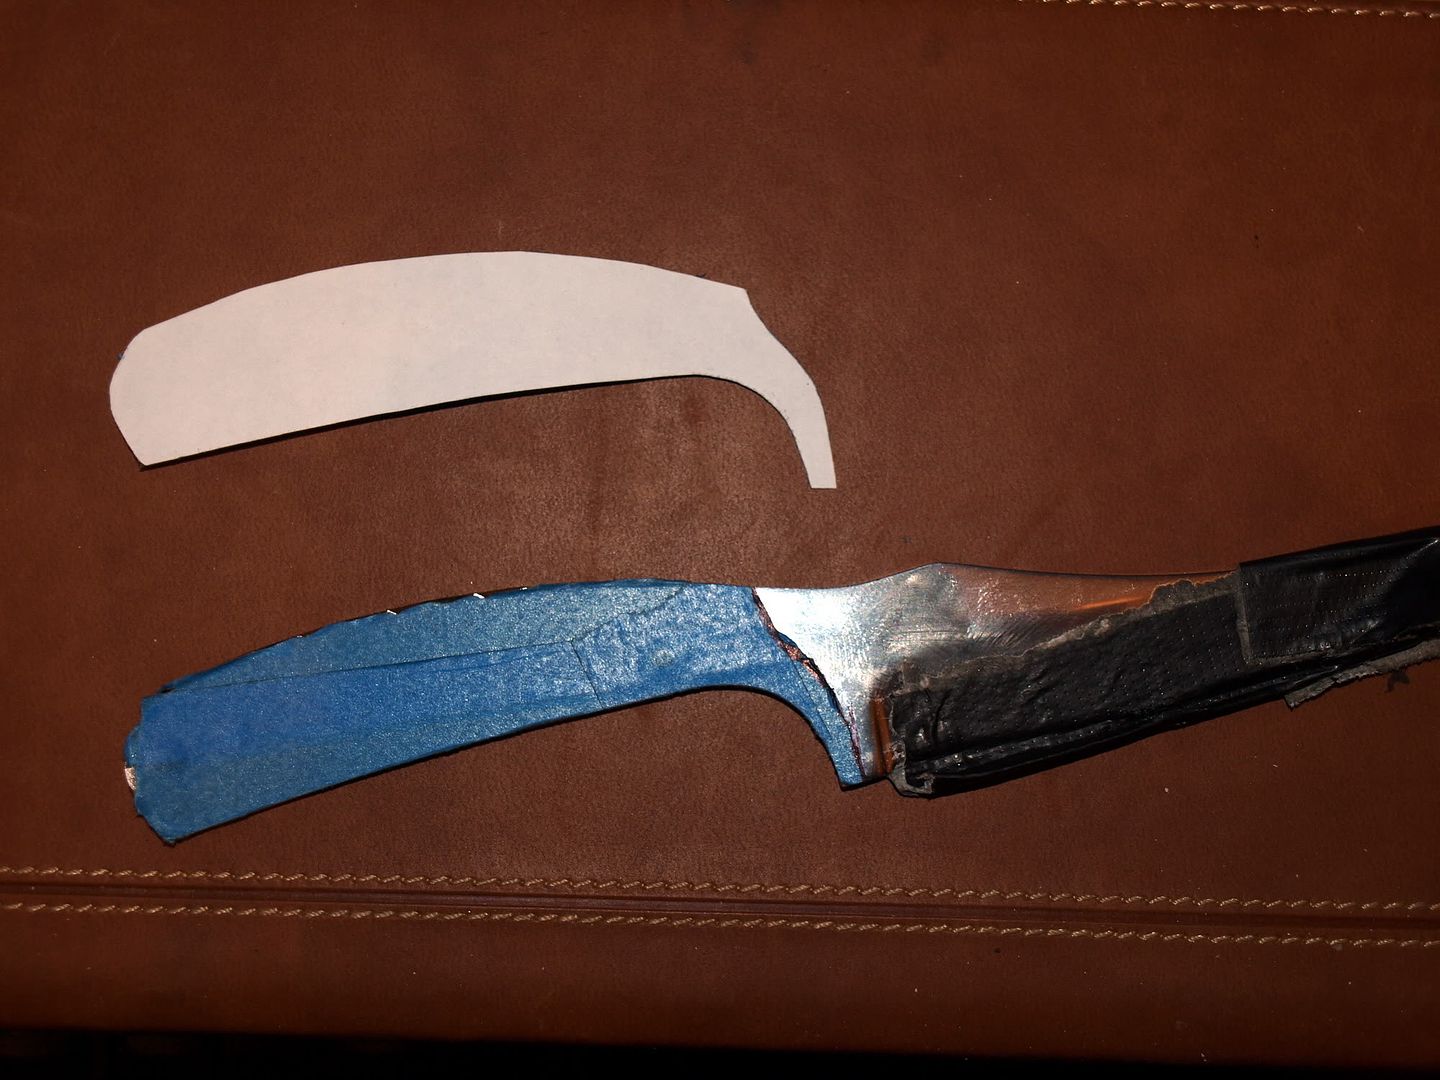
now working on handle design and making a template
-------------------- /l ,[____], l---L-OlllllllO- ()_) ()_)--o-)_) BLACK SANDS MATTER! Very Happy CP Lifetime Member CP CORE TEAM Referral Code CE213 |
|
|
|
|
Jul 3 2012, 08:46 PM
Post
#10
|
|
|
Moderator Group: Members Posts: 4,459 Joined: 25-August 09 From: way on up thar Member No.: 6,983 |
Tracing template to the handle slabs
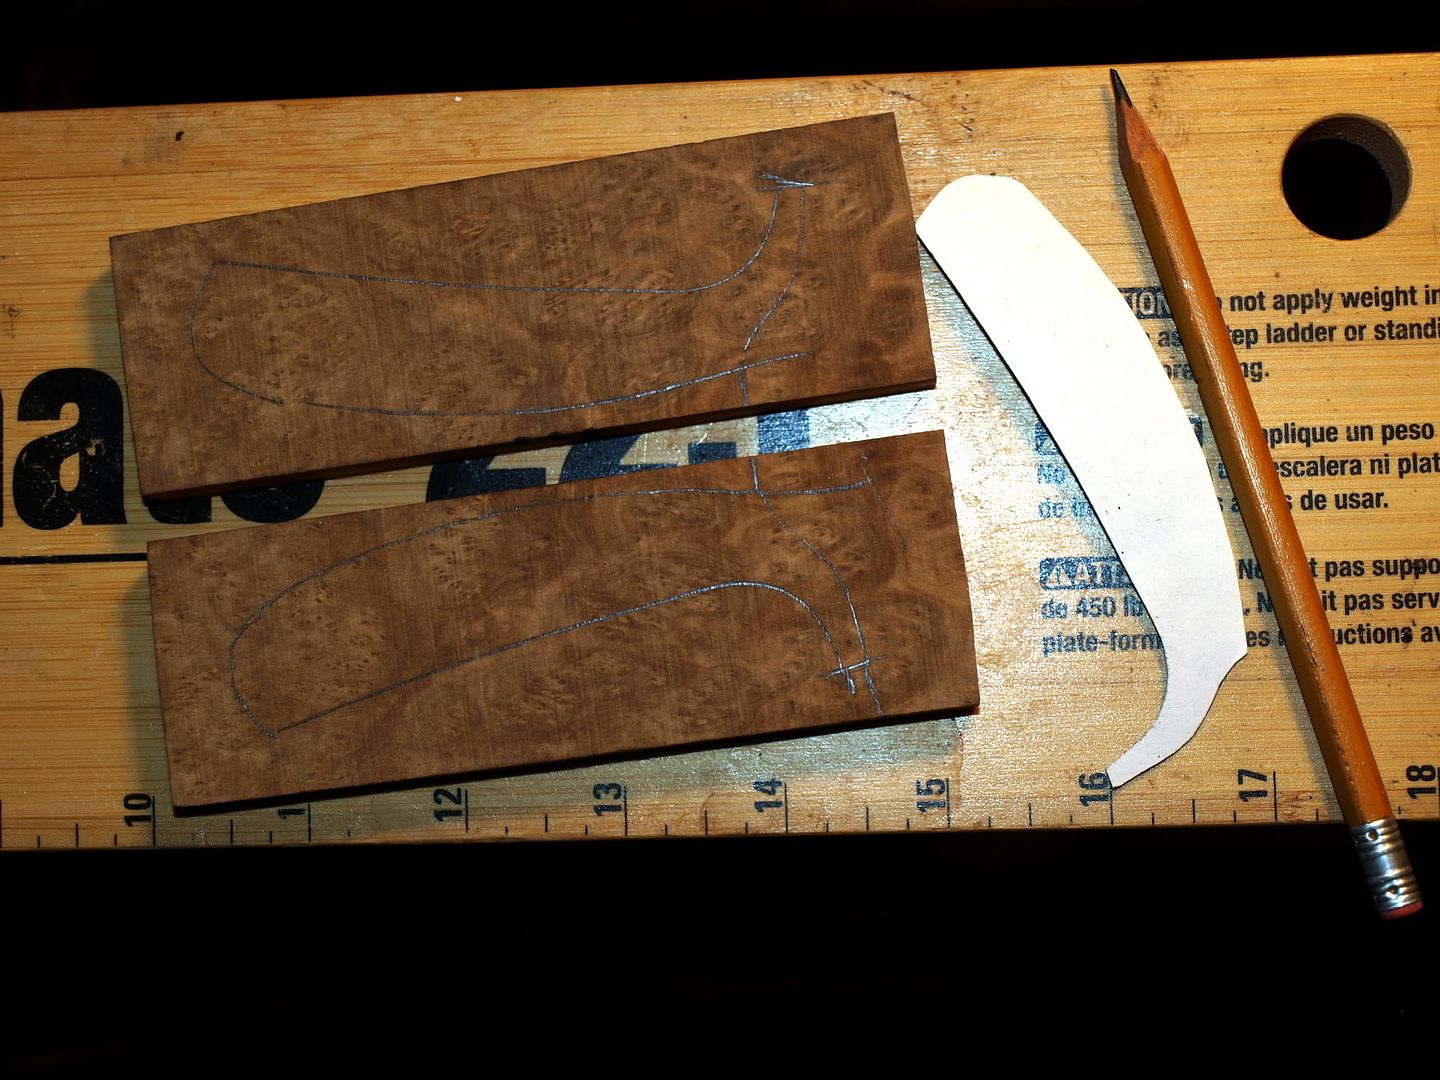 Then the wood is trimmed down with a coping saw and stationary belt sander. These will be slightly oversized when I install them to the knife... then sanded down to the precise fit. I still need to do a little Dremel work near front of the handles (ricasso area) before installing the wood. That area is nearly impossible to sand once on the knife. 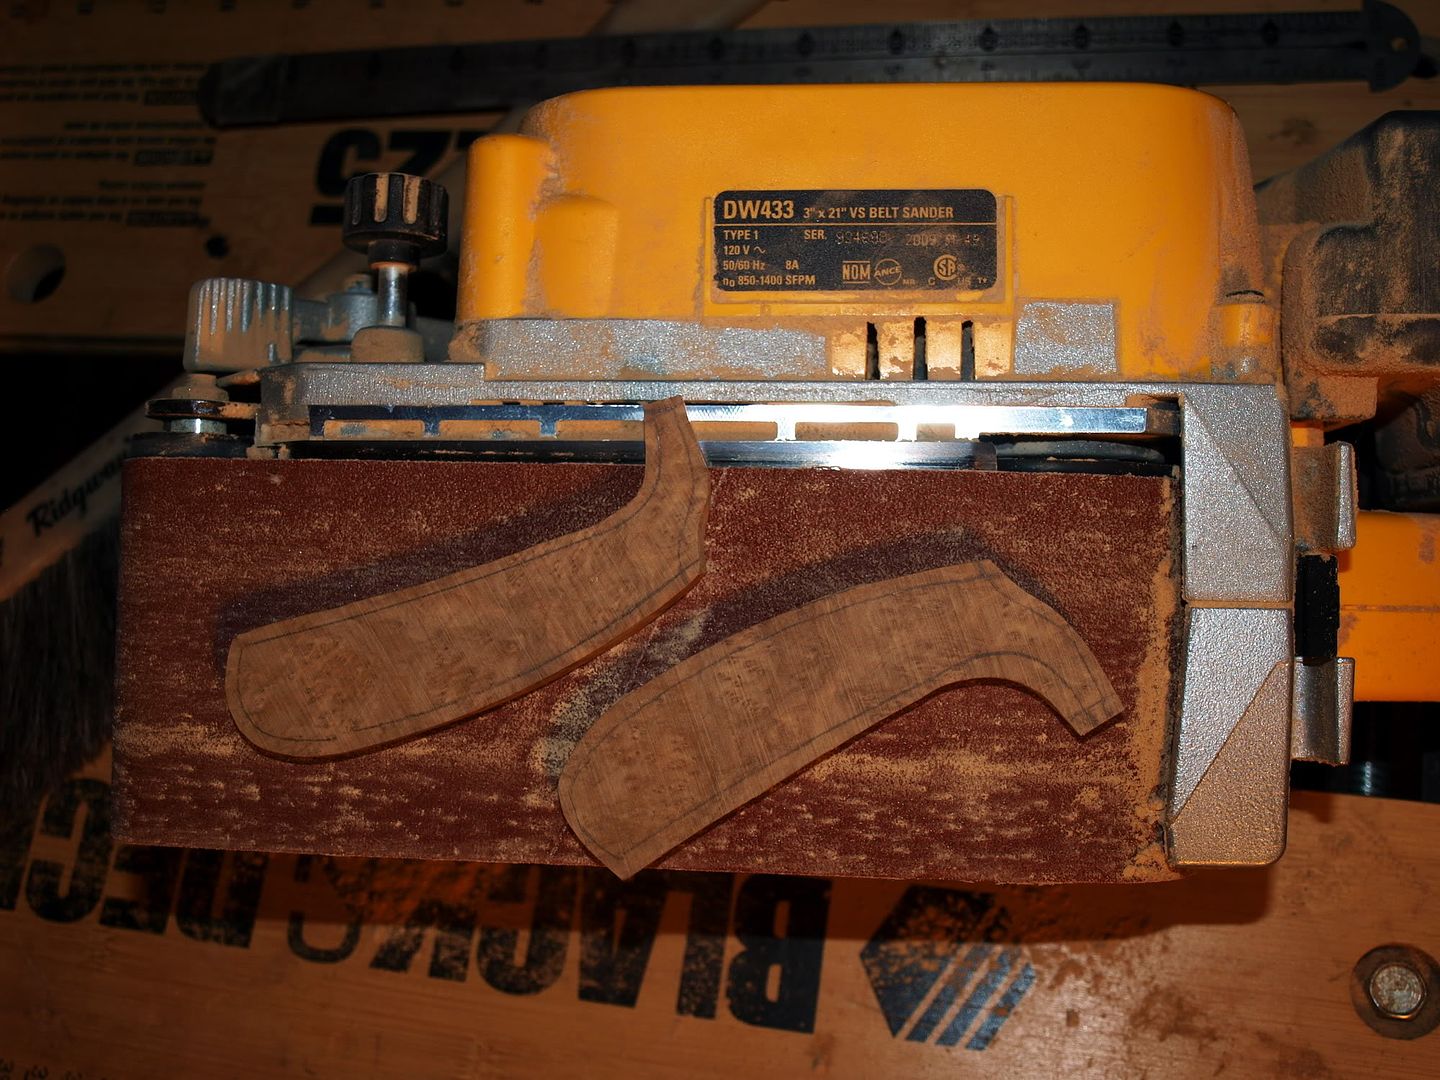
-------------------- /l ,[____], l---L-OlllllllO- ()_) ()_)--o-)_) BLACK SANDS MATTER! Very Happy CP Lifetime Member CP CORE TEAM Referral Code CE213 |
|
|
|
|
Jul 3 2012, 08:54 PM
Post
#11
|
|
|
Master Mucker! Group: Admin Posts: 7,208 Joined: 7-October 03 From: Colorado Member No.: 4 |
It's looking great Chris, sweet wood you chose to use also!
Love the updates!! 
-------------------- Education is the key to the future,
and participation opens the door to opportunity. Discover your prospecting independence & success! ColoradoProspector.com Owner/Webmaster Core team member ♥ |
|
|
|
|
Jul 4 2012, 12:45 PM
Post
#12
|
|
|
Moderator Group: Members Posts: 4,459 Joined: 25-August 09 From: way on up thar Member No.: 6,983 |
Thanks!
I have shaped the ricasso area on both handle sides, they match perfectly now. I used a Dremel Flex with a barrel-shaped diamond bit. Worked it light and slow with a steady hand. I will bevel the ricasso areas freehand next using the same tools. 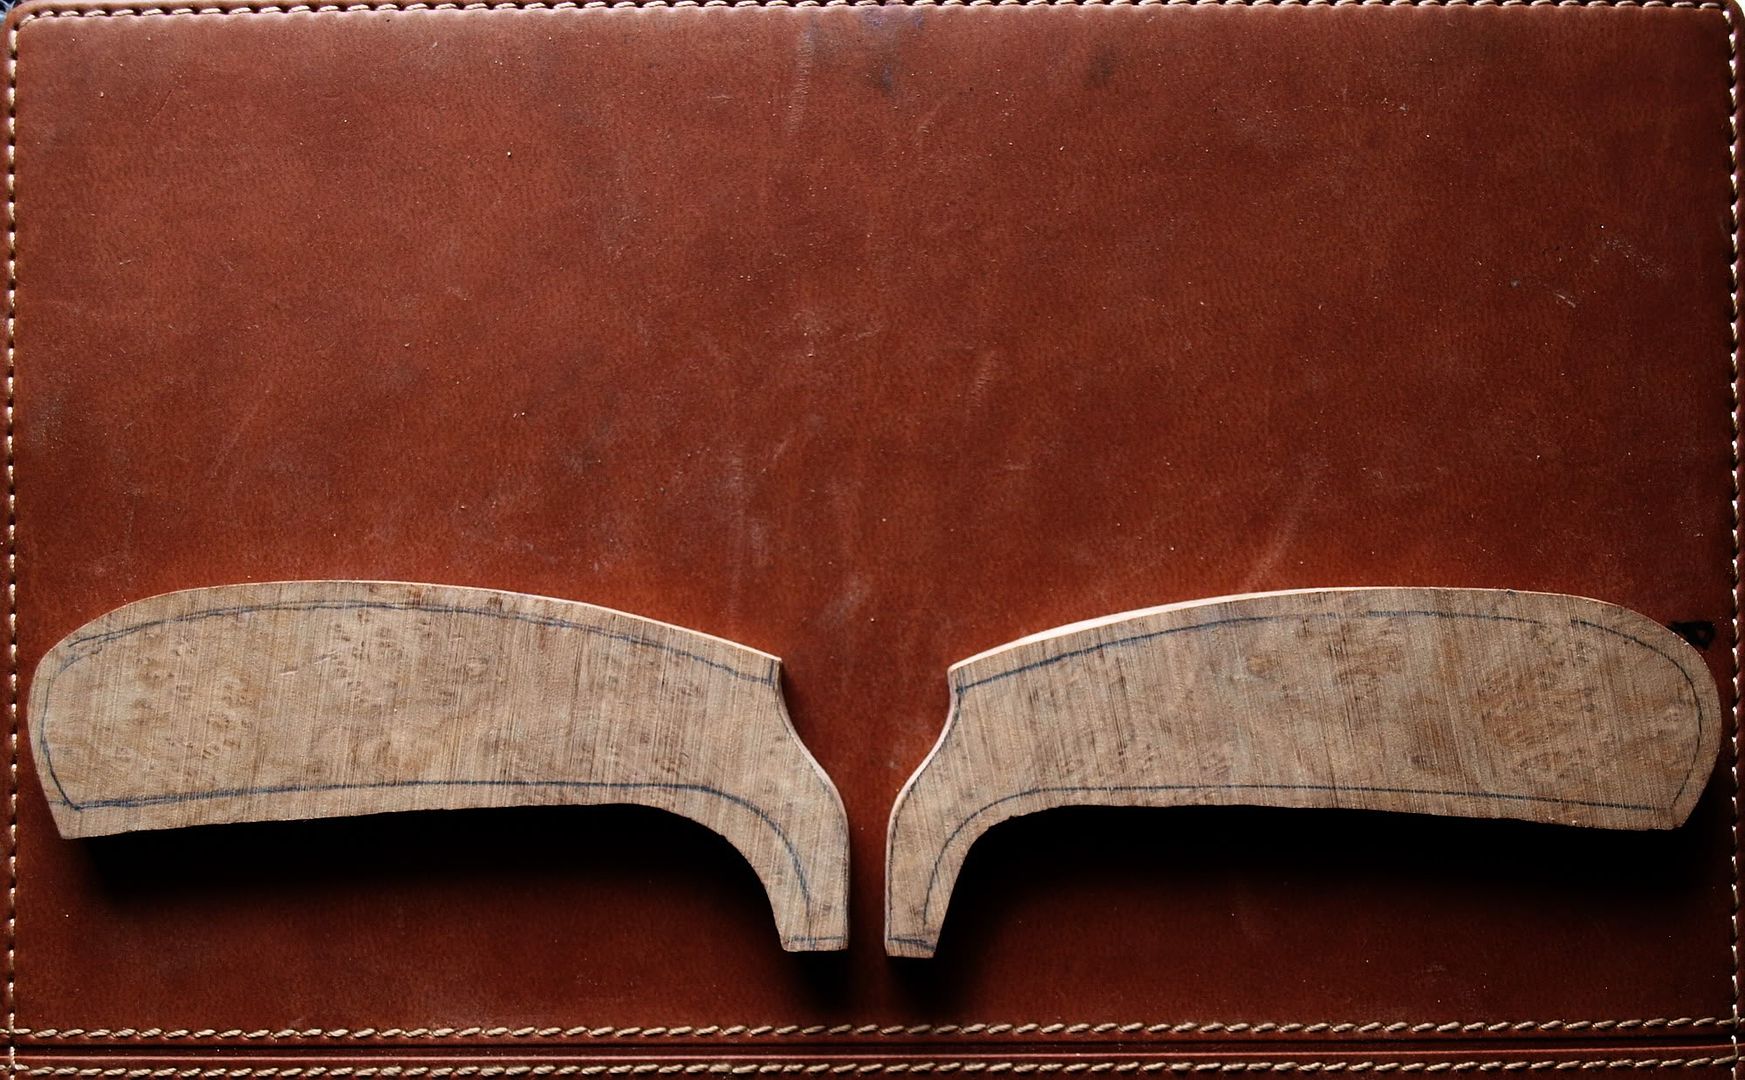
-------------------- /l ,[____], l---L-OlllllllO- ()_) ()_)--o-)_) BLACK SANDS MATTER! Very Happy CP Lifetime Member CP CORE TEAM Referral Code CE213 |
|
|
|
|
Jul 4 2012, 02:22 PM
Post
#13
|
|
|
russau Group: Members Posts: 2,841 Joined: 4-December 03 From: st.louis missouri Member No.: 43 |
looks really nice!
|
|
|
|
|
Jul 4 2012, 04:49 PM
Post
#14
|
|
|
Moderator Group: Members Posts: 4,459 Joined: 25-August 09 From: way on up thar Member No.: 6,983 |
Thanks russ!
I have epoxied one handle side to the tang. Once the epoxy cures, I will drill those holes through. Kinda get a good side view of my file-work which created the vine pattern in this pic. 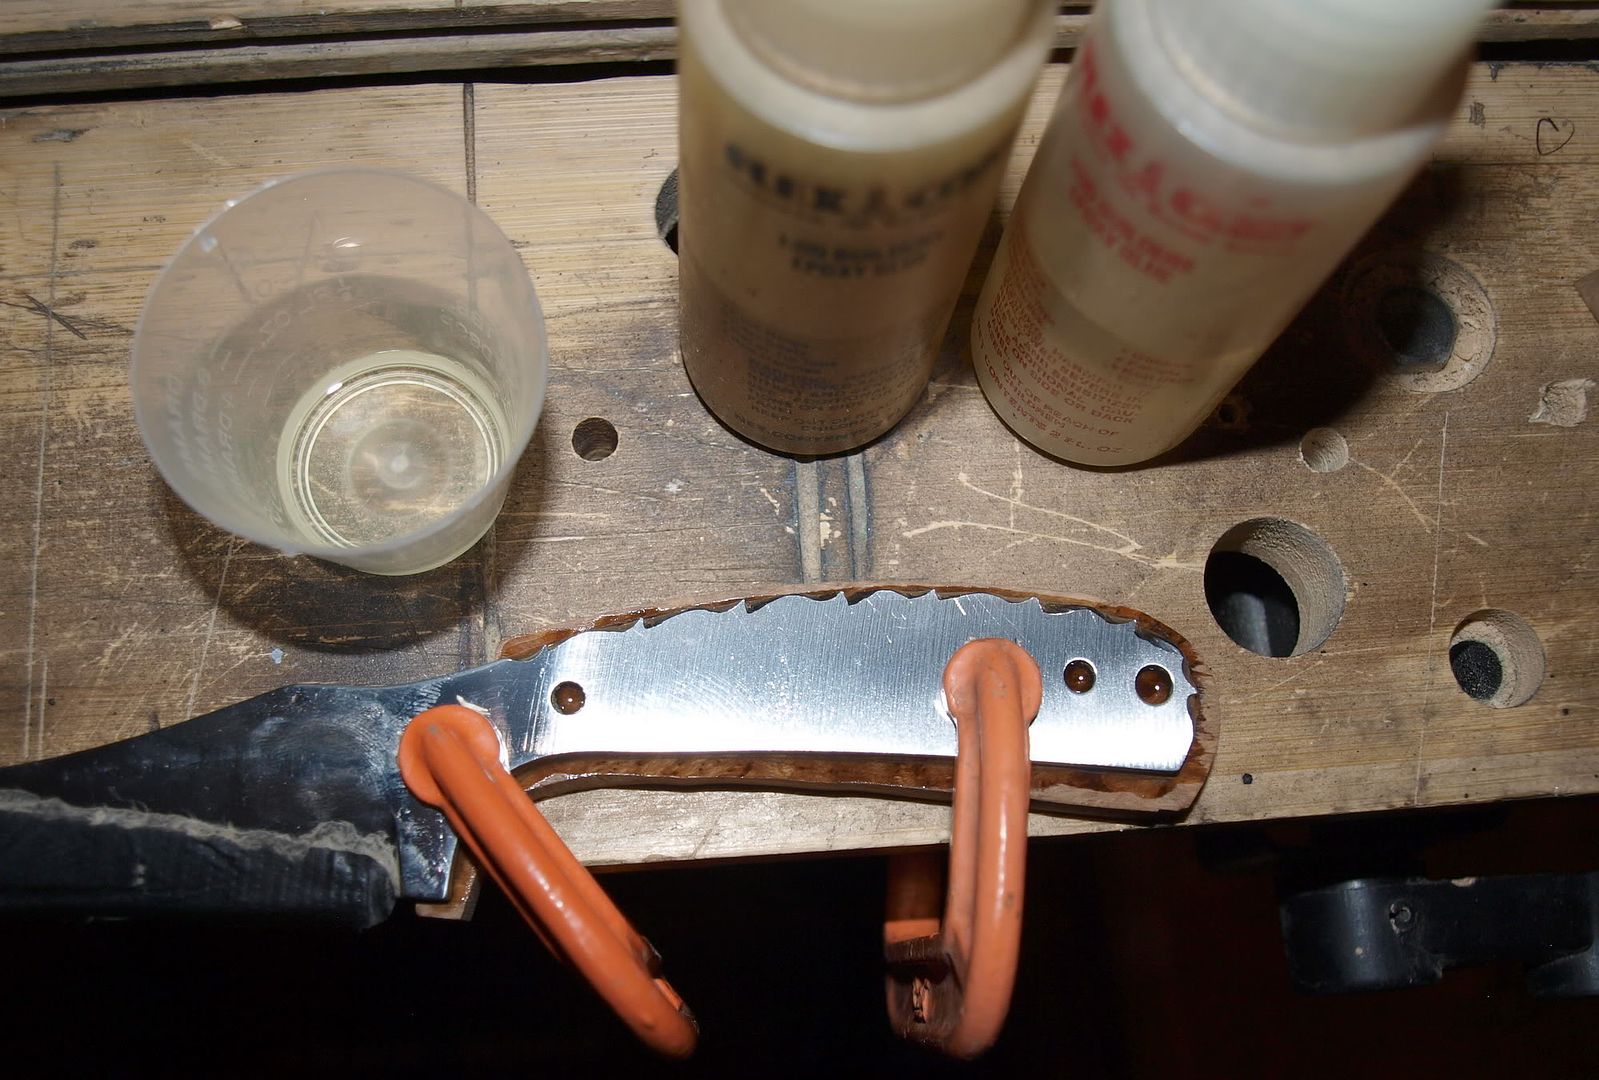
-------------------- /l ,[____], l---L-OlllllllO- ()_) ()_)--o-)_) BLACK SANDS MATTER! Very Happy CP Lifetime Member CP CORE TEAM Referral Code CE213 |
|
|
|
|
Jul 5 2012, 06:36 AM
Post
#15
|
|
|
russau Group: Members Posts: 2,841 Joined: 4-December 03 From: st.louis missouri Member No.: 43 |
that will end up being a very cherished item to pass on to the kids/grandkids some years in the future! your makeing me do some thinking! thanks for the pics and words!
|
|
|
|
|
Jul 5 2012, 02:03 PM
Post
#16
|
|
 Shovel Buster! Group: Members Posts: 130 Joined: 15-December 10 From: Castle Rock Member No.: 7,475 |
Are you planning on doing leather or Kydex for the sheath? I have had success using both for shaped gun holsters I have made in the past.
|
|
|
|
|
Jul 5 2012, 04:10 PM
Post
#17
|
|
|
Moderator Group: Members Posts: 4,459 Joined: 25-August 09 From: way on up thar Member No.: 6,983 |
Kydex wouldn't look right with this knife... definitely leather. I am not fabricating my own sheaths yet but certainly will be in the future. It's a different artform... not quite ready to dip in yet. I have purchased a leather sheath for this one.
I like the look and functionality of Kydex but more for tactical items. I may try to fabricate a Kydex leg holster for my Glock. 
-------------------- /l ,[____], l---L-OlllllllO- ()_) ()_)--o-)_) BLACK SANDS MATTER! Very Happy CP Lifetime Member CP CORE TEAM Referral Code CE213 |
|
|
|
|
Jul 5 2012, 05:27 PM
Post
#18
|
|
|
Moderator Group: Members Posts: 4,459 Joined: 25-August 09 From: way on up thar Member No.: 6,983 |
ok... the epoxy has cured and I've drilled through the two smaller holes (and through the wood handle side) - these will be for the brass rods which will be epoxied and ball-peined into place after the other half of the handle is installed. The third hole is for a lanyard if I chose to include it. I've decided not to include a lanyard on this knife, so that hole won't be drilled. Considering the blade style, I think it will look better/cleaner without.... and I don't really use them.
Next I will epoxy the other handle side. When it sets I will drill through it using the holes I just made as my guide. Anyone notice that the blade-edge and point have been concealed with Gorilla Tape through this entire process? There's a good reason for that.  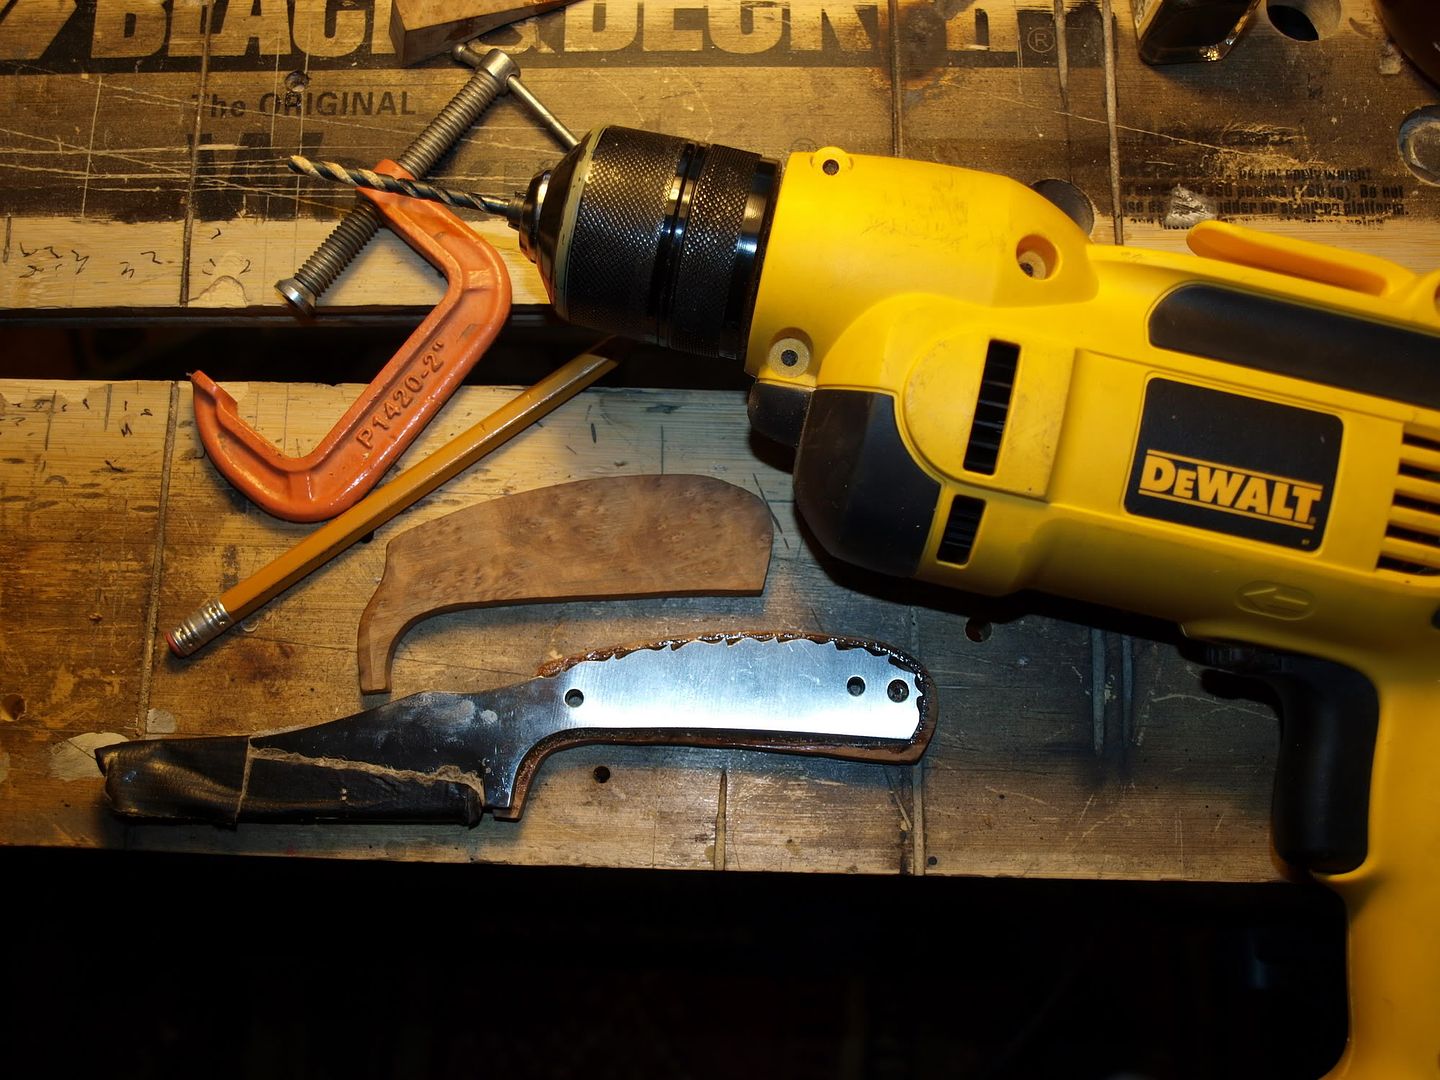
-------------------- /l ,[____], l---L-OlllllllO- ()_) ()_)--o-)_) BLACK SANDS MATTER! Very Happy CP Lifetime Member CP CORE TEAM Referral Code CE213 |
|
|
|
|
Jul 5 2012, 05:41 PM
Post
#19
|
|
|
Moderator Group: Members Posts: 4,459 Joined: 25-August 09 From: way on up thar Member No.: 6,983 |
oops... I accidentally double-posted.
-------------------- /l ,[____], l---L-OlllllllO- ()_) ()_)--o-)_) BLACK SANDS MATTER! Very Happy CP Lifetime Member CP CORE TEAM Referral Code CE213 |
|
|
|
|
Jul 6 2012, 06:35 AM
Post
#20
|
|
|
Moderator Group: Members Posts: 4,459 Joined: 25-August 09 From: way on up thar Member No.: 6,983 |
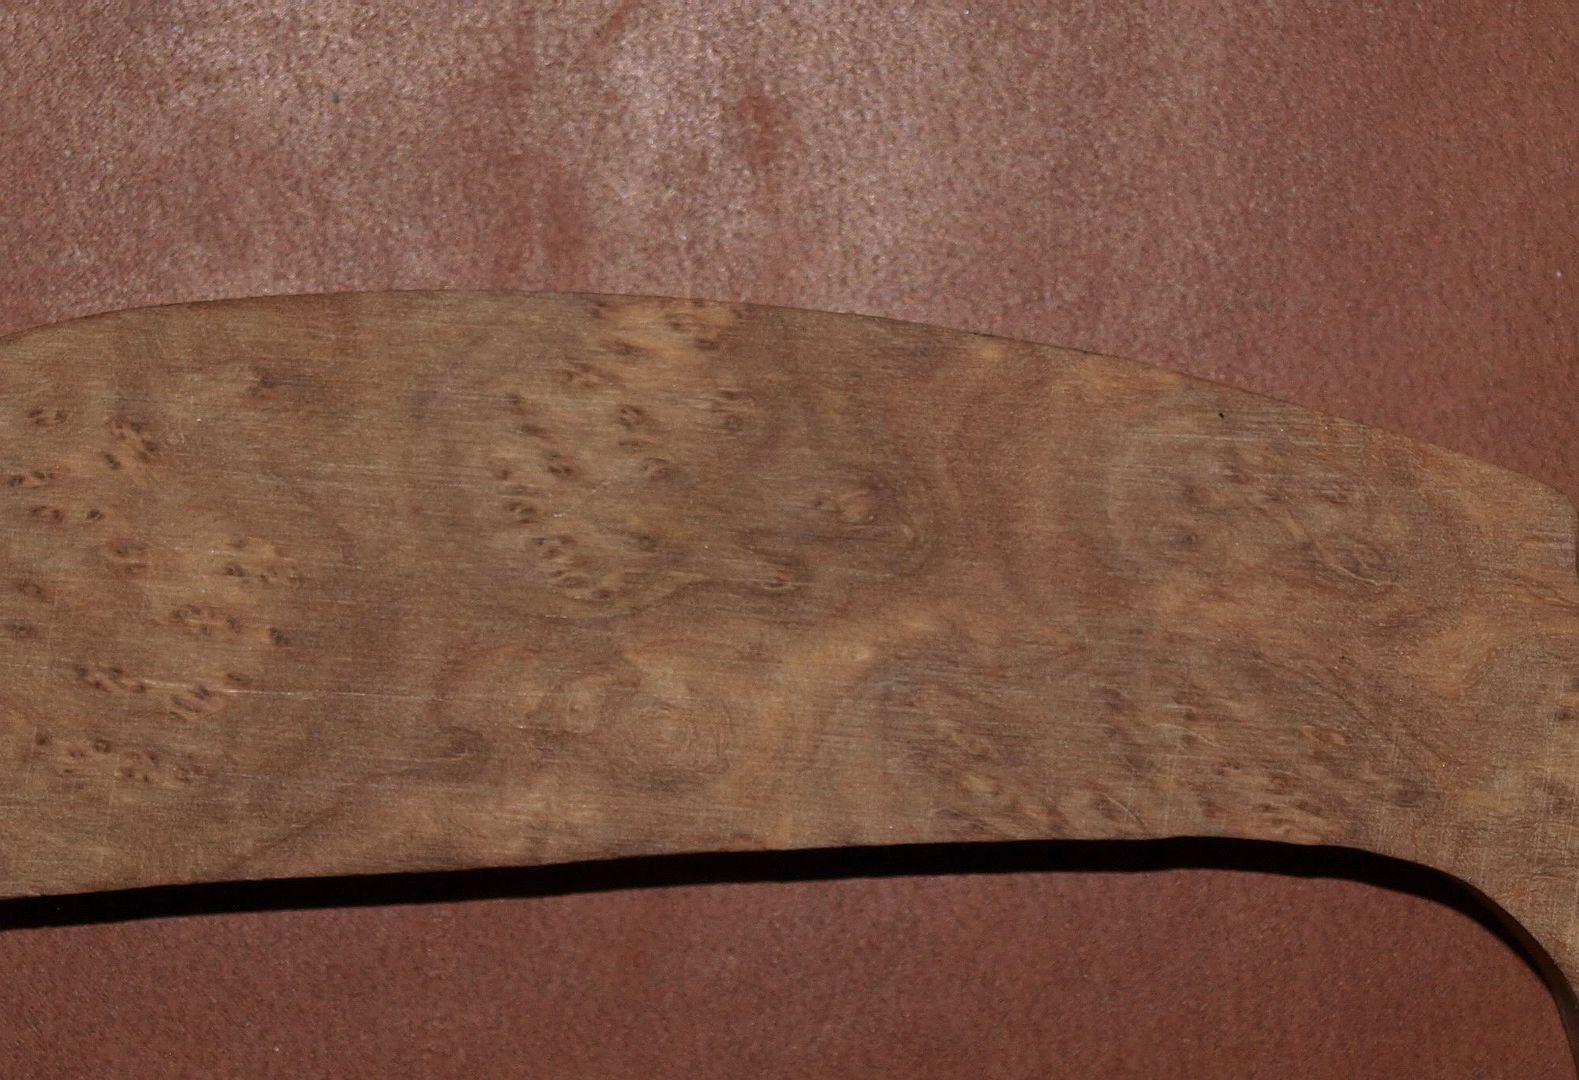
Burl figures.... unfortunately this side will be epoxied down and not seen again. Before installing I noticed this burl impression of what looks like a critter head (manbearpig, haha). Can also make out what looks like a deer with antlers immediately below the critter head. Now I'm wishin' this was the exposed side of the handle, oh well...
-------------------- /l ,[____], l---L-OlllllllO- ()_) ()_)--o-)_) BLACK SANDS MATTER! Very Happy CP Lifetime Member CP CORE TEAM Referral Code CE213 |
|
|
|
|
Jul 6 2012, 10:18 AM
Post
#21
|
|
|
Master Mucker! Group: Admin Posts: 7,208 Joined: 7-October 03 From: Colorado Member No.: 4 |
QUOTE (swizz @ Jul 5 2012, 05:27 PM)  Anyone notice that the blade-edge and point have been concealed with Gorilla Tape through this entire process? There's a good reason for that. I noticed that, just thought it was to keep you from slicing yourself while working on it.... Especially if you are clutsy as I am. Ha! That pattern definately looks like a startled pig!  Some days it will take me several hours just placing a pattern on a rock I want to cut. Too many good choices to choose from. That's going to be one sweet knife Chris! Some days it will take me several hours just placing a pattern on a rock I want to cut. Too many good choices to choose from. That's going to be one sweet knife Chris!
-------------------- Education is the key to the future,
and participation opens the door to opportunity. Discover your prospecting independence & success! ColoradoProspector.com Owner/Webmaster Core team member ♥ |
|
|
|
|
Jul 7 2012, 07:06 AM
Post
#22
|
|
|
Moderator Group: Members Posts: 4,459 Joined: 25-August 09 From: way on up thar Member No.: 6,983 |
QUOTE (Mrs.CP @ Jul 6 2012, 10:18 AM) I noticed that, just thought it was to keep you from slicing yourself while working on it.... YES, that is totally why. One slip with the bench grinder or drill and a person could lose or severely damage a finger or two in a heartbeat. -------------------- /l ,[____], l---L-OlllllllO- ()_) ()_)--o-)_) BLACK SANDS MATTER! Very Happy CP Lifetime Member CP CORE TEAM Referral Code CE213 |
|
|
|
|
Jul 7 2012, 07:27 AM
Post
#23
|
|
 Shovel Buster! Group: Members Posts: 94 Joined: 24-June 10 Member No.: 7,289 |
That looks very nice! I'm anxious to know / see what method you're going to use to finish the wood.
|
|
|
|
|
Jul 7 2012, 07:43 AM
Post
#24
|
|
|
Moderator Group: Members Posts: 4,459 Joined: 25-August 09 From: way on up thar Member No.: 6,983 |
QUOTE (OklaPony @ Jul 7 2012, 07:27 AM) That looks very nice! I'm anxious to know / see what method you're going to use to finish the wood. Hi pony! I will be finishing this wood in the same manner that rifle stocks are finished. I'll sand it down to 600 grit (or finer) first. This burl is very closed-grained so it takes a sanding well. I will moisten the wood between sanding grits to raise the grain.... knocking it back down with each finer grit. Prep coats will include one coat Minwax Pre-Stain treatment. Next one coat of Minwax (natural color) Stain. This will bring depth and richness to the grain without changing the color. Next I will apply numerous coats of Birchwood Casey Tru-Oil.... then followed by several buff coats of Birchwood Casey Gun Stock Wax for protection and luster. Maintenance will be the same as gun stock maintenance.... just re-apply Gun Stock wax and buff occasionally, depending on use and abuse. -------------------- /l ,[____], l---L-OlllllllO- ()_) ()_)--o-)_) BLACK SANDS MATTER! Very Happy CP Lifetime Member CP CORE TEAM Referral Code CE213 |
|
|
|
|
Jul 7 2012, 11:39 AM
Post
#25
|
|
|
Moderator Group: Members Posts: 4,459 Joined: 25-August 09 From: way on up thar Member No.: 6,983 |
The handle sides are both in place and I've cut brass rods for the rivets.
They are about 1/8" longer on each side so that I can peen them tight on both sides. I will lightly coat the brass rods with wet epoxy before the peening. The handle is not shaped and sanded to the tang yet, so it's still crude. I will do this after peening... sanding down the rods flat to the handle in the process. 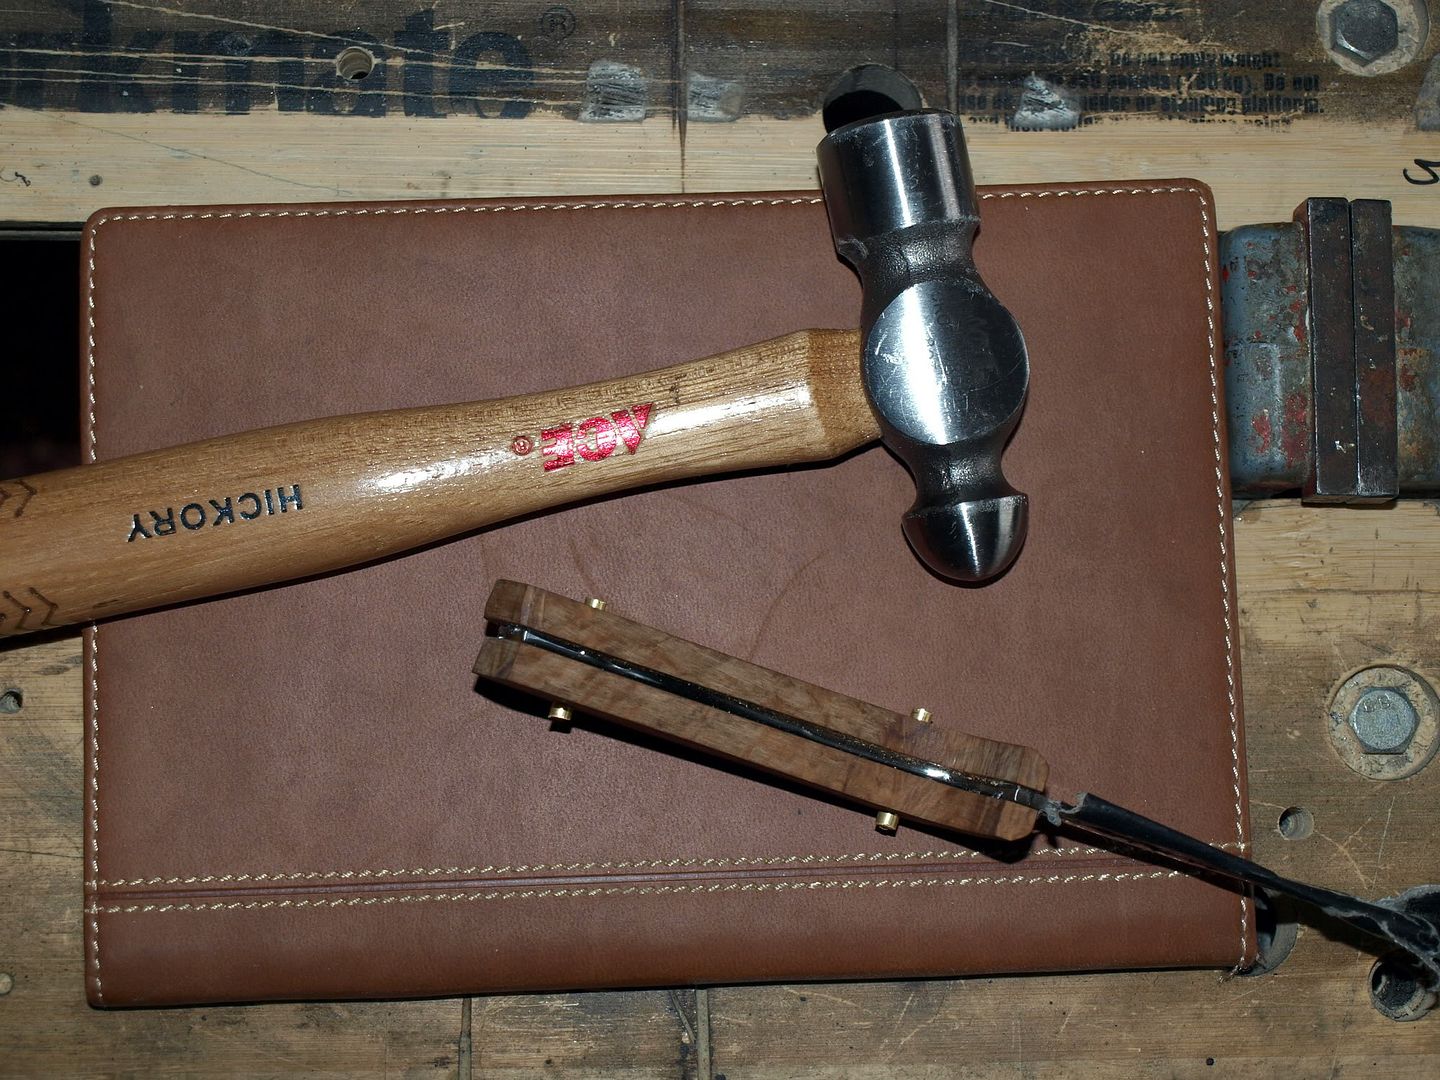
-------------------- /l ,[____], l---L-OlllllllO- ()_) ()_)--o-)_) BLACK SANDS MATTER! Very Happy CP Lifetime Member CP CORE TEAM Referral Code CE213 |
|
|
|
|
Jul 7 2012, 12:17 PM
Post
#26
|
|
|
Moderator Group: Members Posts: 4,459 Joined: 25-August 09 From: way on up thar Member No.: 6,983 |
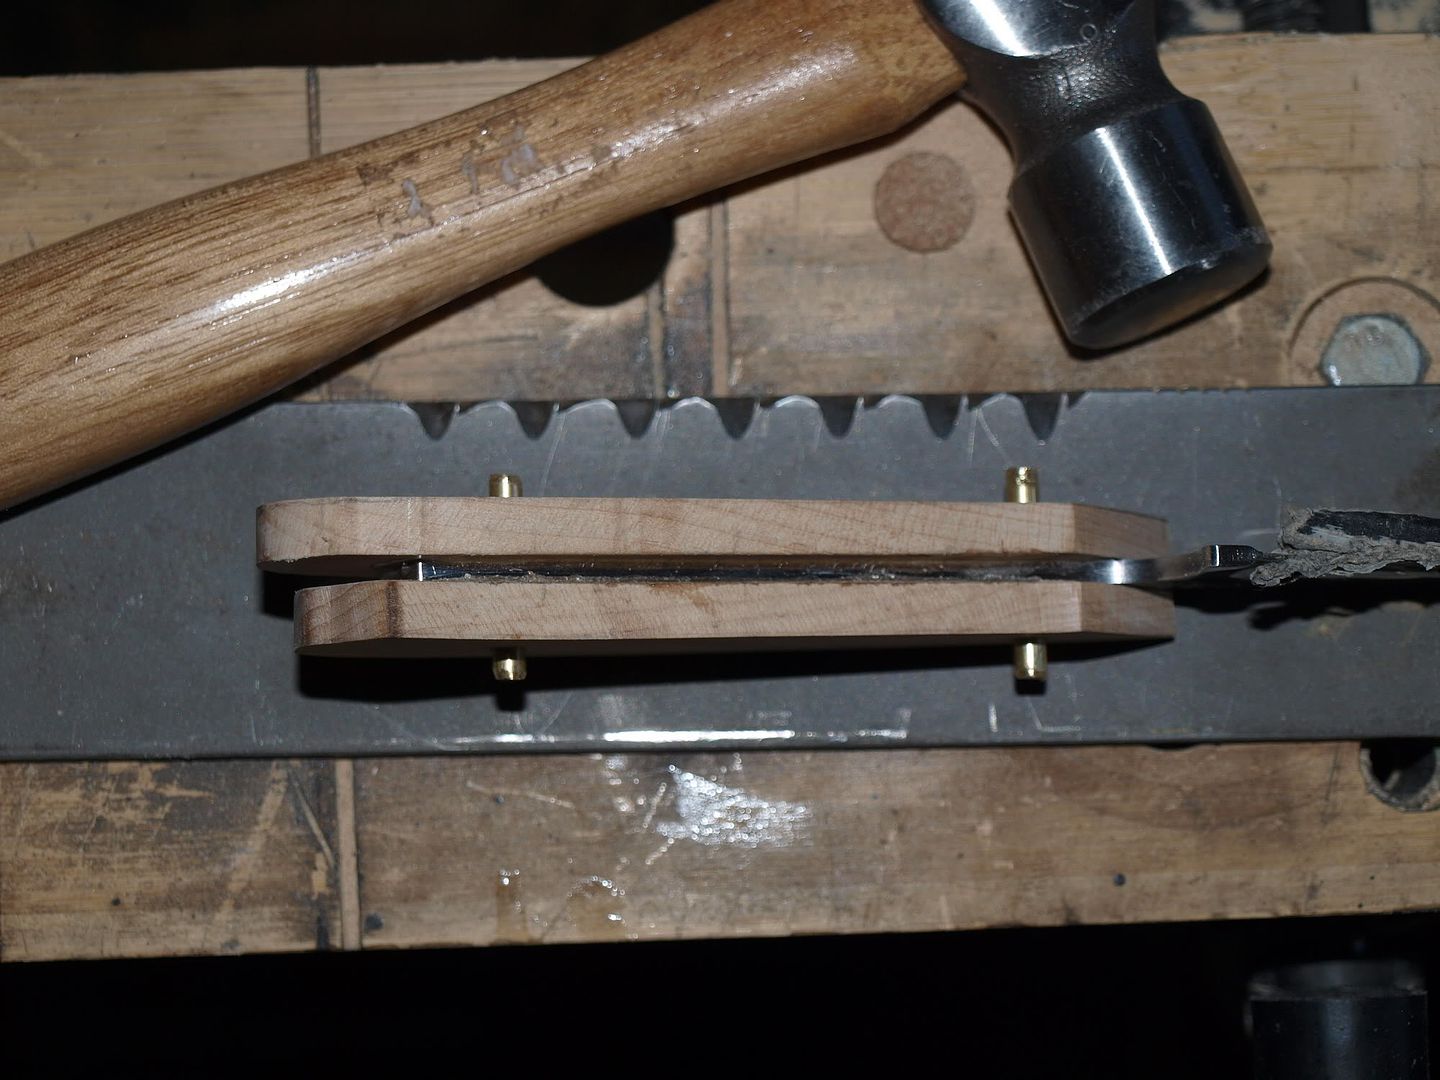
Peening expands the brass rods for a super tight fit. I used the flat-head side of the hammer for this since I'm not trying to 'round' the brass ends... they will be ground/sanded flat to the handle.
In the first pic you can see the expansion of the brass. 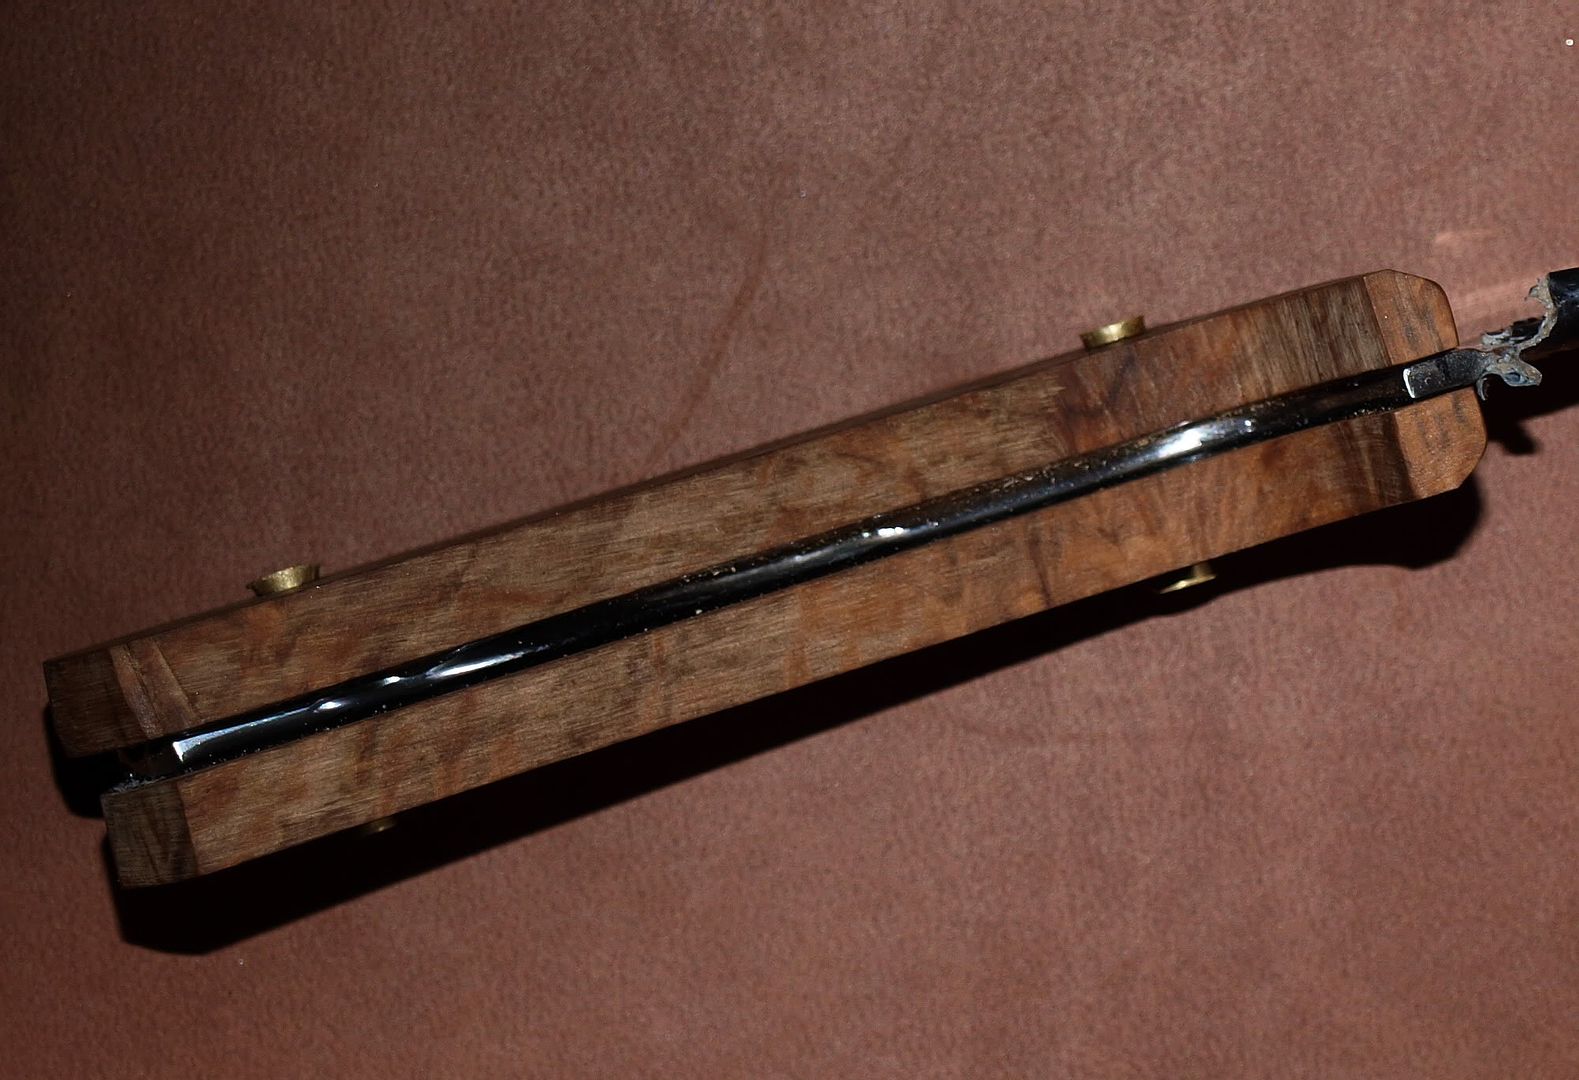 Denise,take a close look at this pic. It is the flip-side of the "scared pig" burl. I'm starting to see... well, I'll let you decide.  It should be interesting once I sand it a bit. It should be interesting once I sand it a bit.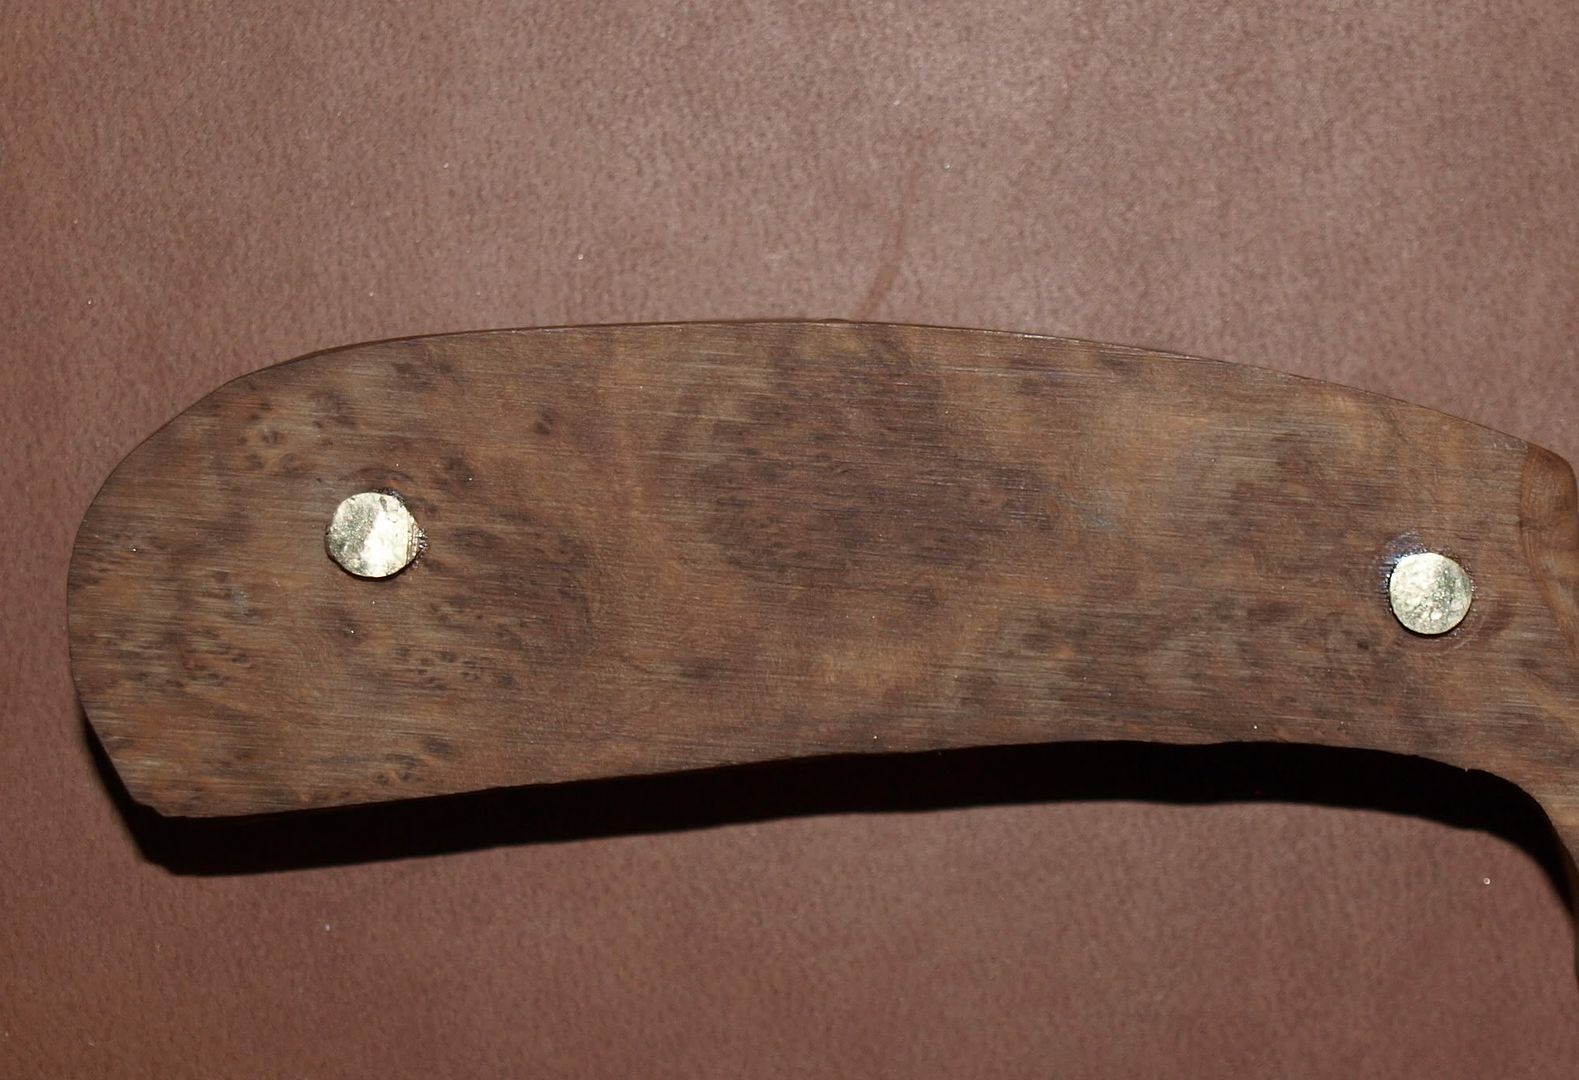
-------------------- /l ,[____], l---L-OlllllllO- ()_) ()_)--o-)_) BLACK SANDS MATTER! Very Happy CP Lifetime Member CP CORE TEAM Referral Code CE213 |
|
|
|
|
Jul 7 2012, 12:57 PM
Post
#27
|
|
|
Moderator Group: Members Posts: 4,459 Joined: 25-August 09 From: way on up thar Member No.: 6,983 |
Next....
I have the knife back in the table vise for some sanding. Here I'm using a Flex Dremel with a barrel-sanding bit to get the wood flush with the tang. I don't want to sand my brass or sides until that epoxy has fully cured. 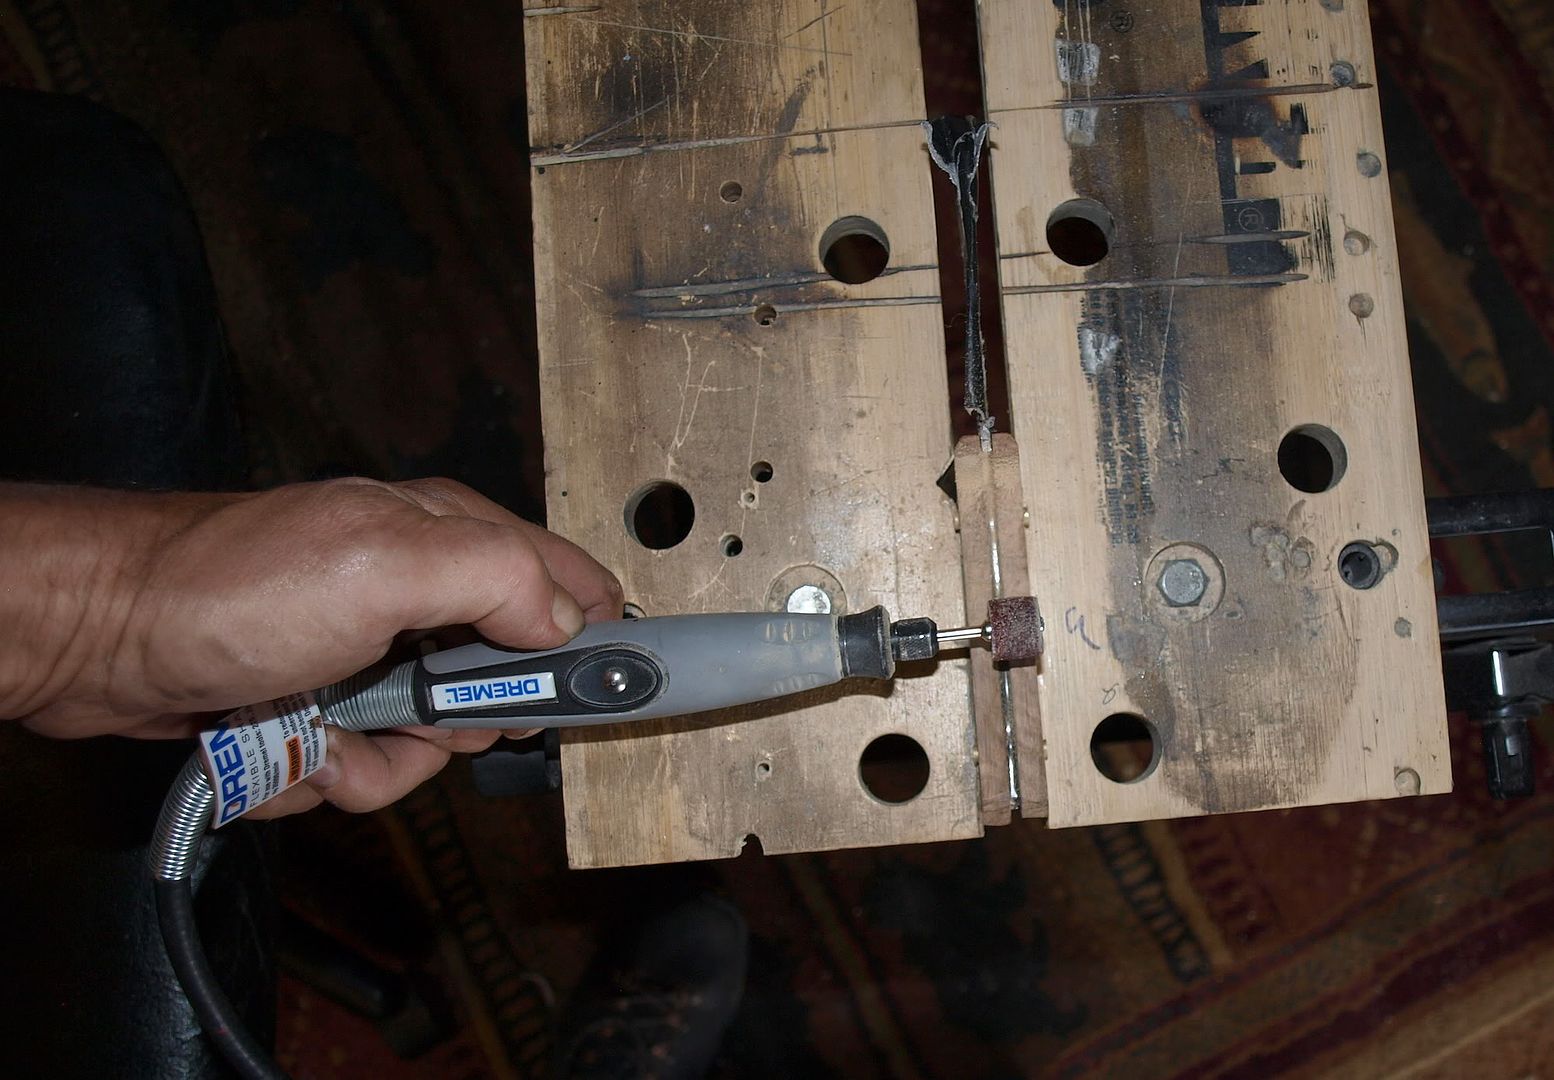
-------------------- /l ,[____], l---L-OlllllllO- ()_) ()_)--o-)_) BLACK SANDS MATTER! Very Happy CP Lifetime Member CP CORE TEAM Referral Code CE213 |
|
|
|
|
Jul 7 2012, 01:56 PM
Post
#28
|
|
|
Moderator Group: Members Posts: 4,459 Joined: 25-August 09 From: way on up thar Member No.: 6,983 |
There are many different tools or sanders you can use to work the handle.... files, Dremel, sanding blocks, handheld electric sanders, etc., it's basic woodwork. I'm just using what I have in my arsenal.
I'm getting close to the tang now so I've switched to an orbital finishing sander as the Dremel is too abrasive and scarring. Eventually it will come down to hand-sanding for the final finish. 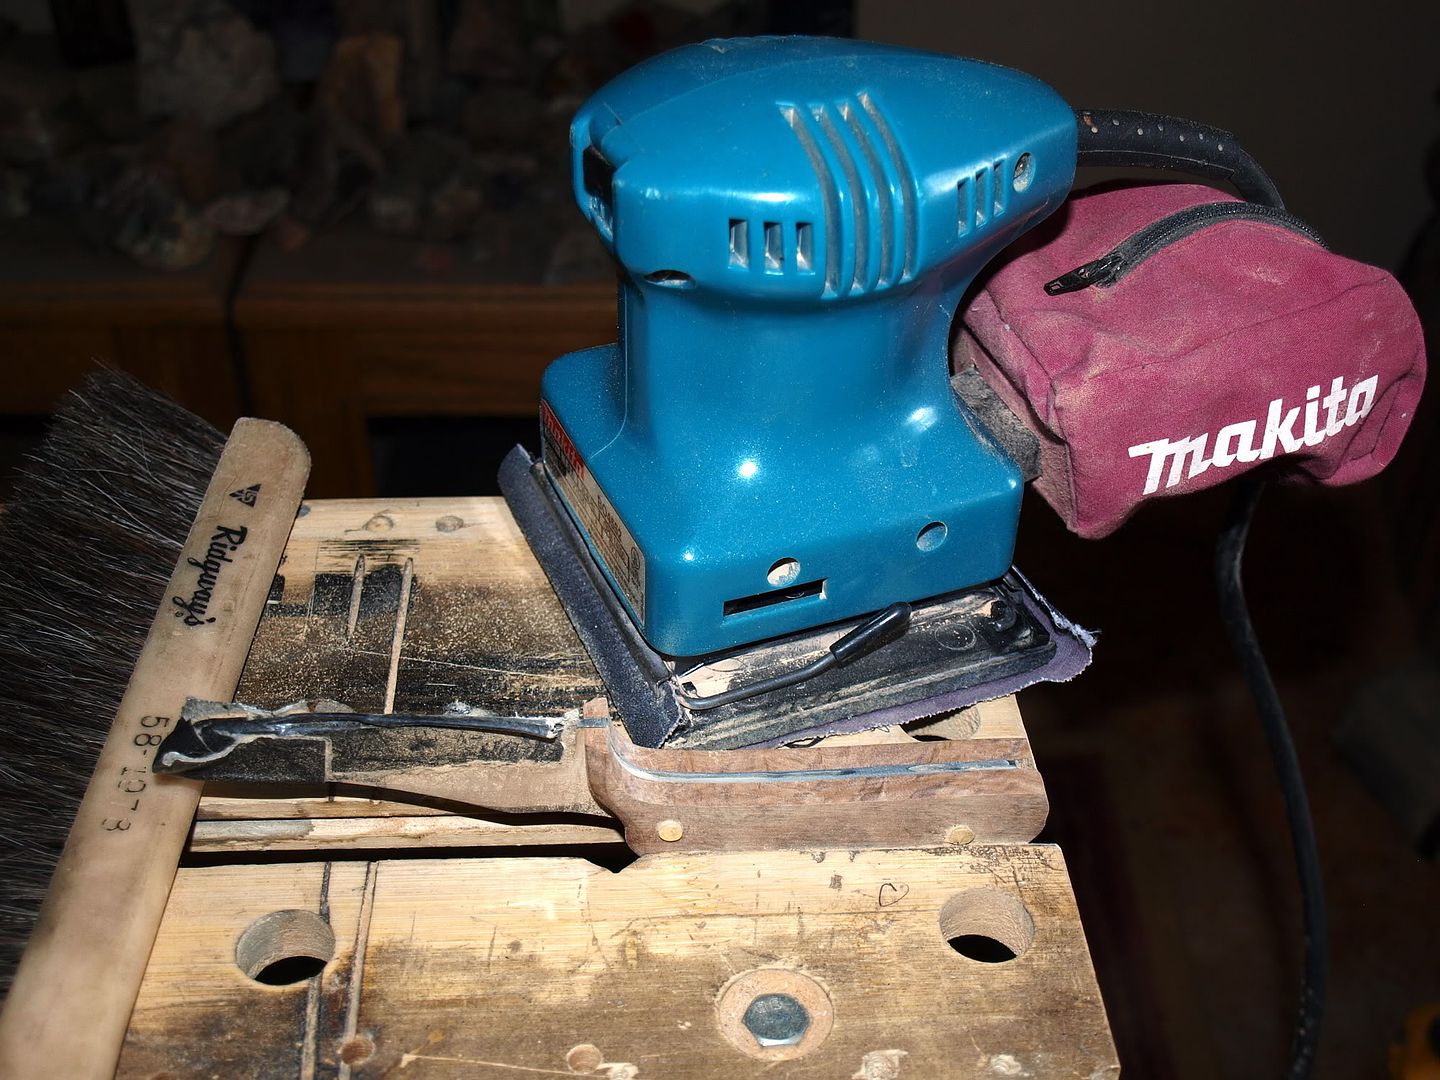
-------------------- /l ,[____], l---L-OlllllllO- ()_) ()_)--o-)_) BLACK SANDS MATTER! Very Happy CP Lifetime Member CP CORE TEAM Referral Code CE213 |
|
|
|
|
Jul 7 2012, 02:05 PM
Post
#29
|
|
|
Master Mucker! Group: Admin Posts: 7,208 Joined: 7-October 03 From: Colorado Member No.: 4 |
That's turning out great! Your updates of tips, pictures and techniques are awesome Chris. I'm sure there are several other talented people in the forum here scratching their heads thinking........
I bet I could do that! The startled pig must have seen his evil wild boar cousin on the other side. You are a very talented inspiration Chris! Thanks for sharing your work with us!! 
-------------------- Education is the key to the future,
and participation opens the door to opportunity. Discover your prospecting independence & success! ColoradoProspector.com Owner/Webmaster Core team member ♥ |
|
|
|
|
Jul 8 2012, 08:54 AM
Post
#30
|
|
|
Moderator Group: Members Posts: 4,459 Joined: 25-August 09 From: way on up thar Member No.: 6,983 |
Thanks! I'm hoping that maybe some other folk here might want to try it. Many of us are very outdoorsy and crafty and I think it fits well. You and Dan would be naturals at it, try! It's not really hard to make a basic functional knife and it's a lot of fun. Don't "need" a bunch of tools or money either... heck, the early settlers and cowpoke made some excellent knives back in the day without a fraction of the tool resources or electricity that we now have. The build I'm working on here is going to end up costing me less than $30 total.. and that's only because I had to buy the steel and wood.... and added the vine-pattern which will require purchasing epoxy pigment. I won the "Western Skinner" knife blank on eBay for $6.51 (such a deal for heat-treated 440C!!!), and (also on eBay) purchased the handle slabs (scales) for about $10. I spent a couple of bucks on the right sized brass rods for the handle scales... which I can also use on future builds. I'd like to make some nice kitchen knives at some point too.
For now, I won't be able to update progress much until later in the week. I may add another (smaller) brass rivet to the handle near the ricasso area for more durability and I'll post that if I do it. I have to order some black pigment that is compatible with the filler I will be using for the vine-pattern (which I hand-filed into the top of the tang). This will be one of the final steps of my knife before finishing but I have to wait for the pigment to get here. -------------------- /l ,[____], l---L-OlllllllO- ()_) ()_)--o-)_) BLACK SANDS MATTER! Very Happy CP Lifetime Member CP CORE TEAM Referral Code CE213 |
|
|
|
|
Jul 8 2012, 02:18 PM
Post
#31
|
|
|
Moderator Group: Members Posts: 4,459 Joined: 25-August 09 From: way on up thar Member No.: 6,983 |
QUOTE (swizz @ Jul 8 2012, 08:54 AM) I may add another (smaller) brass rivet to the handle near the ricasso area for more durability and I'll post that if I do it. Drilling to add another rivet to this part of the handle. 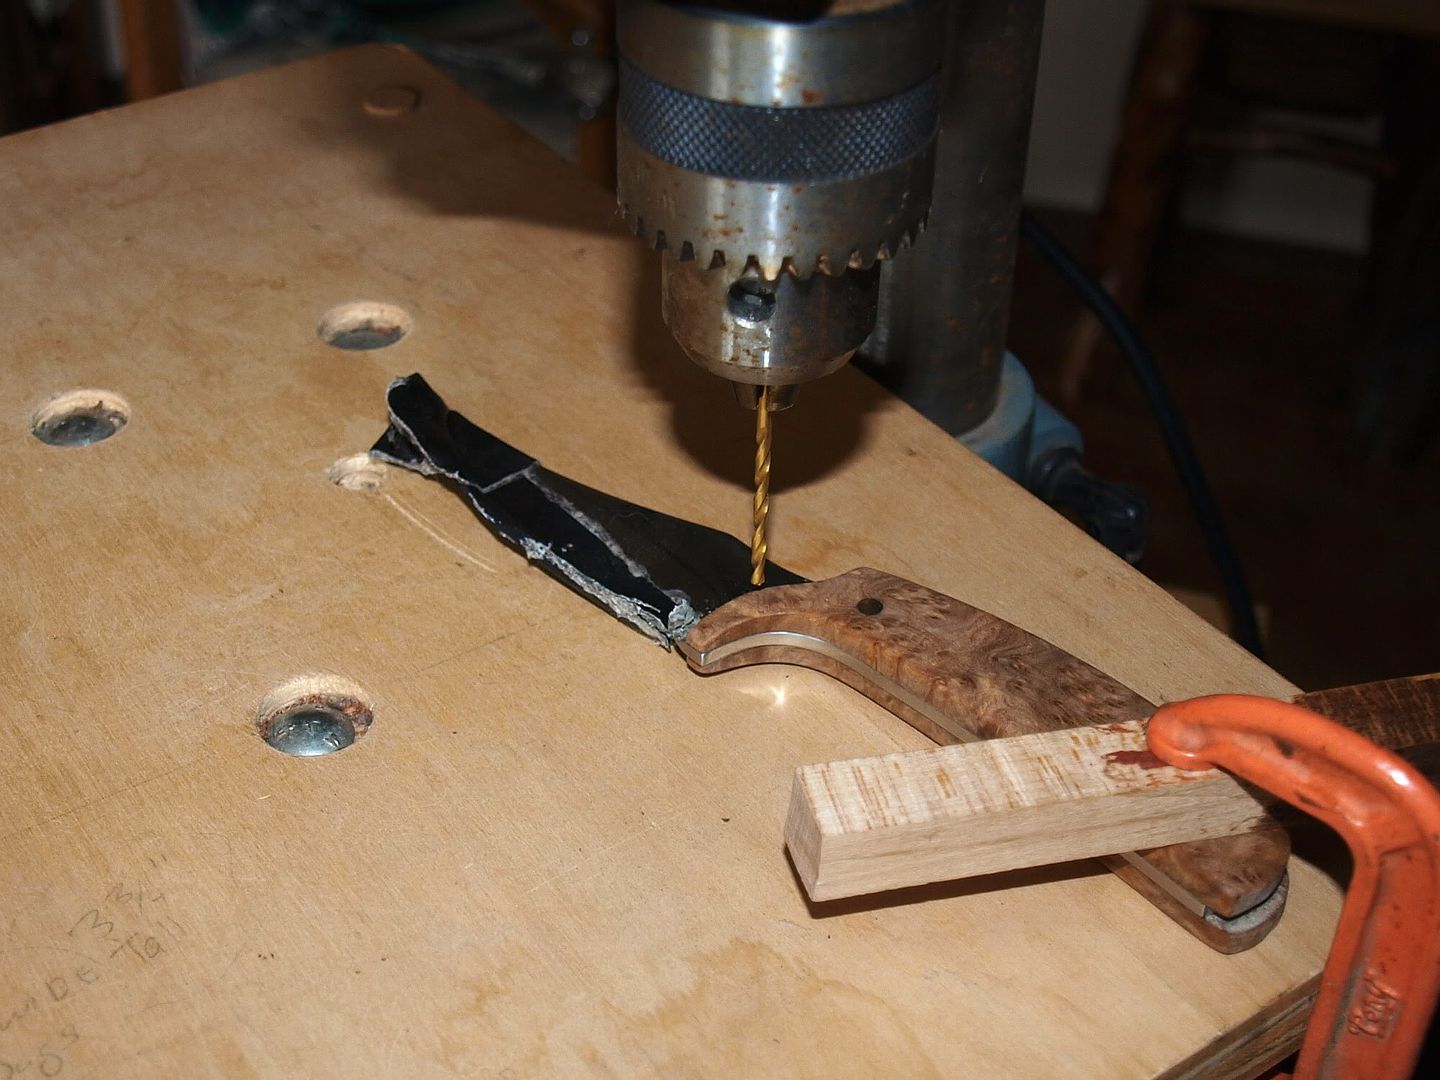 I done broke the wood! On both sides of the knife. Not to worry... this was a weak point in my handle design and needed to be addressed. My solution was to put a small peened rivet there. I'm glad I finally screwed something up with this build, it was going waaaay too smooth. Can't say I didn't see this coming. I have a plan. 
-------------------- /l ,[____], l---L-OlllllllO- ()_) ()_)--o-)_) BLACK SANDS MATTER! Very Happy CP Lifetime Member CP CORE TEAM Referral Code CE213 |
|
|
|
|
Jul 8 2012, 07:08 PM
Post
#32
|
|
|
Moderator Group: Members Posts: 4,459 Joined: 25-August 09 From: way on up thar Member No.: 6,983 |
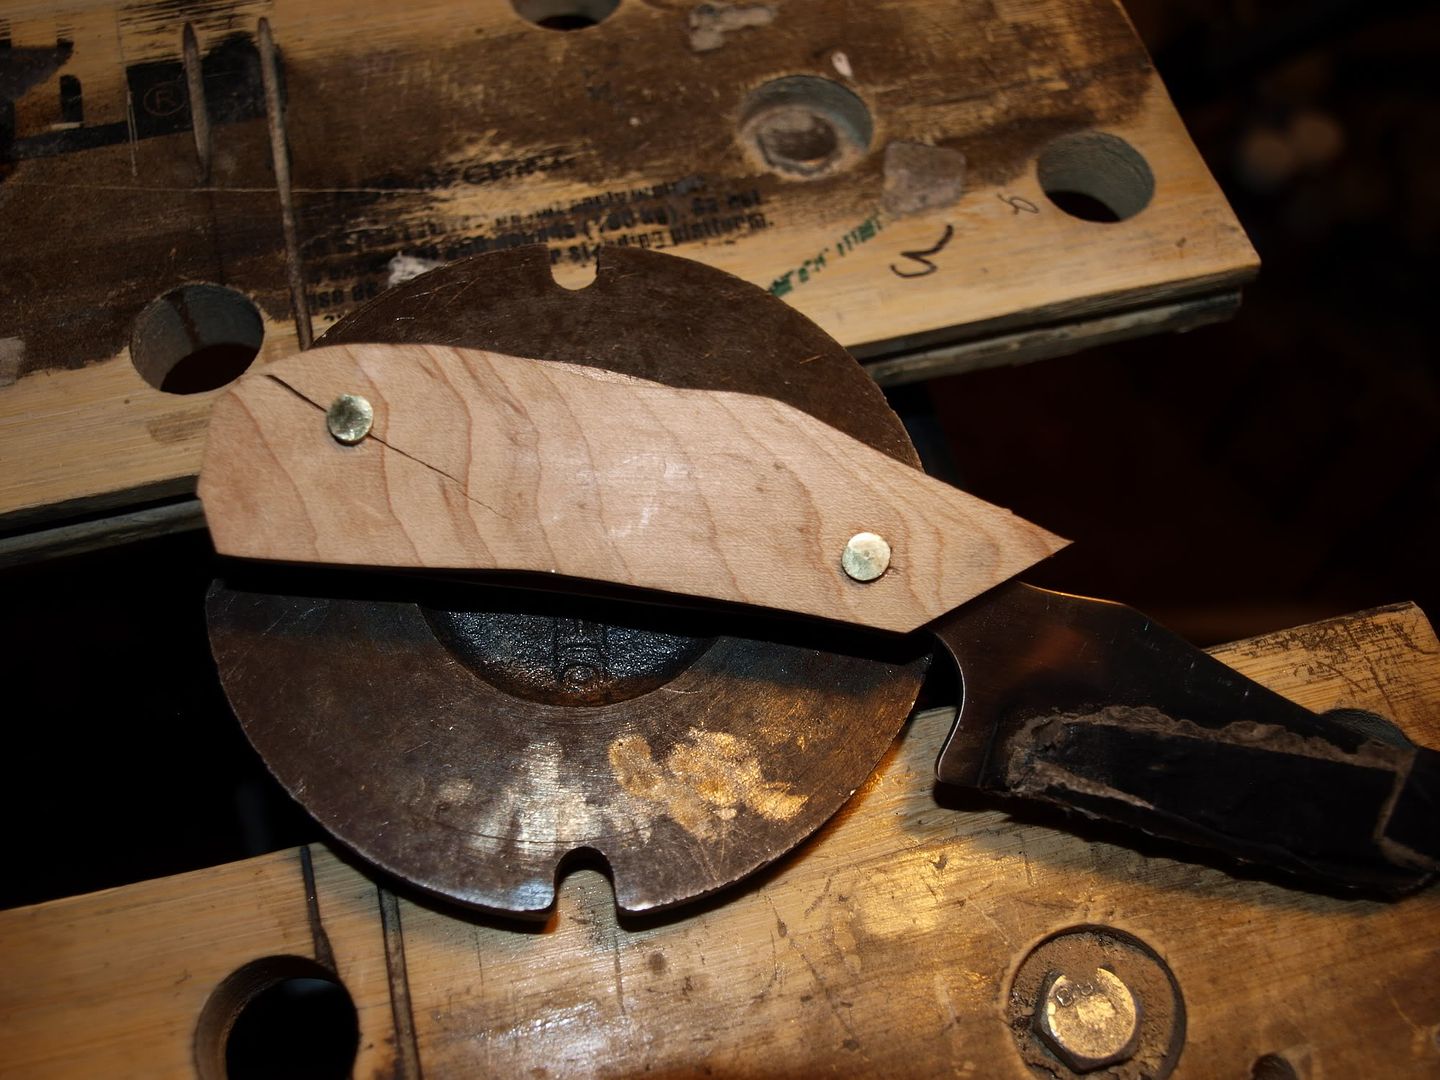
QUOTE (swizz @ Jul 8 2012, 02:18 PM) I have a plan. The plan didn't work out so I removed the handle and will make a new one. No biggie, I like the practice! This time I'm not going to buy exotic wood. That stuff was strange to work with. It was hard, but kind of brittle. Not pleasant to breathe when sanding it either. I'm going to use my own wood this time, which the knife is sitting on here.... good ol Maple and it won't cost me a dime. 
-------------------- /l ,[____], l---L-OlllllllO- ()_) ()_)--o-)_) BLACK SANDS MATTER! Very Happy CP Lifetime Member CP CORE TEAM Referral Code CE213 |
|
|
|
|
Jul 8 2012, 08:17 PM
Post
#33
|
|
|
Moderator Group: Members Posts: 4,459 Joined: 25-August 09 From: way on up thar Member No.: 6,983 |
Ok... back on track.
I've traced my new handle design and am about to cut them out with a scroll saw. You can use any saw, I used a hand coping saw last time. 
-------------------- /l ,[____], l---L-OlllllllO- ()_) ()_)--o-)_) BLACK SANDS MATTER! Very Happy CP Lifetime Member CP CORE TEAM Referral Code CE213 |
|
|
|
|
Jul 9 2012, 06:04 AM
Post
#34
|
|
|
russau Group: Members Posts: 2,841 Joined: 4-December 03 From: st.louis missouri Member No.: 43 |
nice grain pattern of that maple! it ought to look equally nice!
|
|
|
|
|
Jul 9 2012, 12:55 PM
Post
#35
|
|
|
Master Mucker! Group: Admin Posts: 7,208 Joined: 7-October 03 From: Colorado Member No.: 4 |
Dang it, that stinks about the other wood but I have to agree with Russ. The patterns in the Maple are going to look great for the handle!
-------------------- Education is the key to the future,
and participation opens the door to opportunity. Discover your prospecting independence & success! ColoradoProspector.com Owner/Webmaster Core team member ♥ |
|
|
|
|
Jul 9 2012, 06:45 PM
Post
#36
|
|
|
Moderator Group: Members Posts: 4,459 Joined: 25-August 09 From: way on up thar Member No.: 6,983 |
Back in business... I've epoxied the first handle scale and will leave it clamped overnight.
 -------------------- /l ,[____], l---L-OlllllllO- ()_) ()_)--o-)_) BLACK SANDS MATTER! Very Happy CP Lifetime Member CP CORE TEAM Referral Code CE213 |
|
|
|
|
Jul 10 2012, 04:10 PM
Post
#37
|
|
|
Moderator Group: Members Posts: 4,459 Joined: 25-August 09 From: way on up thar Member No.: 6,983 |
oops again..... this time I was overly ambitious peening. Still learnin'
-------------------- /l ,[____], l---L-OlllllllO- ()_) ()_)--o-)_) BLACK SANDS MATTER! Very Happy CP Lifetime Member CP CORE TEAM Referral Code CE213 |
|
|
|
|
Jul 10 2012, 05:26 PM
Post
#38
|
|
|
Moderator Group: Members Posts: 4,459 Joined: 25-August 09 From: way on up thar Member No.: 6,983 |
OK... I jumped right back up on that hoss!
Handle attempt #3  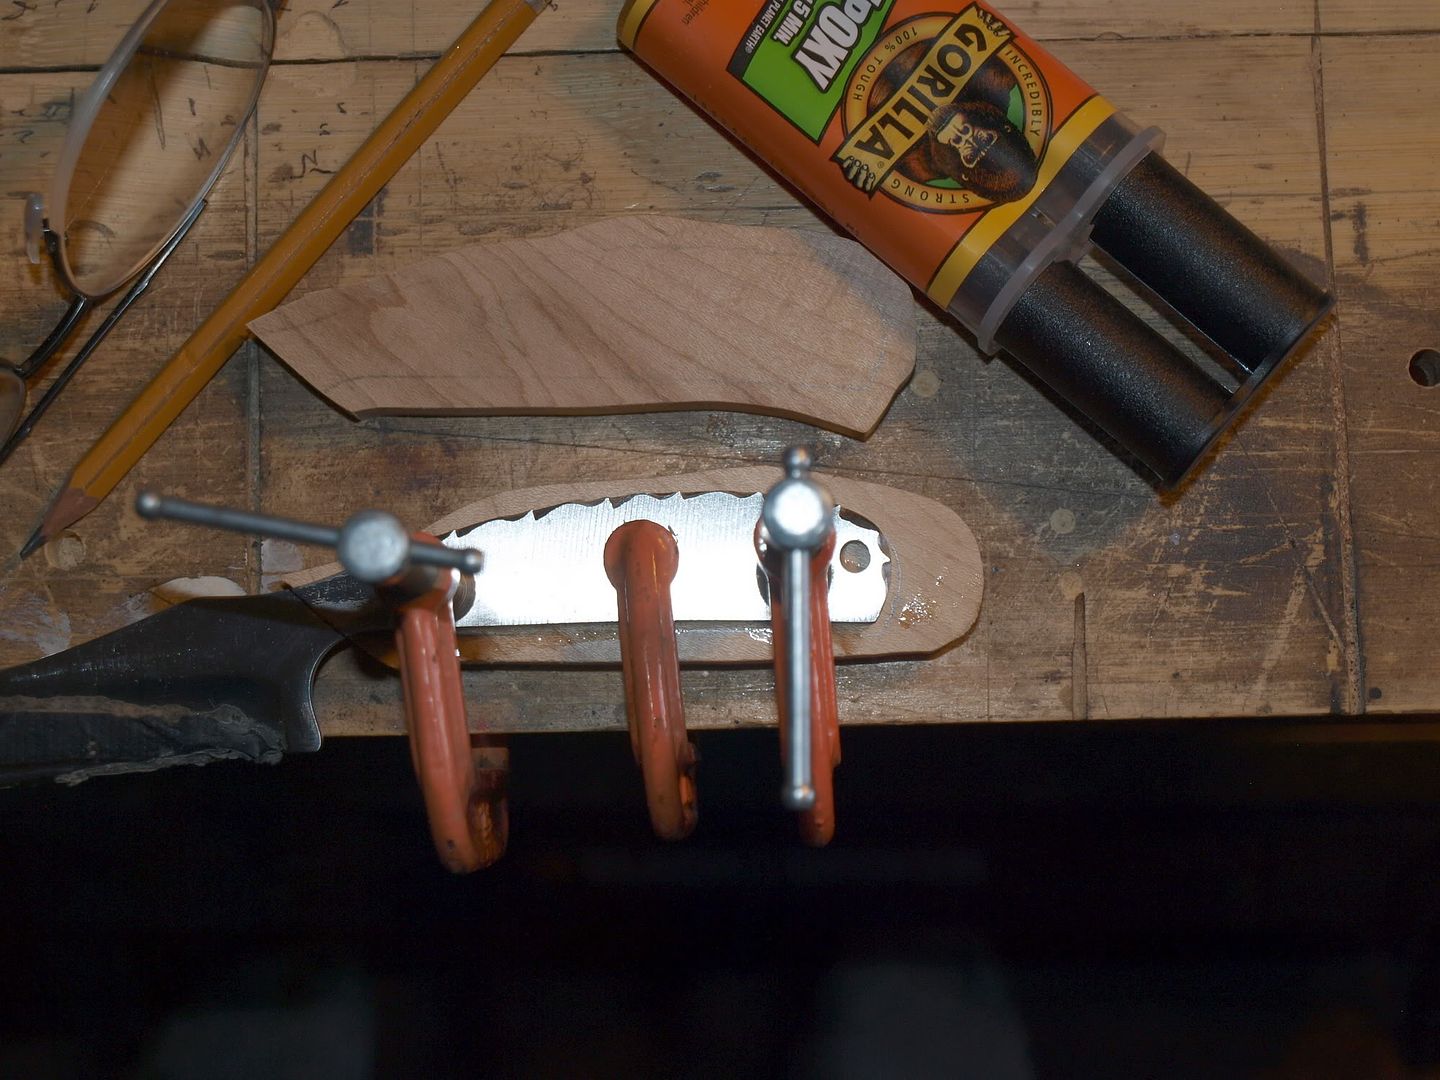 -------------------- /l ,[____], l---L-OlllllllO- ()_) ()_)--o-)_) BLACK SANDS MATTER! Very Happy CP Lifetime Member CP CORE TEAM Referral Code CE213 |
|
|
|
|
Jul 11 2012, 06:30 AM
Post
#39
|
|
|
russau Group: Members Posts: 2,841 Joined: 4-December 03 From: st.louis missouri Member No.: 43 |
frustrating for sure!
|
|
|
|
|
Jul 11 2012, 07:10 AM
Post
#40
|
|
|
Moderator Group: Members Posts: 4,459 Joined: 25-August 09 From: way on up thar Member No.: 6,983 |
QUOTE (russau @ Jul 11 2012, 06:30 AM) frustrating for sure! Not at all. This is new to me and I expected (actually hoped) to make some errors in construction. The materials I'm using for this first build are really inexpensive (under $20 invested) so I don't mind donating them to the learning curve if need be. If I'm not making mistakes.... I'm not learning. I should have most of the bugs in the process worked out by the time I'm ready to produce quality pieces.... that's the goal anyway. Hopefully anyone who's following this thread and thinking about trying it can learn from a few of my mistakes along the way. Definitely not frustrating though, just part of the learning process. -------------------- /l ,[____], l---L-OlllllllO- ()_) ()_)--o-)_) BLACK SANDS MATTER! Very Happy CP Lifetime Member CP CORE TEAM Referral Code CE213 |
|
|
|
|
Jul 11 2012, 06:40 PM
Post
#41
|
|
|
Moderator Group: Members Posts: 4,459 Joined: 25-August 09 From: way on up thar Member No.: 6,983 |
Alrighty then... I'm at the peening stage again. It's best to leave about 1/8" of extra brass rod on each side of the handle to peen down. You don't have to peen the entire 1/8" down to the handle. The idea is to keep tapping it on both sides until the brass rod expands inside the holes. This holds the handle scales to the tang TIGHT. I'll then sand down the excess until it is flush with the handle.... then I'll sand the rest of the wood down to the tang.
-------------------- /l ,[____], l---L-OlllllllO- ()_) ()_)--o-)_) BLACK SANDS MATTER! Very Happy CP Lifetime Member CP CORE TEAM Referral Code CE213 |
|
|
|
|
Jul 14 2012, 02:35 PM
Post
#42
|
|
 Master Mucker! Group: Admin Posts: 4,149 Joined: 7-October 03 From: Colorado Member No.: 3 |
This project has been fun to follow. I can see why you'd definately want to start off with something cheaper for the learning curve.
I'm wondering if maybe a very slight taper on the handle holes would help allow a tad bit more room for the peening process to help lock and hold the handle in place. Possibly even doing the first peening stage during the gluing but that would require both be done at the same time. Would maybe lessen the chances of handle bust outs? Look forward to seeing the end results of this one and the ones that are sure to follow. My grandad hand made a knife from an old file and added a antler handle in his younger days......when I find it in the storage boxes I'll post up a pic. Knife making looks like it could be really fun and creative for sure. Thanks for including us all on this one Swizz. -------------------- CP-Owner/Administrator
www.ColoradoProspector.com IF YOU USE IT, THE GROUND PRODUCED IT! MINERS MAKE "IT" HAPPEN!! |
|
|
|
|
Jul 14 2012, 04:47 PM
Post
#43
|
|
|
Moderator Group: Members Posts: 4,459 Joined: 25-August 09 From: way on up thar Member No.: 6,983 |
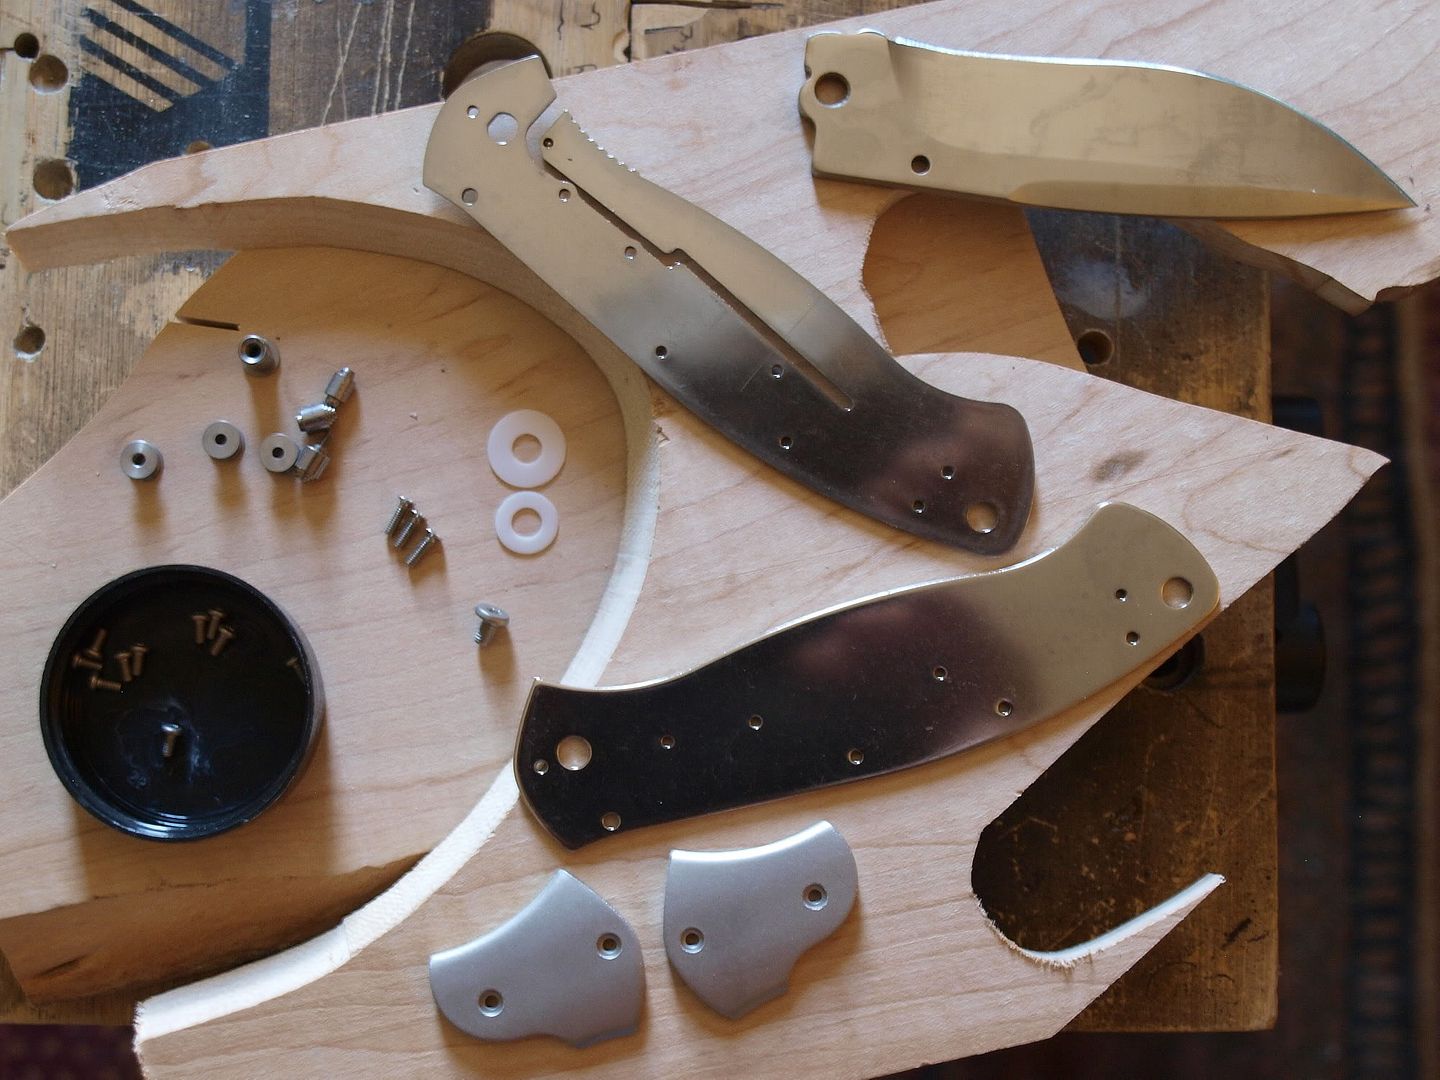
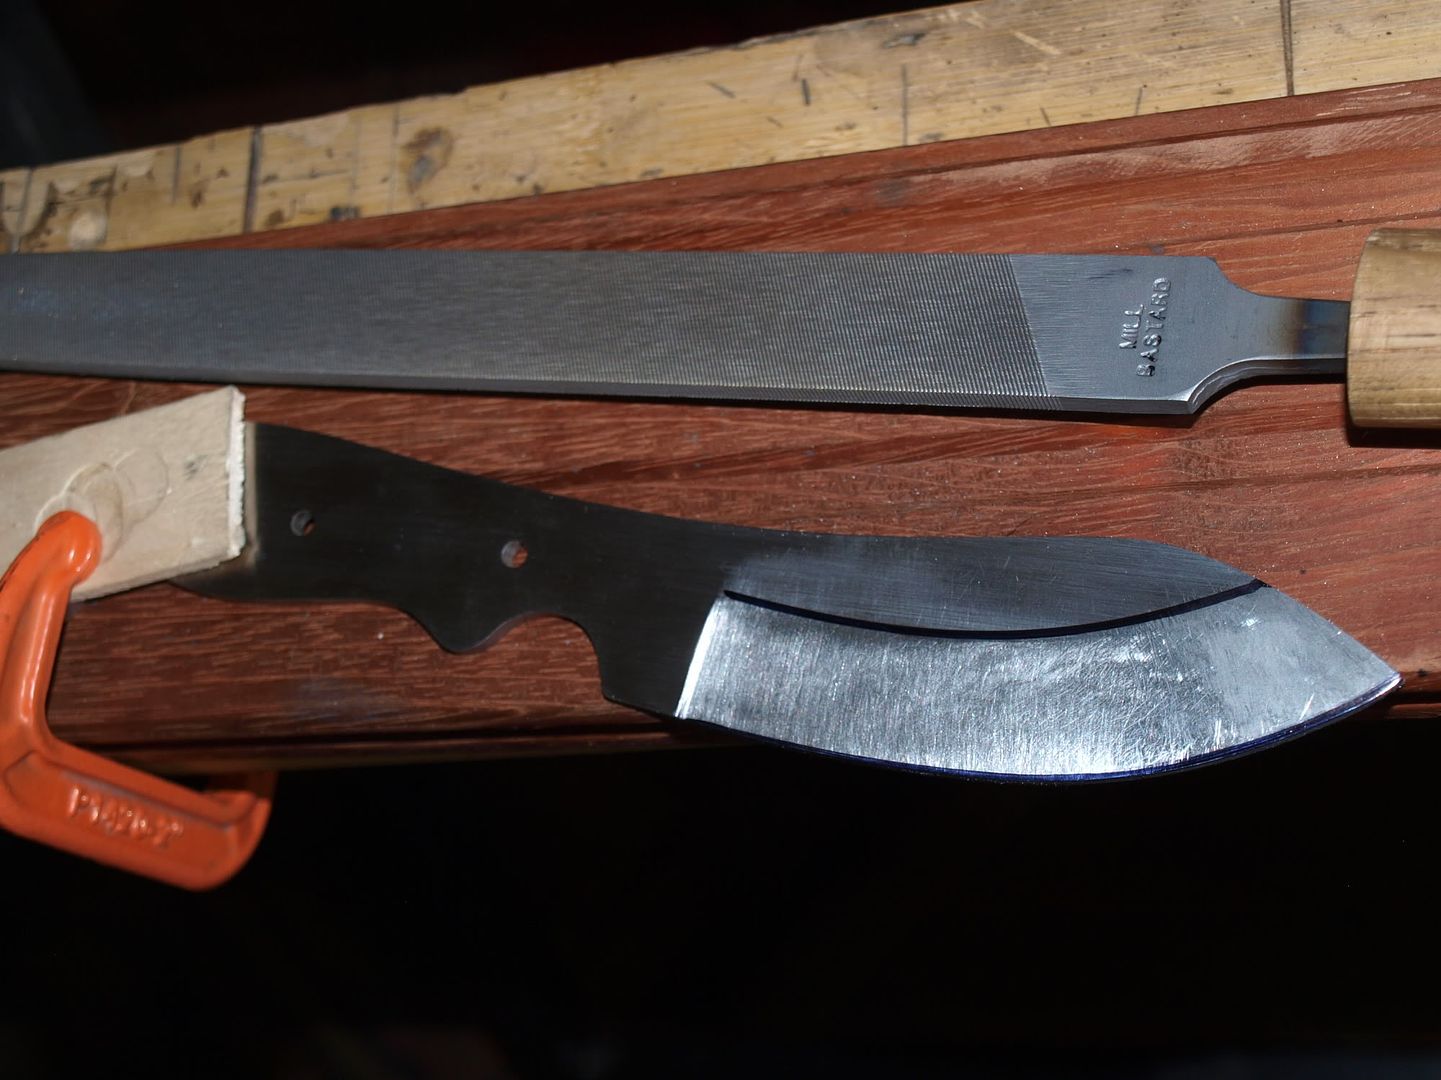
QUOTE (ColoradoProspector @ Jul 14 2012, 02:35 PM) I can see why you'd definately want to start off with something cheaper for the learning curve. Yup, that knife is toast. After being careful peening again.... I broke yet another handle. I'm no rookie to peeing either, the machete peened out well with no problems. So I got to thinkin'... then I put a straight-edge to that knife blank. Slightly crooked, like a snake! It was enough bad tolerance to create this havoc. All I can figure is it happened during the annealing process at the factory. It's 440C heat-treated to 56-58 RC hardness so there's no way I can straighten it. Still... really no big deal. I'm sure you guys know very well how it goes with stuff like that since you are lap doggs and bust projects that you've invested hours into occasionally. It pisses ya off, but ya move on quickly and put it behind. I still learned valuable lessons on this first attempt, and I learned detail file work. Lesson: Don't buy knife blanks from eBay. Buy them at KnifeKits.com. Very reputable and everything ya need. The knife below came with two pre-drilled bolsters and three stainless pins to peen them onto the blade. It cost $26.95. I'm not doing fancy file work this time. I just want to complete a quality knife. This blade is made from AUS8 steel (good stuff). I've attached the bolsters today. So far, success! I peened 3 stainless pins through it, then ground them down and smoothed the bolsters until the pins disappear. It will be buffed after handle installation. You can read the instructions pictured below to know how this is done. 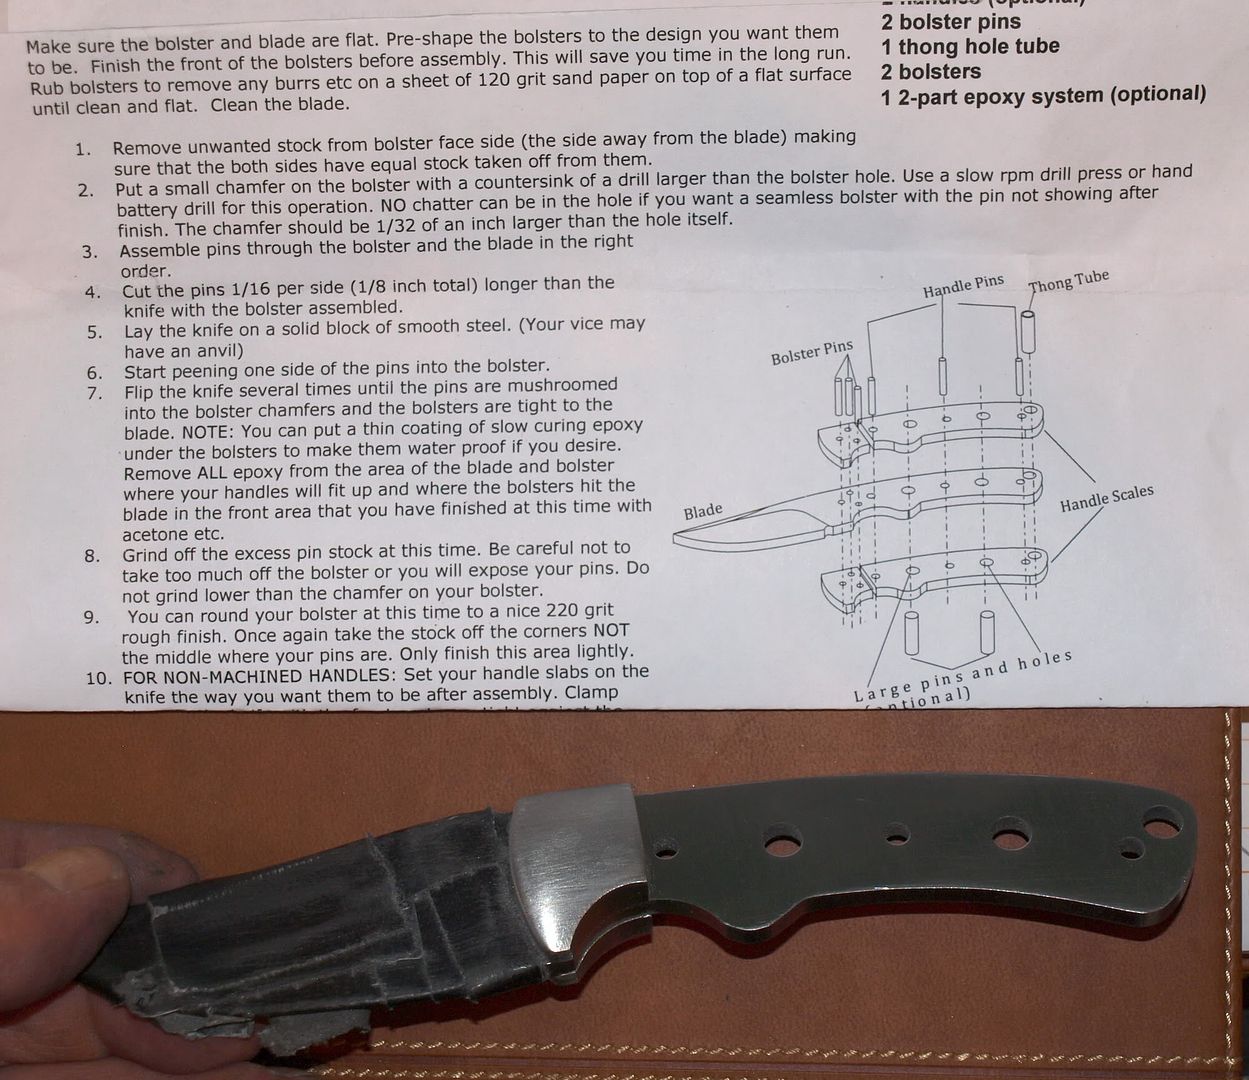 -------------------- /l ,[____], l---L-OlllllllO- ()_) ()_)--o-)_) BLACK SANDS MATTER! Very Happy CP Lifetime Member CP CORE TEAM Referral Code CE213 |
|
|
|
|
Jul 14 2012, 09:04 PM
Post
#44
|
|
|
Moderator Group: Members Posts: 4,459 Joined: 25-August 09 From: way on up thar Member No.: 6,983 |
"Necessity is the mother of invention".
I've rigged my belt sander to work as a vertical stationary sander. I clamped it into my portable table vise and mounted a feeder block perpendicular. Makes life much easier. 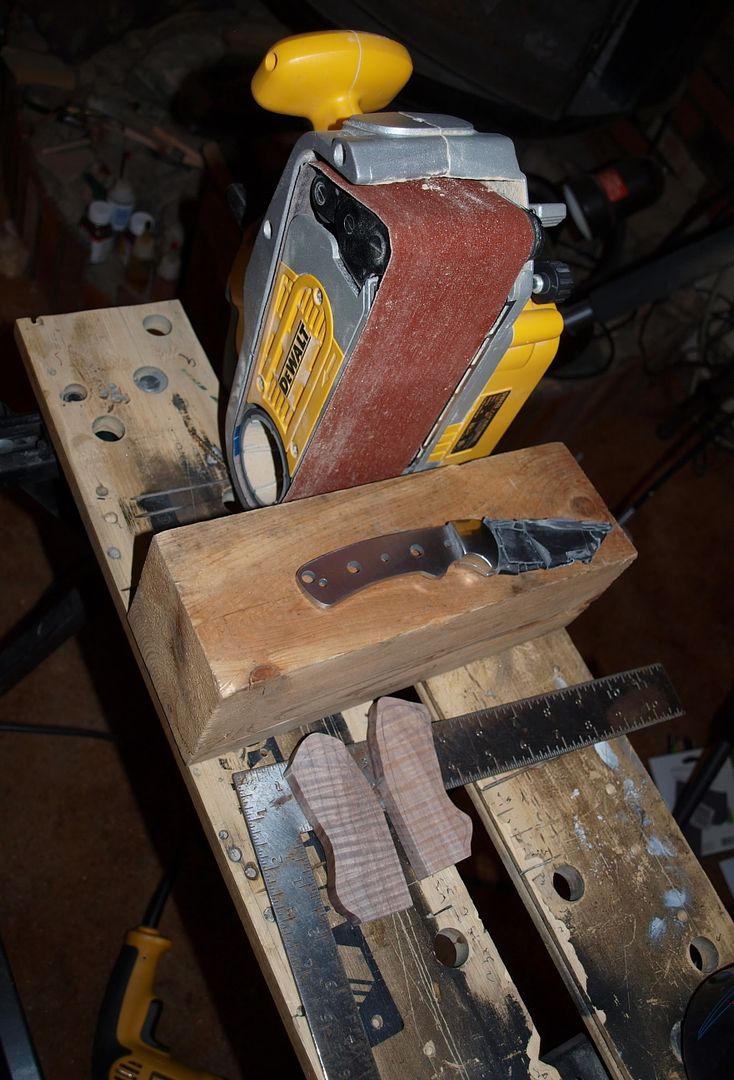
-------------------- /l ,[____], l---L-OlllllllO- ()_) ()_)--o-)_) BLACK SANDS MATTER! Very Happy CP Lifetime Member CP CORE TEAM Referral Code CE213 |
|
|
|
|
Jul 15 2012, 05:48 AM
Post
#45
|
|
|
russau Group: Members Posts: 2,841 Joined: 4-December 03 From: st.louis missouri Member No.: 43 |
this has been a very interesting thread on makeing a knife!
|
|
|
|
|
Jul 16 2012, 01:53 PM
Post
#46
|
|
|
Master Mucker! Group: Admin Posts: 4,149 Joined: 7-October 03 From: Colorado Member No.: 3 |
Doh!! A crooked knife blank would sure do it!
Glad you've got a better blank to use now. We've definately had the same problem with projects in lapidary having poor surfaces that had to be fixed and or accounted for. Like you said though, just gotta move on and keep trying. Looks like the sander mount should help out a bunch too. We'll all be looking forward to the finish on the new knife blank. -------------------- CP-Owner/Administrator
www.ColoradoProspector.com IF YOU USE IT, THE GROUND PRODUCED IT! MINERS MAKE "IT" HAPPEN!! |
|
|
|
|
Jul 16 2012, 05:49 PM
Post
#47
|
|
|
Moderator Group: Members Posts: 4,459 Joined: 25-August 09 From: way on up thar Member No.: 6,983 |
Going well so far...
-------------------- /l ,[____], l---L-OlllllllO- ()_) ()_)--o-)_) BLACK SANDS MATTER! Very Happy CP Lifetime Member CP CORE TEAM Referral Code CE213 |
|
|
|
|
Jul 16 2012, 06:55 PM
Post
#48
|
|
|
Moderator Group: Members Posts: 4,459 Joined: 25-August 09 From: way on up thar Member No.: 6,983 |
I've removed most of the rough from the handle scales with the vertical belt sander that I rigged (pictured earlier).... it worked great for shaping the handle.
Now I'm getting those tricky areas with a rotary barrel sander bit mounted to a drill press. The same could be accomplished with a hand drill or even Dremel... the barrel sander bit was less than $5 at Ace. I'm on a shoestring budget, so just working with the tools I have. I will Dremel and hand-sand to fine finish this area later. 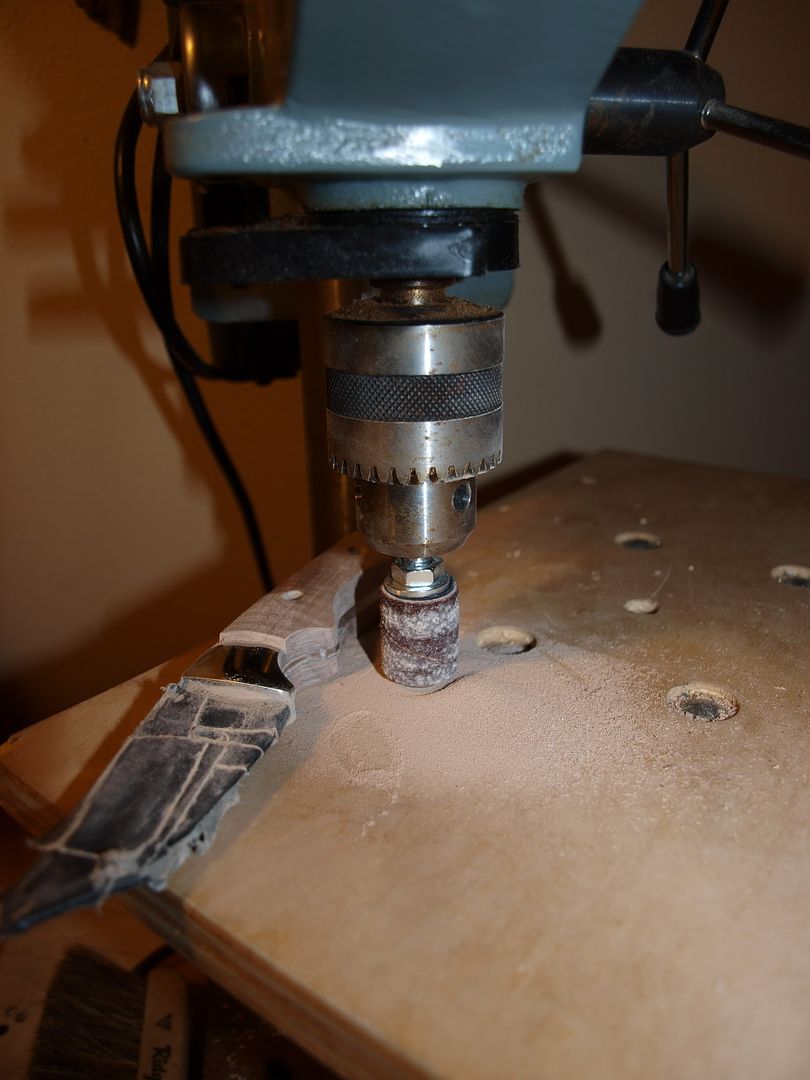
-------------------- /l ,[____], l---L-OlllllllO- ()_) ()_)--o-)_) BLACK SANDS MATTER! Very Happy CP Lifetime Member CP CORE TEAM Referral Code CE213 |
|
|
|
|
Jul 17 2012, 08:36 AM
Post
#49
|
|
|
Moderator Group: Members Posts: 4,459 Joined: 25-August 09 From: way on up thar Member No.: 6,983 |
Back to the belt sander.
I'm currently sanding the bolsters and handle scales flush. Not being shy... using #80 grit. 
-------------------- /l ,[____], l---L-OlllllllO- ()_) ()_)--o-)_) BLACK SANDS MATTER! Very Happy CP Lifetime Member CP CORE TEAM Referral Code CE213 |
|
|
|
|
Jul 17 2012, 10:31 AM
Post
#50
|
|
|
Moderator Group: Members Posts: 4,459 Joined: 25-August 09 From: way on up thar Member No.: 6,983 |
Now smoothing the tricky area near the bolster where it's rounded for a finger grip.
I'm using a Dremel but a word of caution. This tool can muss things up FAST... it can gouge and scar the metal and wood in a heartbeat. I'm taking it very slow and light and using a medium/fine barrel sanding bit. So far, so good. This will be hand-finished later. 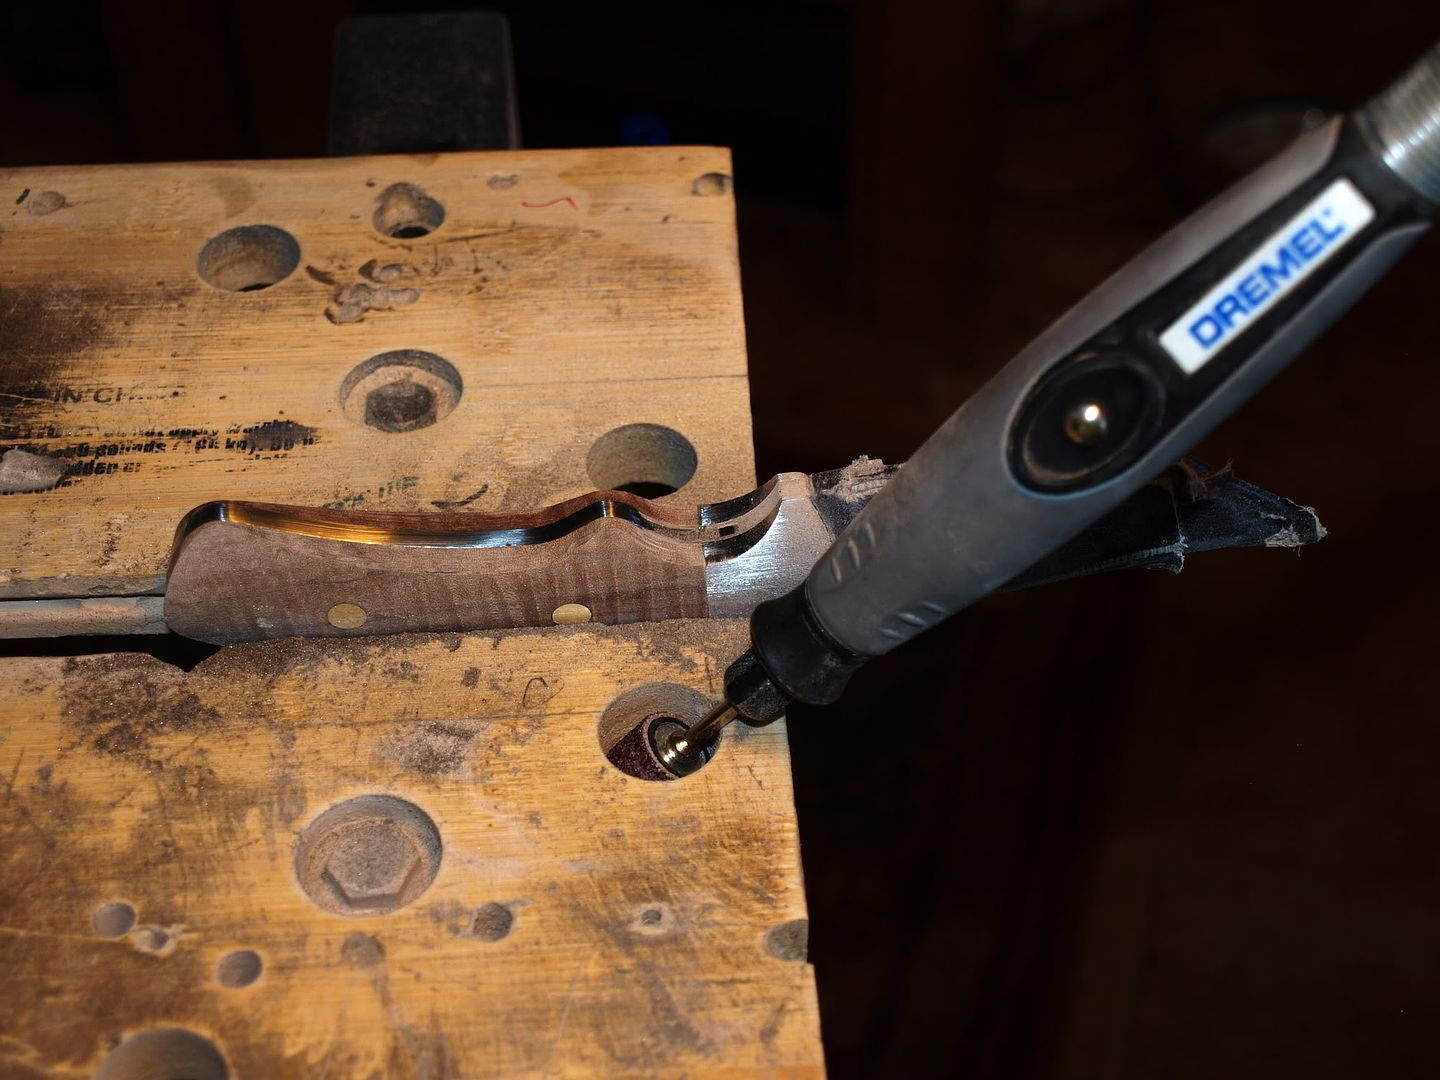 -------------------- /l ,[____], l---L-OlllllllO- ()_) ()_)--o-)_) BLACK SANDS MATTER! Very Happy CP Lifetime Member CP CORE TEAM Referral Code CE213 |
|
|
|
|
Jul 17 2012, 07:25 PM
Post
#51
|
|
|
Moderator Group: Members Posts: 4,459 Joined: 25-August 09 From: way on up thar Member No.: 6,983 |
I'm in the hand-sanding stage now, almost done.
-------------------- /l ,[____], l---L-OlllllllO- ()_) ()_)--o-)_) BLACK SANDS MATTER! Very Happy CP Lifetime Member CP CORE TEAM Referral Code CE213 |
|
|
|
|
Jul 19 2012, 08:16 AM
Post
#52
|
|
|
Moderator Group: Members Posts: 4,459 Joined: 25-August 09 From: way on up thar Member No.: 6,983 |
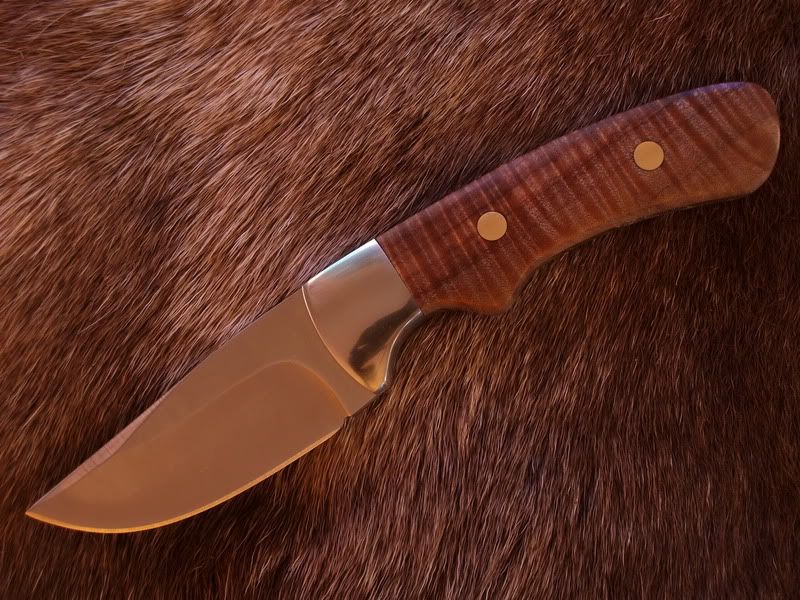
Finished!
-------------------- /l ,[____], l---L-OlllllllO- ()_) ()_)--o-)_) BLACK SANDS MATTER! Very Happy CP Lifetime Member CP CORE TEAM Referral Code CE213 |
|
|
|
|
Jul 20 2012, 07:57 AM
Post
#53
|
|
 Master Mucker! Group: Members Posts: 1,301 Joined: 17-February 12 From: Central CO Member No.: 41,357 |
Beautiful! Top notch work!
Caveman -------------------- Caveman
Aulus Livius Maximus World Traveler, 7 Continent Walker LEVEL 3 LIFETIME MEMBER Referral Code: SE2104 |
|
|
|
|
Jul 20 2012, 11:40 AM
Post
#54
|
|
|
russau Group: Members Posts: 2,841 Joined: 4-December 03 From: st.louis missouri Member No.: 43 |
very well done!
|
|
|
|
|
Jul 20 2012, 04:41 PM
Post
#55
|
|
|
Master Mucker! Group: Admin Posts: 7,208 Joined: 7-October 03 From: Colorado Member No.: 4 |
That turned out fantastic Chris, your efforts definately paid off!!
 That's one sweet looking knife!! That's one sweet looking knife!!
-------------------- Education is the key to the future,
and participation opens the door to opportunity. Discover your prospecting independence & success! ColoradoProspector.com Owner/Webmaster Core team member ♥ |
|
|
|
|
Jul 22 2012, 07:10 AM
Post
#56
|
|
|
Moderator Group: Members Posts: 4,459 Joined: 25-August 09 From: way on up thar Member No.: 6,983 |
Thanks! I would encourage anyone who's interested to try it. Not expensive and really fun to do. I'll never have to buy a factory made knife again and that makes me happy. Tomorrow I'm ordering parts to make my first folding knife for a friend. It's a "kit" knife but degree of diff is level II - IV so it will be a challenge. The kits are made to be customized by the builder so I will be using unique handle material and possibly do some detail file work. I will update this thread when I get going on it.
-------------------- /l ,[____], l---L-OlllllllO- ()_) ()_)--o-)_) BLACK SANDS MATTER! Very Happy CP Lifetime Member CP CORE TEAM Referral Code CE213 |
|
|
|
|
Jul 24 2012, 08:12 AM
Post
#57
|
|
|
Master Mucker! Group: Admin Posts: 7,208 Joined: 7-October 03 From: Colorado Member No.: 4 |
Looking forward to seeing the next project Chris! You do amazing work!!
When your ready to try a handle with stone, let us know.......We have a killed dino bone slab that would be perfect for one. It is a very detailed grey slab with colored spots like red and yellow. I have only used it for a picture background for smaller stones or jewelry pieces. I think you could make better use of it. I can give you details on size in a pm if your interested. -------------------- Education is the key to the future,
and participation opens the door to opportunity. Discover your prospecting independence & success! ColoradoProspector.com Owner/Webmaster Core team member ♥ |
|
|
|
|
Jul 24 2012, 09:03 AM
Post
#58
|
|
|
Moderator Group: Members Posts: 4,459 Joined: 25-August 09 From: way on up thar Member No.: 6,983 |
WOW... I would love that!
I still need to " hone" my skills more to be able to incorporate it into a build but am confident that I'll be able to work with it. What are the dimensions and thickness of the slab? I like the idea! -------------------- /l ,[____], l---L-OlllllllO- ()_) ()_)--o-)_) BLACK SANDS MATTER! Very Happy CP Lifetime Member CP CORE TEAM Referral Code CE213 |
|
|
|
|
Jul 24 2012, 04:38 PM
Post
#59
|
|
|
Master Mucker! Group: Admin Posts: 7,208 Joined: 7-October 03 From: Colorado Member No.: 4 |
 I forgot that I posted a picture of it in the "Show Us Your Paperweight" thread that you started. I forgot that I posted a picture of it in the "Show Us Your Paperweight" thread that you started. It measures approx. 4 1/2" x 2 1/2" x 6mm. Just let us know when you're ready for it. 
-------------------- Education is the key to the future,
and participation opens the door to opportunity. Discover your prospecting independence & success! ColoradoProspector.com Owner/Webmaster Core team member ♥ |
|
|
|
|
Jul 25 2012, 05:41 PM
Post
#60
|
|
|
Rock Bar! Group: Members Posts: 411 Joined: 20-February 07 From: Richland Mississippi Member No.: 994 |
Yes Swizz you are doing a really great job on the knives.
Stone inlayed handles would be killer. Denise's offer of dino is a great idea. Ol Gat did one with dino too. That one turned out beautiful too. I'm sure that you have seen it in another thread here.
|
|
|
|
|
Jul 27 2012, 07:15 PM
Post
#61
|
|
|
Moderator Group: Members Posts: 4,459 Joined: 25-August 09 From: way on up thar Member No.: 6,983 |
I've been without the pc for a week, good to be back and thought I'd do a quick update. Now running Windows 7 Ultimate (instead of Vista), added a 1 Terabyte Hard Drive, and a new graphics card. All sooped-up and ready to rock!!
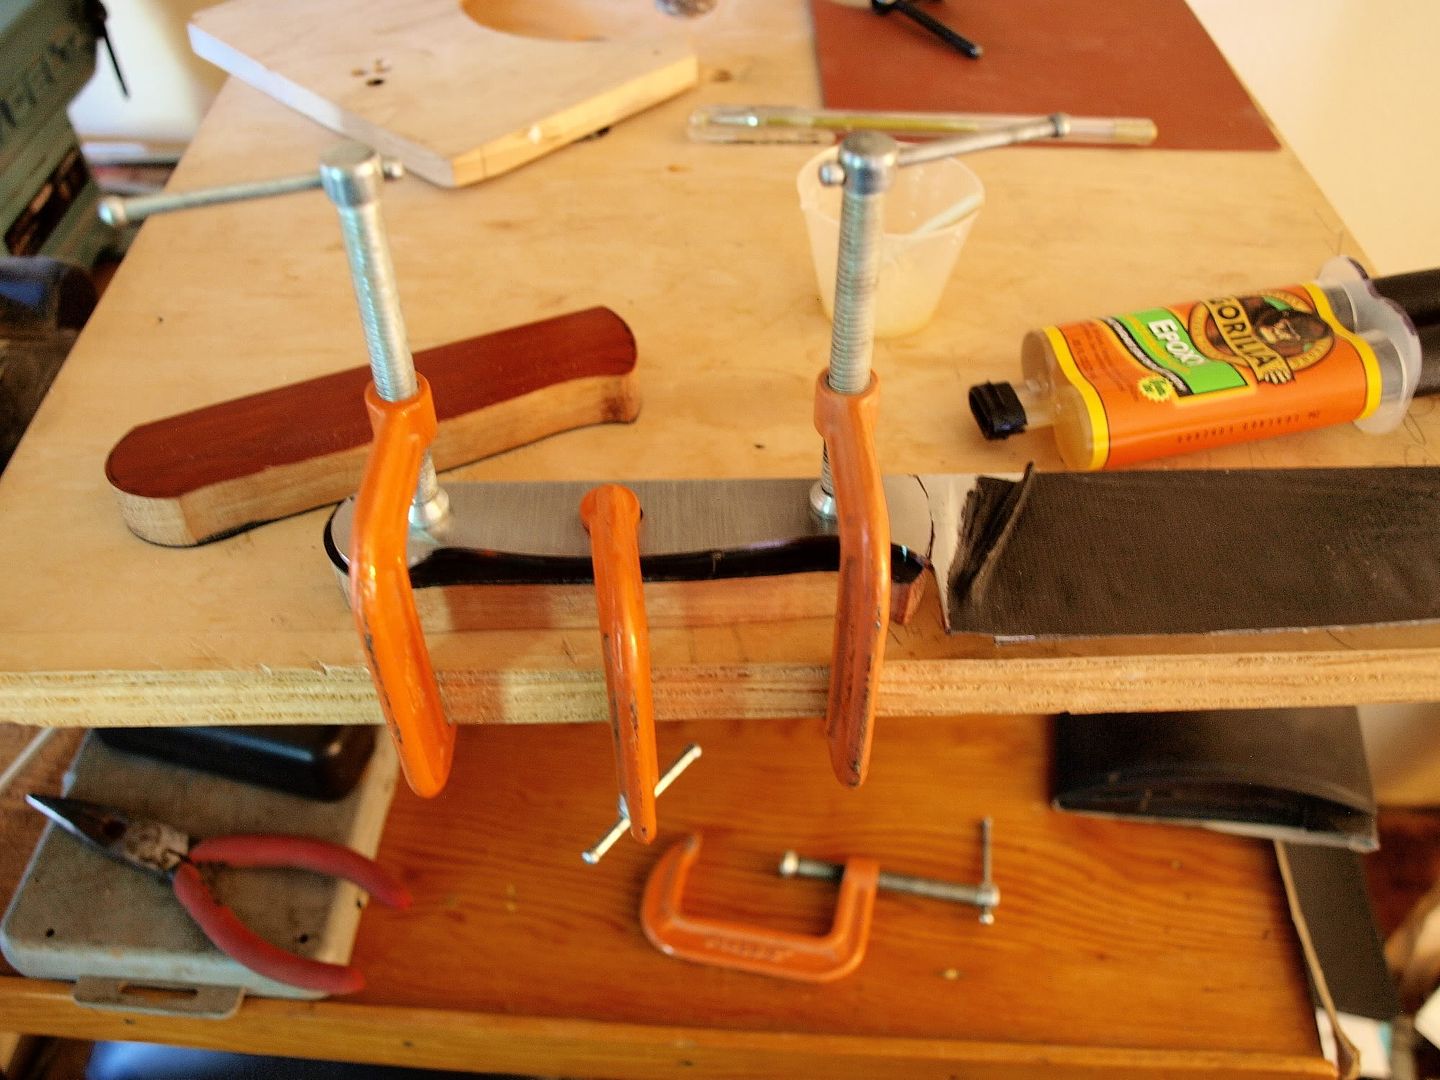
Jim and D... thanks! That dino piece is large enough to do some cool inlays I think. I'll have to search out Gat's thread with the knife he made. Meanwhile back at the knife bench. While waiting for my folding knife parts I went back to working on that first build that I was having trouble with. I've managed to resolve the problems and am back on track with that one again. The main problem was a very slightly bent knife blank (near the handle tang). It was very hard to straighten since it is 1/8" thick heat-treated 440C. With my mallet and makeshift anvil... I made due and brought her back to true. Since then I have installed another set of sugar-maple handle scales (kiln dried) from my scrap pile. This time everything went well. All I have left is to fill the detail file-work on the top of the handle tang (vine pattern pictured waaay earlier). Then it's on to shaping, sanding, sanding, sanding, sanding, sealer, stain, oil finish, and wax buffing.  In this picture I have poured my epoxy mixture into the voids of my vine pattern. Once it fully cures... it is sanded flush to reveal the pattern. Here's where you can learn from a minor mistake of mine. I recommend using masking tape on the wood scales. This sanded down fine after curing but would have been easier if I'd have done that. There are numerous epoxies out there that can be used in knife-making for inlays. Many use a popular golf club shaft epoxy which is pre-tinted black, I haven't tried that. I am using a clear epoxy here which I've colored black with a proprietary pigment paste. I mix the pigment into the resin prior to adding the hardener. This is a slow-cure which will produce an excellent durable inlay material, but it's self-leveling and a pain to work with if not careful. I'll be sanding everything down to #1600 grit prior to buffing and I believe this epoxy will take a nice shine.... we shall see. 
-------------------- /l ,[____], l---L-OlllllllO- ()_) ()_)--o-)_) BLACK SANDS MATTER! Very Happy CP Lifetime Member CP CORE TEAM Referral Code CE213 |
|
|
|
|
Jul 27 2012, 07:33 PM
Post
#62
|
|
|
Moderator Group: Members Posts: 4,459 Joined: 25-August 09 From: way on up thar Member No.: 6,983 |
This pic is a better example of what I'm trying to accomplish.
I've sanded it flush beginning to reveal the vine pattern. You can see I've taped the scales this time and added more filler to areas which had voids. I've also done some handle shaping. 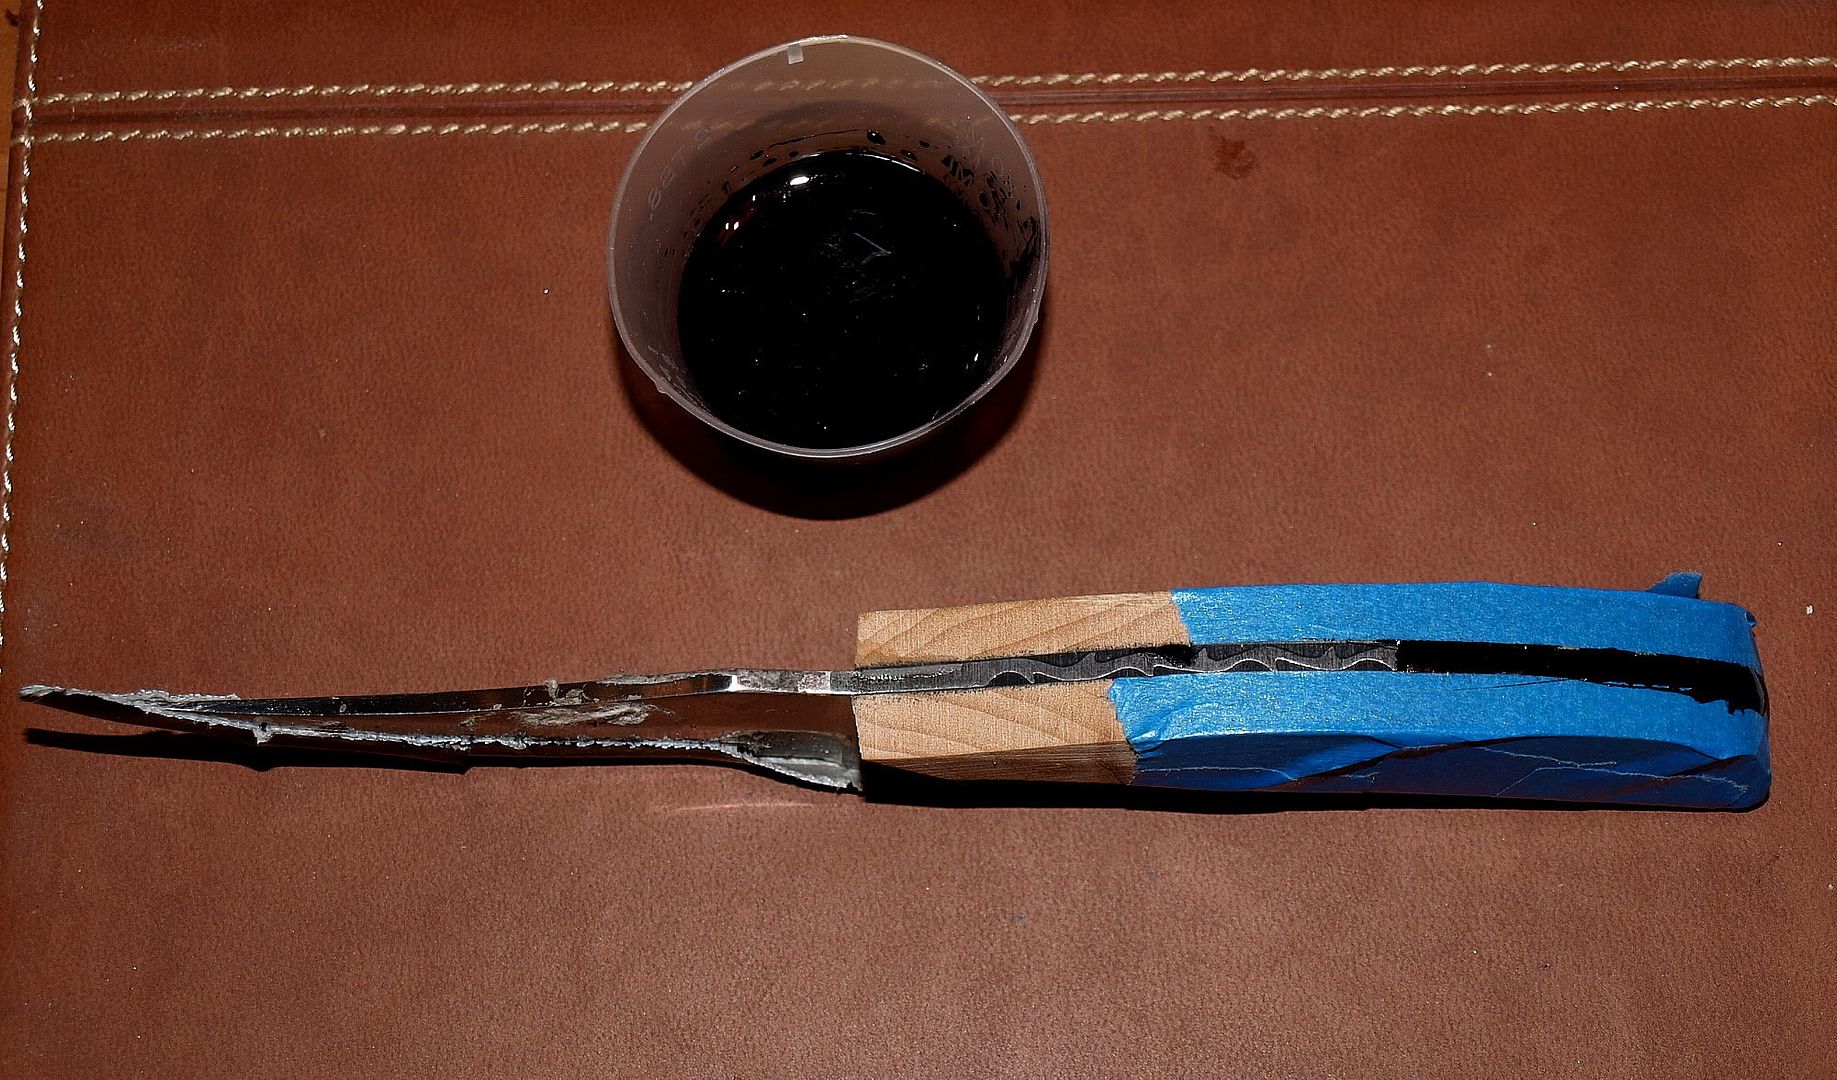
-------------------- /l ,[____], l---L-OlllllllO- ()_) ()_)--o-)_) BLACK SANDS MATTER! Very Happy CP Lifetime Member CP CORE TEAM Referral Code CE213 |
|
|
|
|
Jul 28 2012, 12:07 PM
Post
#63
|
|
|
Moderator Group: Members Posts: 4,459 Joined: 25-August 09 From: way on up thar Member No.: 6,983 |
While that's curing.... the parts for my folding knife have come in and I've begun to work on that. I'm planning on doing a Cocobolo wood handle for this one.
-------------------- /l ,[____], l---L-OlllllllO- ()_) ()_)--o-)_) BLACK SANDS MATTER! Very Happy CP Lifetime Member CP CORE TEAM Referral Code CE213 |
|
|
|
|
Jul 28 2012, 01:58 PM
Post
#64
|
|
|
Moderator Group: Members Posts: 4,459 Joined: 25-August 09 From: way on up thar Member No.: 6,983 |
So far it's coming together nicely.
 oops.... 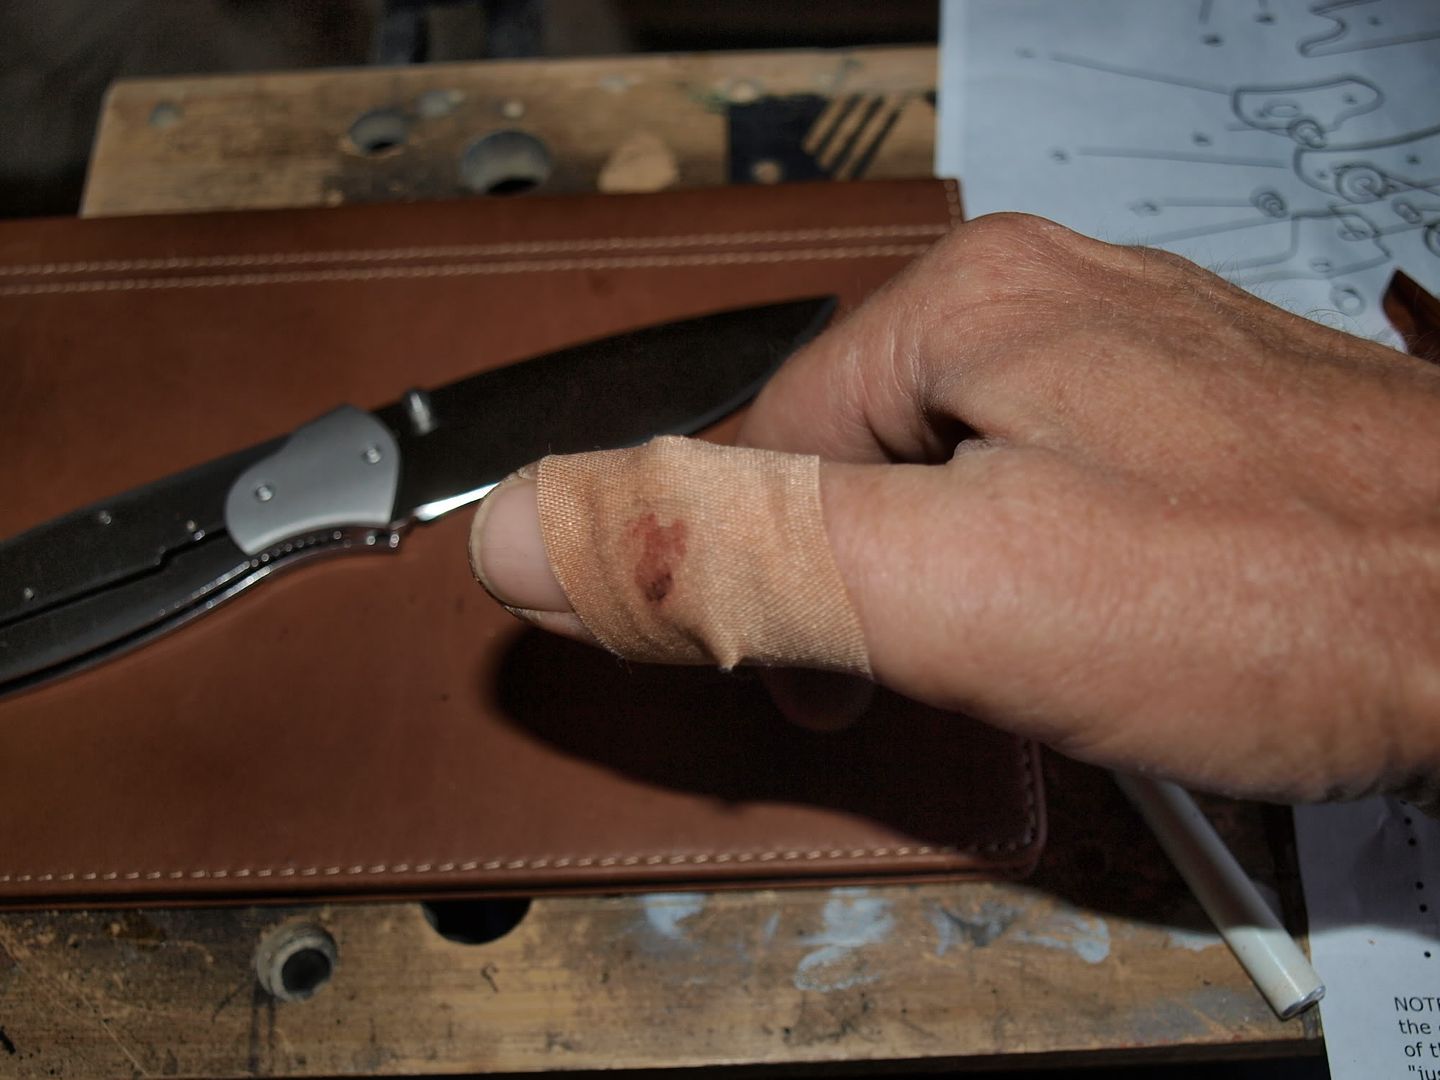
-------------------- /l ,[____], l---L-OlllllllO- ()_) ()_)--o-)_) BLACK SANDS MATTER! Very Happy CP Lifetime Member CP CORE TEAM Referral Code CE213 |
|
|
|
|
Jul 28 2012, 02:08 PM
Post
#65
|
|
|
Master Mucker! Group: Admin Posts: 7,208 Joined: 7-October 03 From: Colorado Member No.: 4 |
 Sharpness test..........check! Sharpness test..........check!
-------------------- Education is the key to the future,
and participation opens the door to opportunity. Discover your prospecting independence & success! ColoradoProspector.com Owner/Webmaster Core team member ♥ |
|
|
|
|
Jul 28 2012, 02:30 PM
Post
#66
|
|
|
Moderator Group: Members Posts: 4,459 Joined: 25-August 09 From: way on up thar Member No.: 6,983 |
I've disassembled the bolsters and am sanding them. I would like to get these to a mirror finish.
-------------------- /l ,[____], l---L-OlllllllO- ()_) ()_)--o-)_) BLACK SANDS MATTER! Very Happy CP Lifetime Member CP CORE TEAM Referral Code CE213 |
|
|
|
|
Jul 29 2012, 11:55 AM
Post
#67
|
|
|
Master Mucker! Group: Admin Posts: 4,149 Joined: 7-October 03 From: Colorado Member No.: 3 |
Oops?!
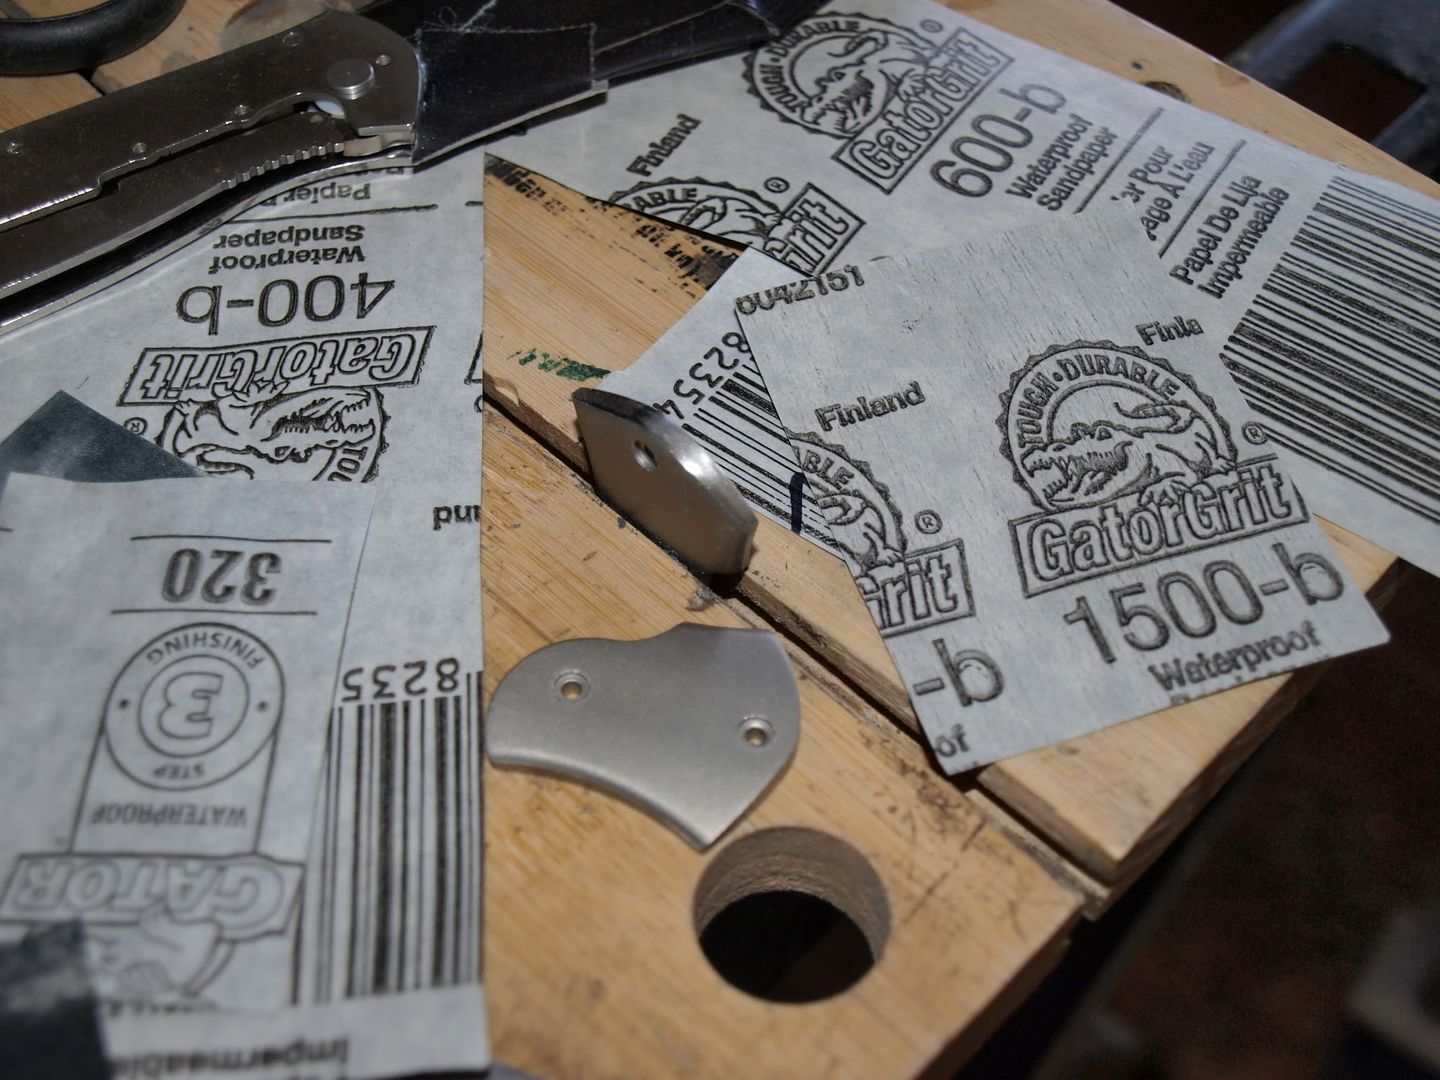
Looks like a definate OUCH! Glad the bent blank could be trued out and still used. The folding knife looks like it will be a fun project too....well, I'd actually suggest less blade testing during though.  You can definately hit a mirror like finish I bet. Once you've sanded out to 1500 grit pictured, then go to the finer/finest wet dry paper you can find. (2200 should be available) Then you can actually use polish medium just like stone work uses.....red rouge, titanium oxide etc with a wet leather pad for a real nice polish. That will be a nice touch to the finish. Looking forward to seeing them progress, especially the rework to re-expose the vine pattern on the original project.  -------------------- CP-Owner/Administrator
www.ColoradoProspector.com IF YOU USE IT, THE GROUND PRODUCED IT! MINERS MAKE "IT" HAPPEN!! |
|
|
|
|
Jul 29 2012, 03:23 PM
Post
#68
|
|
|
Moderator Group: Members Posts: 4,459 Joined: 25-August 09 From: way on up thar Member No.: 6,983 |
QUOTE (ColoradoProspector @ Jul 29 2012, 11:55 AM) Oops?! Looks like a definate OUCH! nah.... it's just a flesh wound  -------------------- /l ,[____], l---L-OlllllllO- ()_) ()_)--o-)_) BLACK SANDS MATTER! Very Happy CP Lifetime Member CP CORE TEAM Referral Code CE213 |
|
|
|
|
Aug 2 2012, 07:02 AM
Post
#69
|
|
|
Master Mucker! Group: Admin Posts: 7,208 Joined: 7-October 03 From: Colorado Member No.: 4 |
 Haha, classic!!....Monty Python Haha, classic!!....Monty Python
-------------------- Education is the key to the future,
and participation opens the door to opportunity. Discover your prospecting independence & success! ColoradoProspector.com Owner/Webmaster Core team member ♥ |
|
|
|
|
Aug 2 2012, 08:35 AM
Post
#70
|
|
|
Rock Bar! Group: Members Posts: 411 Joined: 20-February 07 From: Richland Mississippi Member No.: 994 |
Good one Swizz! LMAO!!
|
|
|
|
|
Aug 2 2012, 12:41 PM
Post
#71
|
|
|
Moderator Group: Members Posts: 4,459 Joined: 25-August 09 From: way on up thar Member No.: 6,983 |
Ok.... I have finished the knife that I had problems with earlier. This is the one that I did the custom file work on.
I'm still working on the folding knife and should have that one wrapped up tonight. My next build after that will be a nice Chef's knife (which I need). I'm going to be making that from a blank as well, so it should be really easy. I also ordered some bar-stock metal... so after that I will attempt to design and make my own blade from scratch. That'll be a new learning process I'm looking forward to. 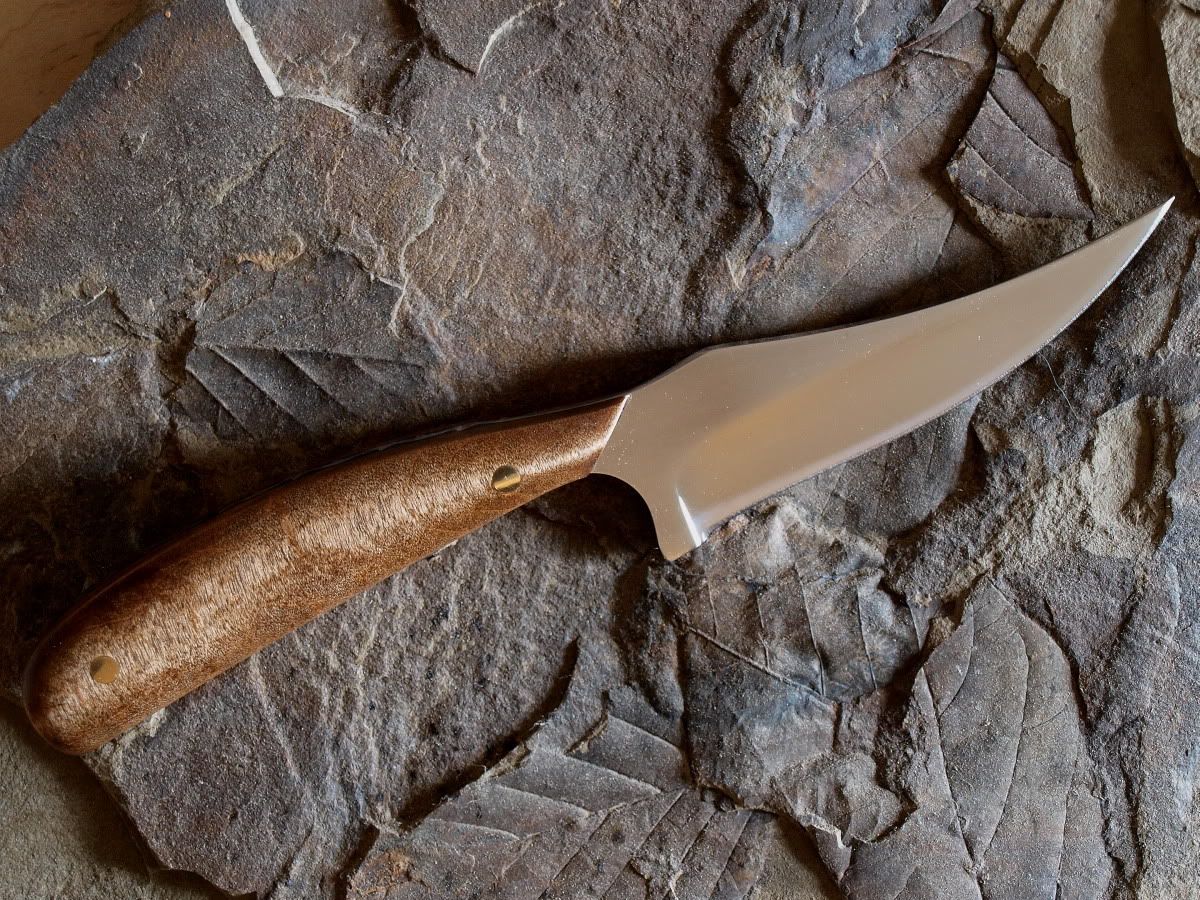 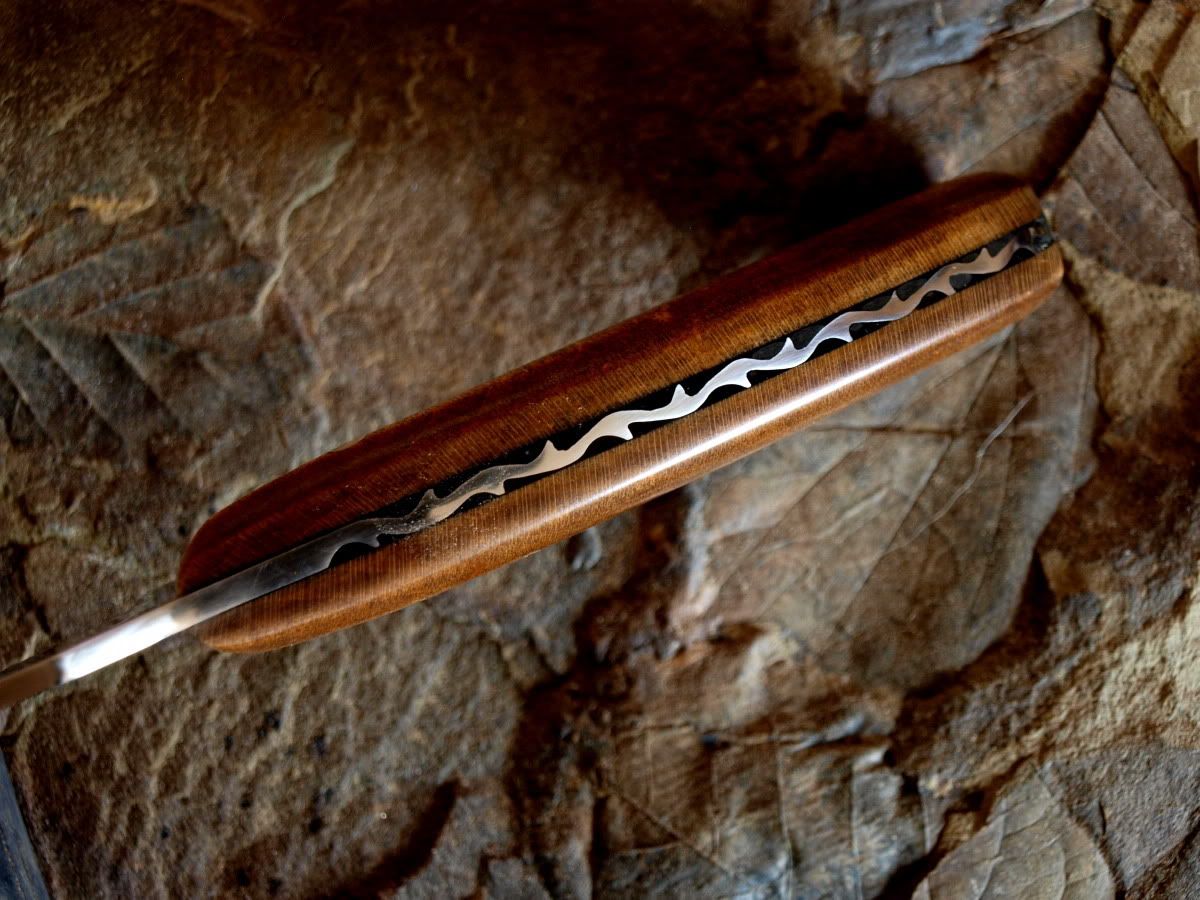
-------------------- /l ,[____], l---L-OlllllllO- ()_) ()_)--o-)_) BLACK SANDS MATTER! Very Happy CP Lifetime Member CP CORE TEAM Referral Code CE213 |
|
|
|
|
Aug 3 2012, 05:24 AM
Post
#72
|
|
|
russau Group: Members Posts: 2,841 Joined: 4-December 03 From: st.louis missouri Member No.: 43 |
IMPRESSIVE!
|
|
|
|
|
Aug 3 2012, 06:24 AM
Post
#73
|
|
|
Rock Bar! Group: Members Posts: 411 Joined: 20-February 07 From: Richland Mississippi Member No.: 994 |
Wow Chris that's quite beautiful.
Uhh my birthday is Monday...hint hint.
|
|
|
|
|
Aug 3 2012, 07:54 AM
Post
#74
|
|
|
Master Mucker! Group: Admin Posts: 7,208 Joined: 7-October 03 From: Colorado Member No.: 4 |
That turned out incredible, you do amazing work. The custom file work looks fantastic! You hit another one right out of the ballpark Chris! BTW....Pretty sweet looking fossil leaves specimen it is sitting on also! 
-------------------- Education is the key to the future,
and participation opens the door to opportunity. Discover your prospecting independence & success! ColoradoProspector.com Owner/Webmaster Core team member ♥ |
|
|
|
|
Aug 3 2012, 08:49 PM
Post
#75
|
|
|
Moderator Group: Members Posts: 4,459 Joined: 25-August 09 From: way on up thar Member No.: 6,983 |
Thanks for the kind words you guys.
 The level of building that I've been doing is not terribly difficult to learn or do and I would encourage anyone who's interested to try it. It's also rewarding because you can use, sell, or barter the end product. It's just fun to create stuff. Even with minimal hand tools and a shoestring budget, this can be done by you. I received my (full tang) Chef's knife blank and I'll crank out a handle for it and be done fast. After that I'm kicking it up a notch by making my own blade blank from annealed bar stock (ATS34 steel) then getting it professionally heat treated. That will be my next step to creating original crafted blade designs that I can put my name on. QUOTE (Mrs.CP @ Aug 3 2012, 07:54 AM) BTW....Pretty sweet looking fossil leaves specimen it is sitting on also! hehe... I thought you might like that old fossil plate. I was looking around here for a good background and settled on that one. -------------------- /l ,[____], l---L-OlllllllO- ()_) ()_)--o-)_) BLACK SANDS MATTER! Very Happy CP Lifetime Member CP CORE TEAM Referral Code CE213 |
|
|
|
|
Aug 4 2012, 09:31 AM
Post
#76
|
|
|
Moderator Group: Members Posts: 4,459 Joined: 25-August 09 From: way on up thar Member No.: 6,983 |
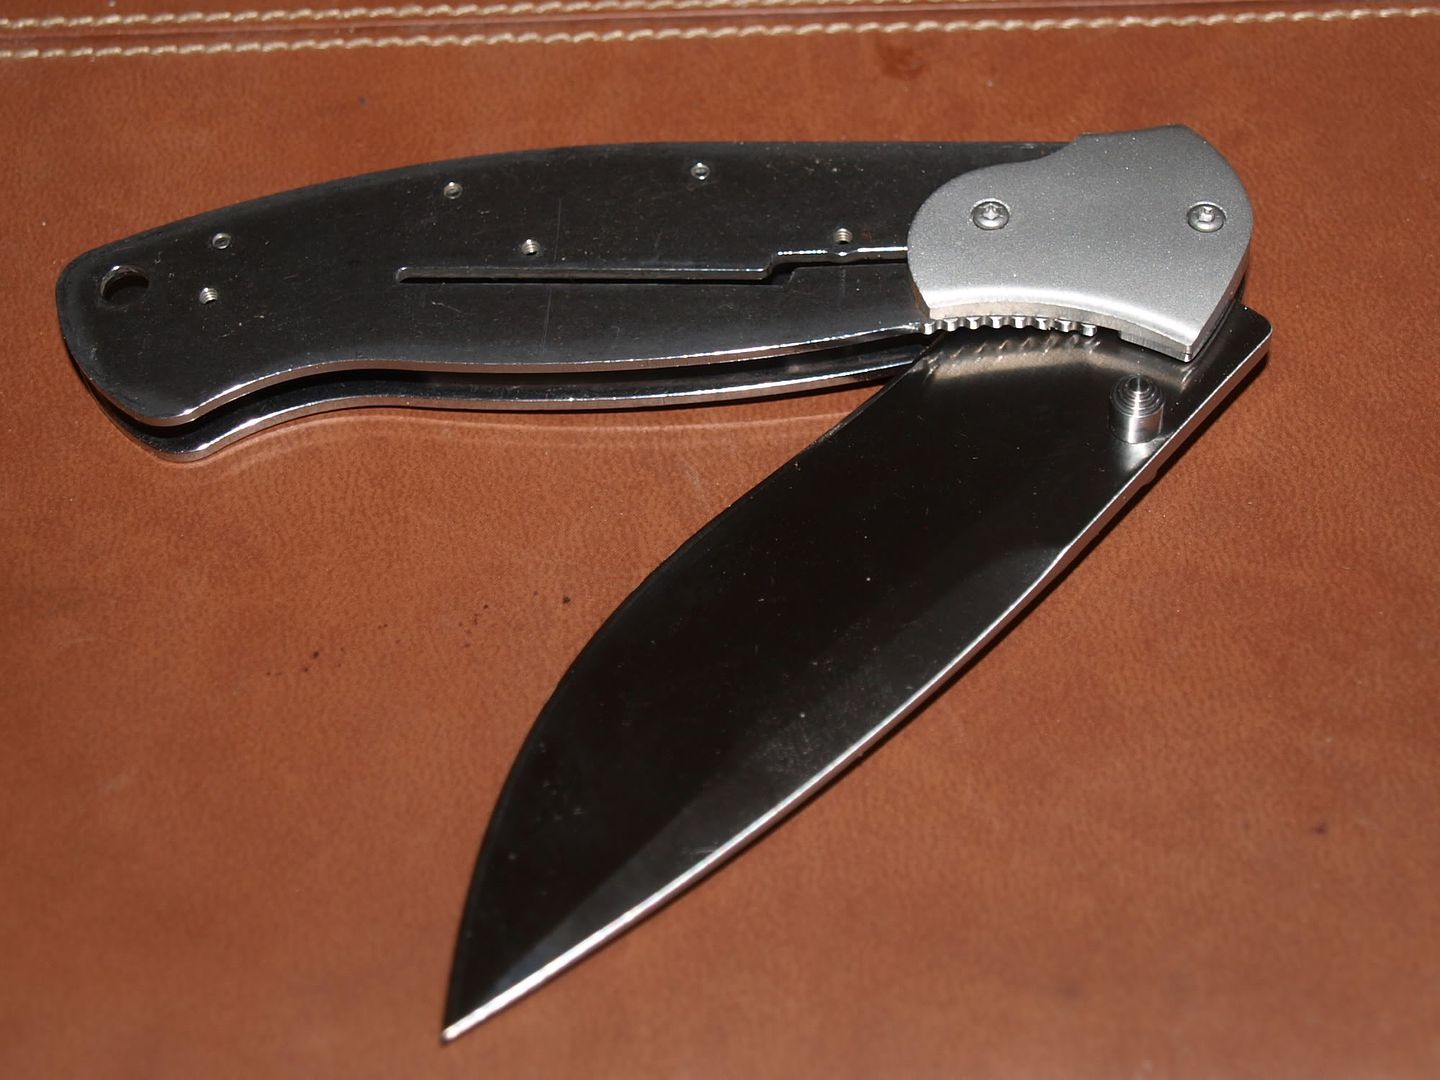
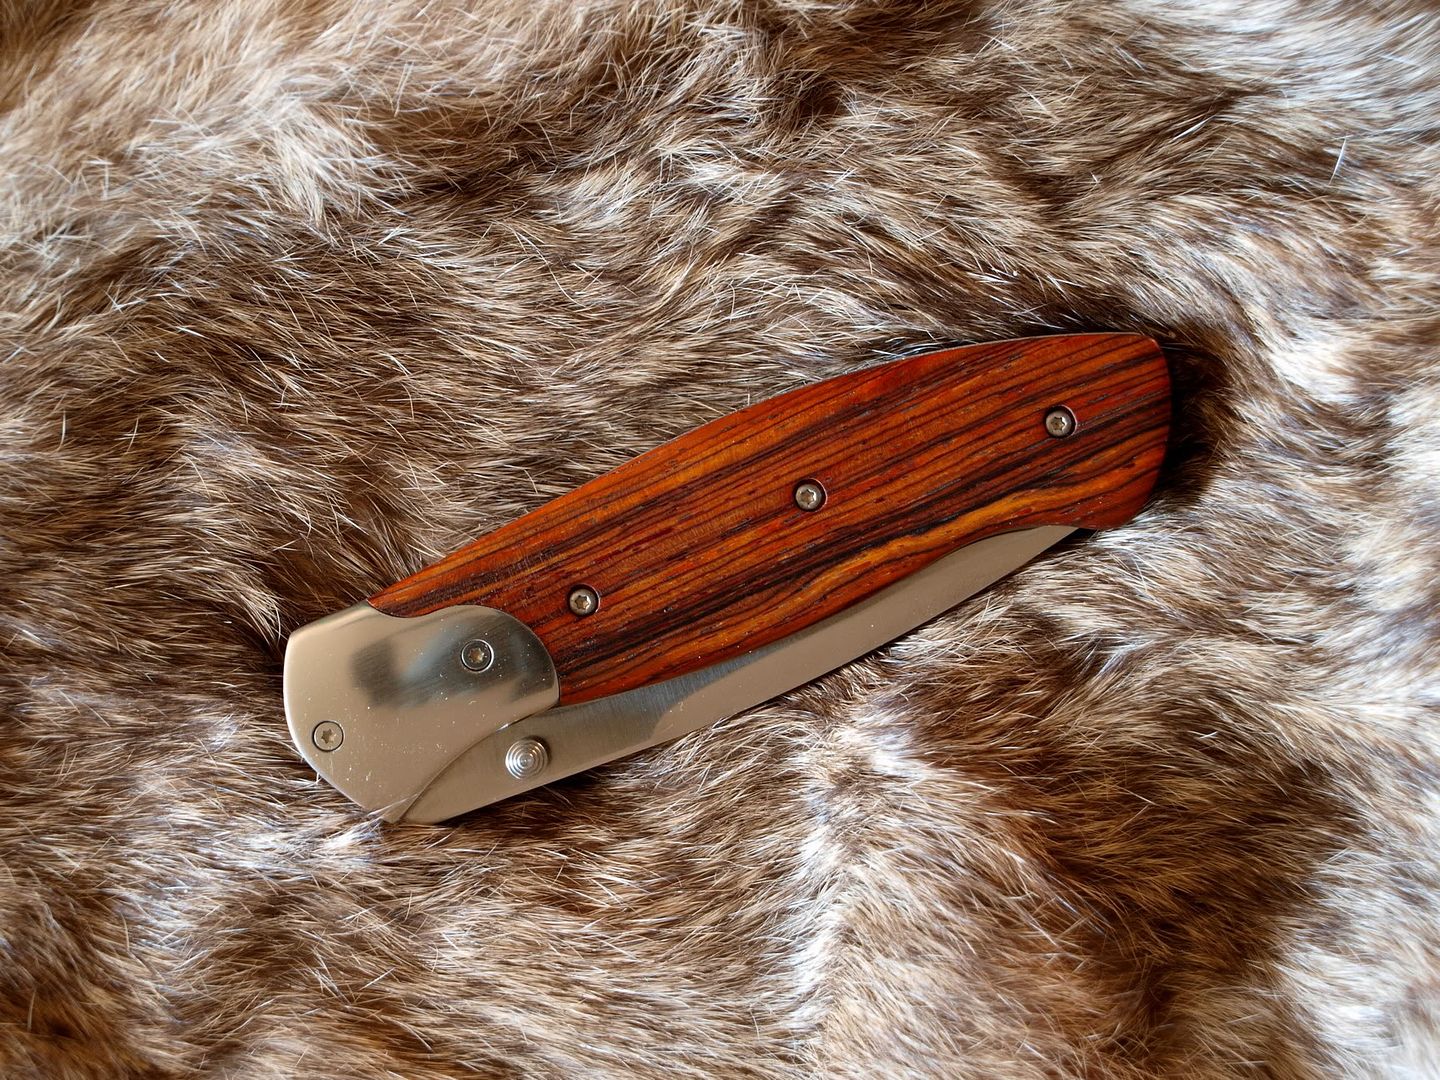
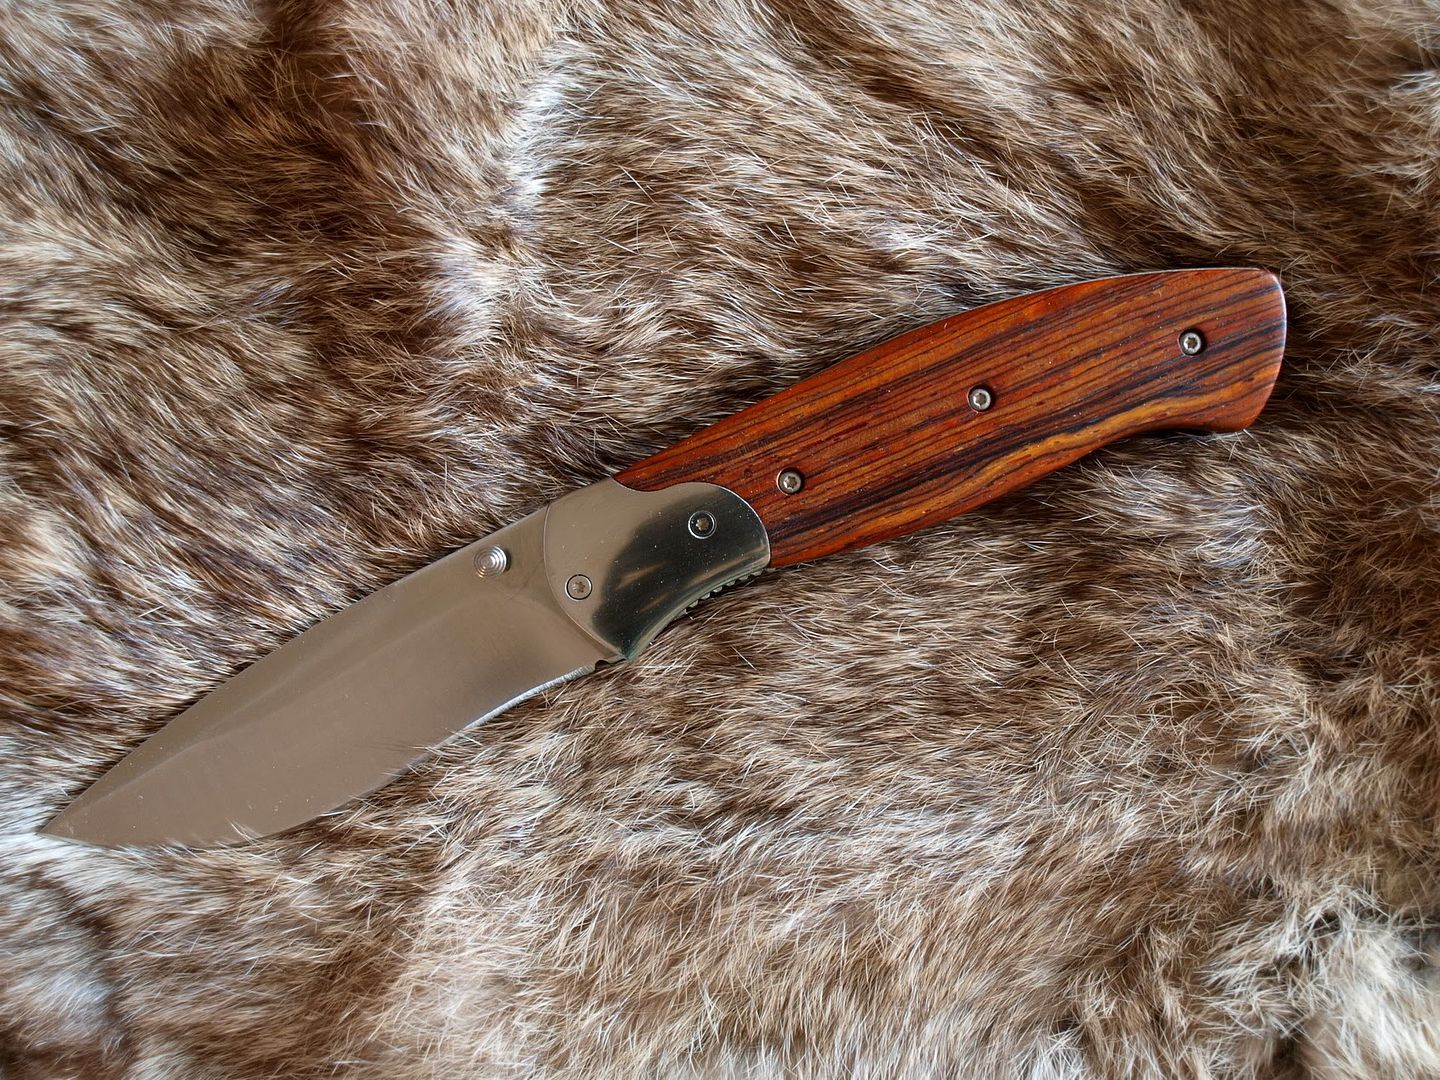
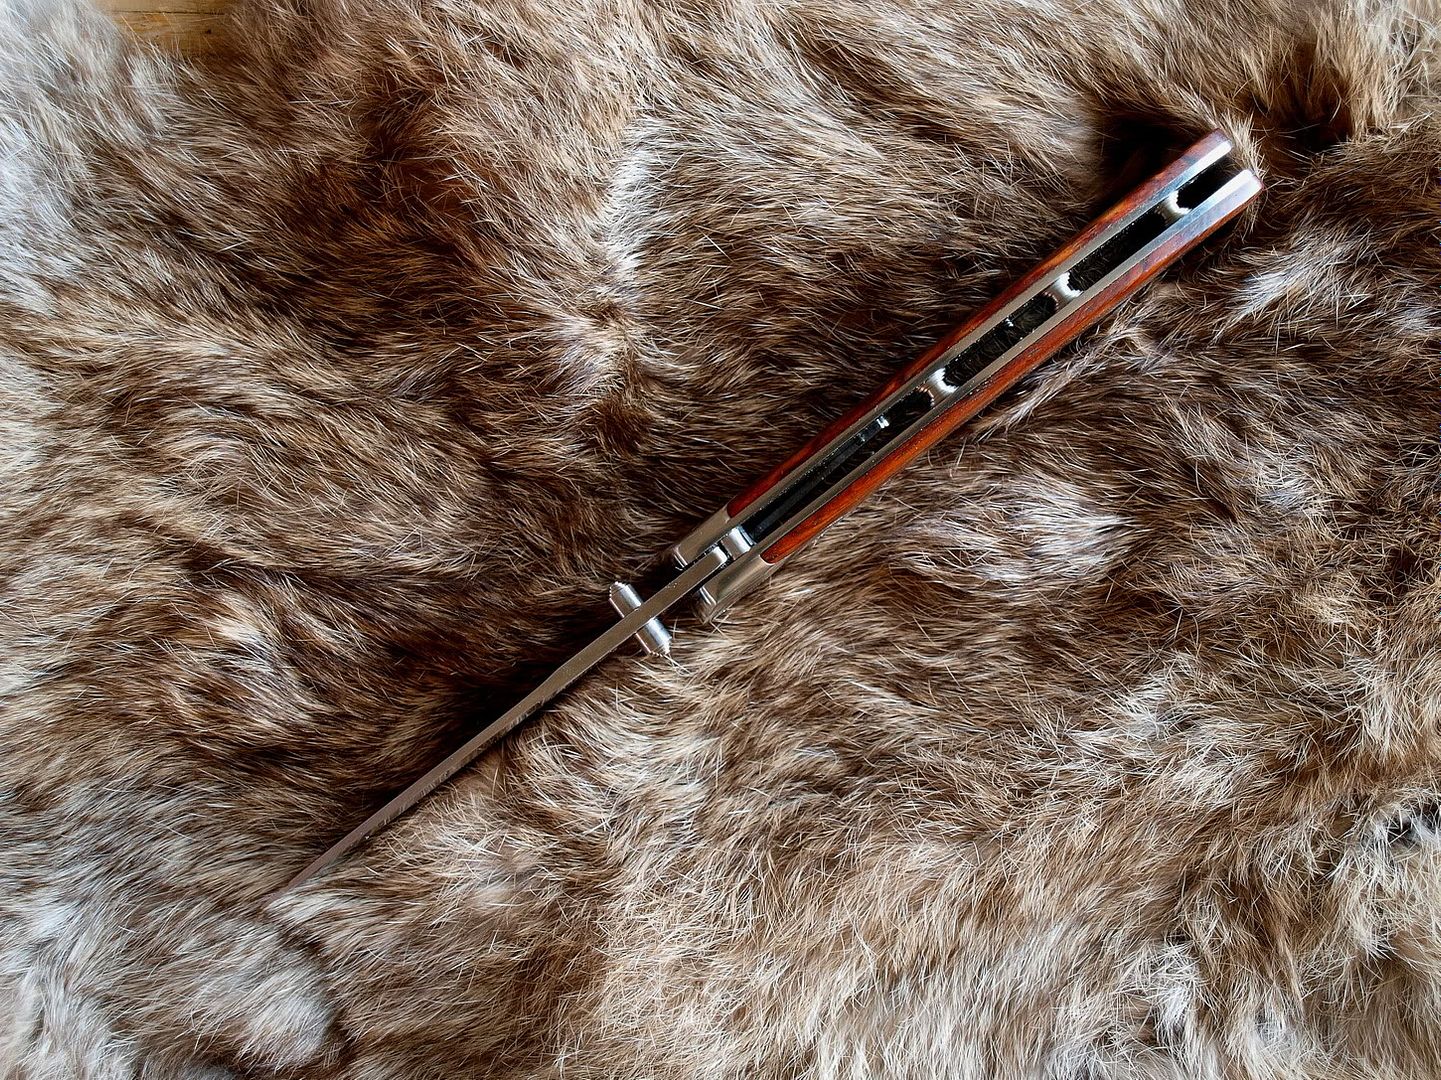
Here is the liner-lock folding knife I just completed. It was a very good learning experience. The blade is almost 4" long so it's a biggun. Steel is AUS8 and I used Cocoblo for the handle.
-------------------- /l ,[____], l---L-OlllllllO- ()_) ()_)--o-)_) BLACK SANDS MATTER! Very Happy CP Lifetime Member CP CORE TEAM Referral Code CE213 |
|
|
|
|
Aug 4 2012, 10:34 AM
Post
#77
|
|
|
Moderator Group: Members Posts: 4,459 Joined: 25-August 09 From: way on up thar Member No.: 6,983 |
Here's the Chef's knife that I'm beginning work on. This blank is pretty rough so I'm going to spend some time sanding and buffing it before I make a handle for it. The steel is AUS8 and already heat treated/hardened.
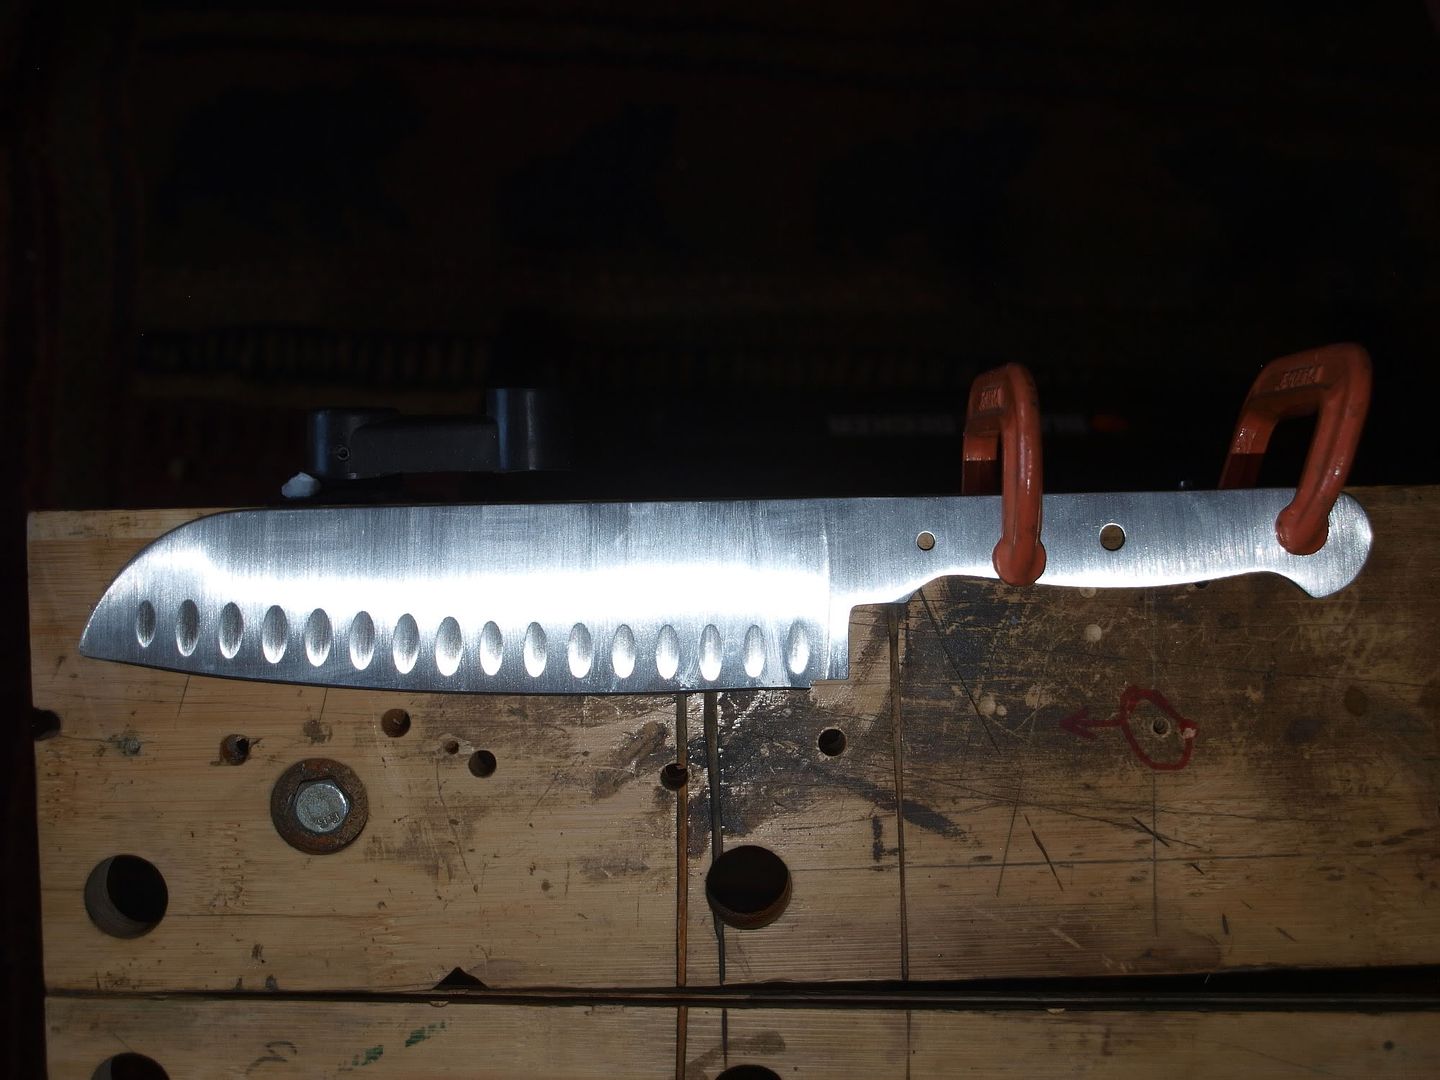
-------------------- /l ,[____], l---L-OlllllllO- ()_) ()_)--o-)_) BLACK SANDS MATTER! Very Happy CP Lifetime Member CP CORE TEAM Referral Code CE213 |
|
|
|
|
Aug 4 2012, 09:11 PM
Post
#78
|
|
|
Moderator Group: Members Posts: 4,459 Joined: 25-August 09 From: way on up thar Member No.: 6,983 |
I'm going to use a piece of scrap tongue & groove wood flooring (mahogany) for handles on the Chef knife.
If you have a keen eye, you'll notice that I've reshaped the handle tang a little. I used a flex Dremel with coarse sanding barrel bit and shaped it to my liking. 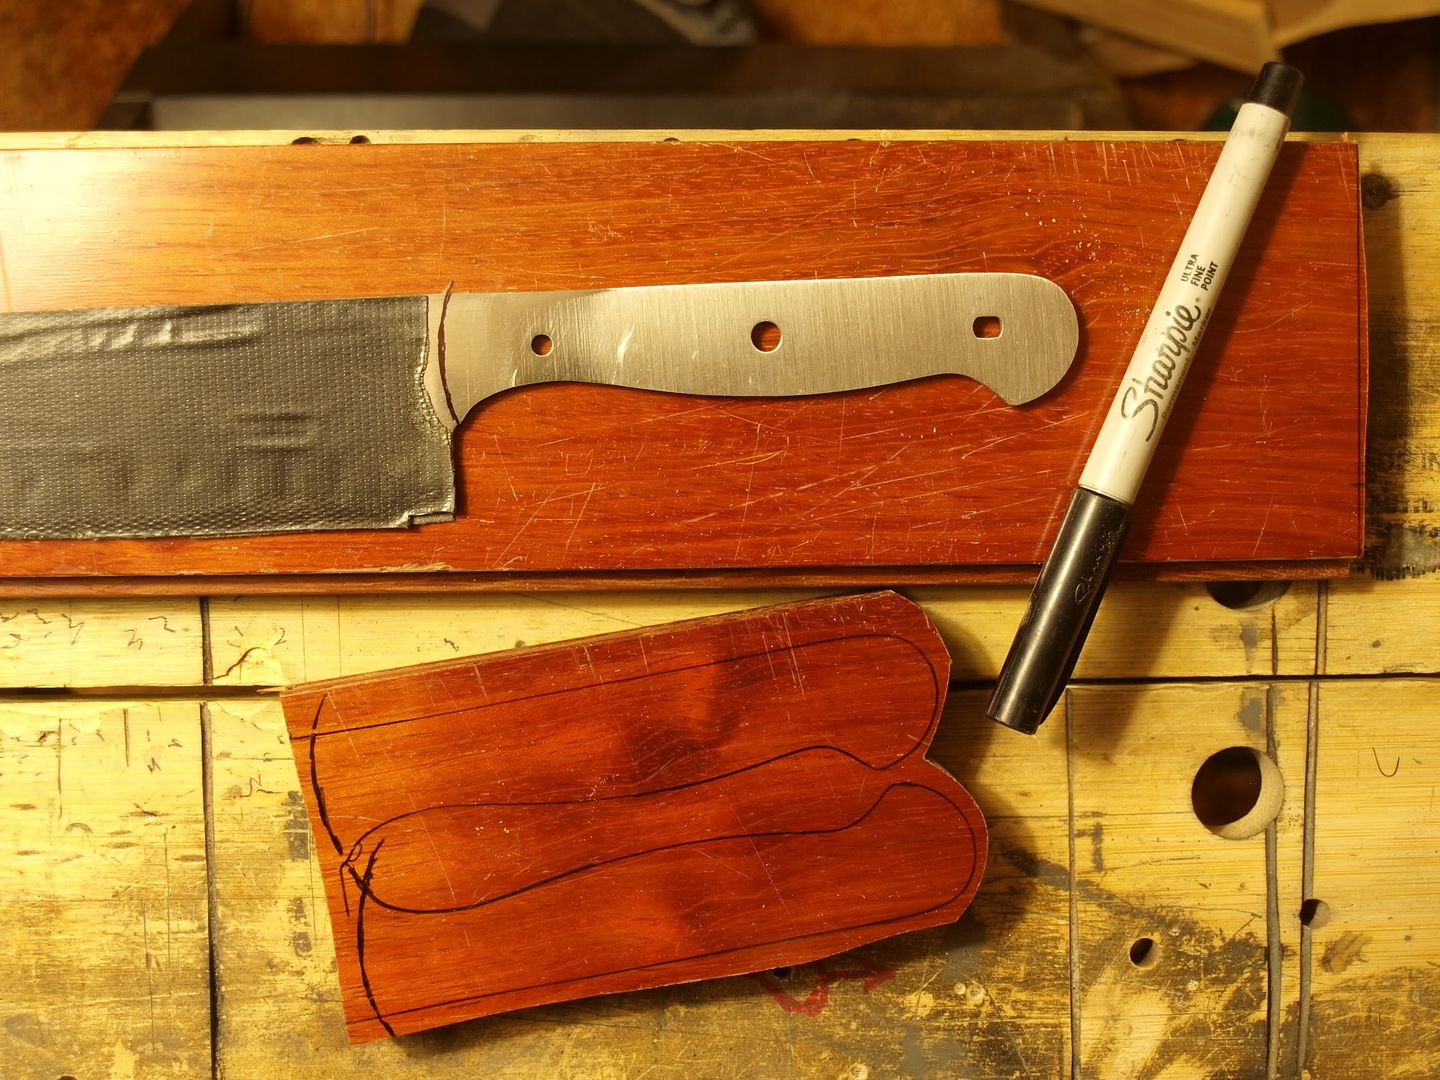
-------------------- /l ,[____], l---L-OlllllllO- ()_) ()_)--o-)_) BLACK SANDS MATTER! Very Happy CP Lifetime Member CP CORE TEAM Referral Code CE213 |
|
|
|
|
Aug 4 2012, 09:24 PM
Post
#79
|
|
|
Master Mucker! Group: Admin Posts: 7,208 Joined: 7-October 03 From: Colorado Member No.: 4 |
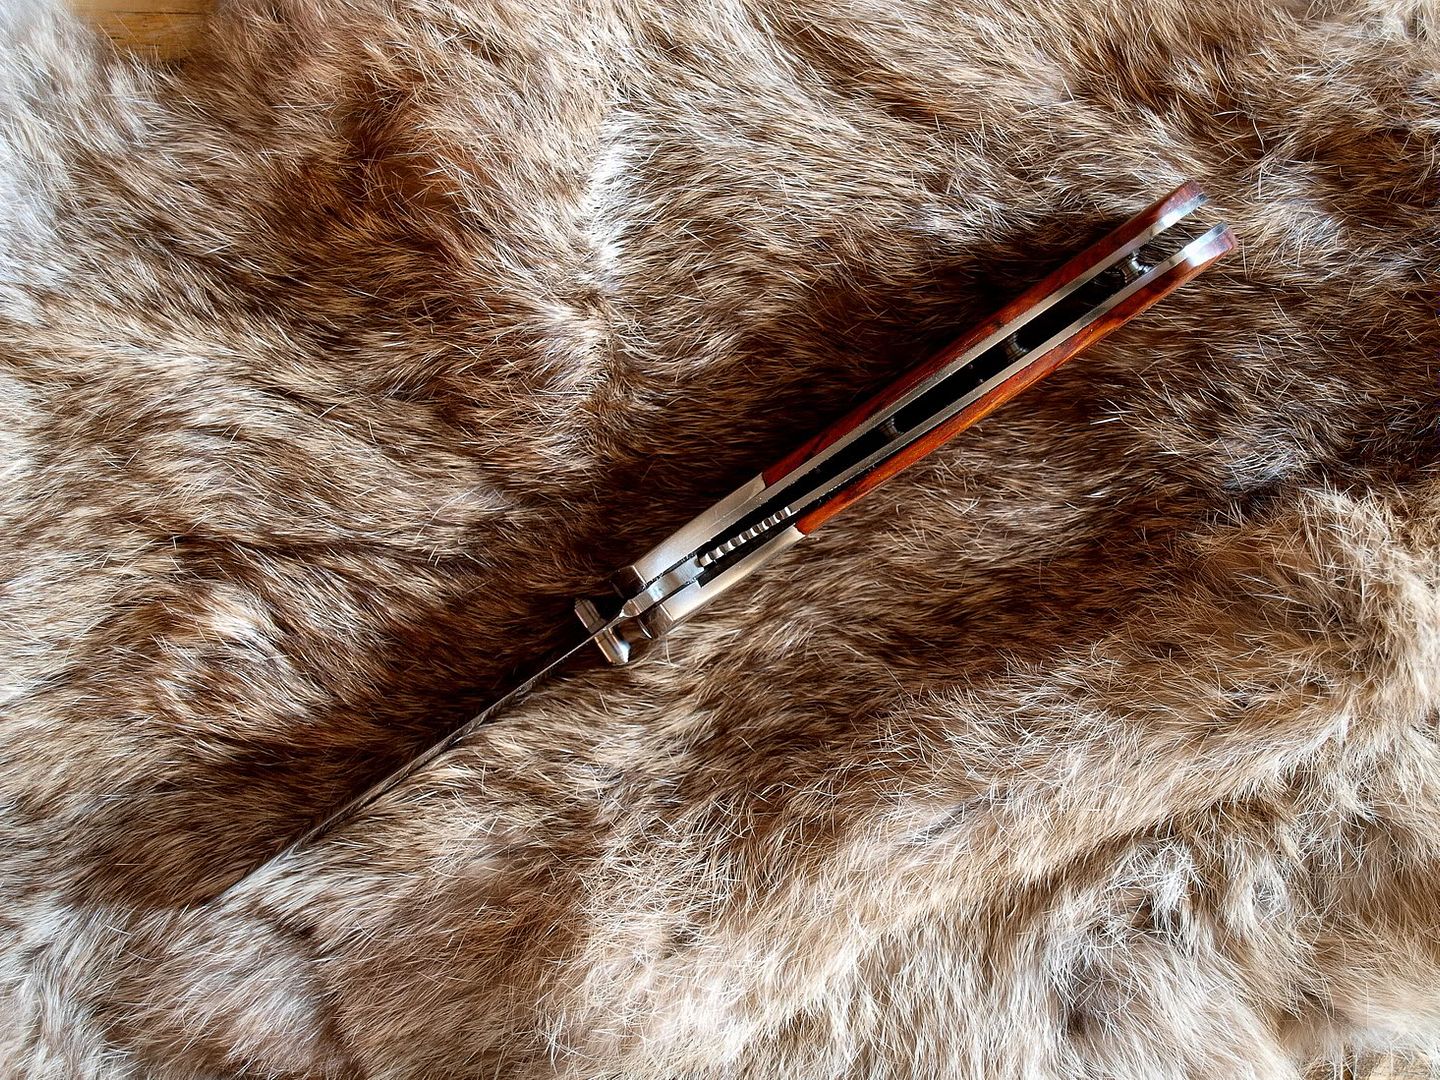
That turned out great Chris! Sweet looking wood handle, good job!
I have to also mention that beautiful bunny (?) pelt that it is on. Nice! I'm looking forward to seeing the chef kife finished. Looks like your crusing right into it. -------------------- Education is the key to the future,
and participation opens the door to opportunity. Discover your prospecting independence & success! ColoradoProspector.com Owner/Webmaster Core team member ♥ |
|
|
|
|
Aug 5 2012, 11:56 AM
Post
#80
|
|
|
Moderator Group: Members Posts: 4,459 Joined: 25-August 09 From: way on up thar Member No.: 6,983 |
You got it right... that's a wabbit pelt! I have a few different colors of them in my fly-tying supplies. The rabbit might be dead but that pelt will live on and be used for many things.
Chef knife handle progress: I'm adding handle spacers to this one and thought I'd share this process real quick. It doesn't serve much function other than aesthetics. This spacer material is black and made of some kind of plastic. It comes in many different colors and is very thin. Some spacer material is made of vulcanized paper and/or other materials. I bought this from a knifemaking supply store (online) and the sheet was only a couple of bucks. There's enough left over to use on future builds. Here I have cut it and epoxied it to my rough handle scales using Gorilla epoxy. The spacers will be tight against the handle tang once I attach the scales to the knife. I'll let the epoxy set for a couple of hours before unclamping and then move on to attaching them to the knife. 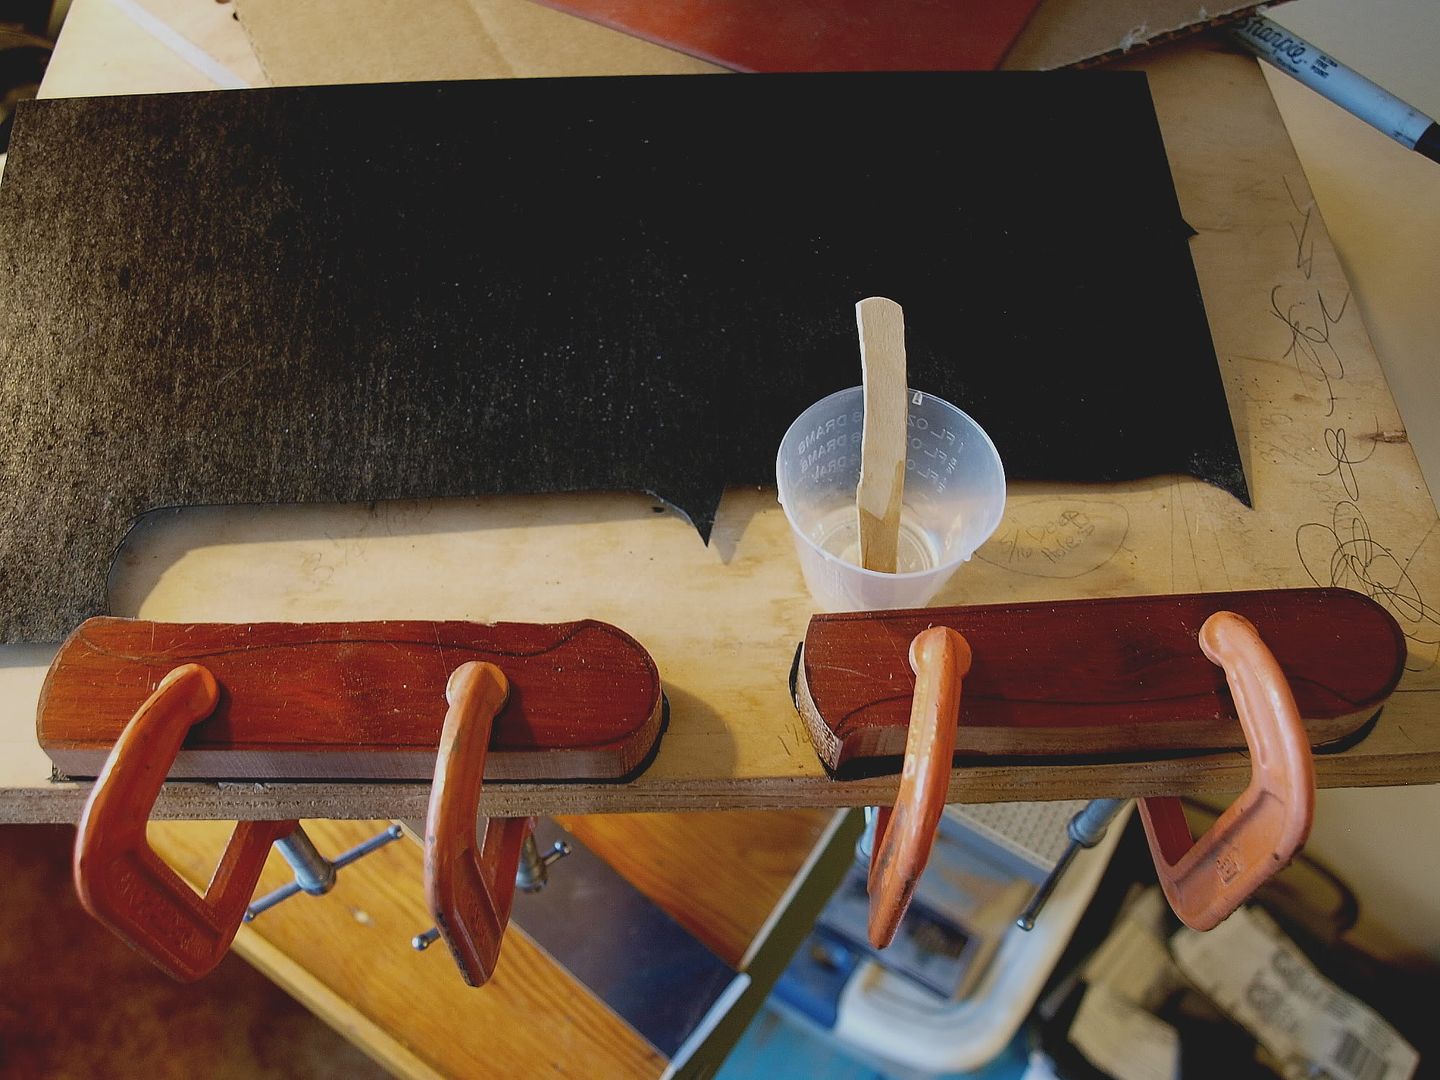
-------------------- /l ,[____], l---L-OlllllllO- ()_) ()_)--o-)_) BLACK SANDS MATTER! Very Happy CP Lifetime Member CP CORE TEAM Referral Code CE213 |
|
|
|
|
Aug 5 2012, 01:55 PM
Post
#81
|
|
|
Moderator Group: Members Posts: 4,459 Joined: 25-August 09 From: way on up thar Member No.: 6,983 |
While that's drying...
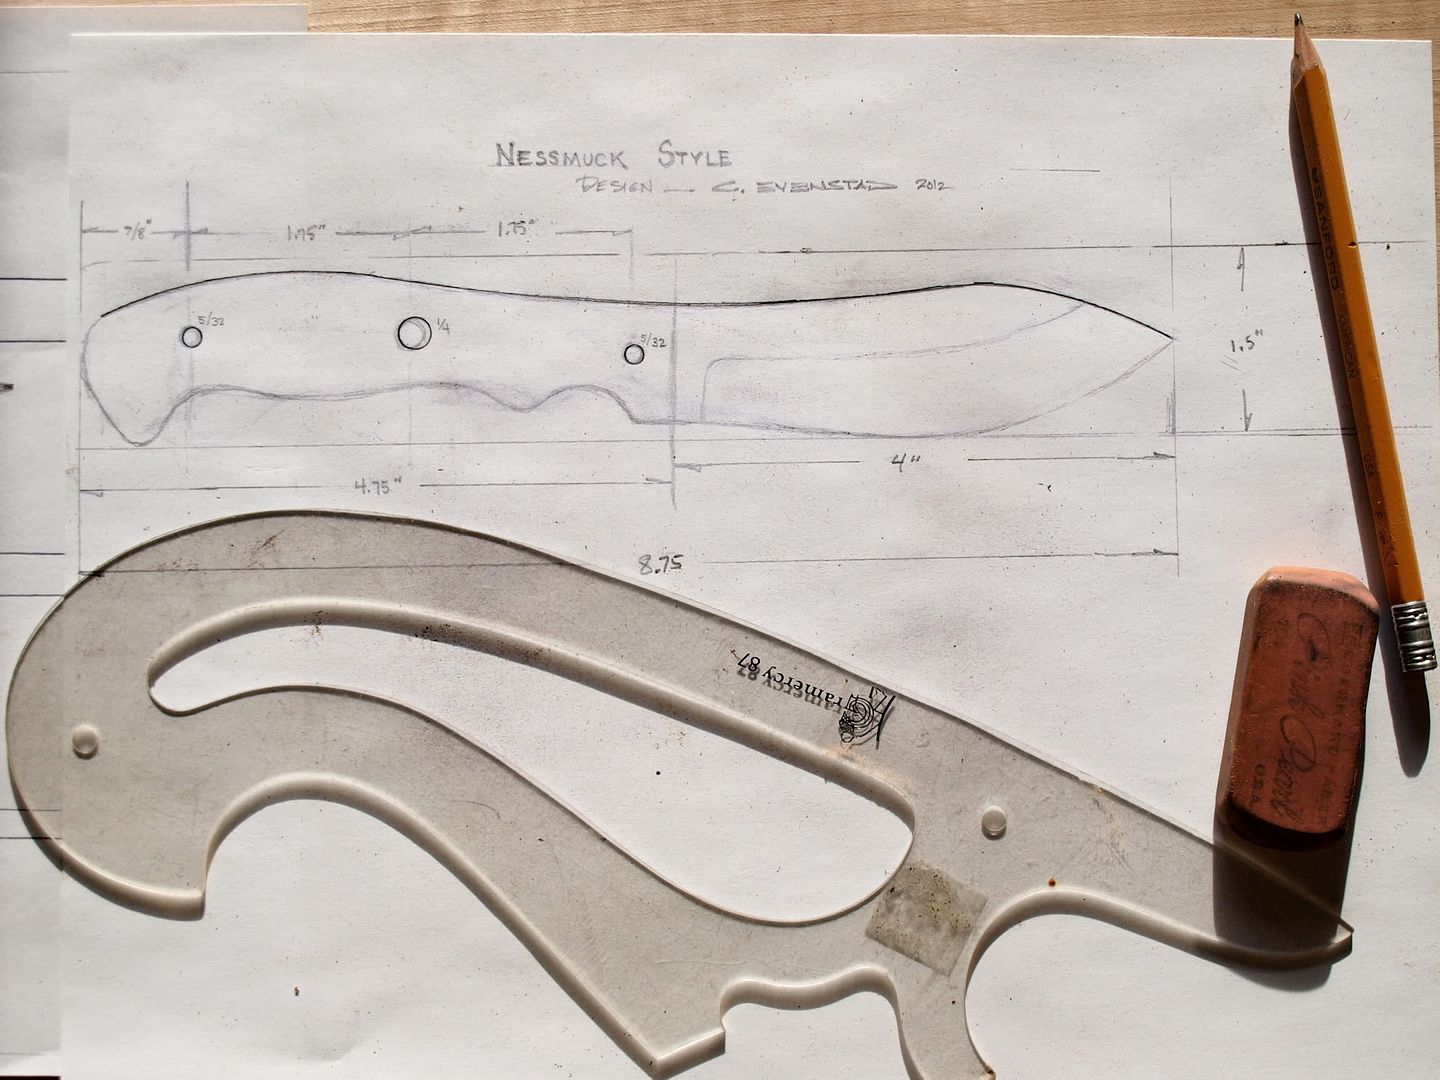
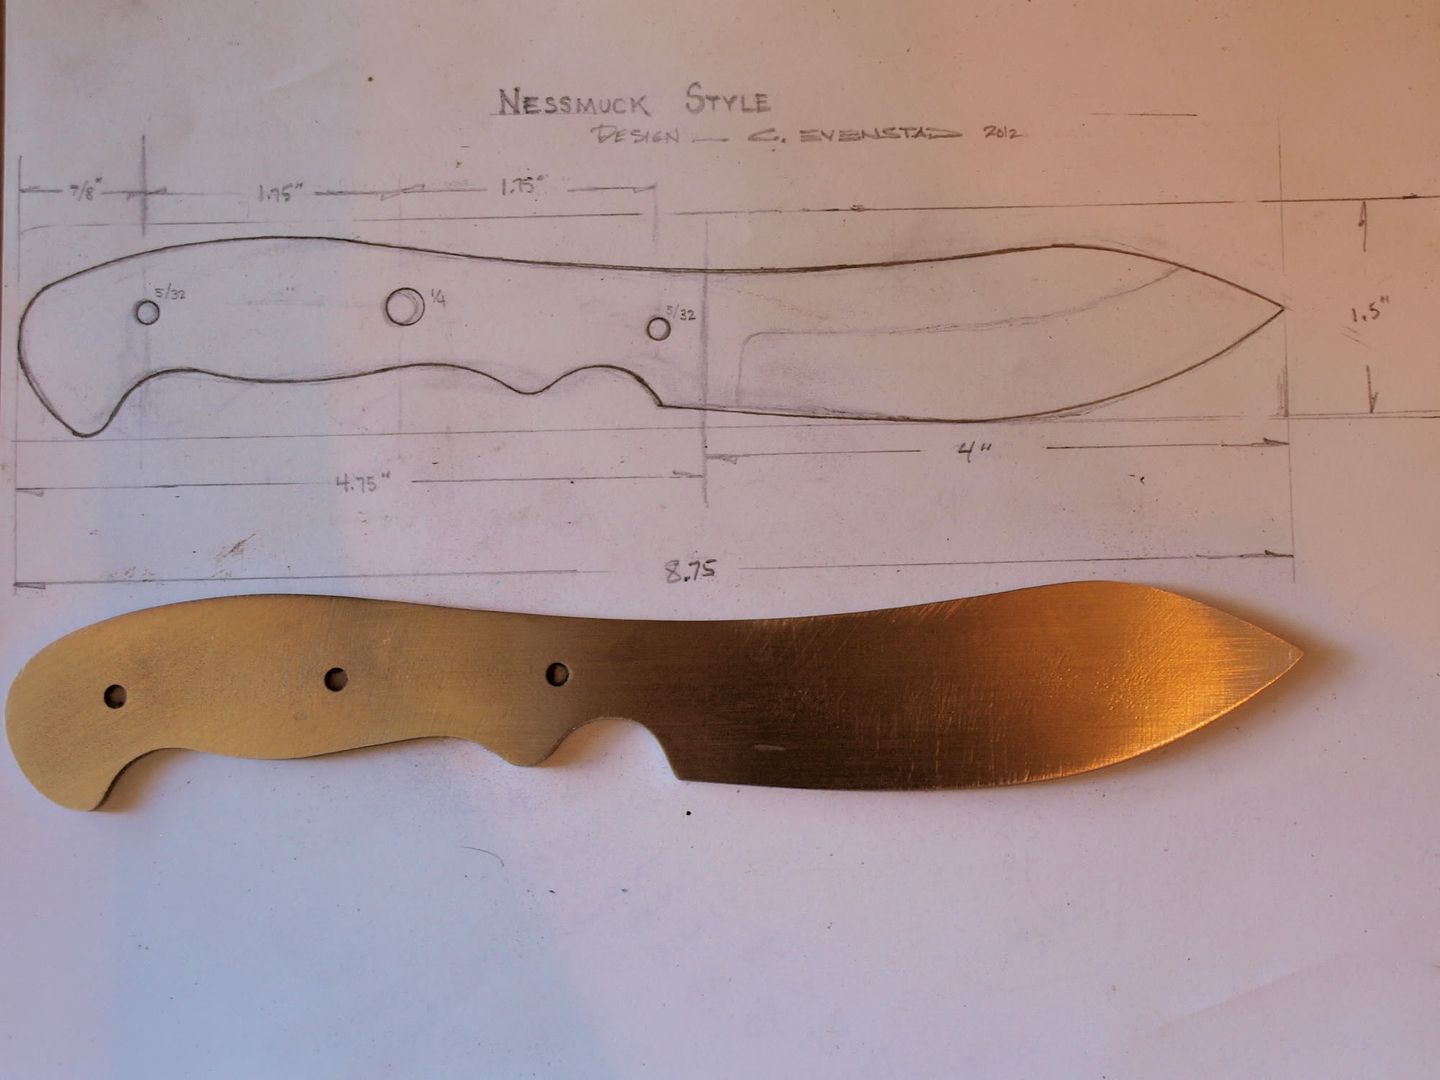
I've designed my first blade. This is my sketch of what I'll be building next. I'll make a template of this drawing and transfer it to the bar stock steel. The metal I will be using is also pictured. ATS-34 is an excellent steel for knifemaking. This piece is annealed but not heat-treated yet. That will make shaping and detail filing less difficult. Once I cut, shape, and detail the knife blank... I'll send it out to be heat treated to a Rockwell hardness of 58-60. When it's returned, I'll begin work on the handle. This method of knifemaking is "Stock Removal". This will be my first try at it and hopefully produce an original piece that I can call 100% my own. My design is based on the very old Nessmuck style of knife which was extremely common in the 1800s. Kind of an all-purpose knife used by the settlers, cowboys, miners, hunters, ranchers, etc. Handle materials and handle styles for this knife can be basically anything the builder chooses but the common trait of the Nessmuck is the blade shape which is similar to a modern skinner. I guess I chose this blade shape/style cuz I'm kinda old fashioned. 
-------------------- /l ,[____], l---L-OlllllllO- ()_) ()_)--o-)_) BLACK SANDS MATTER! Very Happy CP Lifetime Member CP CORE TEAM Referral Code CE213 |
|
|
|
|
Aug 5 2012, 03:56 PM
Post
#82
|
|
|
Rock Bar! Group: Members Posts: 411 Joined: 20-February 07 From: Richland Mississippi Member No.: 994 |
Go ahead and admit it Chris. You are a pro knife maker with eons of training and experience. There ain't no way that you are new at it. Your work is giving you away. If you expect us to believe that you are a novice you need to leave a flaw or two...beautiful work dude.
|
|
|
|
|
Aug 5 2012, 04:35 PM
Post
#83
|
|
|
Moderator Group: Members Posts: 4,459 Joined: 25-August 09 From: way on up thar Member No.: 6,983 |
I really wish I had more experience at this. My only experience is from when I was in high school 1979. I had both Metal and Wood Shop classes. We were allowed to do a combined shop project that year which was "Make A Knife". We crafted the blade (full tang) in Metal Shop, then the next hour was Wood Shop where we did handle work. I really got into that project and got an A after turning in my knife... which somehow got stolen from the Shop locker!!!  After those long hours of crafting that knife as teenager, then to have it ripped off, I thought I was cured of knifemaking forever and went back to crafting marijuana pipes when the teacher wasn't looking. After those long hours of crafting that knife as teenager, then to have it ripped off, I thought I was cured of knifemaking forever and went back to crafting marijuana pipes when the teacher wasn't looking.  Needless to say, I plum forgot everything about how to "Make A Knife". I doubt any Shop classes in the country offer knifemaking classes anymore, lol... hell we were making and wearing hunting knives in school, gun racks in trucks. Lucky to live in that more innocent time and a small rural community as a kid. Now that my interest has been rekindled by Woody's gift of a Machete... I dove in a bit and used the internet to learn, which is a tremendous resource as you know. Needless to say, I plum forgot everything about how to "Make A Knife". I doubt any Shop classes in the country offer knifemaking classes anymore, lol... hell we were making and wearing hunting knives in school, gun racks in trucks. Lucky to live in that more innocent time and a small rural community as a kid. Now that my interest has been rekindled by Woody's gift of a Machete... I dove in a bit and used the internet to learn, which is a tremendous resource as you know.I made plenty of mistakes on that one with the vine pattern but managed to back-track and fix them as I went along (I think this is known as the "Texas Two-Step" ). What should have been a fast build took forever and that's ok.. have to put my hands on all the burners. I was really super careful with the folding knife and that one turned out well. The large skinner that I made is far from flawless in my mind. I had problems squaring the bolsters and if I look hard I see much room for improvement on that one. I'm getting better now but will continue to make mistakes for sure. As a beginner I can testify again that it can be done by anyone with patience and determination with minimal tools or investment. I got a little 'artsy' with the vine thing but it's not a necessary skill for making a quality knife. You should try it Jim! Making them from blanks is fun and easy and I already know that you are an exceptionally talented artist with attention to detail and an eye for beauty. Your works don't lie and I have a guitar pick here to prove it! I might turn out to be a flop at stock removal but I have to try it. Steel shaping is a much different animal than what I've been doing thus far. -------------------- /l ,[____], l---L-OlllllllO- ()_) ()_)--o-)_) BLACK SANDS MATTER! Very Happy CP Lifetime Member CP CORE TEAM Referral Code CE213 |
|
|
|
|
Aug 5 2012, 05:17 PM
Post
#84
|
|
|
Moderator Group: Members Posts: 4,459 Joined: 25-August 09 From: way on up thar Member No.: 6,983 |
Chef knife.... here I've epoxied one handle scale with the black spacer facing the tang. I'll leave it clamped overnight then drill holes for the pins.
-------------------- /l ,[____], l---L-OlllllllO- ()_) ()_)--o-)_) BLACK SANDS MATTER! Very Happy CP Lifetime Member CP CORE TEAM Referral Code CE213 |
|
|
|
|
Aug 6 2012, 08:00 AM
Post
#85
|
|
|
Moderator Group: Members Posts: 4,459 Joined: 25-August 09 From: way on up thar Member No.: 6,983 |
Meanwhile... with the Nessmuck project, I had to alter the design. After cutting out a template from my first drawing it was apparent that the handle tang was too small. Here, I have altered my drawing and added another 3/4" to the tang as well as lengthened the blade. I'm cleaning up the curves now, will cut another template shortly and try it in hand... maybe as a cardboard knife cut-out first.
-------------------- /l ,[____], l---L-OlllllllO- ()_) ()_)--o-)_) BLACK SANDS MATTER! Very Happy CP Lifetime Member CP CORE TEAM Referral Code CE213 |
|
|
|
|
Aug 6 2012, 12:54 PM
Post
#86
|
|
|
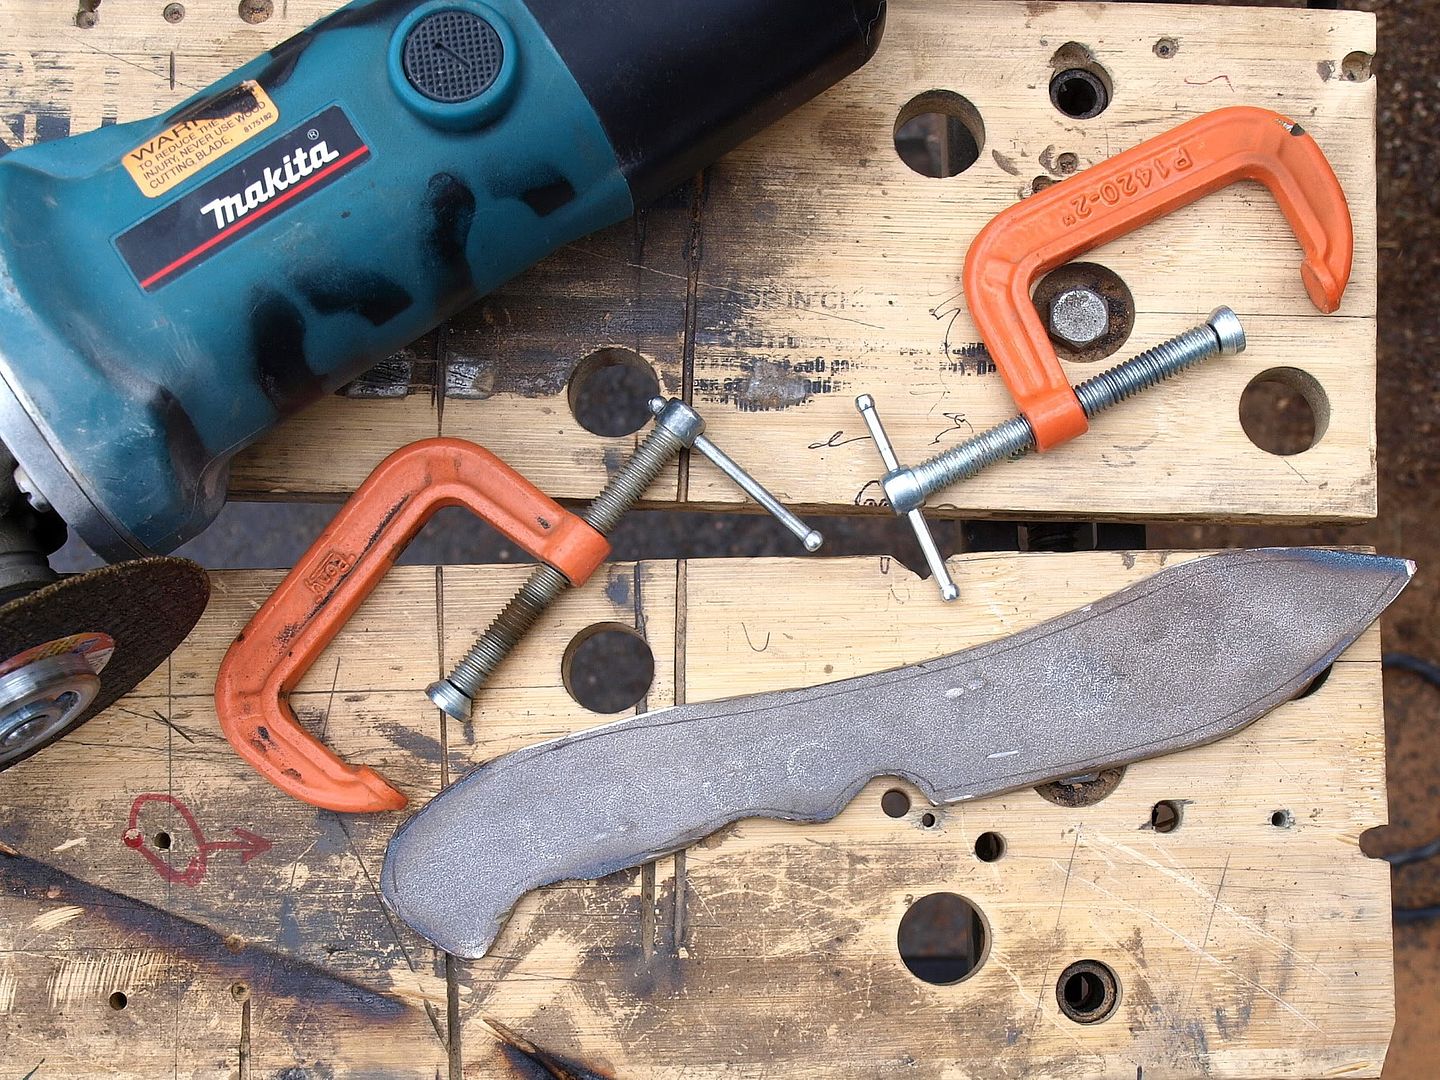
Moderator Group: Members Posts: 4,459 Joined: 25-August 09 From: way on up thar Member No.: 6,983 |
I'm happy with the design and now I've traced it onto the steel and have begun to remove stock with my angle grinder (4" metal cutting wheel). This can be done with a hacksaw or Jeweler's Saw also. I'm going about it slow as not to overheat the steel.
I'm staying outside of my lines to be on the cautious side. After I get the rough shape I can clean up the profile with the angle grinder or bench grinder... and then a Mill File. There are many ways to remove stock and get the profile. I'm just using what tools I have available to me. 
-------------------- /l ,[____], l---L-OlllllllO- ()_) ()_)--o-)_) BLACK SANDS MATTER! Very Happy CP Lifetime Member CP CORE TEAM Referral Code CE213 |
|
|
|
|
Aug 6 2012, 02:27 PM
Post
#87
|
|
|
Moderator Group: Members Posts: 4,459 Joined: 25-August 09 From: way on up thar Member No.: 6,983 |
Rough profile completed...
-------------------- /l ,[____], l---L-OlllllllO- ()_) ()_)--o-)_) BLACK SANDS MATTER! Very Happy CP Lifetime Member CP CORE TEAM Referral Code CE213 |
|
|
|
|
Aug 7 2012, 12:38 PM
Post
#88
|
|
|
Moderator Group: Members Posts: 4,459 Joined: 25-August 09 From: way on up thar Member No.: 6,983 |
The Nessmuck design is coming along well. I cleaned up the edges with my bench grinder and am currently removing the natural pitting of the steel with my belt sander (mounted vertically).
 Meanwhile, the Chef knife is almost done. Here is the rough handle scales attached and pinned (brass pins, peened). I'm about to take it to the belt sander for shaping. 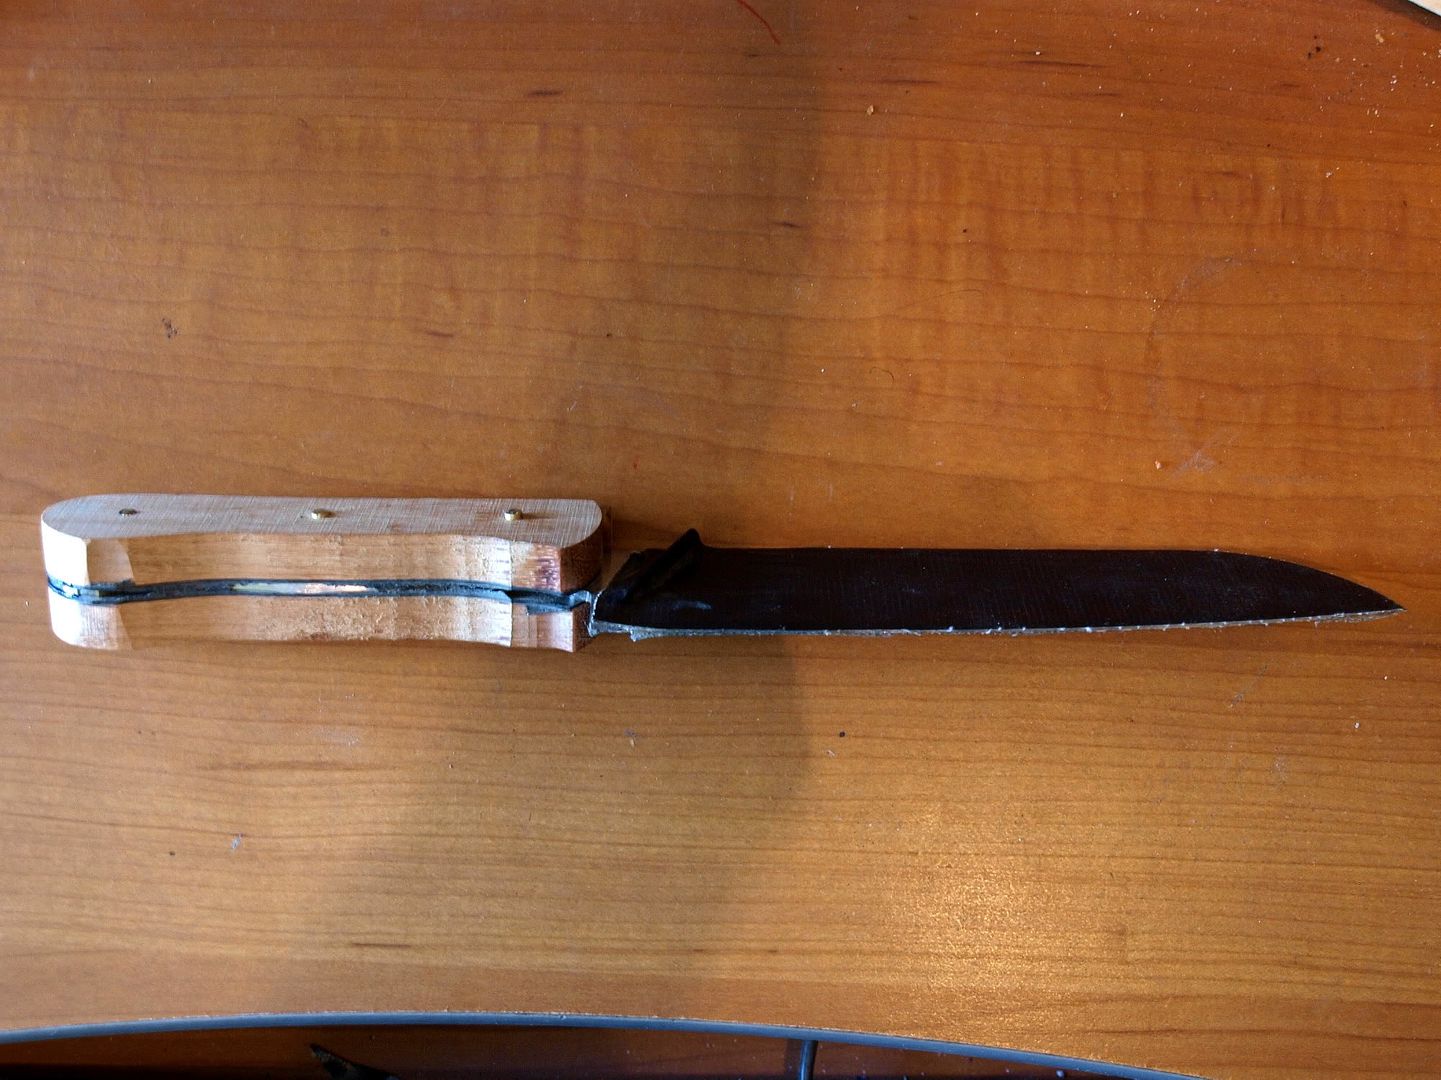 -------------------- /l ,[____], l---L-OlllllllO- ()_) ()_)--o-)_) BLACK SANDS MATTER! Very Happy CP Lifetime Member CP CORE TEAM Referral Code CE213 |
|
|
|
|
Aug 9 2012, 12:47 PM
Post
#89
|
|
|
Master Mucker! Group: Admin Posts: 7,208 Joined: 7-October 03 From: Colorado Member No.: 4 |
Those are coming along nicely Chris!
The Nessmuck knife is a great design, it's going to look sweet when finished!!
-------------------- Education is the key to the future,
and participation opens the door to opportunity. Discover your prospecting independence & success! ColoradoProspector.com Owner/Webmaster Core team member ♥ |
|
|
|
|
Aug 10 2012, 12:08 PM
Post
#90
|
|
|
Moderator Group: Members Posts: 4,459 Joined: 25-August 09 From: way on up thar Member No.: 6,983 |
I have a little time today so I've begun to hand-file a bevel on the Nessmuck. This may take some time. I'm not going to put a sharpening edge on it... that will be done AFTER heat treating, very important. My goal here is to equally establish my bevel on both sides of the profile. I'm going with a tall bevel on this knife to increase it's 'slicing' ability. A short bevel would lend itself more to a 'chopping' edge.
 -------------------- /l ,[____], l---L-OlllllllO- ()_) ()_)--o-)_) BLACK SANDS MATTER! Very Happy CP Lifetime Member CP CORE TEAM Referral Code CE213 |
|
|
|
|
Aug 12 2012, 01:37 PM
Post
#91
|
|
|
Moderator Group: Members Posts: 4,459 Joined: 25-August 09 From: way on up thar Member No.: 6,983 |
I'm still hand-filing the first bevel on the Nessmuck.... starting to look more like a knife now.
 -------------------- /l ,[____], l---L-OlllllllO- ()_) ()_)--o-)_) BLACK SANDS MATTER! Very Happy CP Lifetime Member CP CORE TEAM Referral Code CE213 |
|
|
|
|
Aug 12 2012, 02:37 PM
Post
#92
|
|
|
Moderator Group: Members Posts: 4,459 Joined: 25-August 09 From: way on up thar Member No.: 6,983 |
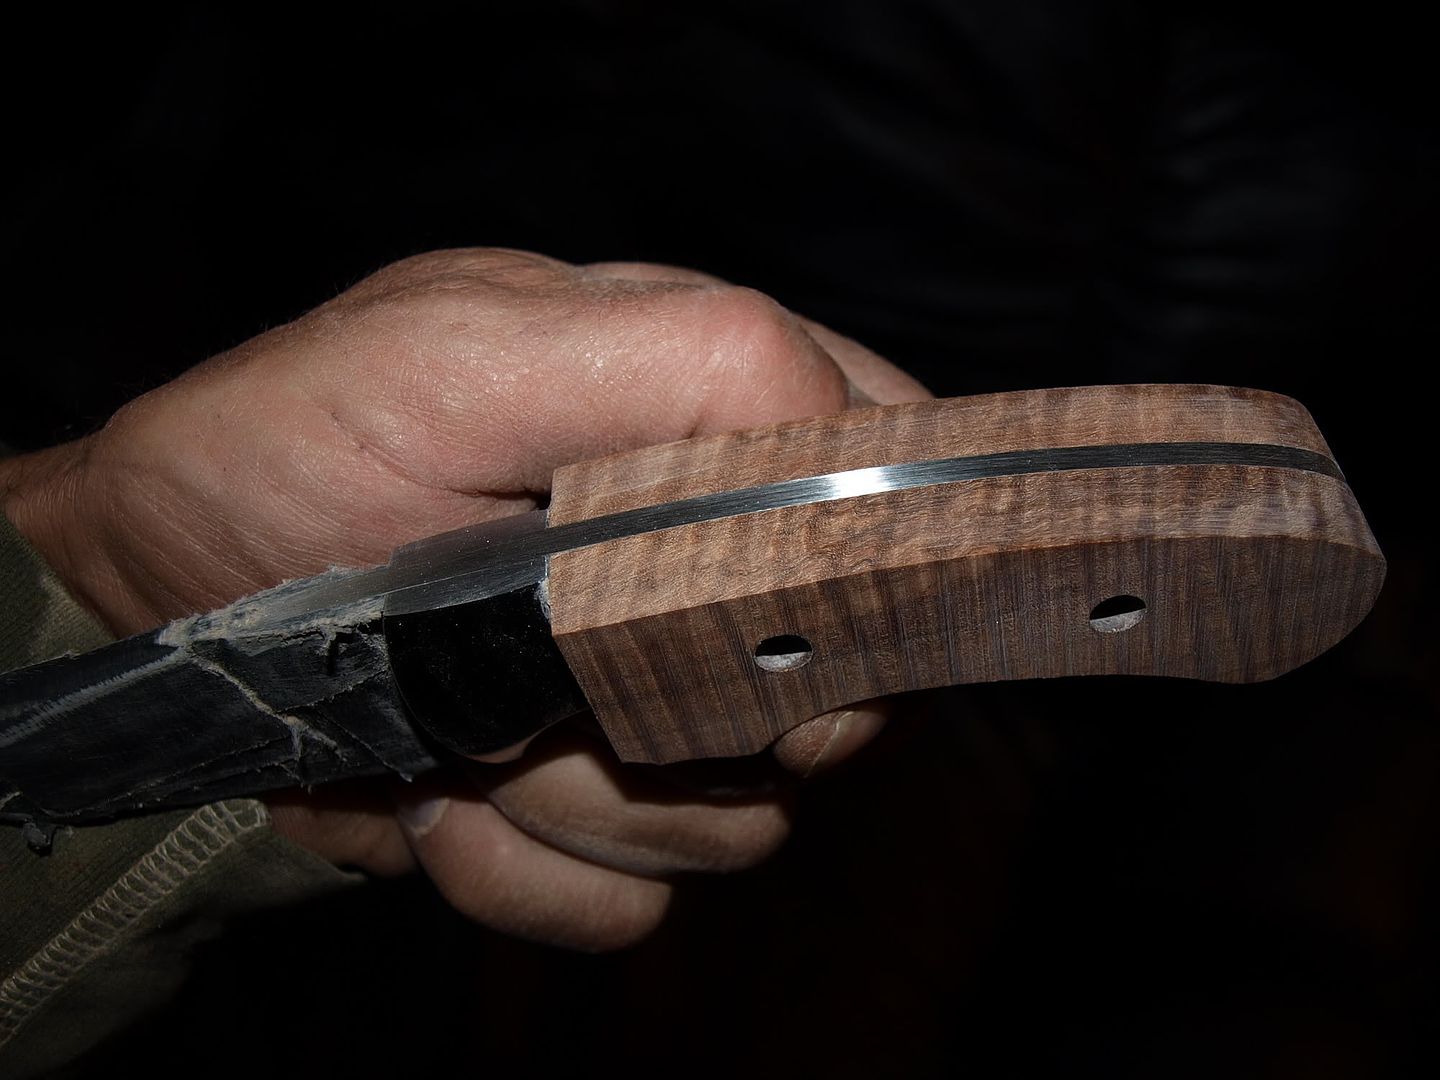
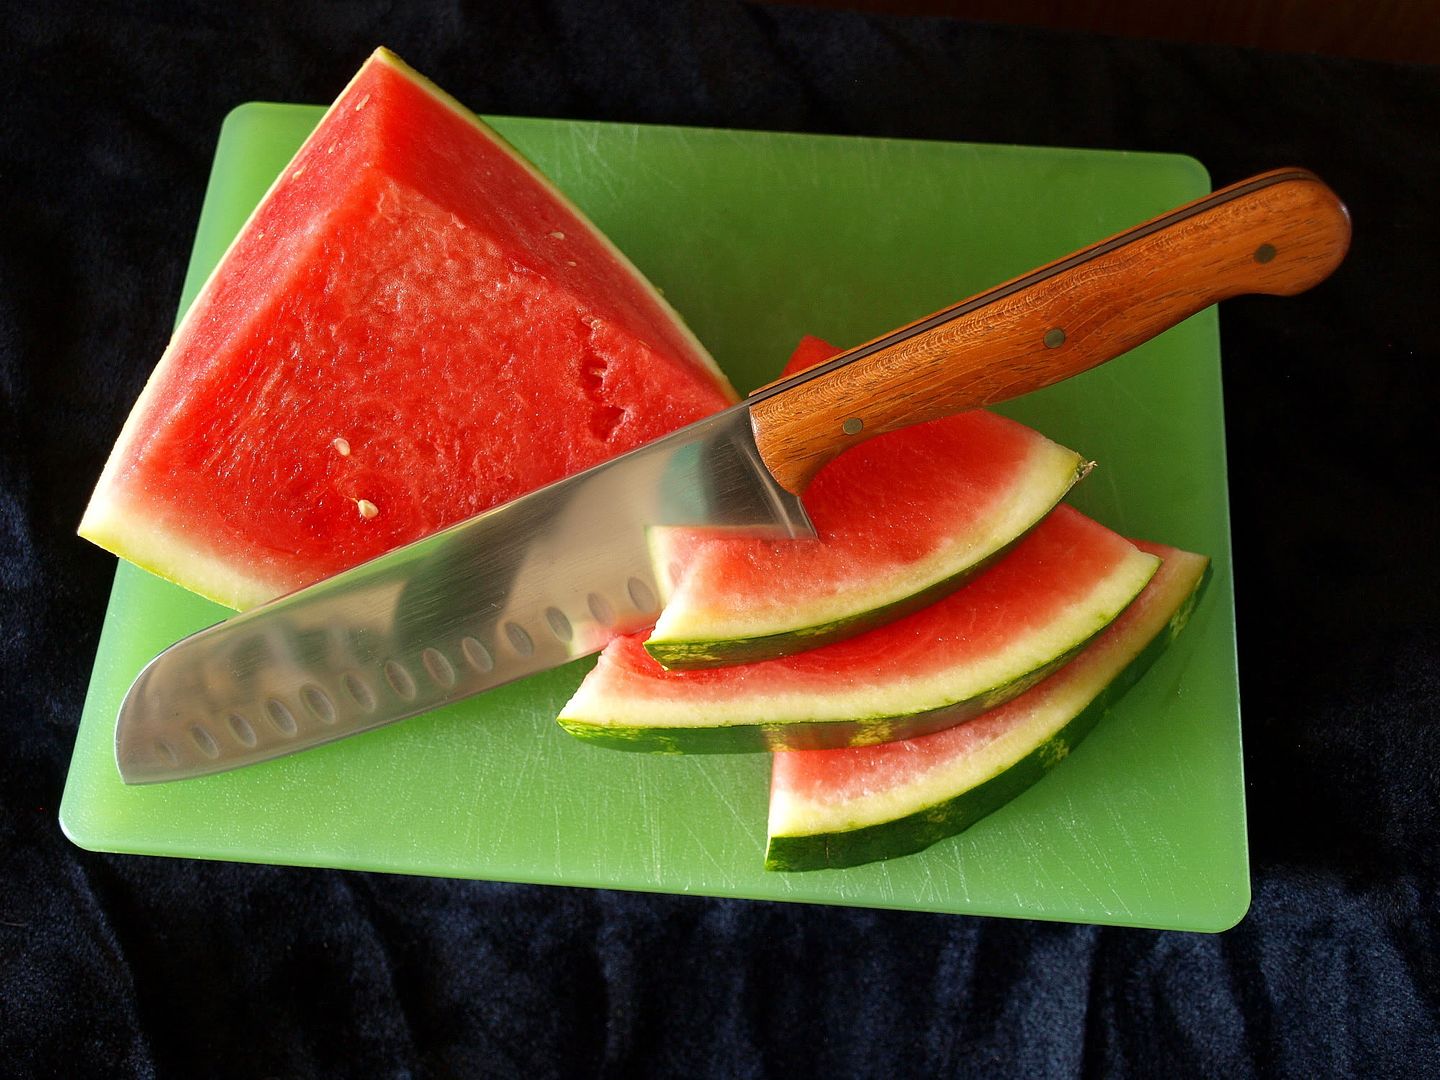
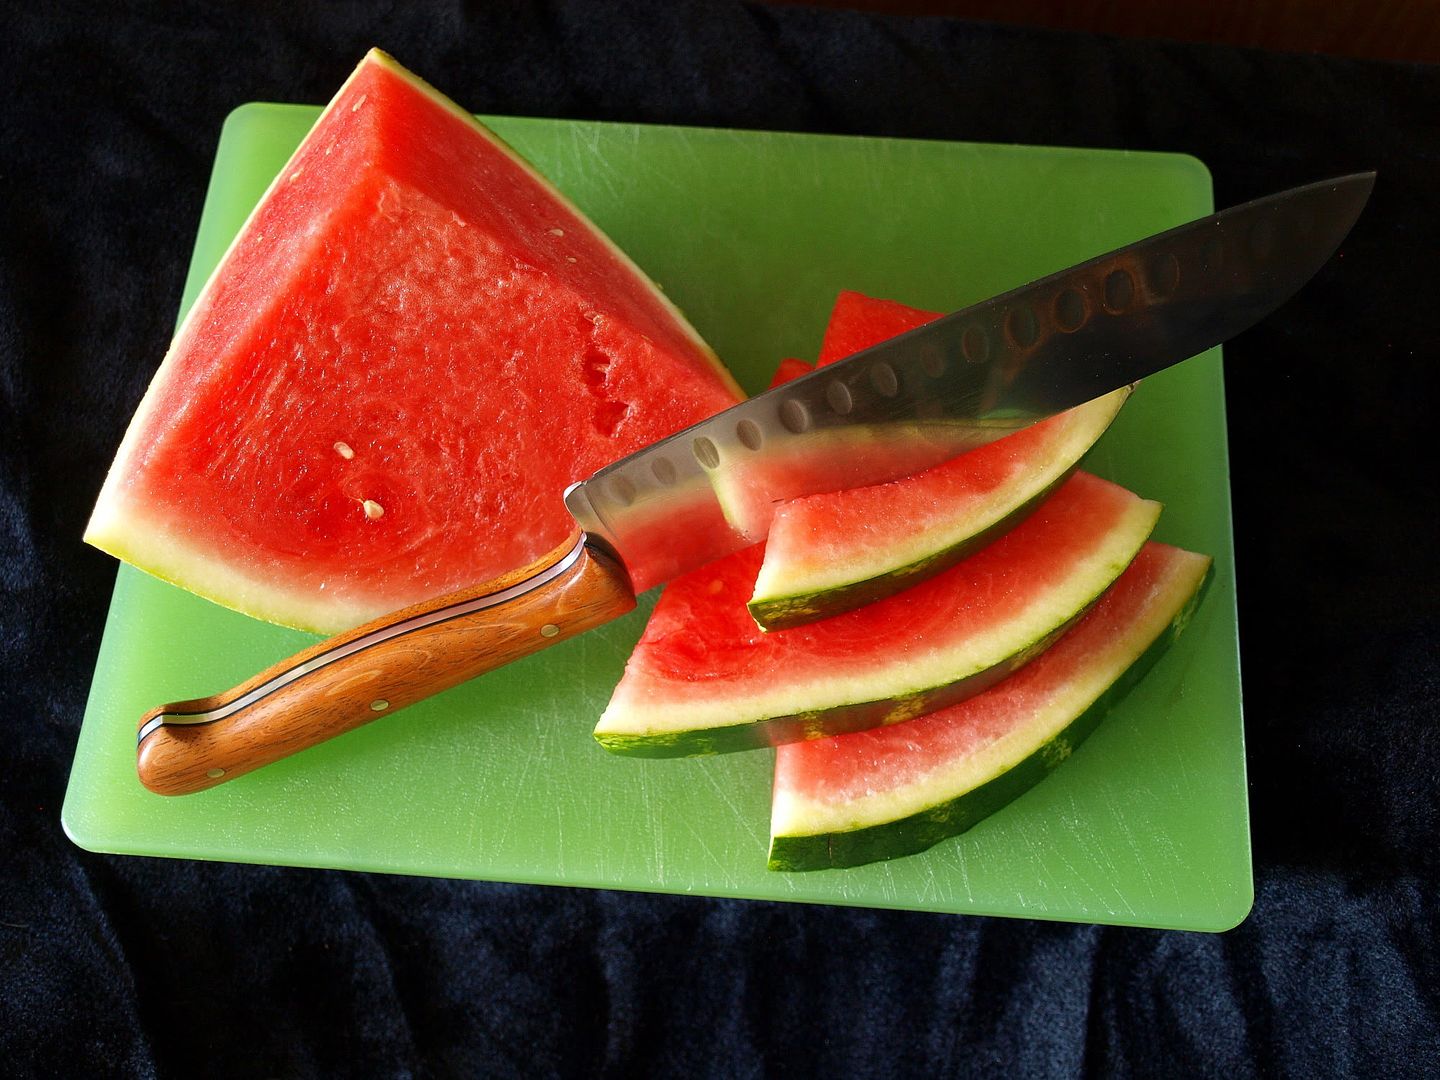
I have finished the Santoku Chef Knife. Now you can see how the black handle spacers look... I think they added a nice touch. Racing stripes so it can chop and slice faster!
-------------------- /l ,[____], l---L-OlllllllO- ()_) ()_)--o-)_) BLACK SANDS MATTER! Very Happy CP Lifetime Member CP CORE TEAM Referral Code CE213 |
|
|
|
|
Aug 13 2012, 07:45 PM
Post
#93
|
|
|
Master Mucker! Group: Admin Posts: 4,149 Joined: 7-October 03 From: Colorado Member No.: 3 |
Very nice work Chris!
Look forward to seeing the Nessmuck from a total blank....cool!
-------------------- CP-Owner/Administrator
www.ColoradoProspector.com IF YOU USE IT, THE GROUND PRODUCED IT! MINERS MAKE "IT" HAPPEN!! |
|
|
|
|
Aug 14 2012, 07:42 AM
Post
#94
|
|
|
Master Mucker! Group: Admin Posts: 7,208 Joined: 7-October 03 From: Colorado Member No.: 4 |
The chef knife turned out fantastic!! Love how you displayed it for a photo shot!
 -------------------- Education is the key to the future,
and participation opens the door to opportunity. Discover your prospecting independence & success! ColoradoProspector.com Owner/Webmaster Core team member ♥ |
|
|
|
|
Aug 15 2012, 02:36 PM
Post
#95
|
|
|
Moderator Group: Members Posts: 4,459 Joined: 25-August 09 From: way on up thar Member No.: 6,983 |
Thanks Denise! That knife was fast and easy.
Nessy, on the other hand.... difficult. Stock removal is laborious with hand files but coming along well. I'm almost finished with my second bevel. If I mess it up after all this work, I'm going to cry.I am getting the bevel lines, cutting edge, and ricassos to match.  -------------------- /l ,[____], l---L-OlllllllO- ()_) ()_)--o-)_) BLACK SANDS MATTER! Very Happy CP Lifetime Member CP CORE TEAM Referral Code CE213 |
|
|
|
|
Aug 15 2012, 06:13 PM
Post
#96
|
|
|
Rock Bar! Group: Members Posts: 411 Joined: 20-February 07 From: Richland Mississippi Member No.: 994 |
great job on the knives Chris! Most definately a talent!!! Lots of patients is apparent. Attention to detail is very apparent too.
|
|
|
|
|
Aug 16 2012, 12:09 PM
Post
#97
|
|
|
Moderator Group: Members Posts: 4,459 Joined: 25-August 09 From: way on up thar Member No.: 6,983 |
Thanks Jim!
I'm happy to say that I've completed both primary bevels now on the Nessmuk. I think the hard part is done. They are currently sanded down to about #320. I've decided that the original handle tang I designed was too big and here I have redesigned it. I will reshape it using the bench grinder (possibly cutting disc too). I will also have to drill new pin holes to accommodate this design. 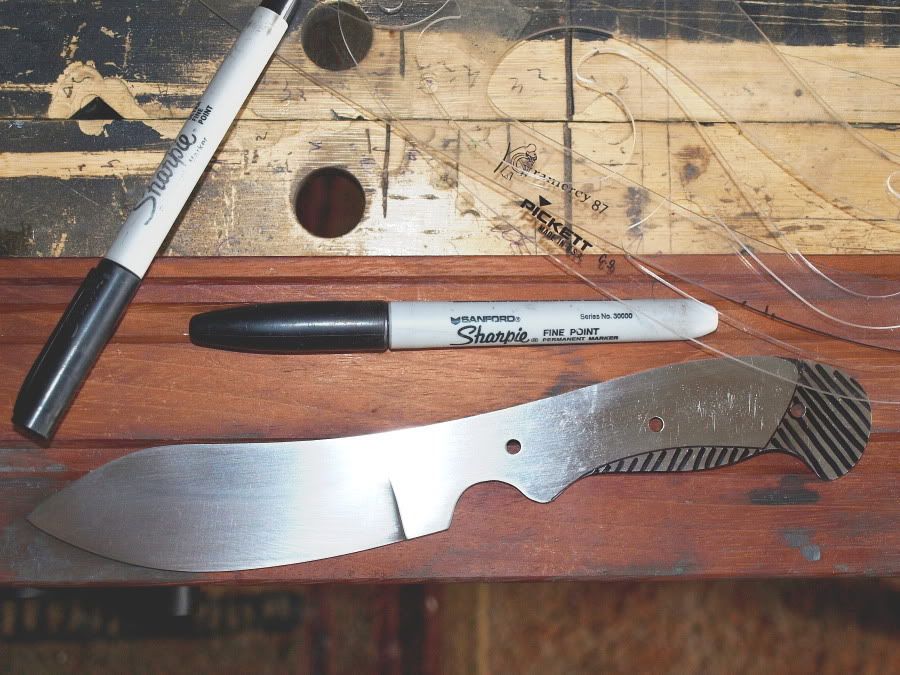
-------------------- /l ,[____], l---L-OlllllllO- ()_) ()_)--o-)_) BLACK SANDS MATTER! Very Happy CP Lifetime Member CP CORE TEAM Referral Code CE213 |
|
|
|
|
Aug 18 2012, 07:16 AM
Post
#98
|
|
|
Moderator Group: Members Posts: 4,459 Joined: 25-August 09 From: way on up thar Member No.: 6,983 |
The Nessmuk (I just realized I've been spelling it wrong... correct spelling of the name is ..."muk") is now ready to be sent off for heat treat/hardening. The company I'm sending it to only does heat-treating once a week on Mondays so it'll be a couple of weeks before I get it back.
Once it comes back I will install the handle scales (maybe stabilized Black Ash Burl for this one), polish/buff all exposed steel, then file a secondary cutting edge into it and sharpen. It will be complete except for sheath. I intend to learn sheath-making soon so that this one has a nice little custom home to sleep in. Here's what it looks like now after I reshaped the tang and drilled new pin holes. The cutting edge is very blunt and a little thicker than a dime. Anything thinner would be damaged during the heat-treatment, very important! I also engraved my name and other info (where it will not be seen) as requested by the company that will be performing the heat-treat. The heat-treat service costs $5.50 for this knife and I opted for Cryogenic cooling for an additional $4.00. The Cryo process will add durability and increase edge-retention. Basically they will heat this puppy to somewhere around 2500 degrees, then cool it in a Cryo tank which is about -300. 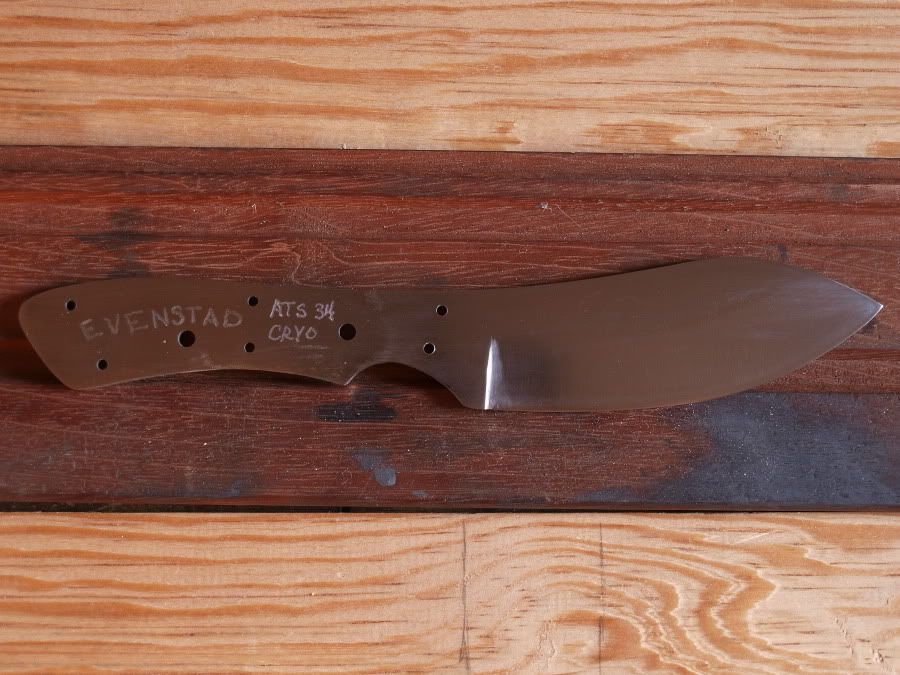
-------------------- /l ,[____], l---L-OlllllllO- ()_) ()_)--o-)_) BLACK SANDS MATTER! Very Happy CP Lifetime Member CP CORE TEAM Referral Code CE213 |
|
|
|
|
Aug 18 2012, 10:46 AM
Post
#99
|
|
|
Master Mucker! Group: Admin Posts: 7,208 Joined: 7-October 03 From: Colorado Member No.: 4 |
Top notch work Chris, great job!
-------------------- Education is the key to the future,
and participation opens the door to opportunity. Discover your prospecting independence & success! ColoradoProspector.com Owner/Webmaster Core team member ♥ |
|
|
|
|
Aug 18 2012, 06:49 PM
Post
#100
|
|
|
russau Group: Members Posts: 2,841 Joined: 4-December 03 From: st.louis missouri Member No.: 43 |
to what rockwell hardness to they take it to?
|
|
|
|
 |
| Lo-Fi Version | Time is now: 17th July 2025 - 06:18 PM |


