Full Version: Knife Making
Colorado Prospector - Gem and mineral prospecting and mining forums > Miners Crafts, Goods & Classified ads > Prospector's Crafts & Creations
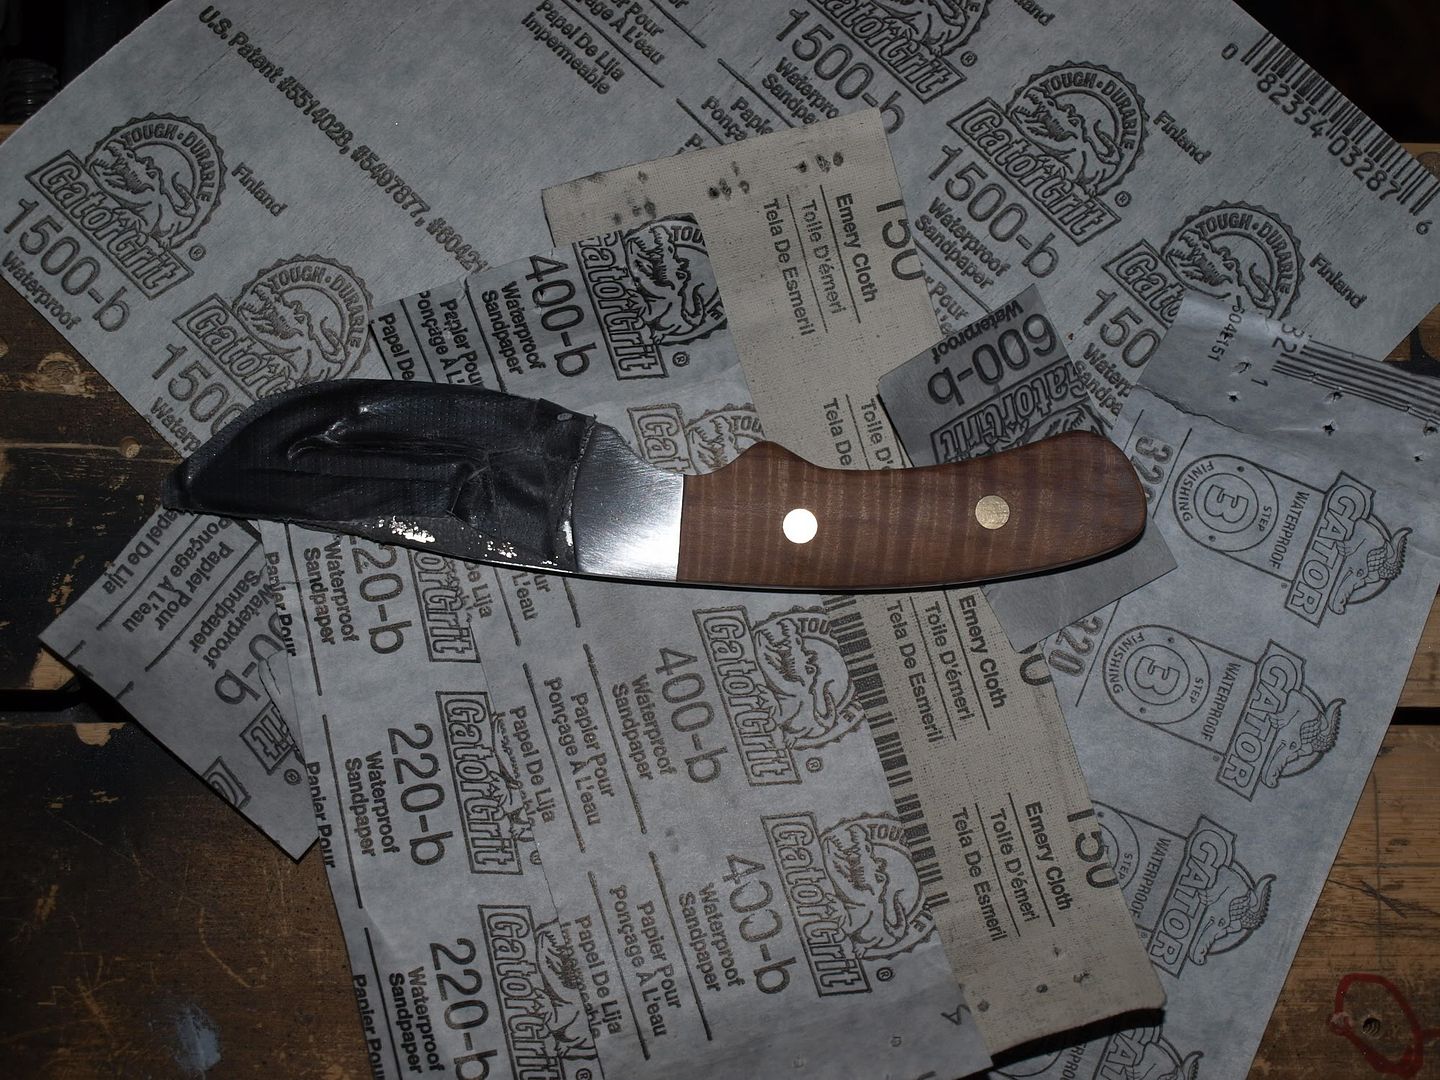
I'm in the hand-sanding stage now, almost done.
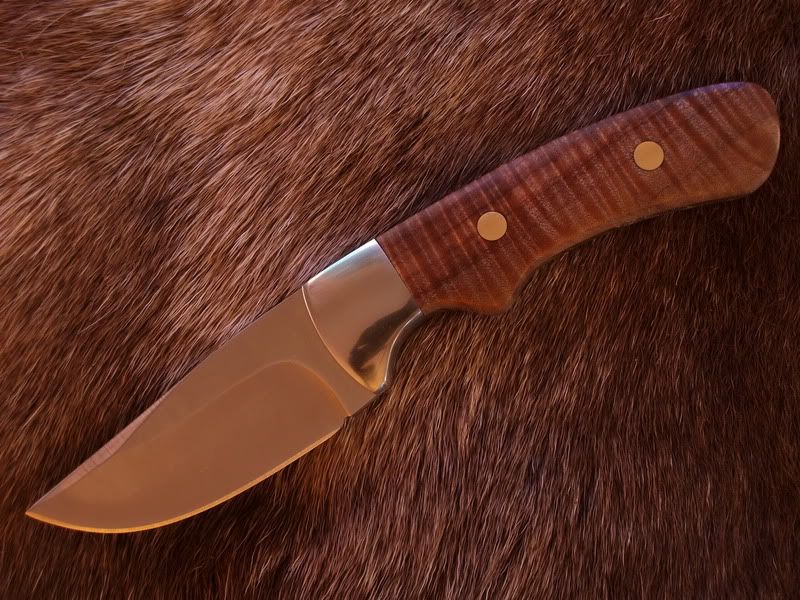
Finished!
Beautiful! Top notch work!
Caveman
Caveman
very well done!
That turned out fantastic Chris, your efforts definately paid off!!  That's one sweet looking knife!!
That's one sweet looking knife!!
Thanks! I would encourage anyone who's interested to try it. Not expensive and really fun to do. I'll never have to buy a factory made knife again and that makes me happy. Tomorrow I'm ordering parts to make my first folding knife for a friend. It's a "kit" knife but degree of diff is level II - IV so it will be a challenge. The kits are made to be customized by the builder so I will be using unique handle material and possibly do some detail file work. I will update this thread when I get going on it.
Looking forward to seeing the next project Chris! You do amazing work!!
When your ready to try a handle with stone, let us know.......We have a killed dino bone slab that would be perfect for one. It is a very detailed grey slab with colored spots like red and yellow. I have only used it for a picture background for smaller stones or jewelry pieces. I think you could make better use of it. I can give you details on size in a pm if your interested.
When your ready to try a handle with stone, let us know.......We have a killed dino bone slab that would be perfect for one. It is a very detailed grey slab with colored spots like red and yellow. I have only used it for a picture background for smaller stones or jewelry pieces. I think you could make better use of it.
I can give you details on size in a pm if your interested.
WOW... I would love that! 
I still need to " hone" my skills more to be able to incorporate it into a build but am confident that I'll be able to work with it. What are the dimensions and thickness of the slab? I like the idea!
I still need to " hone" my skills more to be able to incorporate it into a build but am confident that I'll be able to work with it. What are the dimensions and thickness of the slab? I like the idea!
 I forgot that I posted a picture of it in the "Show Us Your Paperweight" thread that you started.
It measures approx. 4 1/2" x 2 1/2" x 6mm.
Just let us know when you're ready for it.

Yes Swizz you are doing a really great job on the knives. Stone inlayed handles would be killer. Denise's offer of dino is a great idea. Ol Gat did one with dino too. That one turned out beautiful too. I'm sure that you have seen it in another thread here.
Stone inlayed handles would be killer. Denise's offer of dino is a great idea. Ol Gat did one with dino too. That one turned out beautiful too. I'm sure that you have seen it in another thread here.
I've been without the pc for a week, good to be back and thought I'd do a quick update. Now running Windows 7 Ultimate (instead of Vista), added a 1 Terabyte Hard Drive, and a new graphics card. All sooped-up and ready to rock!!
Jim and D... thanks! That dino piece is large enough to do some cool inlays I think. I'll have to search out Gat's thread with the knife he made.
Meanwhile back at the knife bench.
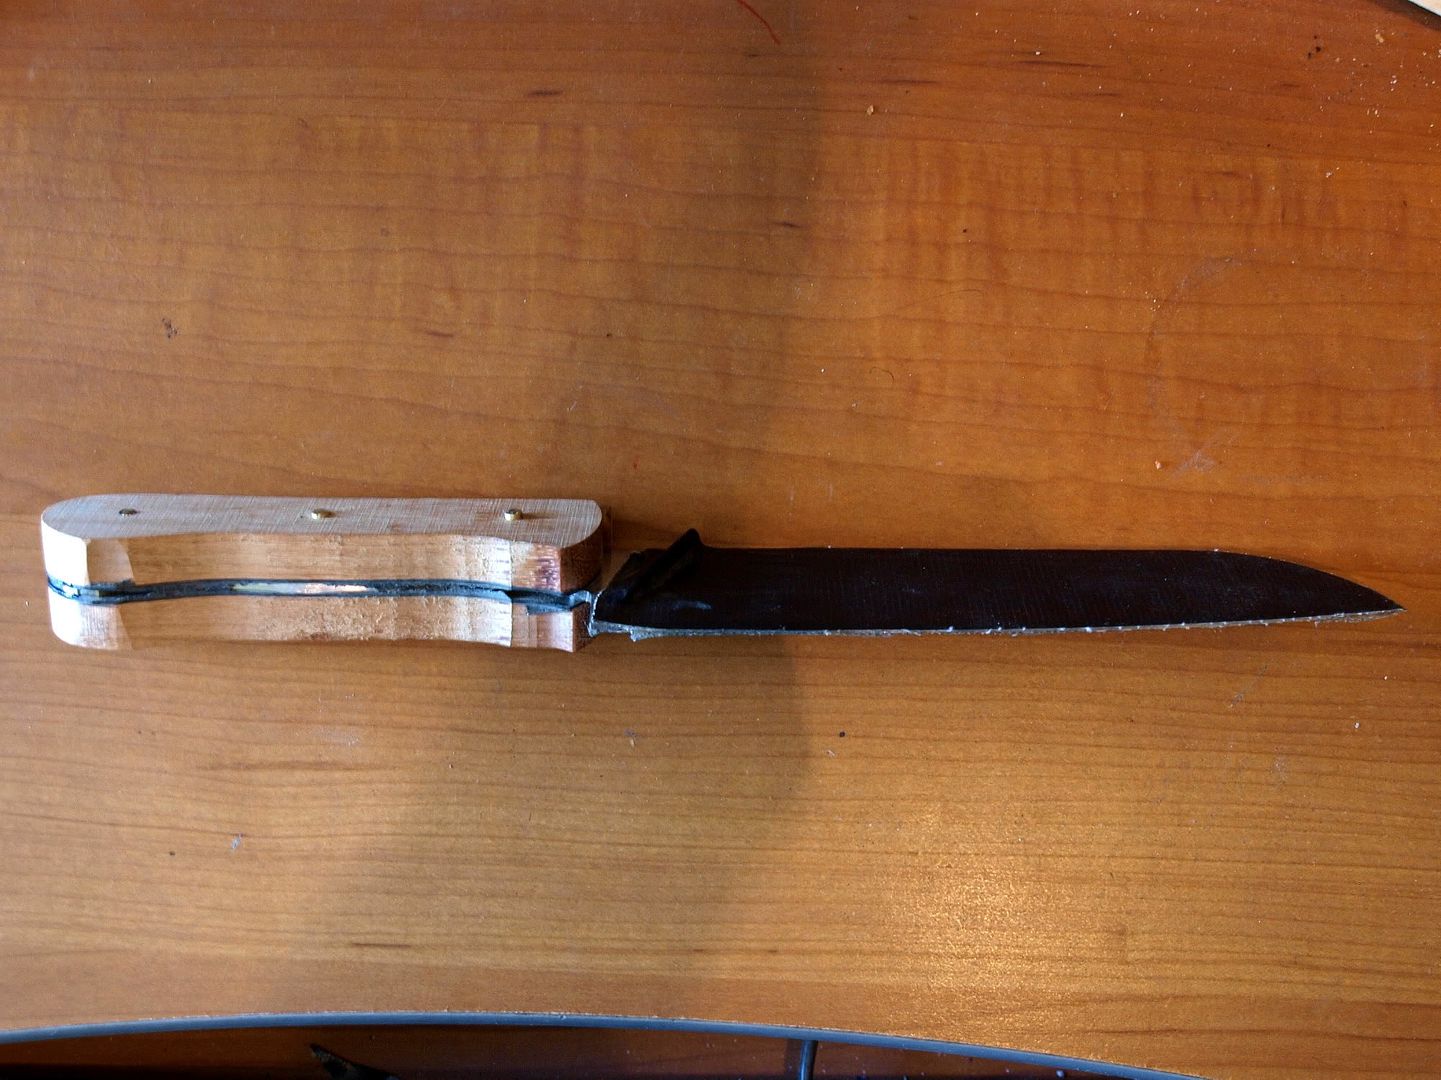
While waiting for my folding knife parts I went back to working on that first build that I was having trouble with. I've managed to resolve the problems and am back on track with that one again.
The main problem was a very slightly bent knife blank (near the handle tang). It was very hard to straighten since it is 1/8" thick heat-treated 440C. With my mallet and makeshift anvil... I made due and brought her back to true.
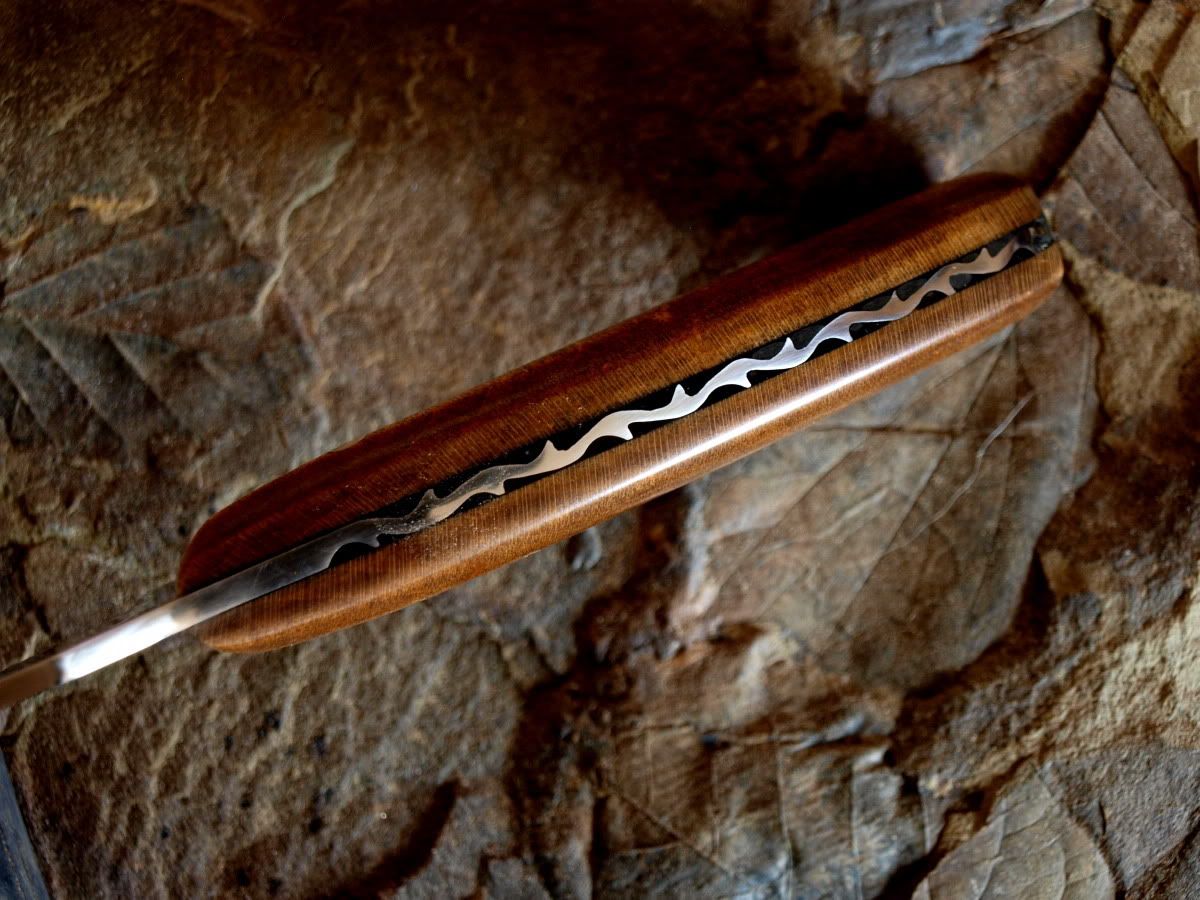
Since then I have installed another set of sugar-maple handle scales (kiln dried) from my scrap pile. This time everything went well. All I have left is to fill the detail file-work on the top of the handle tang (vine pattern pictured waaay earlier). Then it's on to shaping, sanding, sanding, sanding, sanding, sealer, stain, oil finish, and wax buffing.
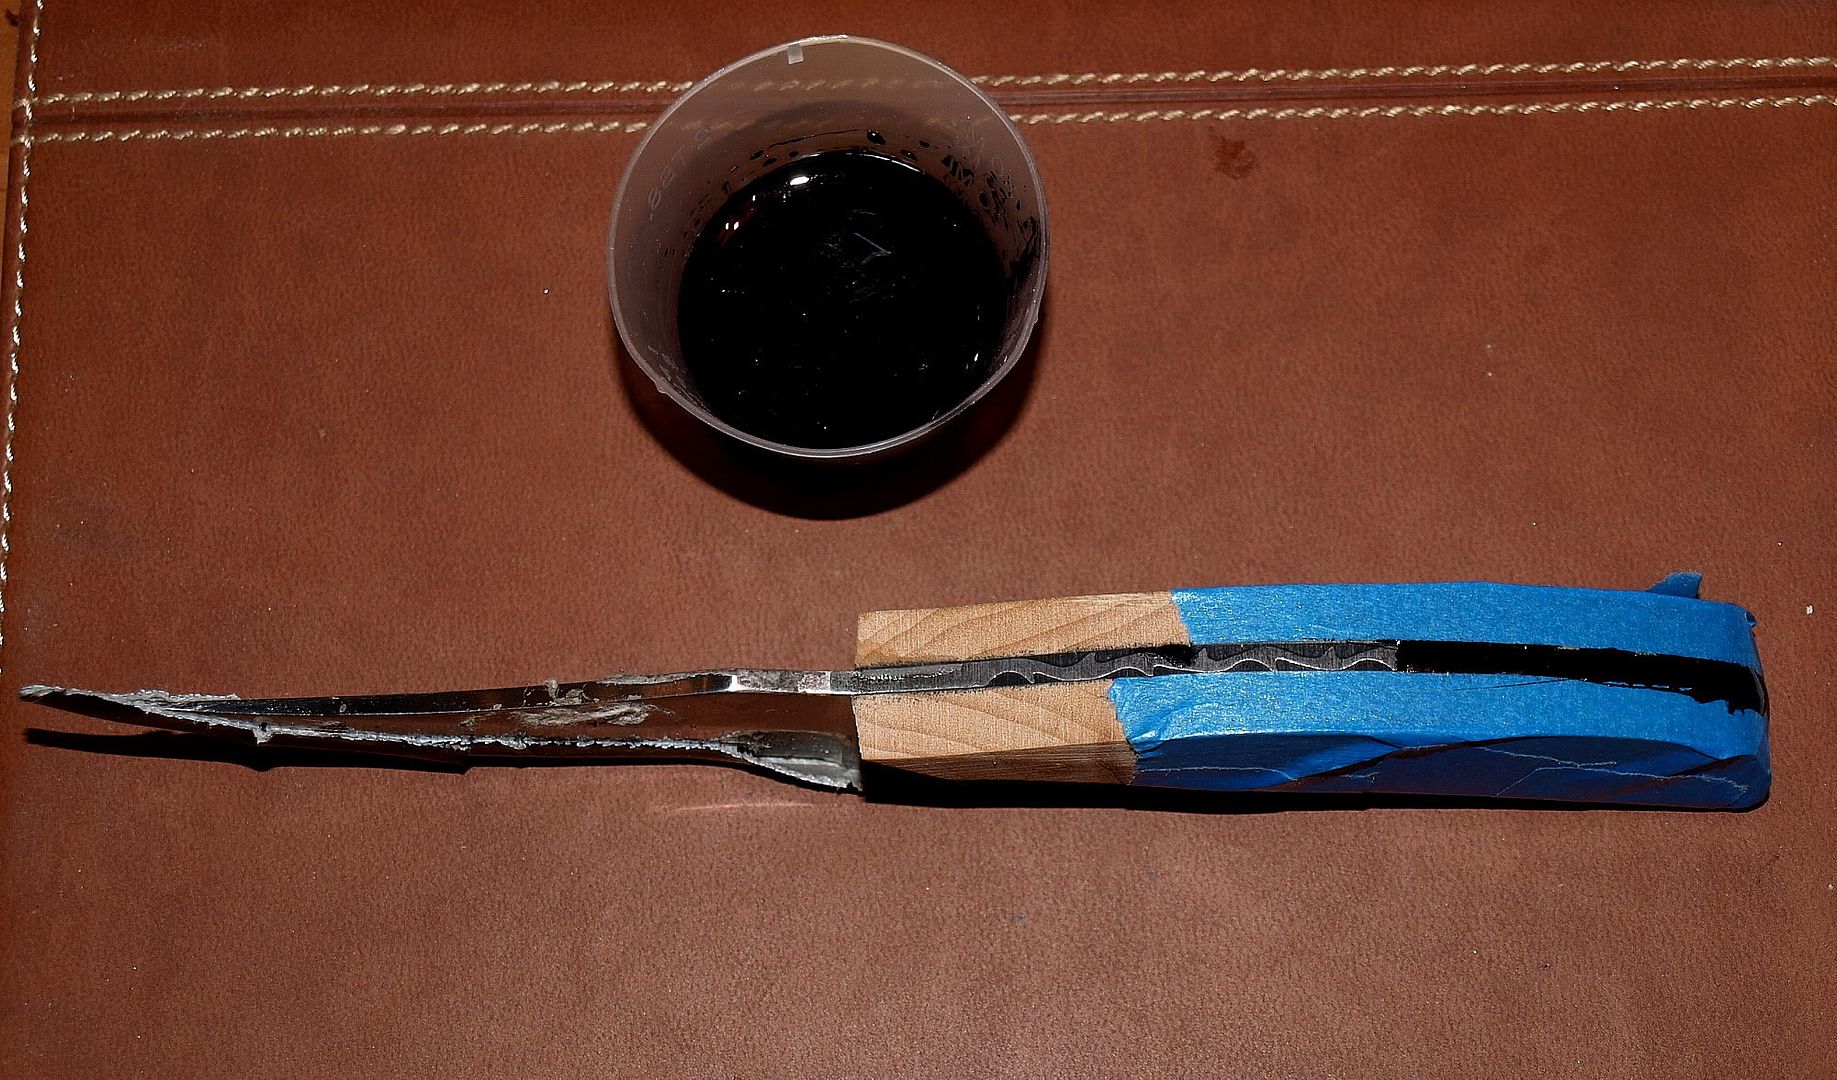
In this picture I have poured my epoxy mixture into the voids of my vine pattern. Once it fully cures... it is sanded flush to reveal the pattern. Here's where you can learn from a minor mistake of mine. I recommend using masking tape on the wood scales. This sanded down fine after curing but would have been easier if I'd have done that. There are numerous epoxies out there that can be used in knife-making for inlays. Many use a popular golf club shaft epoxy which is pre-tinted black, I haven't tried that. I am using a clear epoxy here which I've colored black with a proprietary pigment paste. I mix the pigment into the resin prior to adding the hardener. This is a slow-cure which will produce an excellent durable inlay material, but it's self-leveling and a pain to work with if not careful. I'll be sanding everything down to #1600 grit prior to buffing and I believe this epoxy will take a nice shine.... we shall see.

Jim and D... thanks! That dino piece is large enough to do some cool inlays I think. I'll have to search out Gat's thread with the knife he made.
Meanwhile back at the knife bench.
While waiting for my folding knife parts I went back to working on that first build that I was having trouble with. I've managed to resolve the problems and am back on track with that one again.
The main problem was a very slightly bent knife blank (near the handle tang). It was very hard to straighten since it is 1/8" thick heat-treated 440C. With my mallet and makeshift anvil... I made due and brought her back to true.
Since then I have installed another set of sugar-maple handle scales (kiln dried) from my scrap pile. This time everything went well. All I have left is to fill the detail file-work on the top of the handle tang (vine pattern pictured waaay earlier). Then it's on to shaping, sanding, sanding, sanding, sanding, sealer, stain, oil finish, and wax buffing.
In this picture I have poured my epoxy mixture into the voids of my vine pattern. Once it fully cures... it is sanded flush to reveal the pattern. Here's where you can learn from a minor mistake of mine. I recommend using masking tape on the wood scales. This sanded down fine after curing but would have been easier if I'd have done that. There are numerous epoxies out there that can be used in knife-making for inlays. Many use a popular golf club shaft epoxy which is pre-tinted black, I haven't tried that. I am using a clear epoxy here which I've colored black with a proprietary pigment paste. I mix the pigment into the resin prior to adding the hardener. This is a slow-cure which will produce an excellent durable inlay material, but it's self-leveling and a pain to work with if not careful. I'll be sanding everything down to #1600 grit prior to buffing and I believe this epoxy will take a nice shine.... we shall see.
This pic is a better example of what I'm trying to accomplish.
I've sanded it flush beginning to reveal the vine pattern. You can see I've taped the scales this time and added more filler to areas which had voids. I've also done some handle shaping.
I've sanded it flush beginning to reveal the vine pattern. You can see I've taped the scales this time and added more filler to areas which had voids. I've also done some handle shaping.
While that's curing.... the parts for my folding knife have come in and I've begun to work on that. I'm planning on doing a Cocobolo wood handle for this one.
So far it's coming together nicely.
oops....
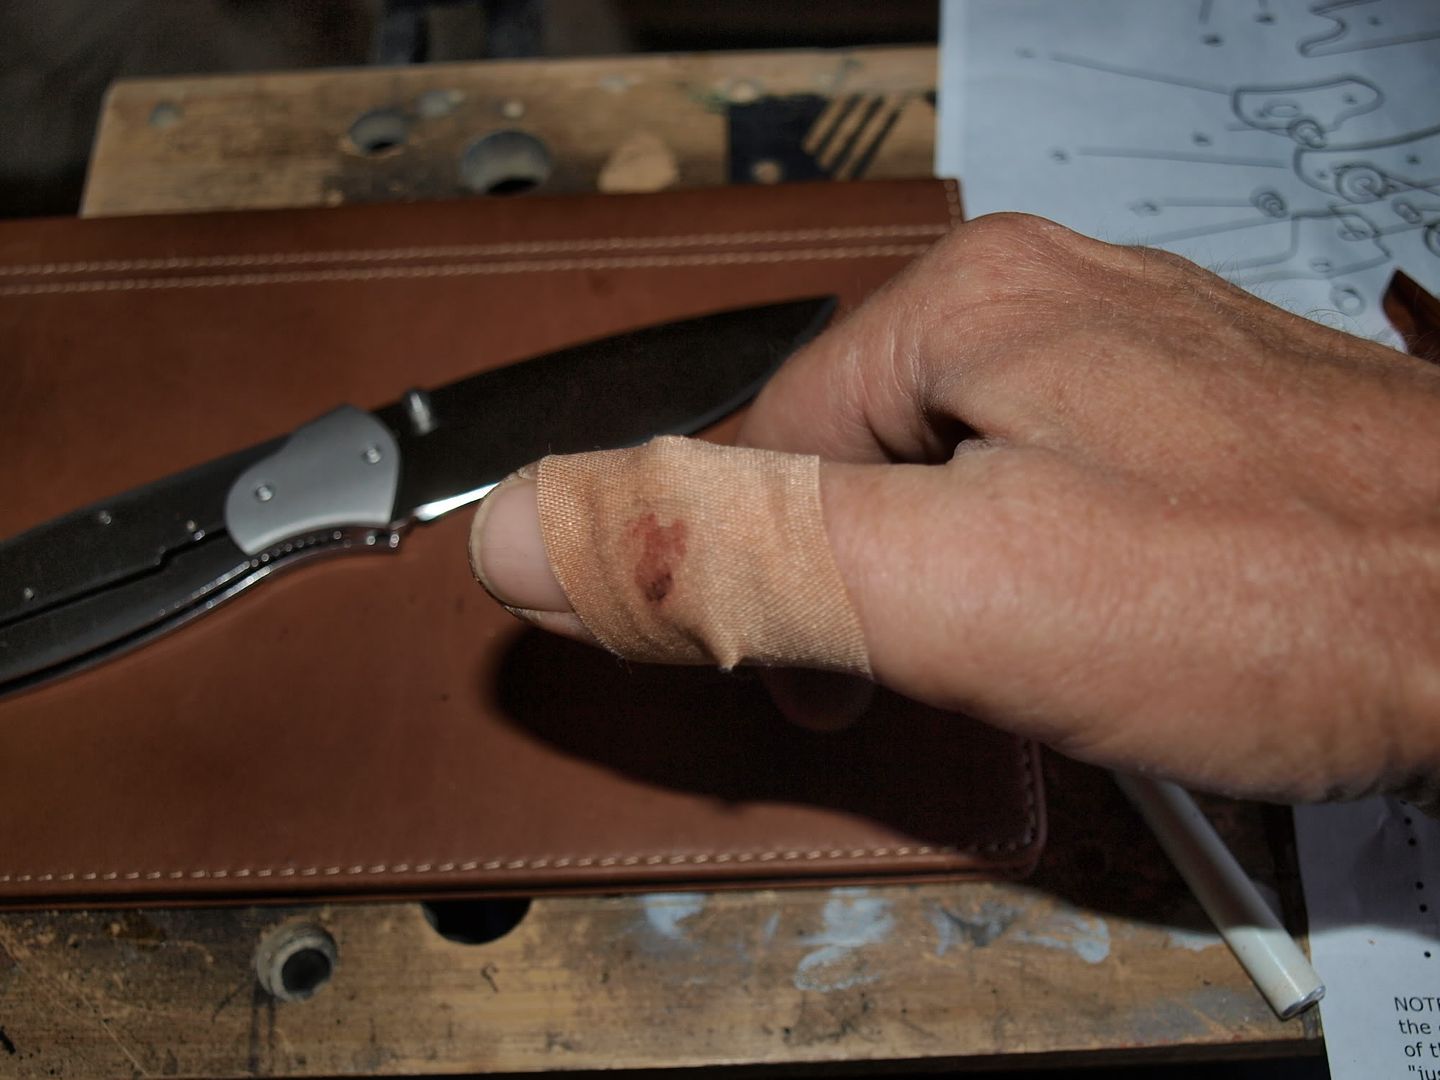
oops....
 Sharpness test..........check!
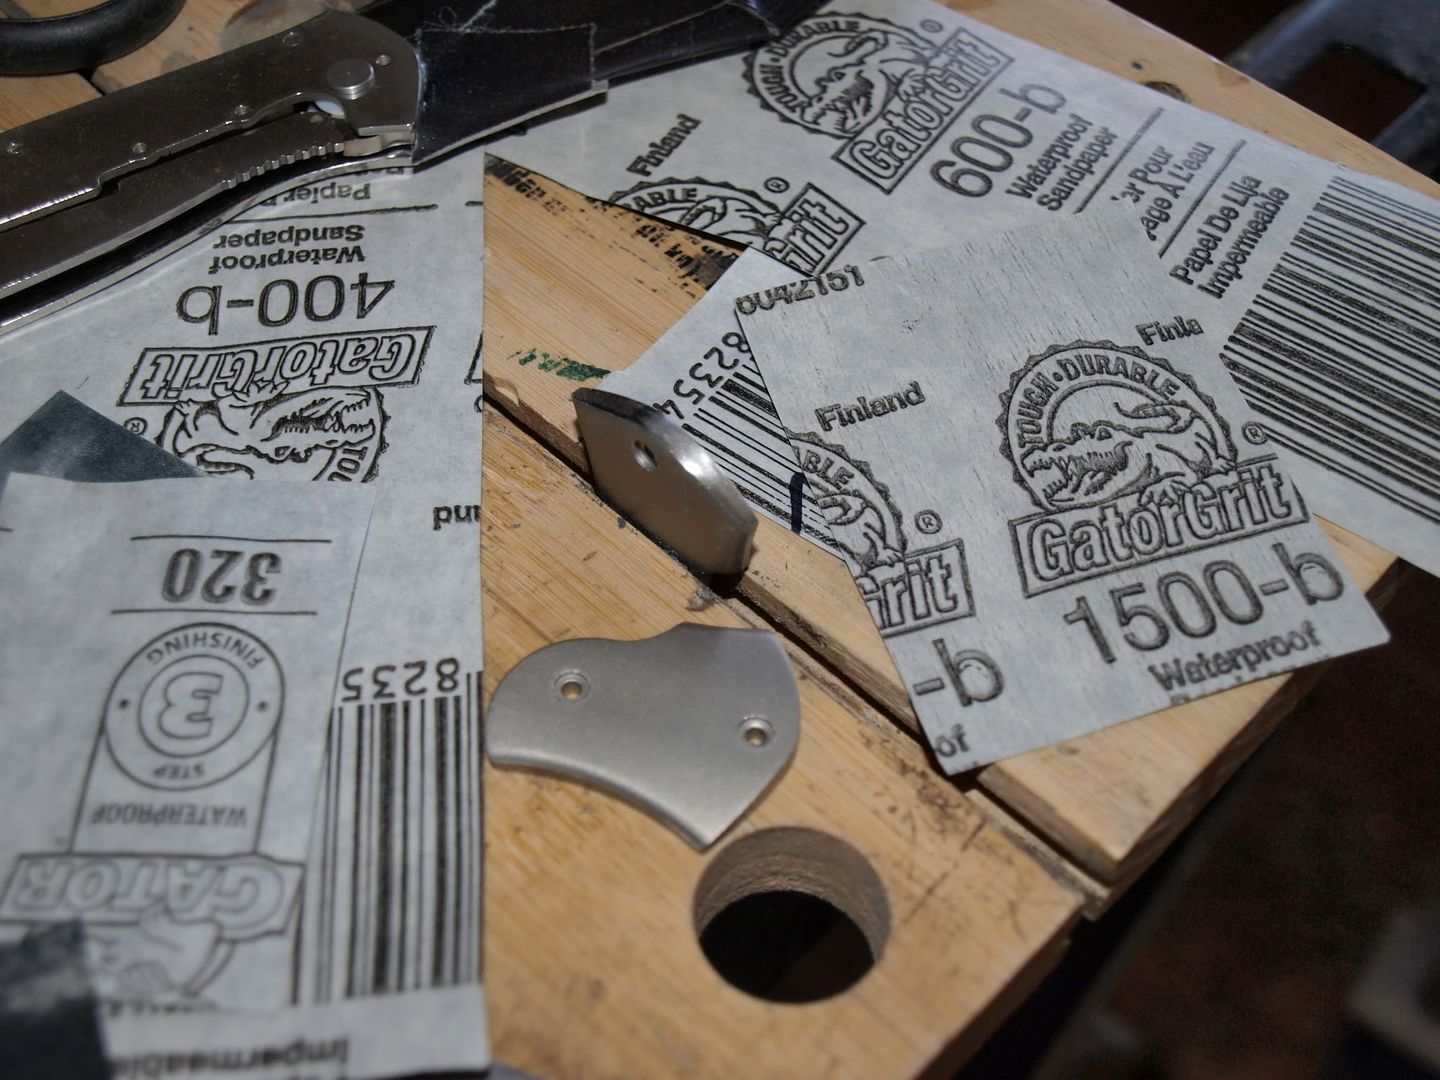
I've disassembled the bolsters and am sanding them. I would like to get these to a mirror finish.
Oops?! Looks like a definate OUCH!
Glad the bent blank could be trued out and still used. The folding knife looks like it will be a fun project too....well, I'd actually suggest less blade testing during though.
You can definately hit a mirror like finish I bet. Once you've sanded out to 1500 grit pictured, then go to the finer/finest wet dry paper you can find. (2200 should be available) Then you can actually use polish medium just like stone work uses.....red rouge, titanium oxide etc with a wet leather pad for a real nice polish. That will be a nice touch to the finish.
Looking forward to seeing them progress, especially the rework to re-expose the vine pattern on the original project.
Looks like a definate OUCH! Glad the bent blank could be trued out and still used. The folding knife looks like it will be a fun project too....well, I'd actually suggest less blade testing during though.
You can definately hit a mirror like finish I bet. Once you've sanded out to 1500 grit pictured, then go to the finer/finest wet dry paper you can find. (2200 should be available) Then you can actually use polish medium just like stone work uses.....red rouge, titanium oxide etc with a wet leather pad for a real nice polish. That will be a nice touch to the finish.
Looking forward to seeing them progress, especially the rework to re-expose the vine pattern on the original project.
QUOTE (ColoradoProspector @ Jul 29 2012, 11:55 AM) 
Oops?! Looks like a definate OUCH!
Looks like a definate OUCH! nah.... it's just a flesh wound

 Haha, classic!!....Monty Python
Good one Swizz! LMAO!!
Haha, classic!!....Monty Python
Good one Swizz! LMAO!!
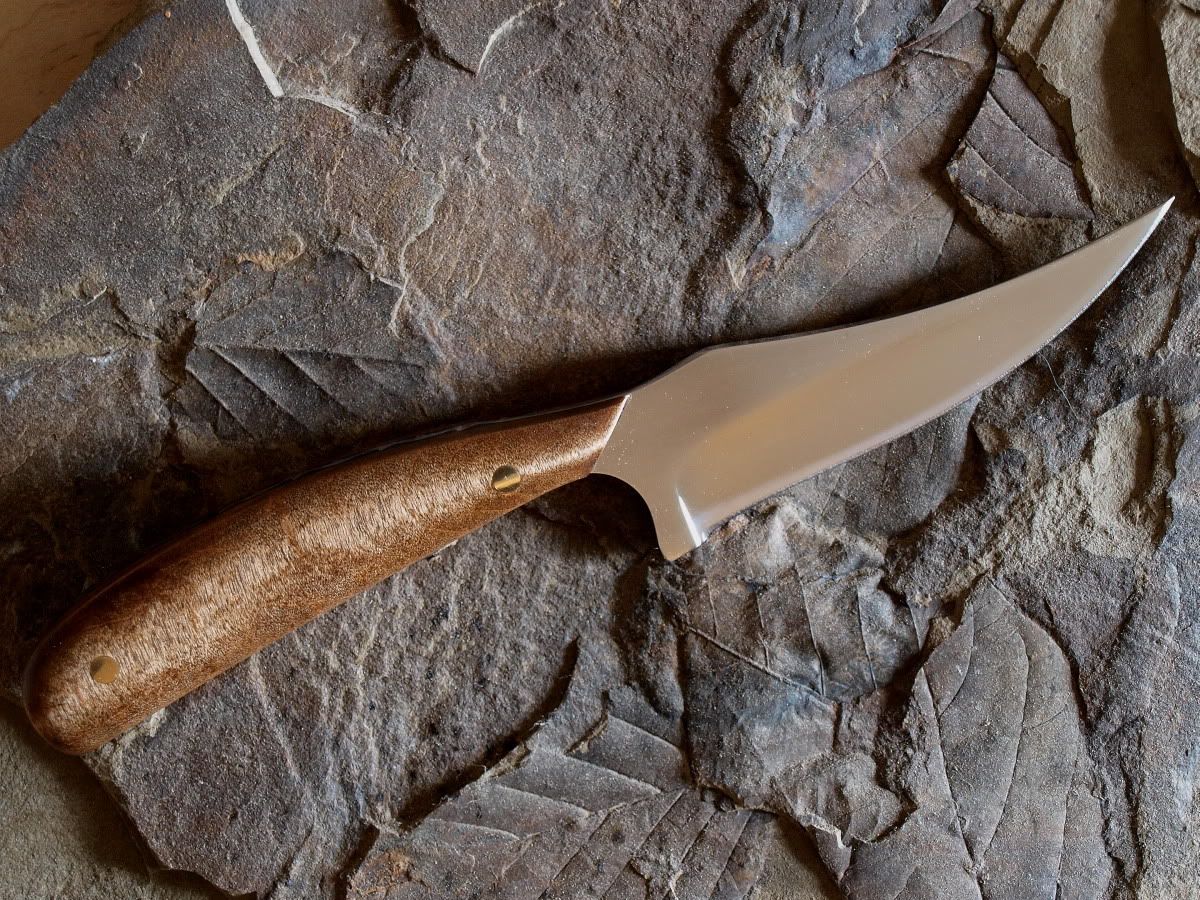
Ok.... I have finished the knife that I had problems with earlier. This is the one that I did the custom file work on.
I'm still working on the folding knife and should have that one wrapped up tonight. My next build after that will be a nice Chef's knife (which I need). I'm going to be making that from a blank as well, so it should be really easy. I also ordered some bar-stock metal... so after that I will attempt to design and make my own blade from scratch. That'll be a new learning process I'm looking forward to.
I'm still working on the folding knife and should have that one wrapped up tonight. My next build after that will be a nice Chef's knife (which I need). I'm going to be making that from a blank as well, so it should be really easy. I also ordered some bar-stock metal... so after that I will attempt to design and make my own blade from scratch. That'll be a new learning process I'm looking forward to.
IMPRESSIVE!
Wow Chris that's quite beautiful. Uhh my birthday is Monday...hint hint.
Uhh my birthday is Monday...hint hint.
That turned out incredible, you do amazing work. The custom file work looks fantastic! You hit another one right out of the ballpark Chris!
BTW....Pretty sweet looking fossil leaves specimen it is sitting on also!

Thanks for the kind words you guys. 
The level of building that I've been doing is not terribly difficult to learn or do and I would encourage anyone who's interested to try it. It's also rewarding because you can use, sell, or barter the end product. It's just fun to create stuff. Even with minimal hand tools and a shoestring budget, this can be done by you. I received my (full tang) Chef's knife blank and I'll crank out a handle for it and be done fast. After that I'm kicking it up a notch by making my own blade blank from annealed bar stock (ATS34 steel) then getting it professionally heat treated. That will be my next step to creating original crafted blade designs that I can put my name on.
hehe... I thought you might like that old fossil plate. I was looking around here for a good background and settled on that one.
The level of building that I've been doing is not terribly difficult to learn or do and I would encourage anyone who's interested to try it. It's also rewarding because you can use, sell, or barter the end product. It's just fun to create stuff. Even with minimal hand tools and a shoestring budget, this can be done by you. I received my (full tang) Chef's knife blank and I'll crank out a handle for it and be done fast. After that I'm kicking it up a notch by making my own blade blank from annealed bar stock (ATS34 steel) then getting it professionally heat treated. That will be my next step to creating original crafted blade designs that I can put my name on.
QUOTE (Mrs.CP @ Aug 3 2012, 07:54 AM)
BTW....Pretty sweet looking fossil leaves specimen it is sitting on also!
hehe... I thought you might like that old fossil plate. I was looking around here for a good background and settled on that one.
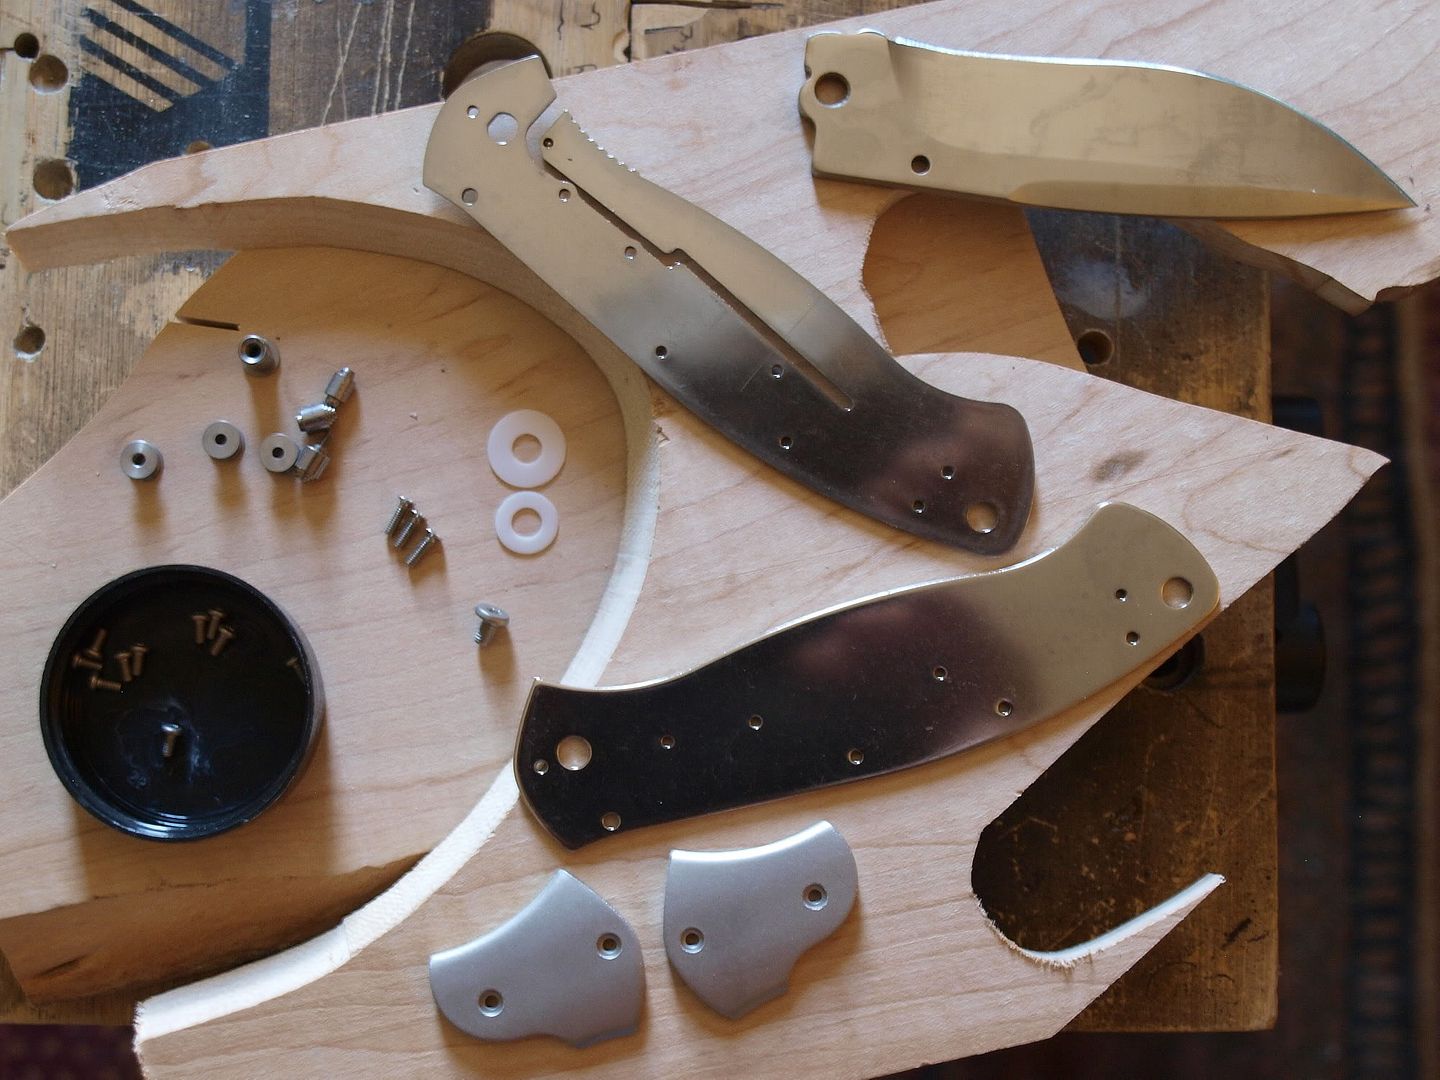
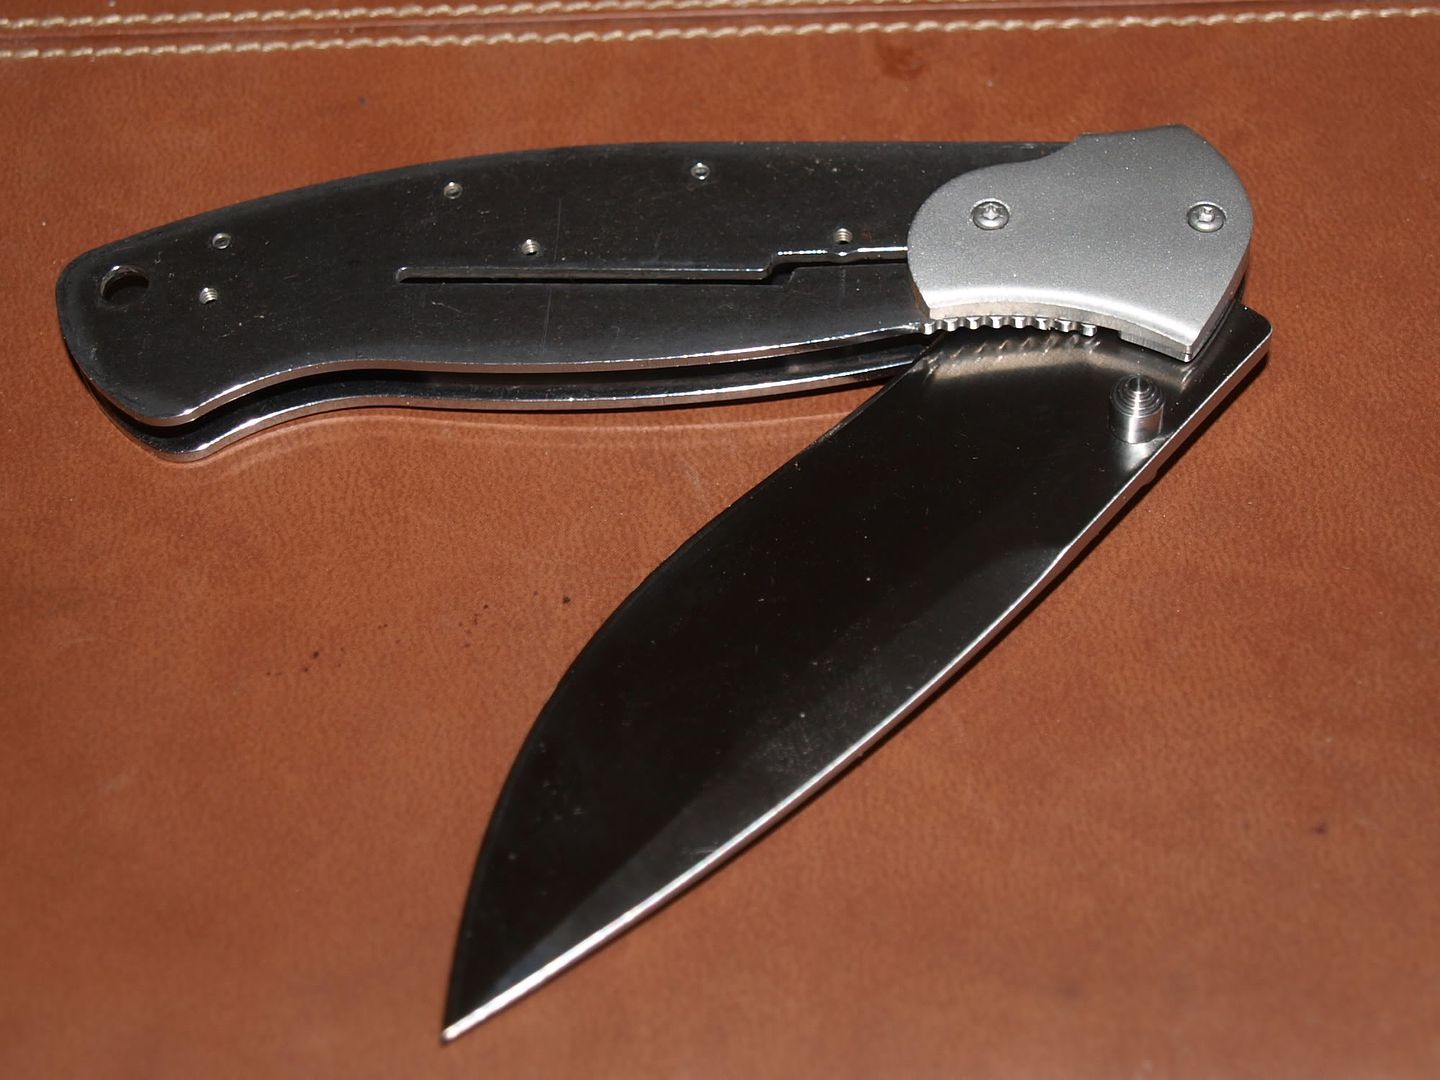
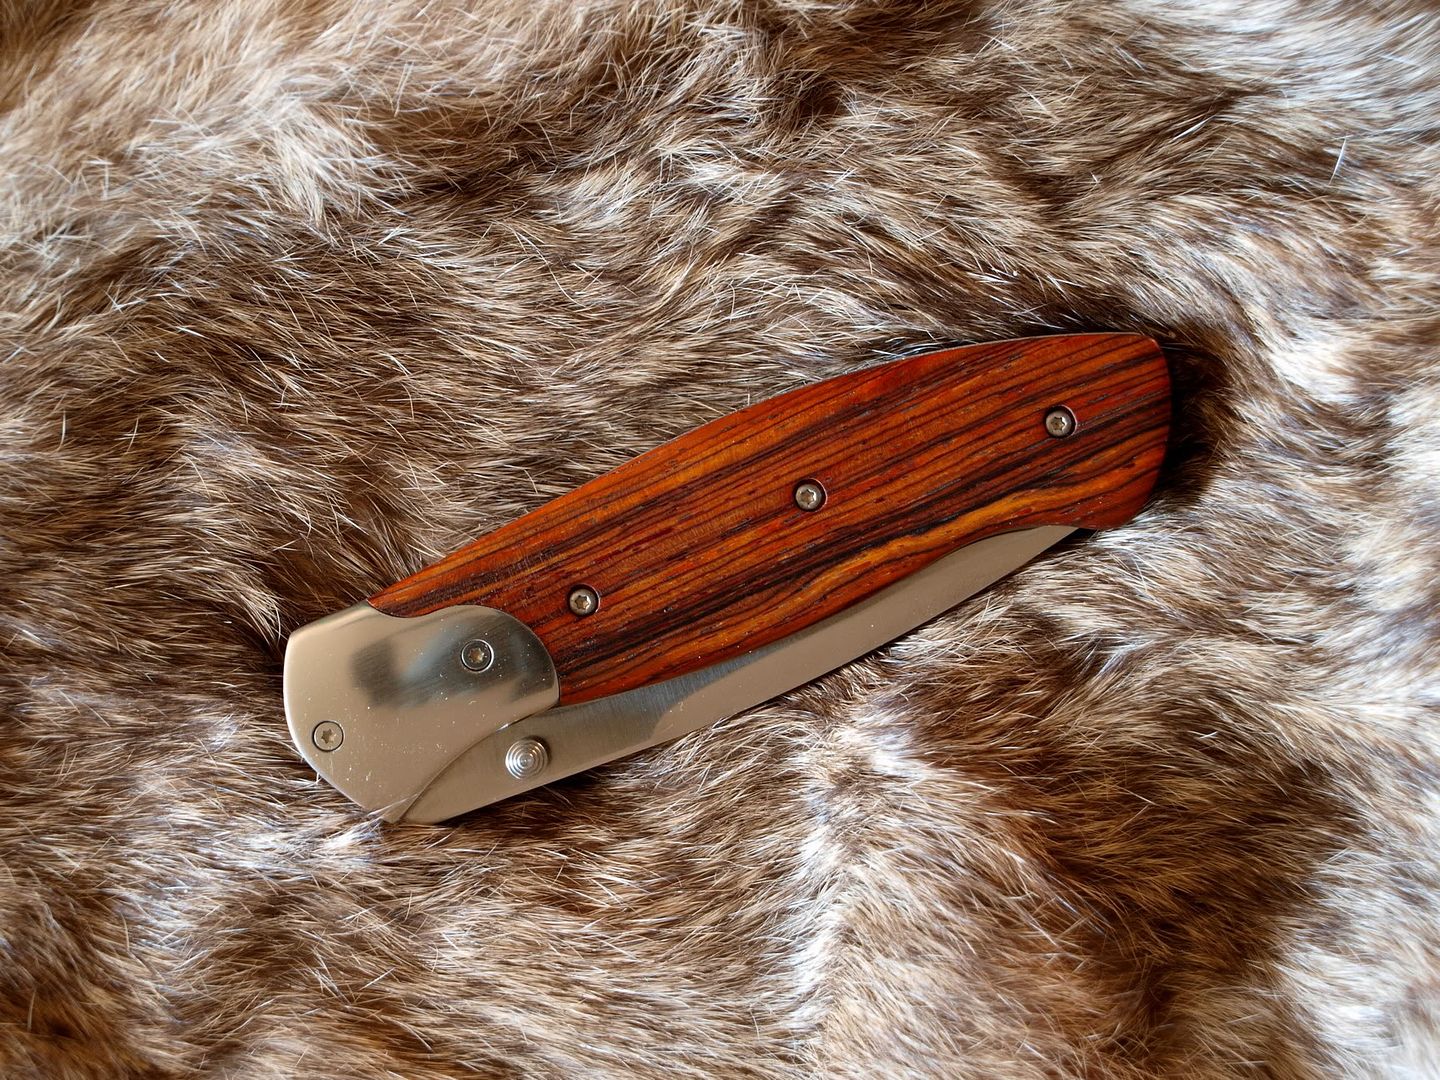
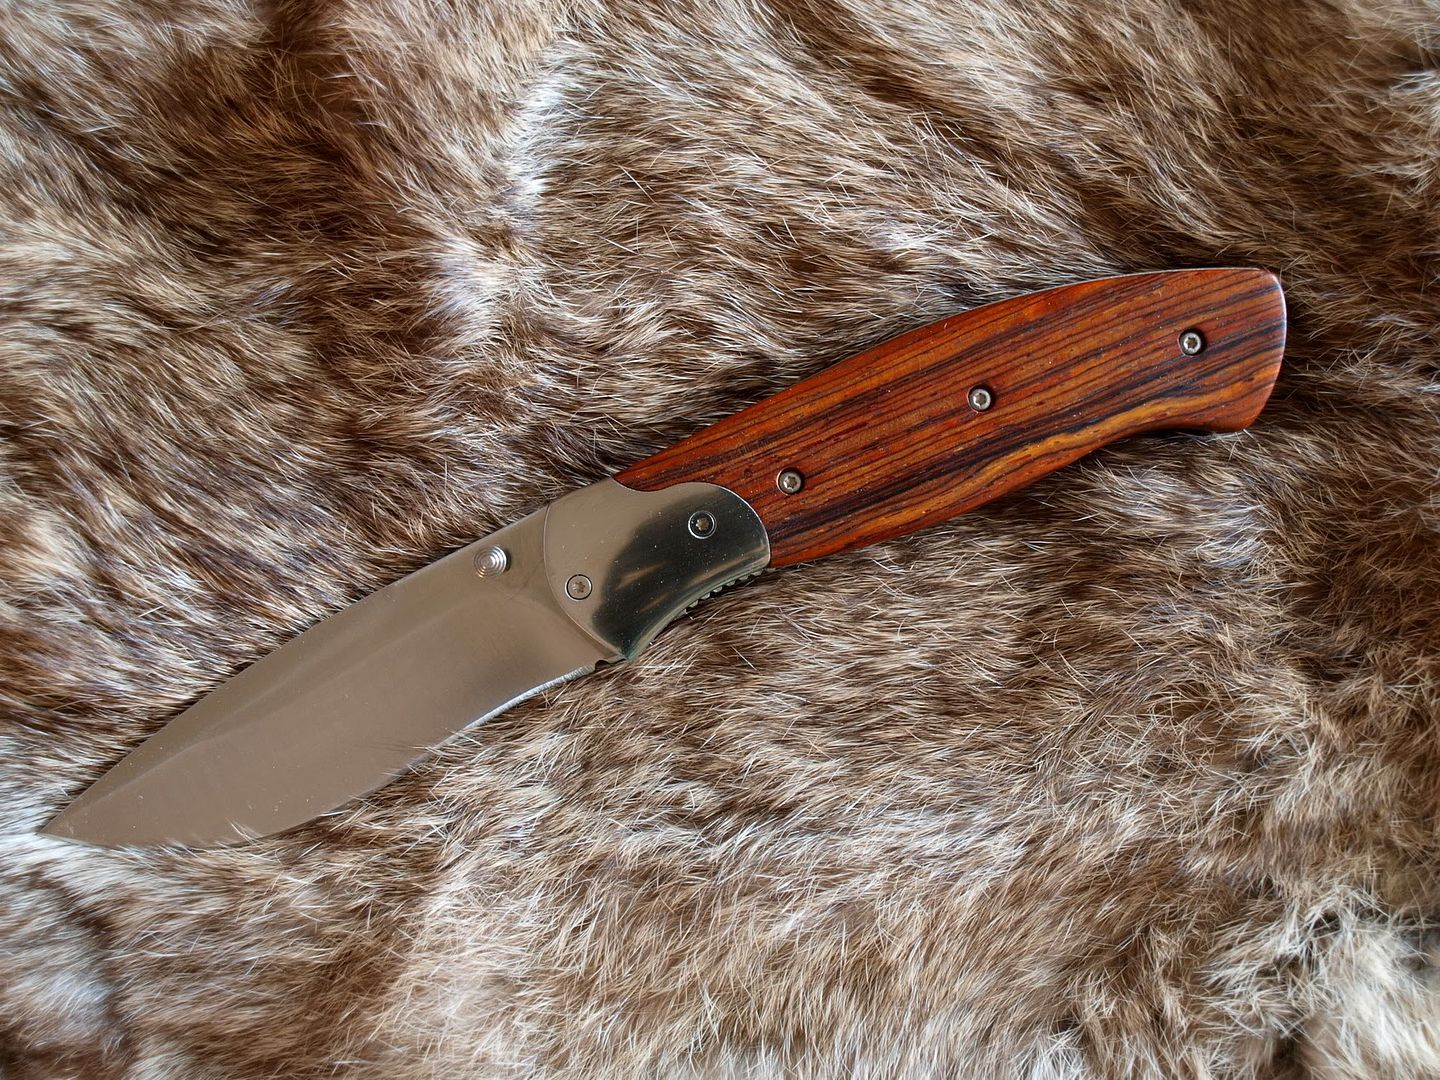
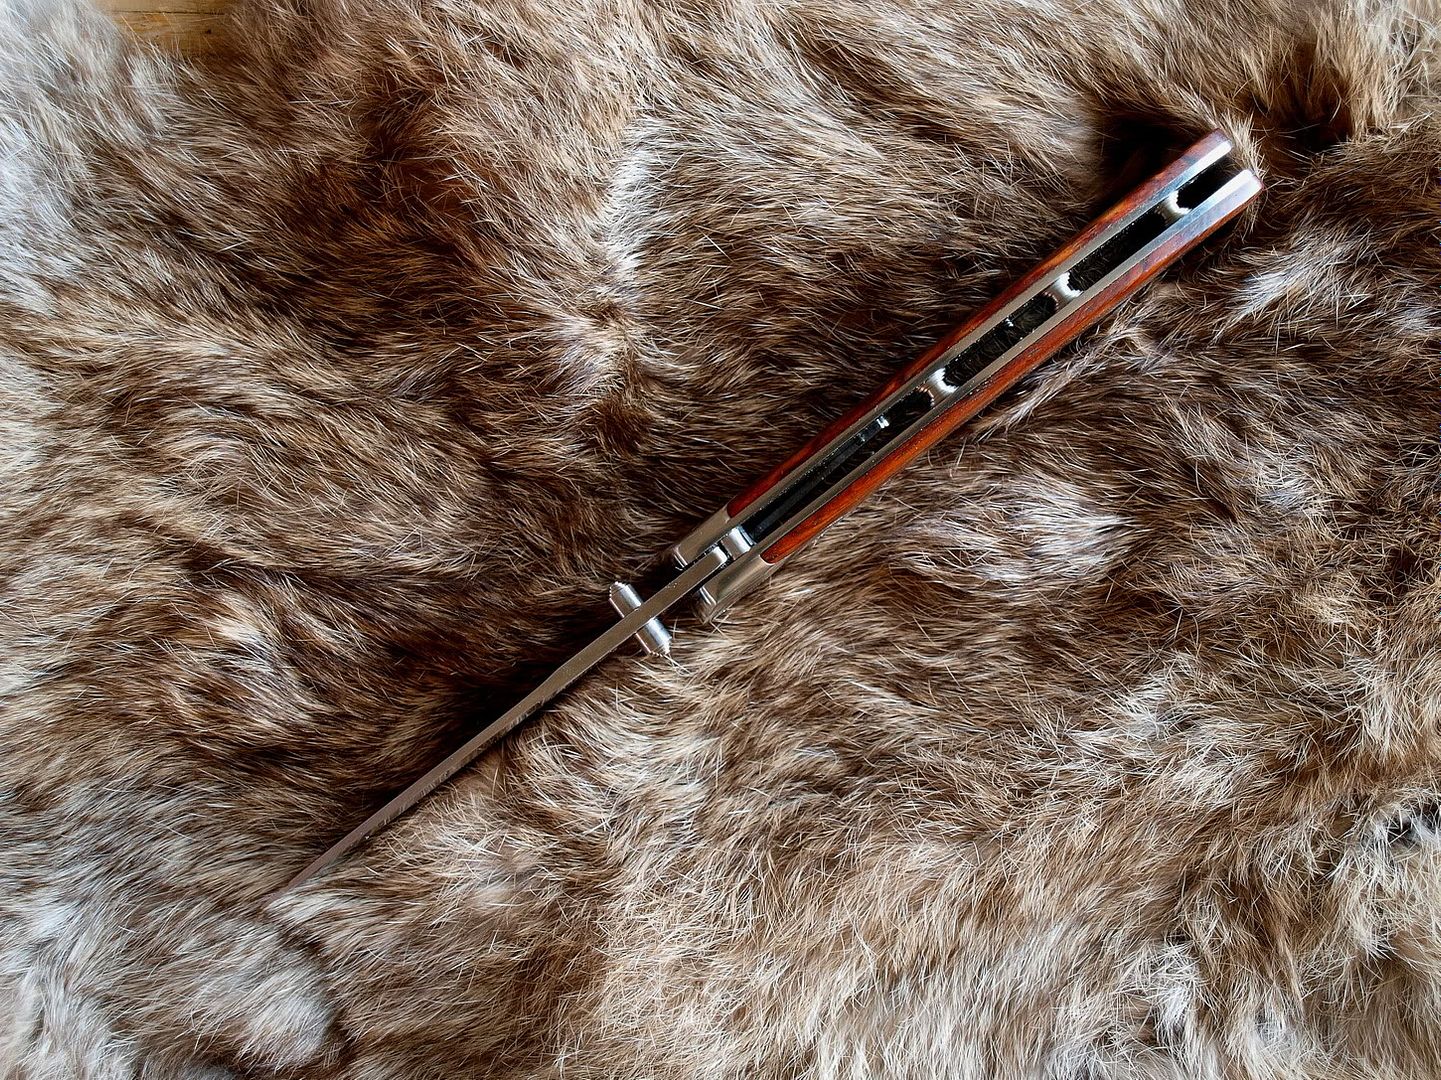
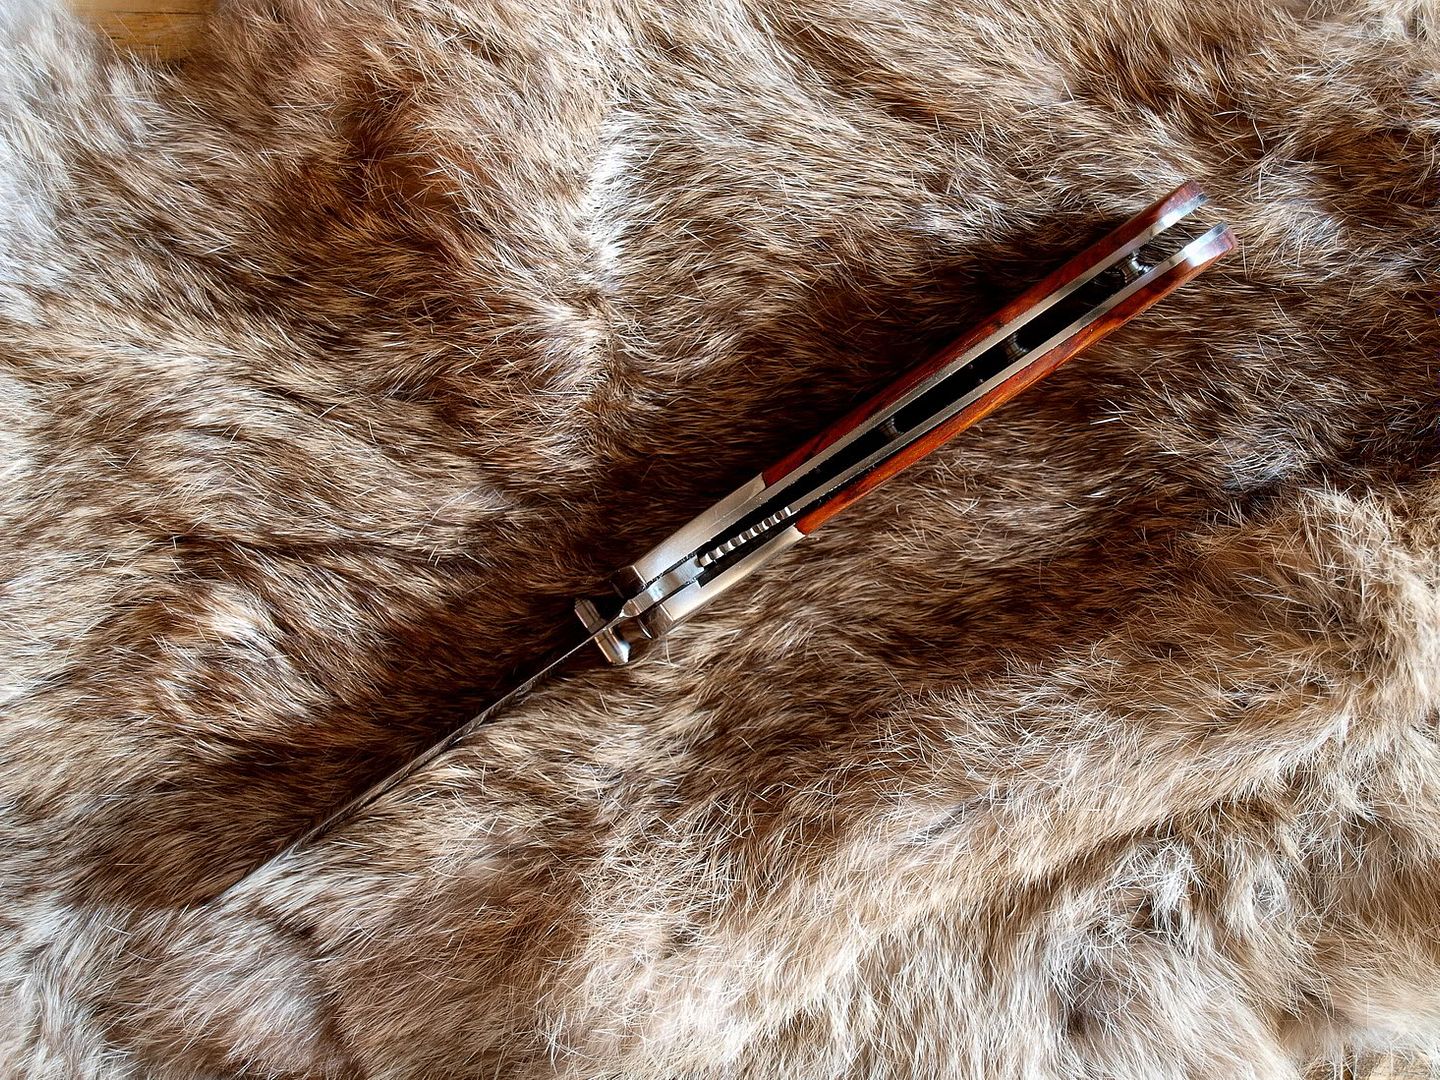
Here is the liner-lock folding knife I just completed. It was a very good learning experience. The blade is almost 4" long so it's a biggun. Steel is AUS8 and I used Cocoblo for the handle.
Here's the Chef's knife that I'm beginning work on. This blank is pretty rough so I'm going to spend some time sanding and buffing it before I make a handle for it. The steel is AUS8 and already heat treated/hardened.
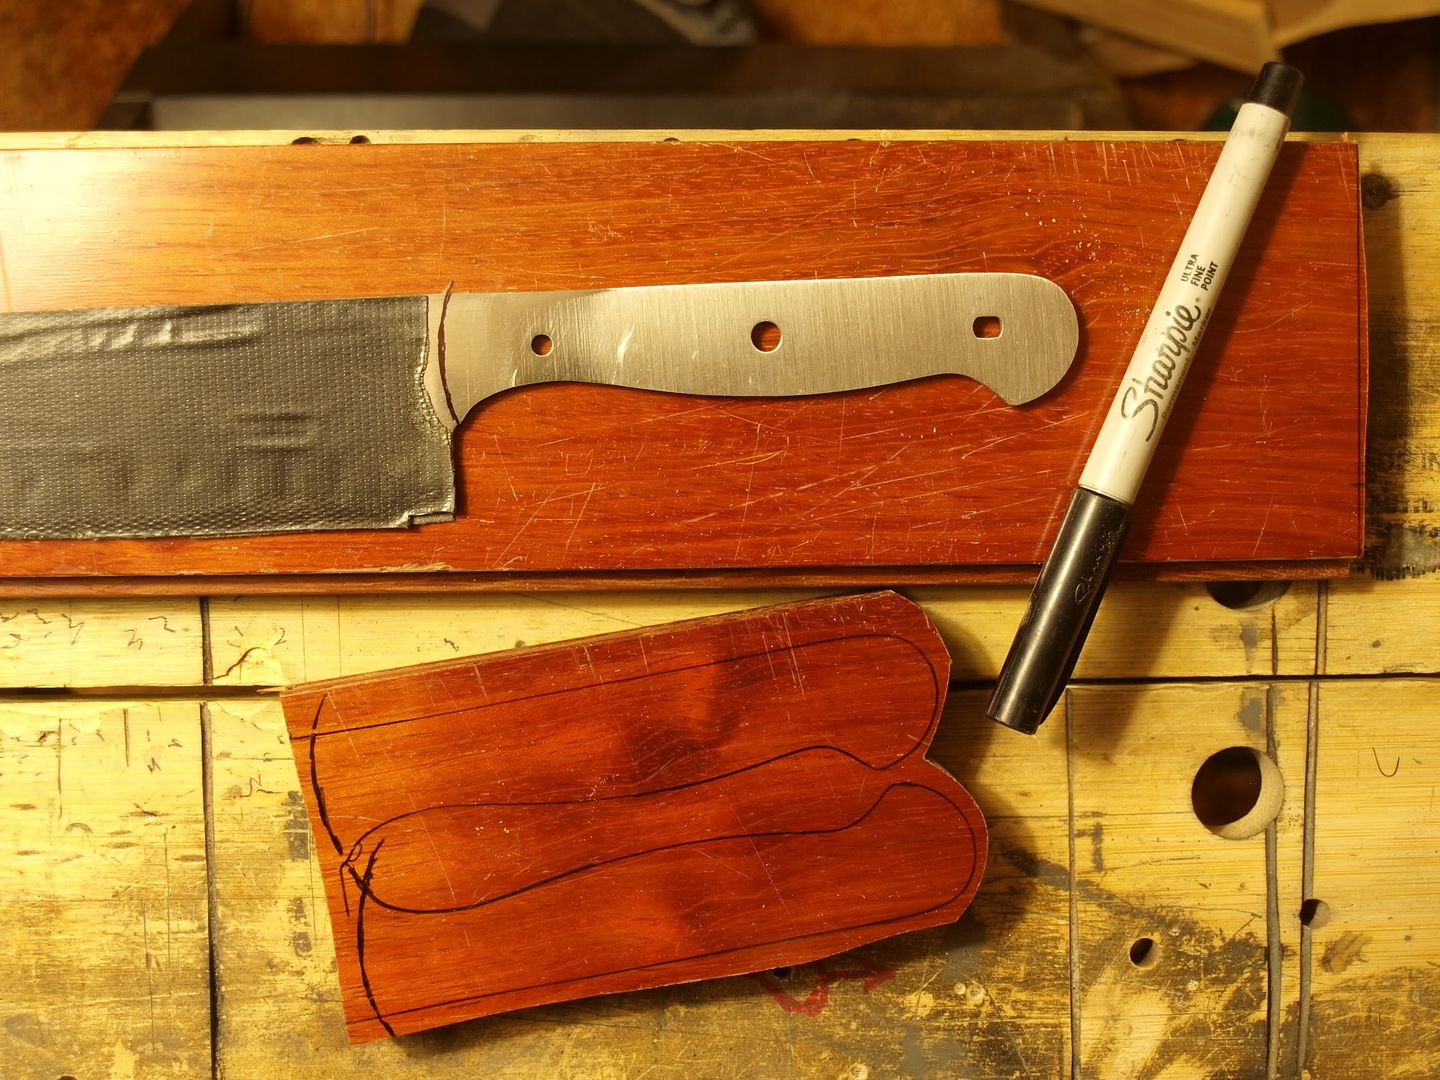
I'm going to use a piece of scrap tongue & groove wood flooring (mahogany) for handles on the Chef knife.
If you have a keen eye, you'll notice that I've reshaped the handle tang a little. I used a flex Dremel with coarse sanding barrel bit and shaped it to my liking.
If you have a keen eye, you'll notice that I've reshaped the handle tang a little. I used a flex Dremel with coarse sanding barrel bit and shaped it to my liking.
That turned out great Chris! Sweet looking wood handle, good job!
I have to also mention that beautiful bunny (?) pelt that it is on. Nice! I'm looking forward to seeing the chef kife finished. Looks like your crusing right into it.
I have to also mention that beautiful bunny (?) pelt that it is on. Nice! I'm looking forward to seeing the chef kife finished. Looks like your crusing right into it.
You got it right... that's a wabbit pelt! I have a few different colors of them in my fly-tying supplies. The rabbit might be dead but that pelt will live on and be used for many things.
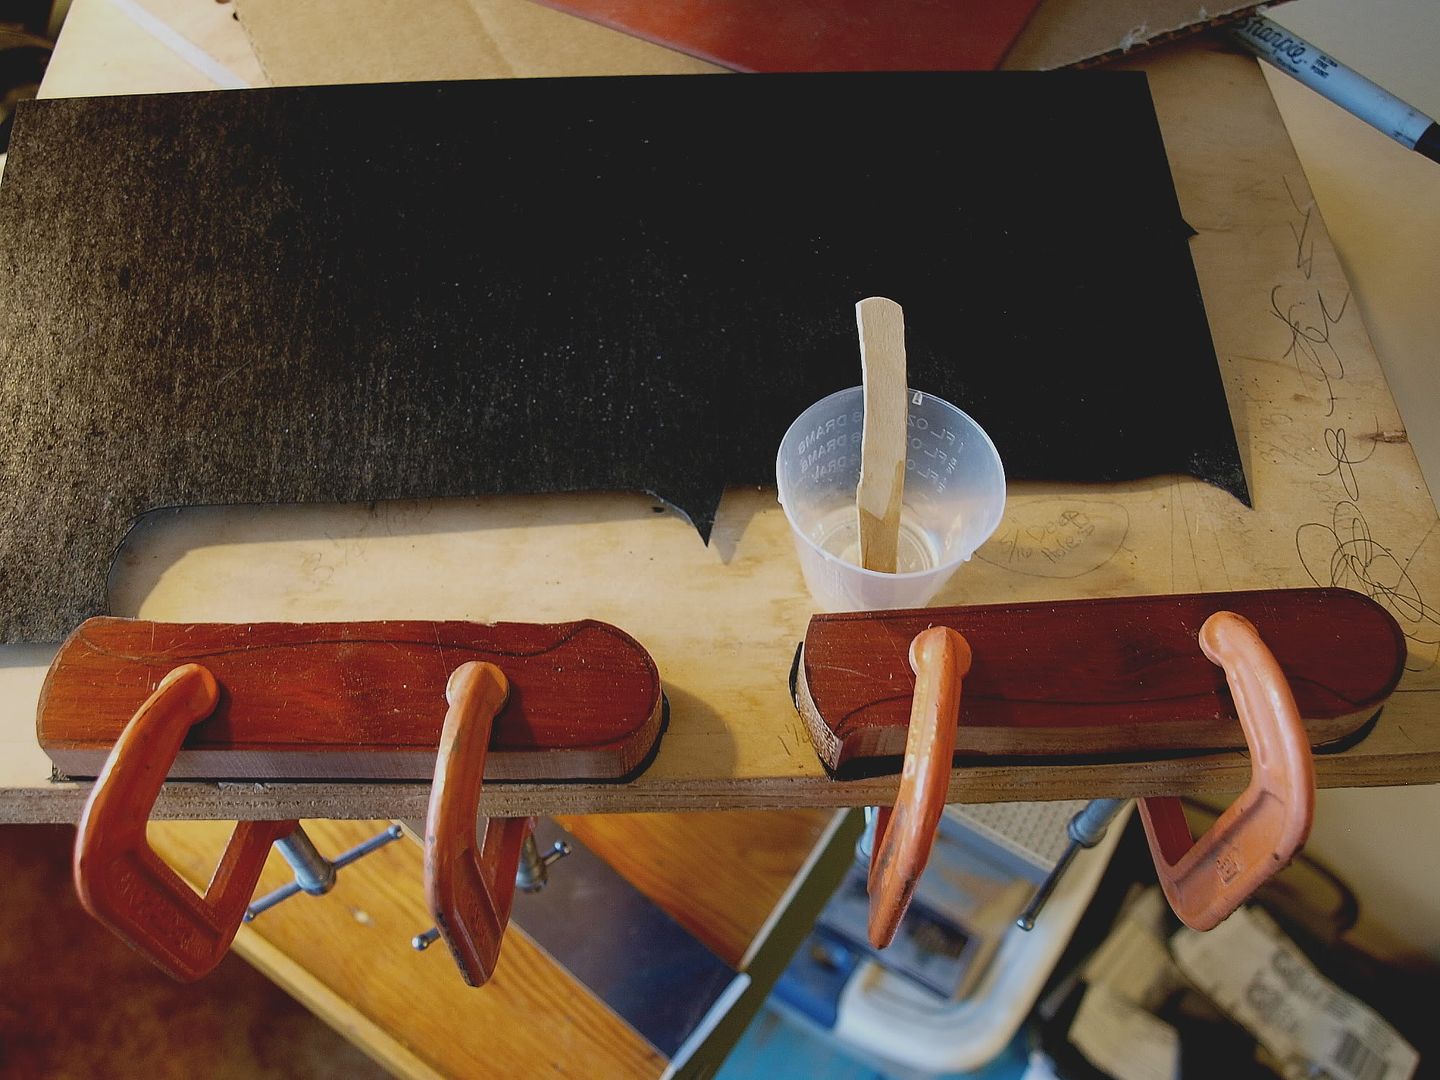
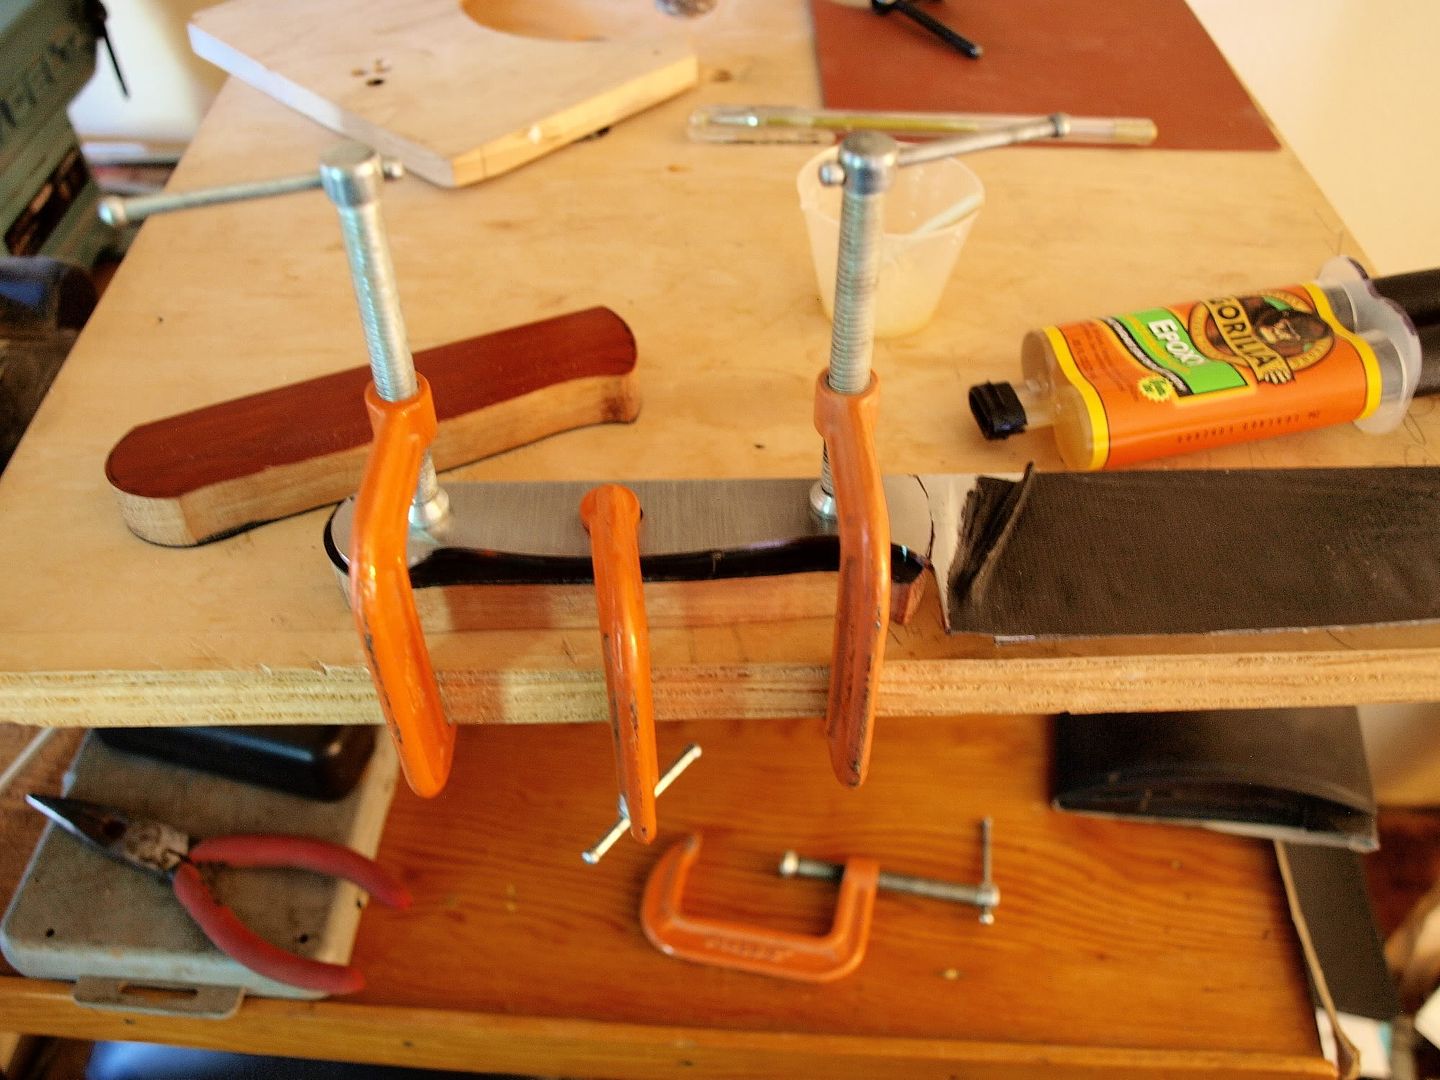
Chef knife handle progress: I'm adding handle spacers to this one and thought I'd share this process real quick. It doesn't serve much function other than aesthetics. This spacer material is black and made of some kind of plastic. It comes in many different colors and is very thin. Some spacer material is made of vulcanized paper and/or other materials. I bought this from a knifemaking supply store (online) and the sheet was only a couple of bucks. There's enough left over to use on future builds.
Here I have cut it and epoxied it to my rough handle scales using Gorilla epoxy. The spacers will be tight against the handle tang once I attach the scales to the knife. I'll let the epoxy set for a couple of hours before unclamping and then move on to attaching them to the knife.
While that's drying...
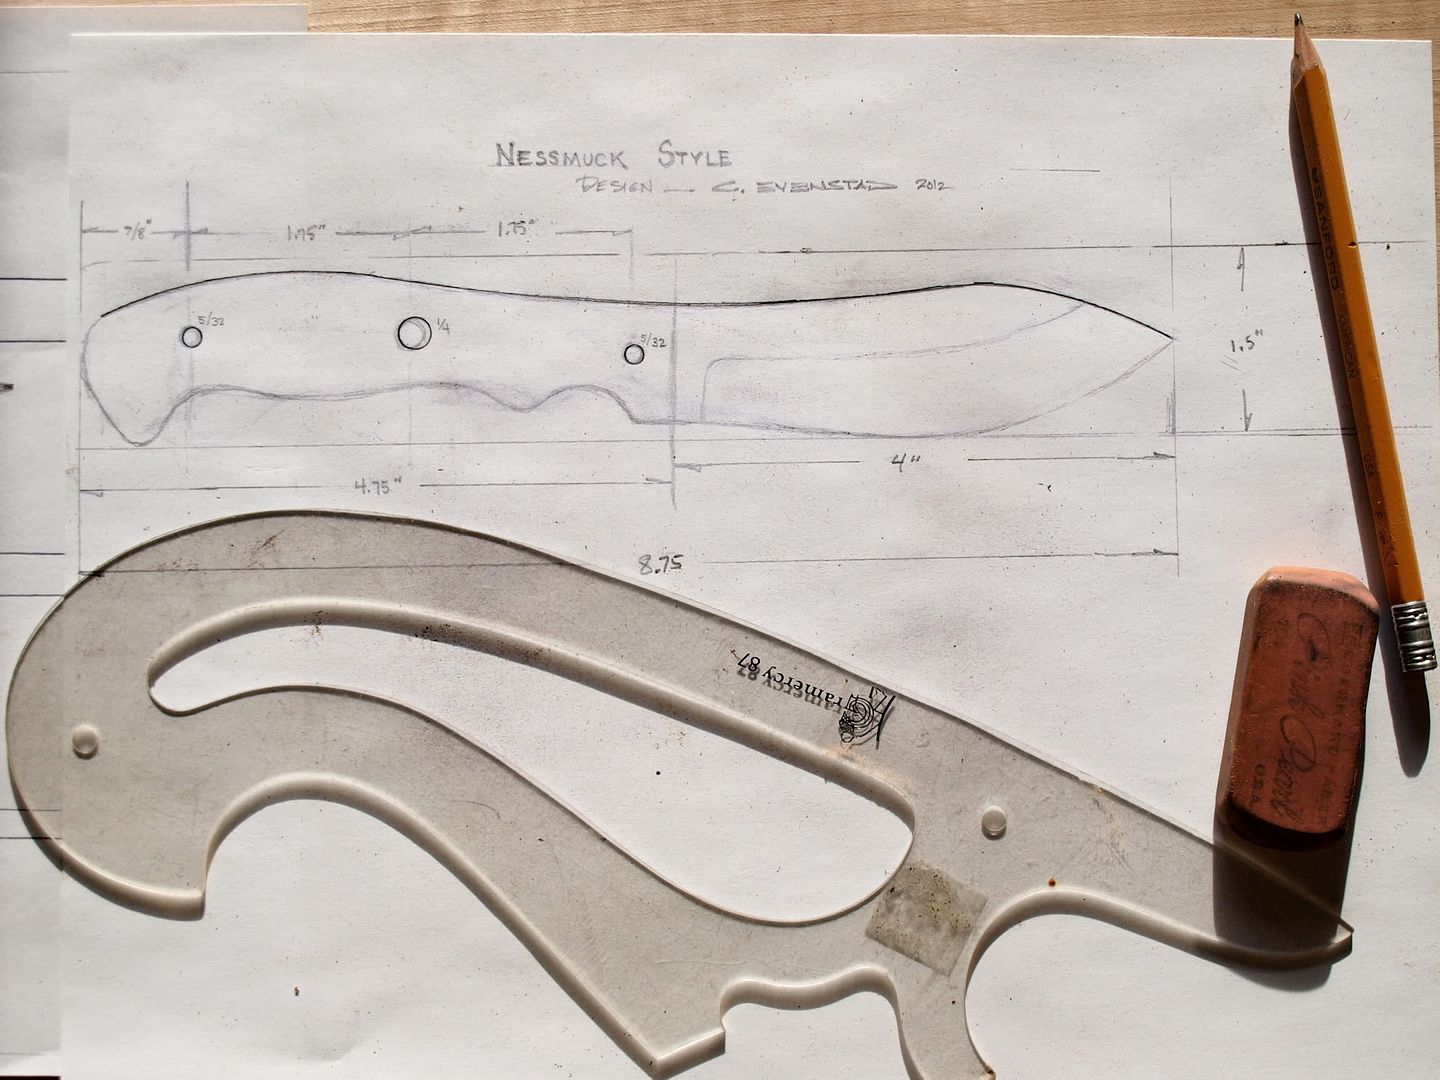
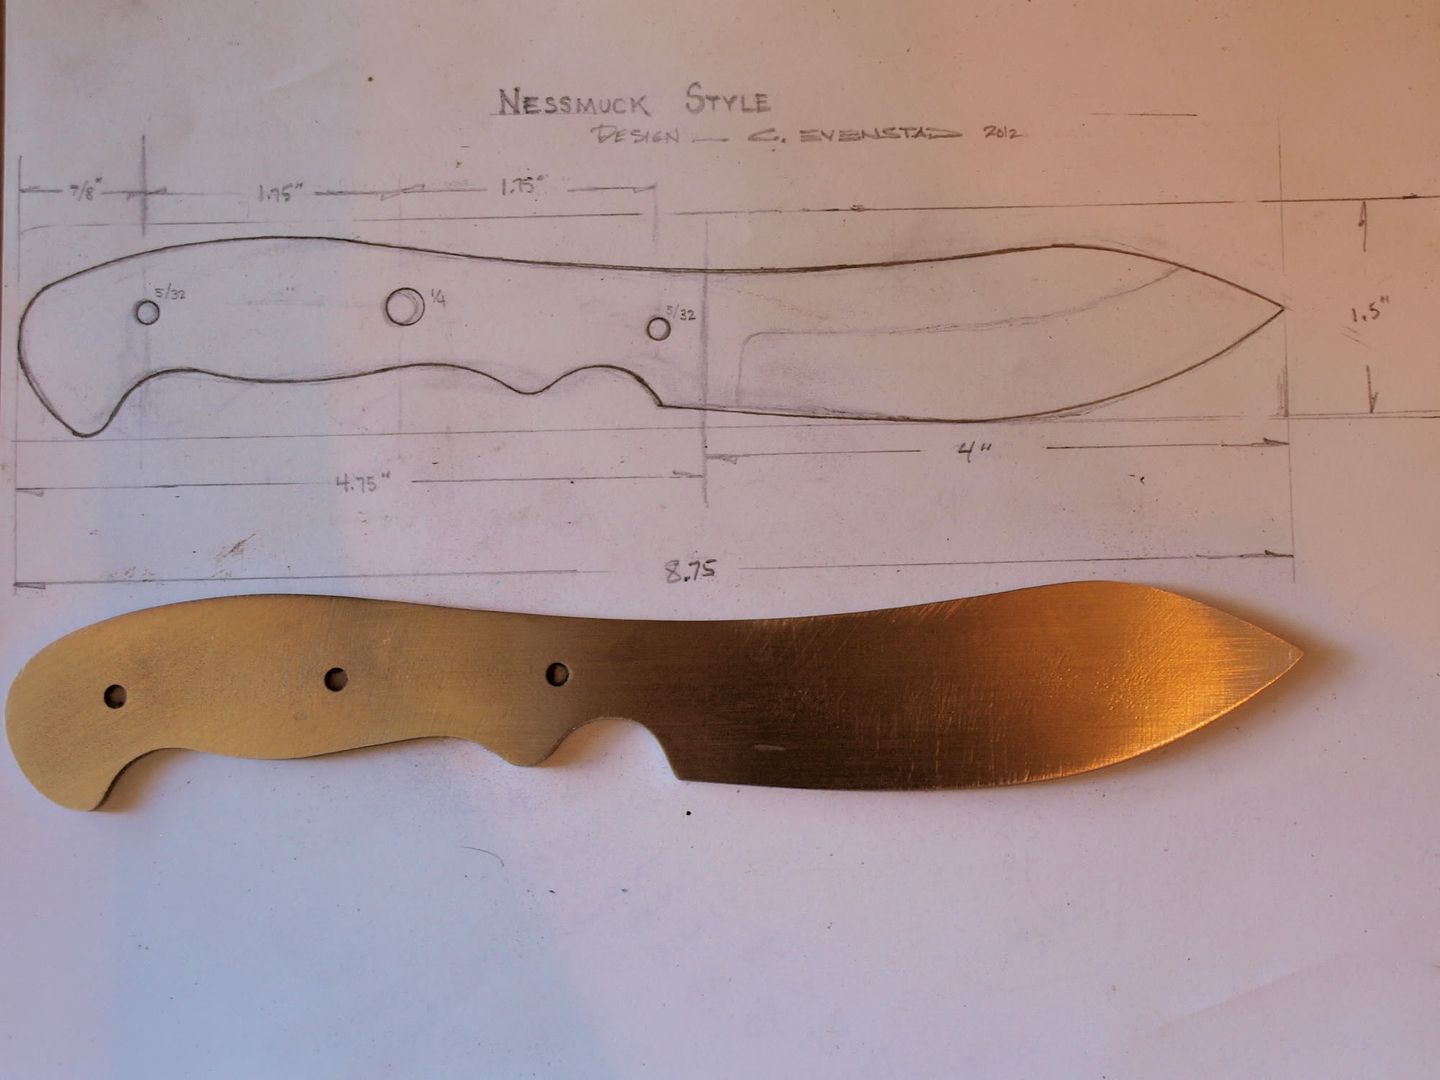
I've designed my first blade. This is my sketch of what I'll be building next. I'll make a template of this drawing and transfer it to the bar stock steel. The metal I will be using is also pictured. ATS-34 is an excellent steel for knifemaking. This piece is annealed but not heat-treated yet. That will make shaping and detail filing less difficult. Once I cut, shape, and detail the knife blank... I'll send it out to be heat treated to a Rockwell hardness of 58-60. When it's returned, I'll begin work on the handle. This method of knifemaking is "Stock Removal". This will be my first try at it and hopefully produce an original piece that I can call 100% my own.
My design is based on the very old Nessmuck style of knife which was extremely common in the 1800s. Kind of an all-purpose knife used by the settlers, cowboys, miners, hunters, ranchers, etc. Handle materials and handle styles for this knife can be basically anything the builder chooses but the common trait of the Nessmuck is the blade shape which is similar to a modern skinner. I guess I chose this blade shape/style cuz I'm kinda old fashioned.
Go ahead and admit it Chris. You are a pro knife maker with eons of training and experience. There ain't no way that you are new at it. Your work is giving you away. If you expect us to believe that you are a novice you need to leave a flaw or two...beautiful work dude.
I really wish I had more experience at this. My only experience is from when I was in high school 1979. I had both Metal and Wood Shop classes. We were allowed to do a combined shop project that year which was "Make A Knife". We crafted the blade (full tang) in Metal Shop, then the next hour was Wood Shop where we did handle work. I really got into that project and got an A after turning in my knife... which somehow got stolen from the Shop locker!!!
 After those long hours of crafting that knife as teenager, then to have it ripped off, I thought I was cured of knifemaking forever and went back to crafting marijuana pipes when the teacher wasn't looking.
  Needless to say, I plum forgot everything about how to "Make A Knife". I doubt any Shop classes in the country offer knifemaking classes anymore, lol... hell we were making and wearing hunting knives in school, gun racks in trucks. Lucky to live in that more innocent time and a small rural community as a kid. Now that my interest has been rekindled by Woody's gift of a Machete... I dove in a bit and used the internet to learn, which is a tremendous resource as you know.
I made plenty of mistakes on that one with the vine pattern but managed to back-track and fix them as I went along (I think this is known as the "Texas Two-Step"
). What should have been a fast build took forever and that's ok.. have to put my hands on all the burners. I was really super careful with the folding knife and that one turned out well. The large skinner that I made is far from flawless in my mind. I had problems squaring the bolsters and if I look hard I see much room for improvement on that one. I'm getting better now but will continue to make mistakes for sure. As a beginner I can testify again that it can be done by anyone with patience and determination with minimal tools or investment. I got a little 'artsy' with the vine thing but it's not a necessary skill for making a quality knife. You should try it Jim! Making them from blanks is fun and easy and I already know that you are an exceptionally talented artist with attention to detail and an eye for beauty. Your works don't lie and I have a guitar pick here to prove it! I might turn out to be a flop at stock removal but I have to try it. Steel shaping is a much different animal than what I've been doing thus far.
Chef knife.... here I've epoxied one handle scale with the black spacer facing the tang. I'll leave it clamped overnight then drill holes for the pins.
Meanwhile... with the Nessmuck project, I had to alter the design. After cutting out a template from my first drawing it was apparent that the handle tang was too small. Here, I have altered my drawing and added another 3/4" to the tang as well as lengthened the blade. I'm cleaning up the curves now, will cut another template shortly and try it in hand... maybe as a cardboard knife cut-out first.
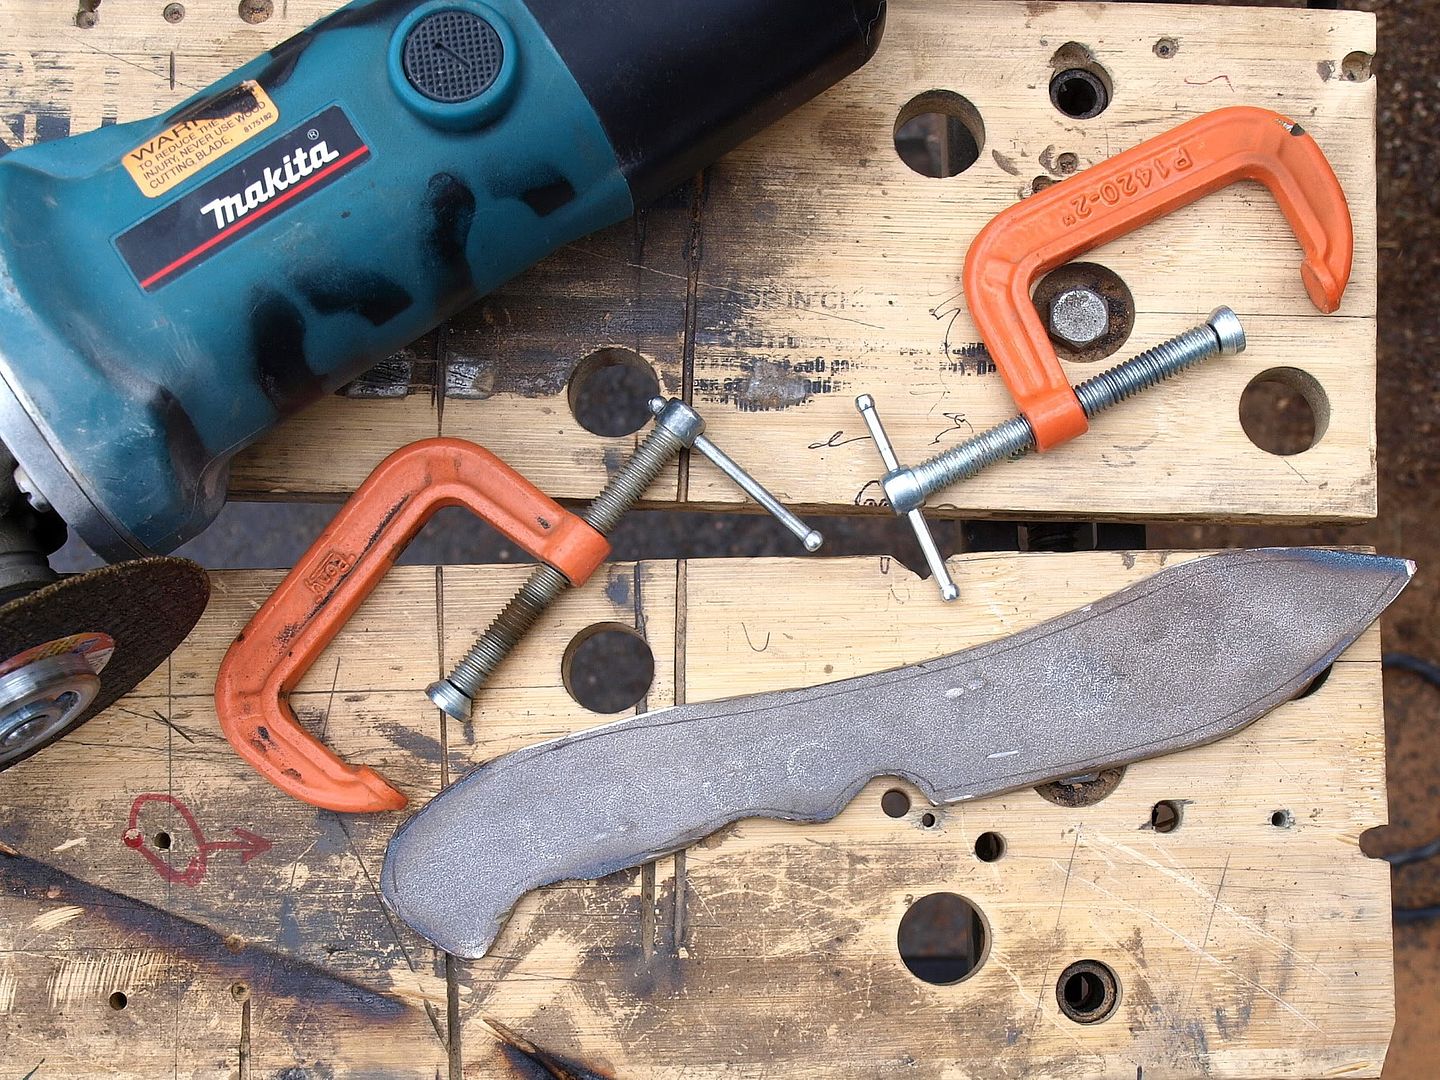
I'm happy with the design and now I've traced it onto the steel and have begun to remove stock with my angle grinder (4" metal cutting wheel). This can be done with a hacksaw or Jeweler's Saw also. I'm going about it slow as not to overheat the steel.
I'm staying outside of my lines to be on the cautious side. After I get the rough shape I can clean up the profile with the angle grinder or bench grinder... and then a Mill File. There are many ways to remove stock and get the profile. I'm just using what tools I have available to me.

I'm staying outside of my lines to be on the cautious side. After I get the rough shape I can clean up the profile with the angle grinder or bench grinder... and then a Mill File. There are many ways to remove stock and get the profile. I'm just using what tools I have available to me.
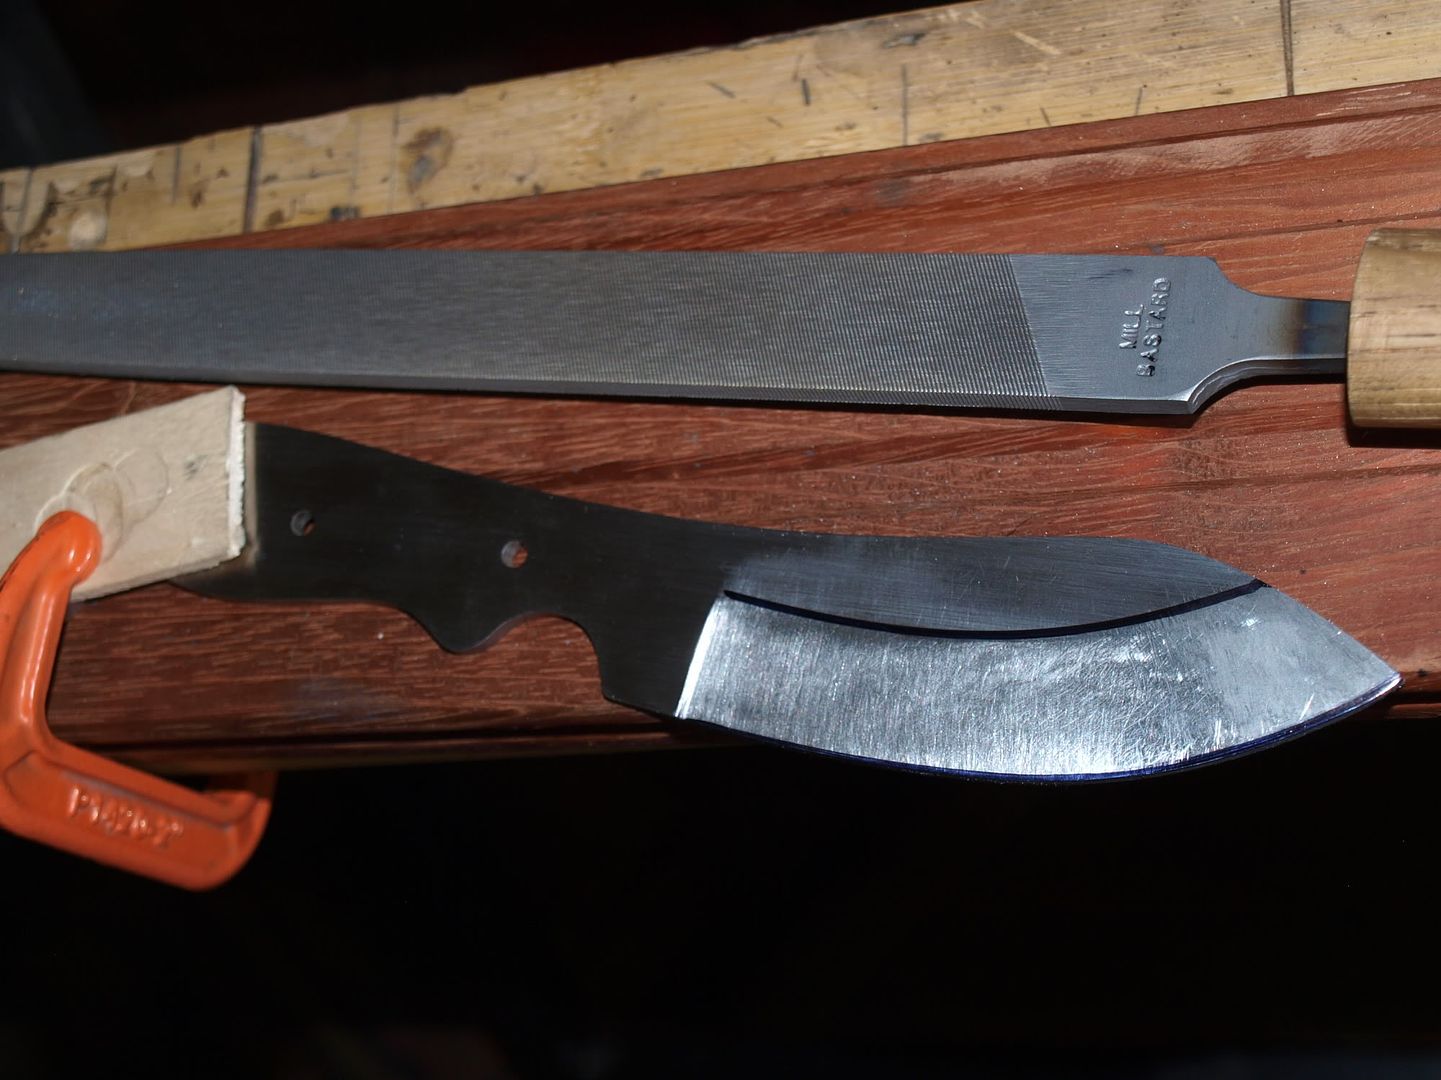
Rough profile completed...
The Nessmuck design is coming along well. I cleaned up the edges with my bench grinder and am currently removing the natural pitting of the steel with my belt sander (mounted vertically).
Meanwhile, the Chef knife is almost done. Here is the rough handle scales attached and pinned (brass pins, peened). I'm about to take it to the belt sander for shaping.
Meanwhile, the Chef knife is almost done. Here is the rough handle scales attached and pinned (brass pins, peened). I'm about to take it to the belt sander for shaping.
Those are coming along nicely Chris! The Nessmuck knife is a great design, it's going to look sweet when finished!!

The Nessmuck knife is a great design, it's going to look sweet when finished!!
I have a little time today so I've begun to hand-file a bevel on the Nessmuck. This may take some time. I'm not going to put a sharpening edge on it... that will be done AFTER heat treating, very important. My goal here is to equally establish my bevel on both sides of the profile. I'm going with a tall bevel on this knife to increase it's 'slicing' ability. A short bevel would lend itself more to a 'chopping' edge.

I'm still hand-filing the first bevel on the Nessmuck.... starting to look more like a knife now.
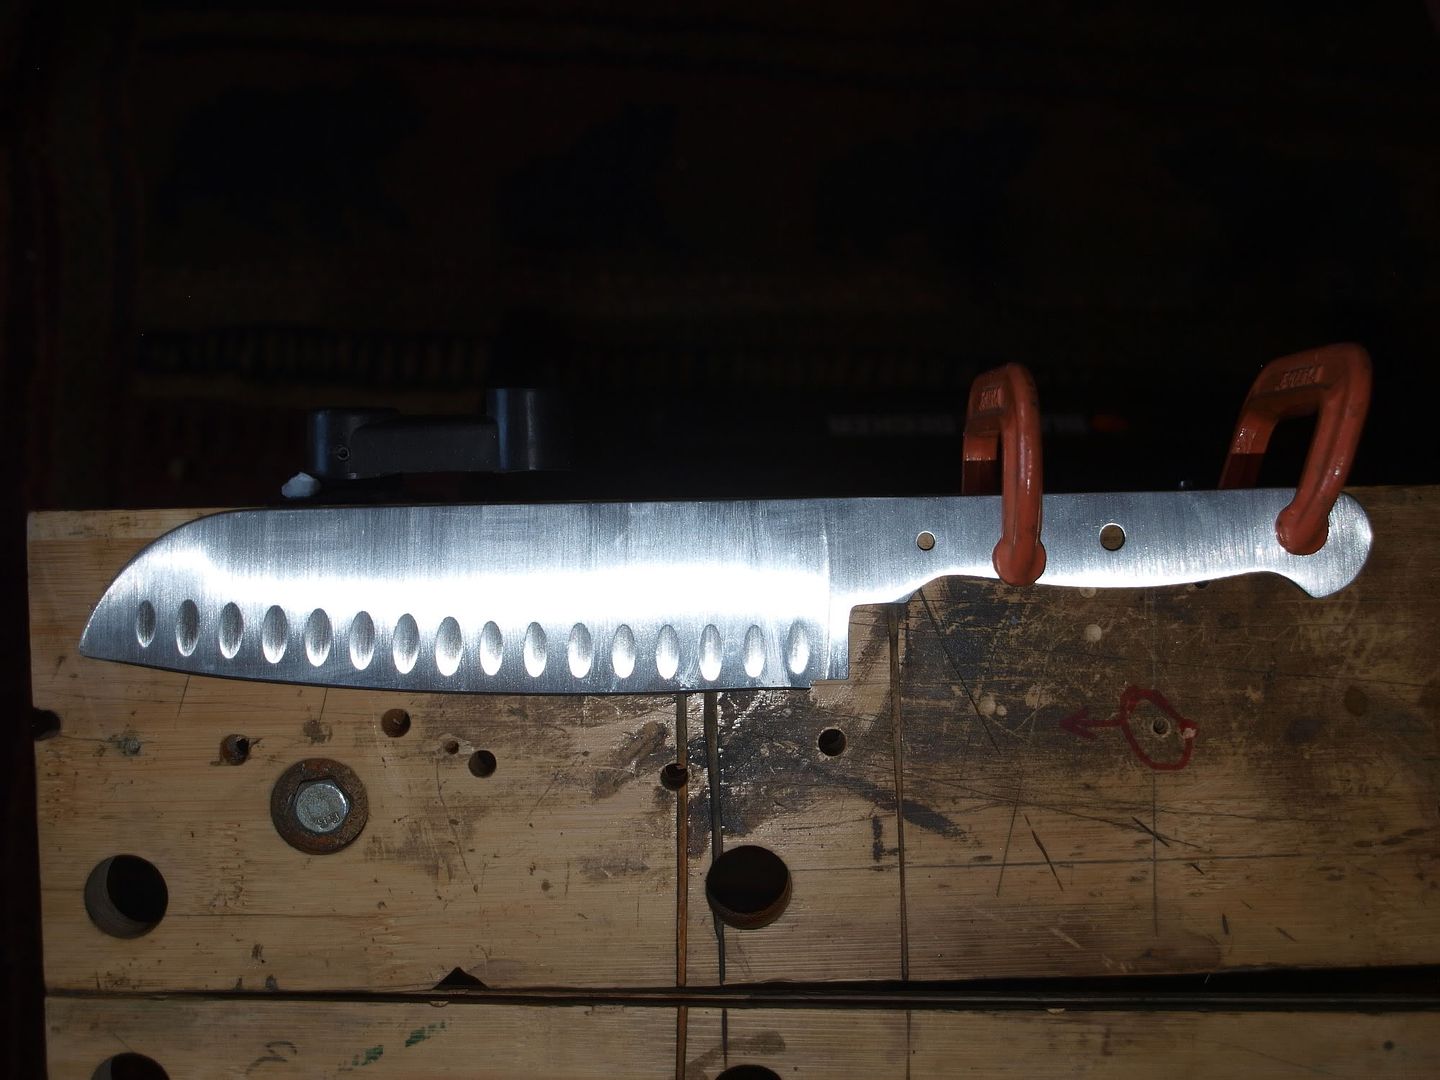
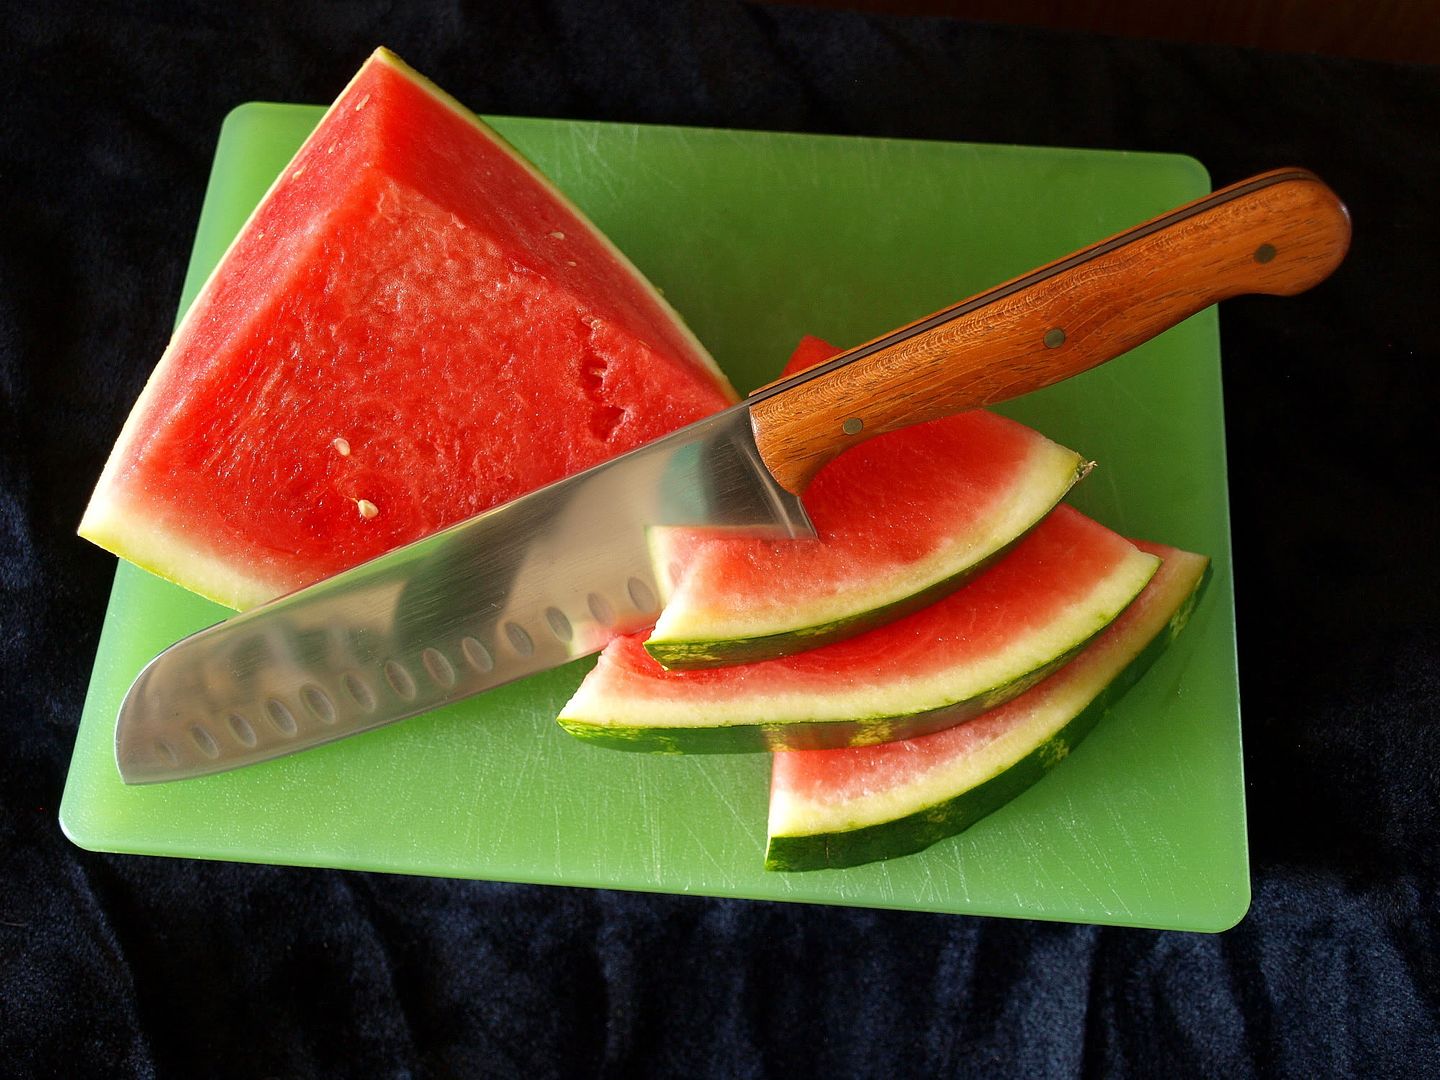
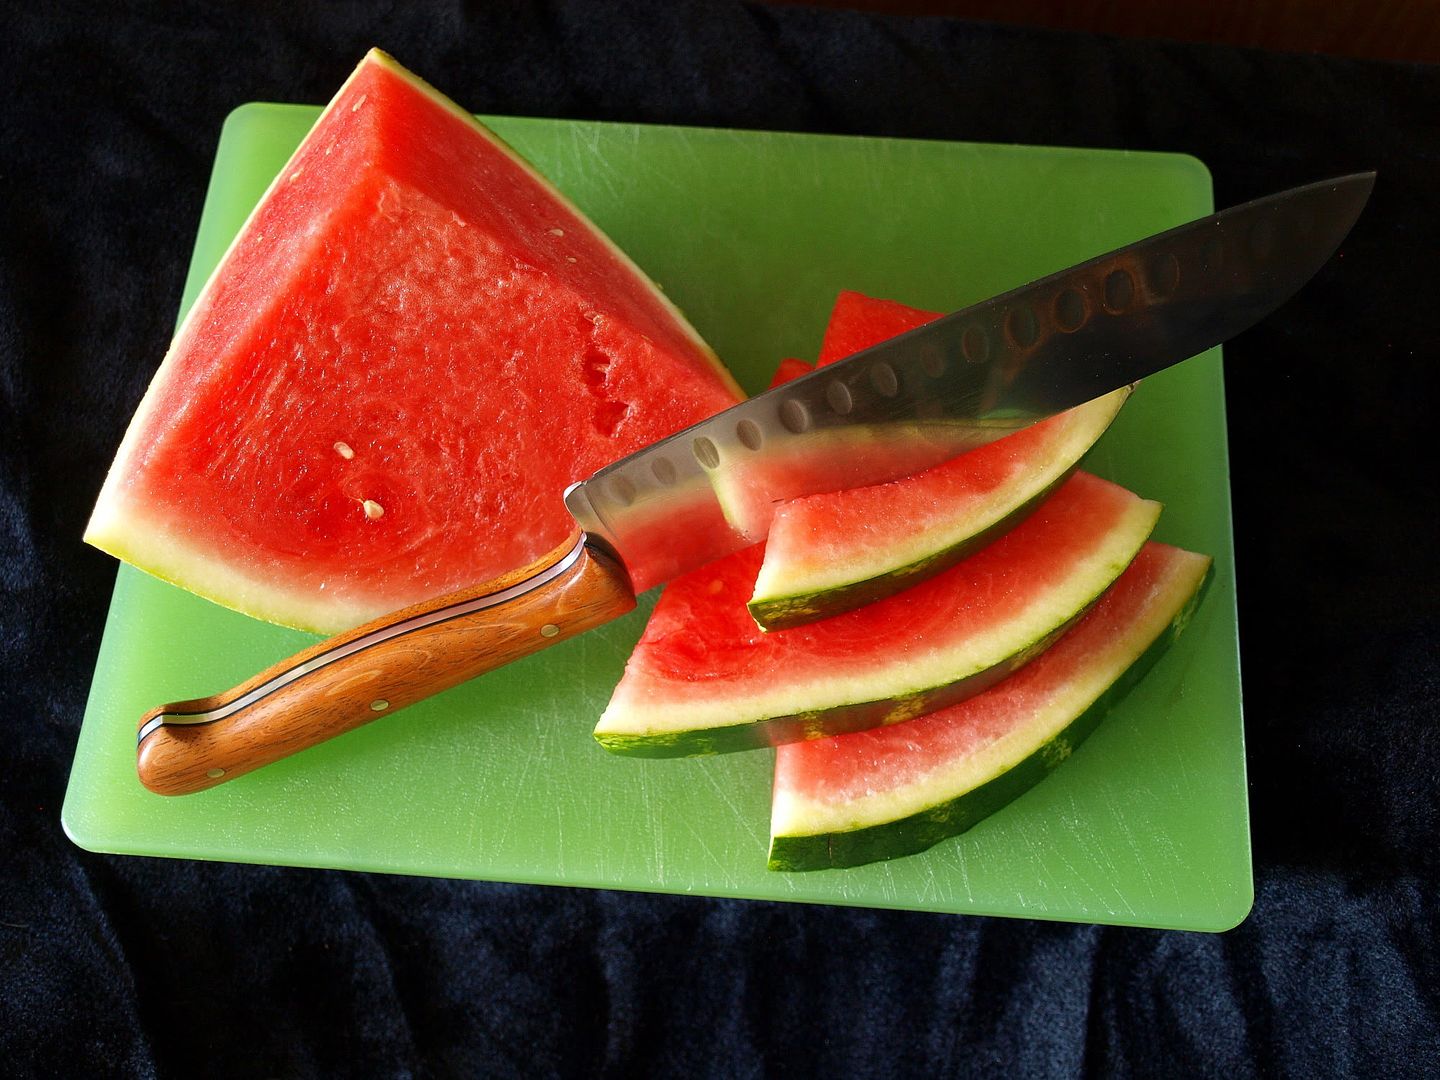
I have finished the Santoku Chef Knife. Now you can see how the black handle spacers look... I think they added a nice touch. Racing stripes so it can chop and slice faster!
Very nice work Chris! Look forward to seeing the Nessmuck from a total blank....cool!
Look forward to seeing the Nessmuck from a total blank....cool!
The chef knife turned out fantastic!! Love how you displayed it for a photo shot! 
Thanks Denise! That knife was fast and easy.
Nessy, on the other hand.... difficult. Stock removal is laborious with hand files but coming along well.
I'm almost finished with my second bevel. If I mess it up after all this work, I'm going to cry.
I am getting the bevel lines, cutting edge, and ricassos to match.

Nessy, on the other hand.... difficult. Stock removal is laborious with hand files but coming along well.
I'm almost finished with my second bevel.
If I mess it up after all this work, I'm going to cry.I am getting the bevel lines, cutting edge, and ricassos to match.
great job on the knives Chris! Most definately a talent!!! Lots of patients is apparent. Attention to detail is very apparent too.
Thanks Jim!
I'm happy to say that I've completed both primary bevels now on the Nessmuk. I think the hard part is done. They are currently sanded down to about #320. I've decided that the original handle tang I designed was too big and here I have redesigned it. I will reshape it using the bench grinder (possibly cutting disc too). I will also have to drill new pin holes to accommodate this design.
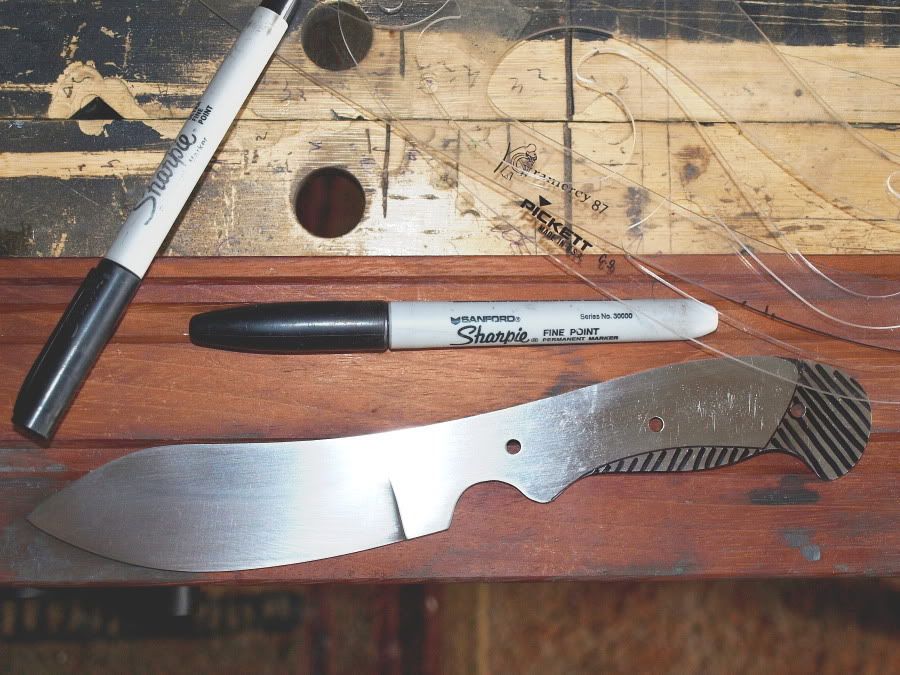
I'm happy to say that I've completed both primary bevels now on the Nessmuk. I think the hard part is done. They are currently sanded down to about #320. I've decided that the original handle tang I designed was too big and here I have redesigned it. I will reshape it using the bench grinder (possibly cutting disc too). I will also have to drill new pin holes to accommodate this design.
The Nessmuk (I just realized I've been spelling it wrong... correct spelling of the name is ..."muk") is now ready to be sent off for heat treat/hardening. The company I'm sending it to only does heat-treating once a week on Mondays so it'll be a couple of weeks before I get it back.
Once it comes back I will install the handle scales (maybe stabilized Black Ash Burl for this one), polish/buff all exposed steel, then file a secondary cutting edge into it and sharpen. It will be complete except for sheath. I intend to learn sheath-making soon so that this one has a nice little custom home to sleep in.
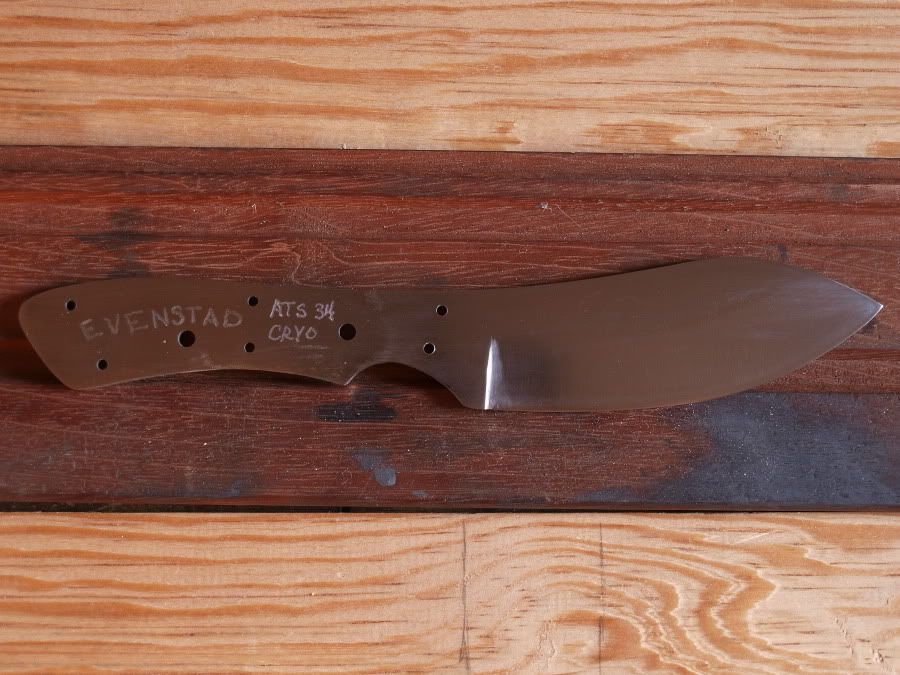
Here's what it looks like now after I reshaped the tang and drilled new pin holes. The cutting edge is very blunt and a little thicker than a dime. Anything thinner would be damaged during the heat-treatment, very important! I also engraved my name and other info (where it will not be seen) as requested by the company that will be performing the heat-treat. The heat-treat service costs $5.50 for this knife and I opted for Cryogenic cooling for an additional $4.00. The Cryo process will add durability and increase edge-retention. Basically they will heat this puppy to somewhere around 2500 degrees, then cool it in a Cryo tank which is about -300.
Once it comes back I will install the handle scales (maybe stabilized Black Ash Burl for this one), polish/buff all exposed steel, then file a secondary cutting edge into it and sharpen. It will be complete except for sheath. I intend to learn sheath-making soon so that this one has a nice little custom home to sleep in.
Here's what it looks like now after I reshaped the tang and drilled new pin holes. The cutting edge is very blunt and a little thicker than a dime. Anything thinner would be damaged during the heat-treatment, very important! I also engraved my name and other info (where it will not be seen) as requested by the company that will be performing the heat-treat. The heat-treat service costs $5.50 for this knife and I opted for Cryogenic cooling for an additional $4.00. The Cryo process will add durability and increase edge-retention. Basically they will heat this puppy to somewhere around 2500 degrees, then cool it in a Cryo tank which is about -300.
Top notch work Chris, great job!
to what rockwell hardness to they take it to?
This is a "lo-fi" version of our main content. To view the full version with more information, formatting and images, please click here.