 20141231_074210 by ghostcreekmine, on Flickr
Full Version: Knife Making
Colorado Prospector - Gem and mineral prospecting and mining forums > Miners Crafts, Goods & Classified ads > Prospector's Crafts & Creations
cool holster!
I'd love to get some "blue guns". Maybe a Glock and a standard 1911 for starters, those are most popular. Then I could start wet-forming handgun holsters.
Took me a minute to figure out what you where talking about. I kept reading it over an over wondering what the blueing of a barrel had to do with making holsters. Lol stupid me. :D
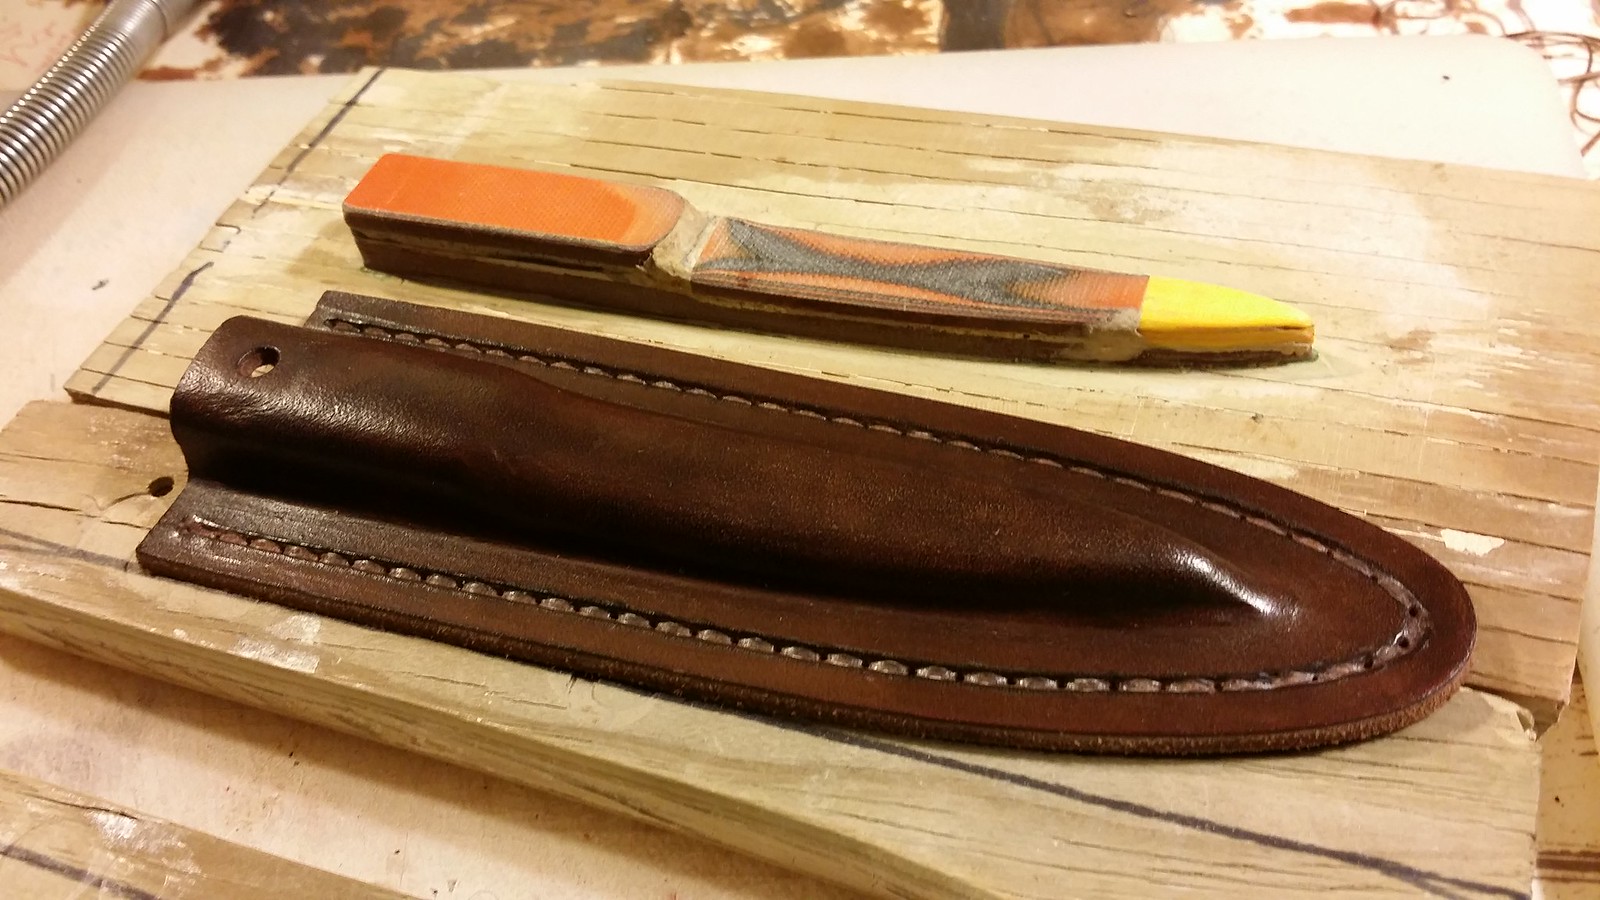
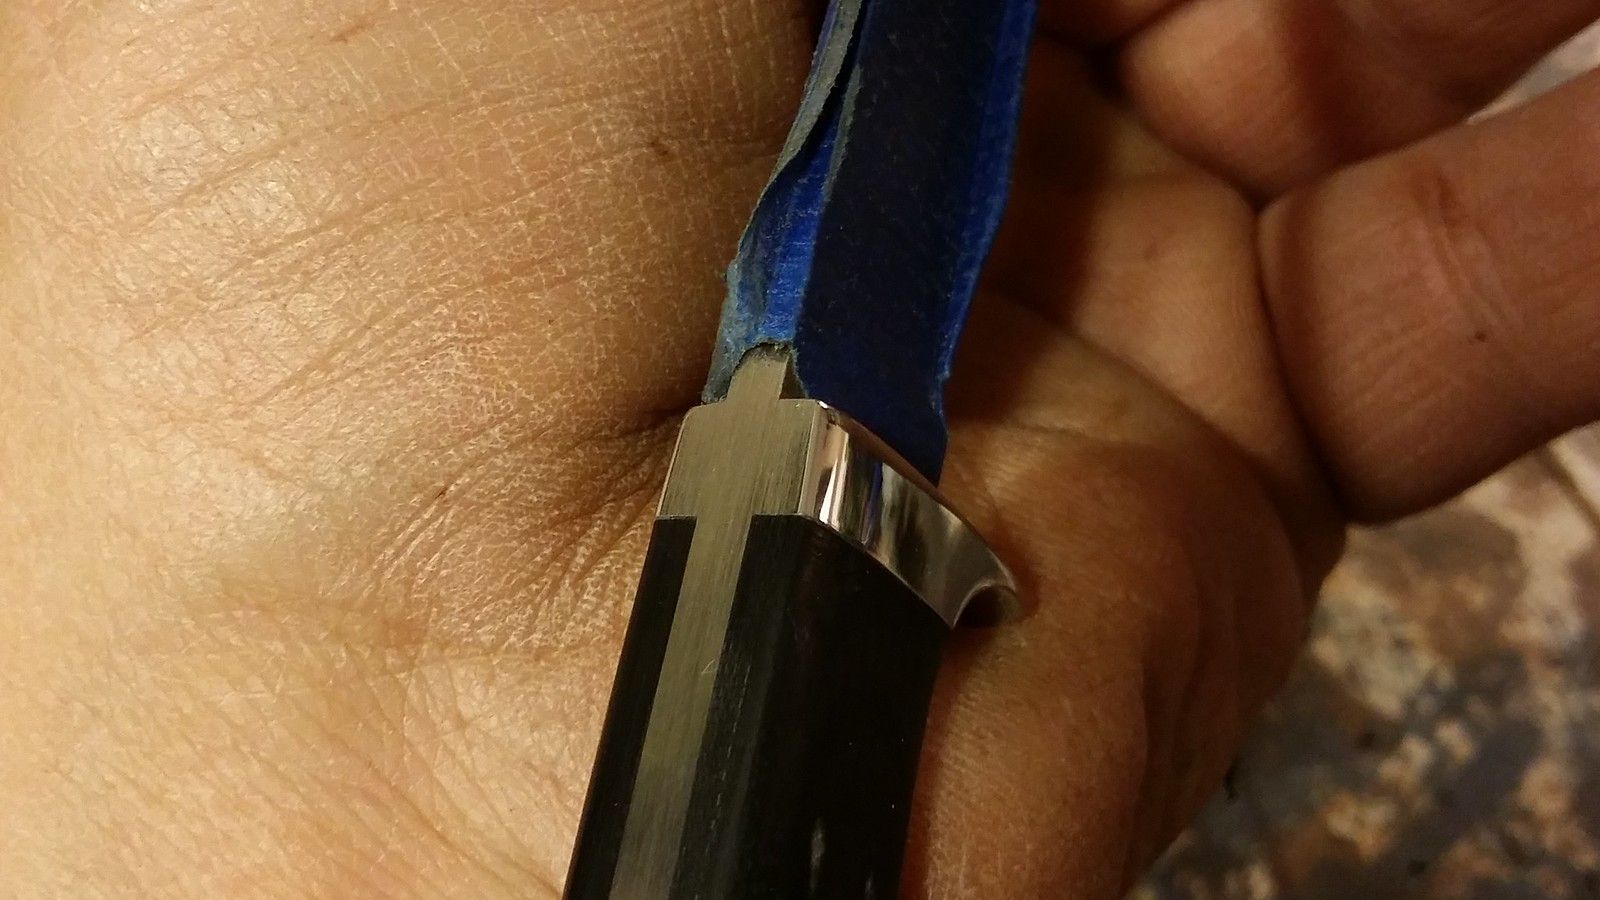
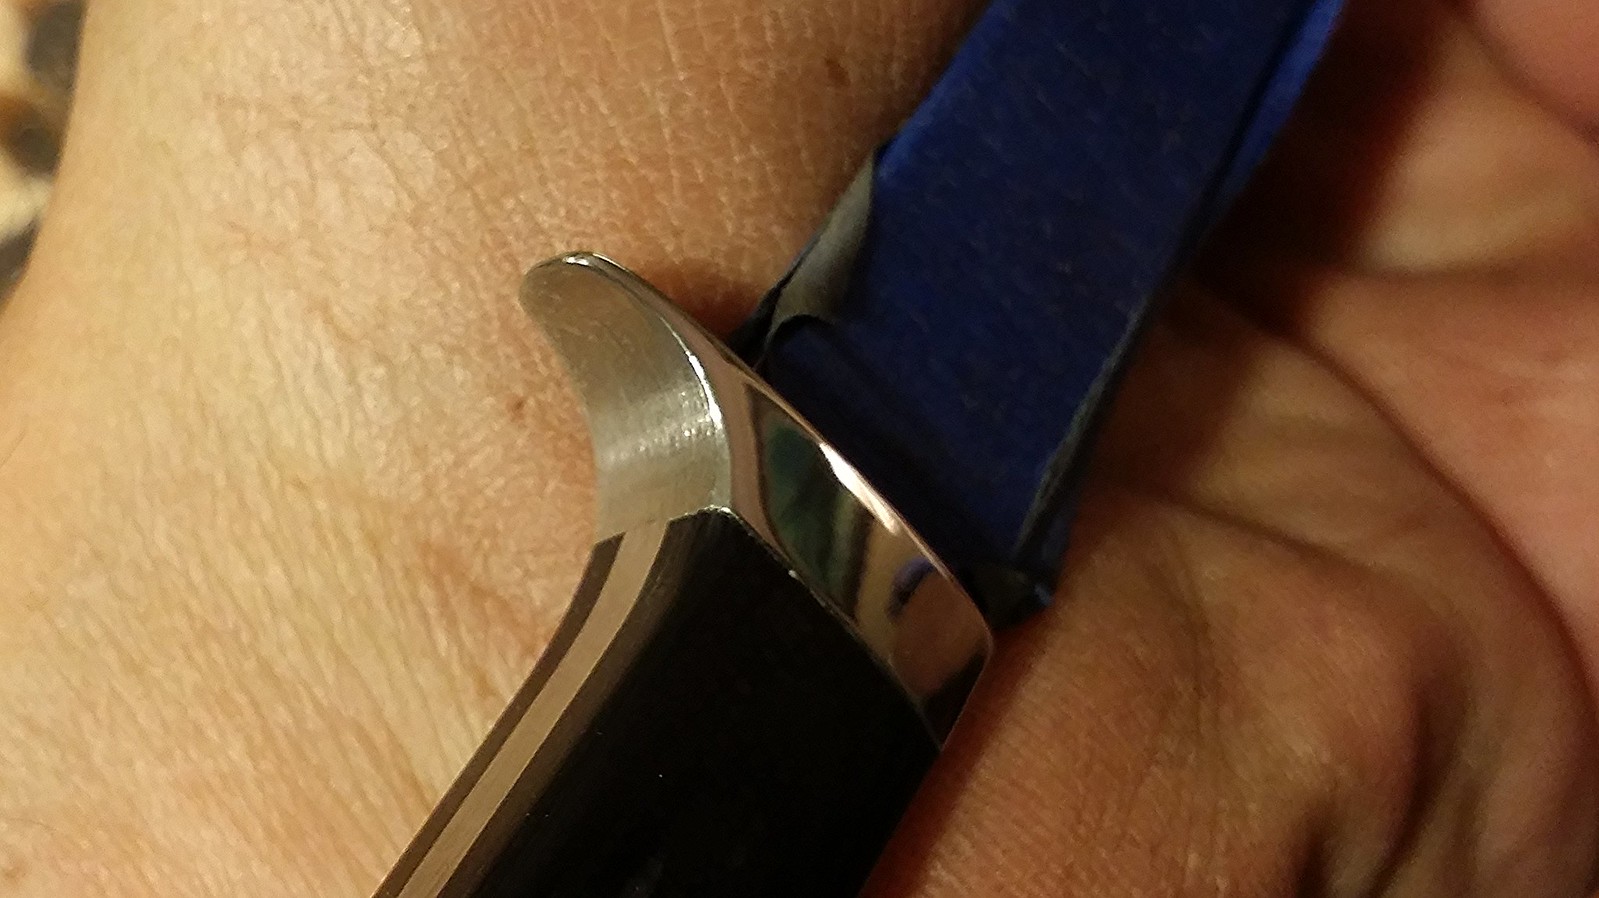
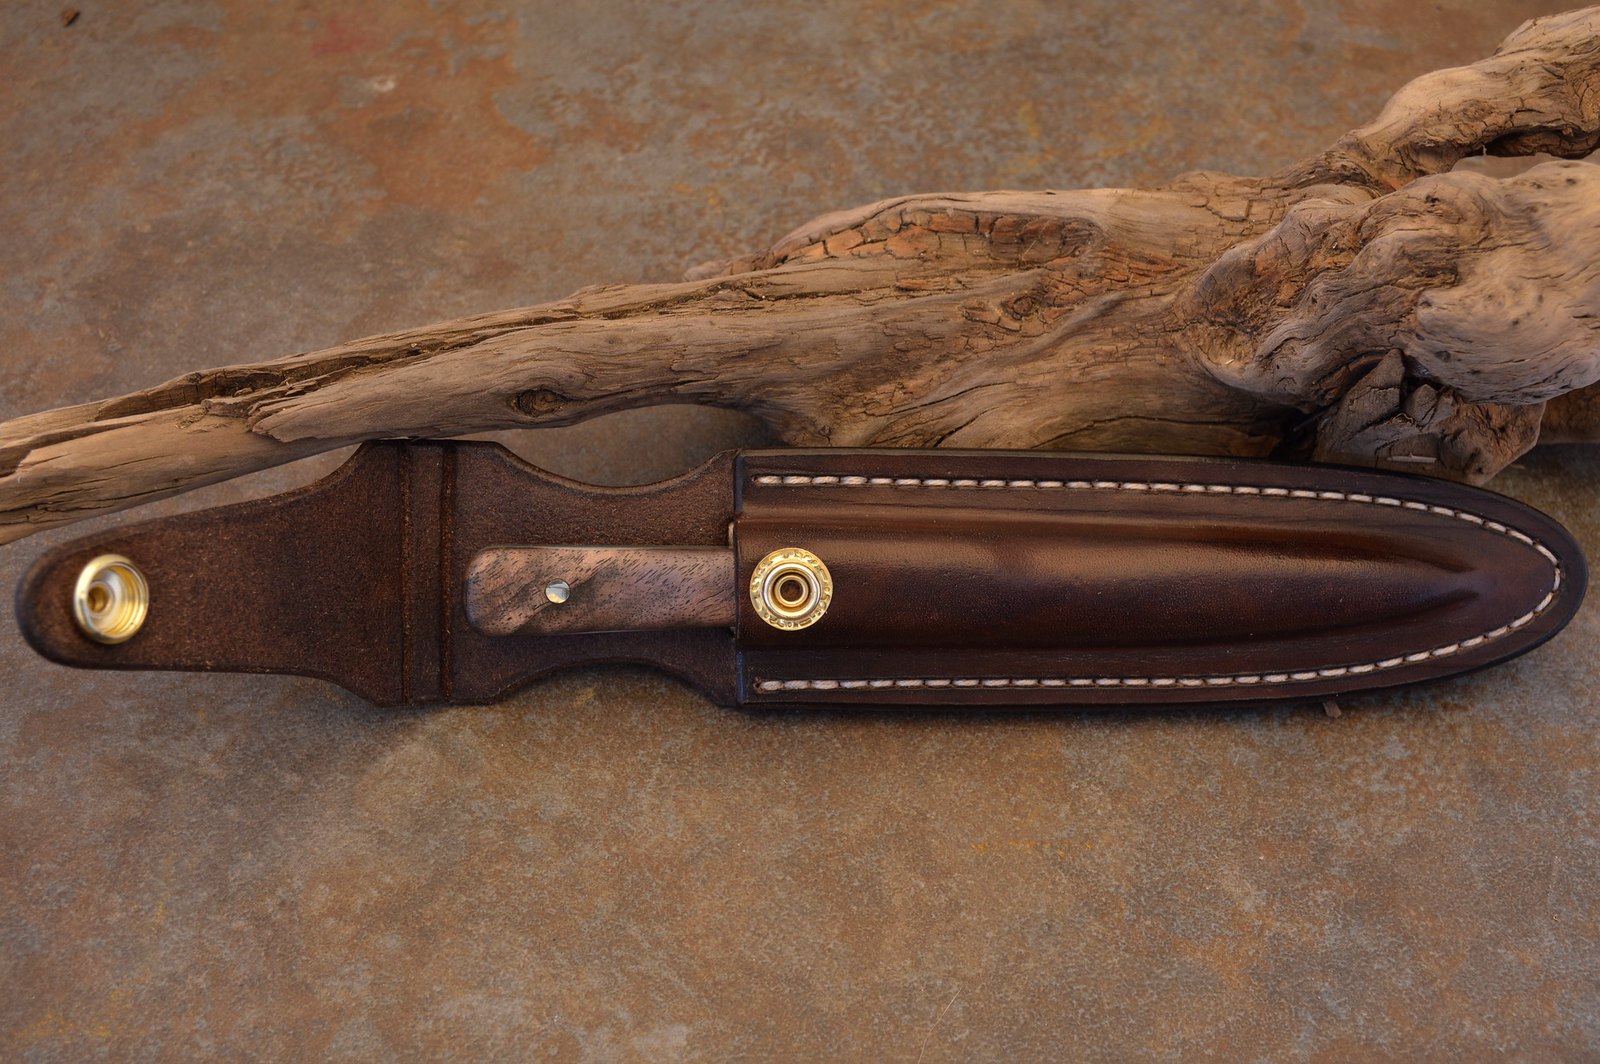
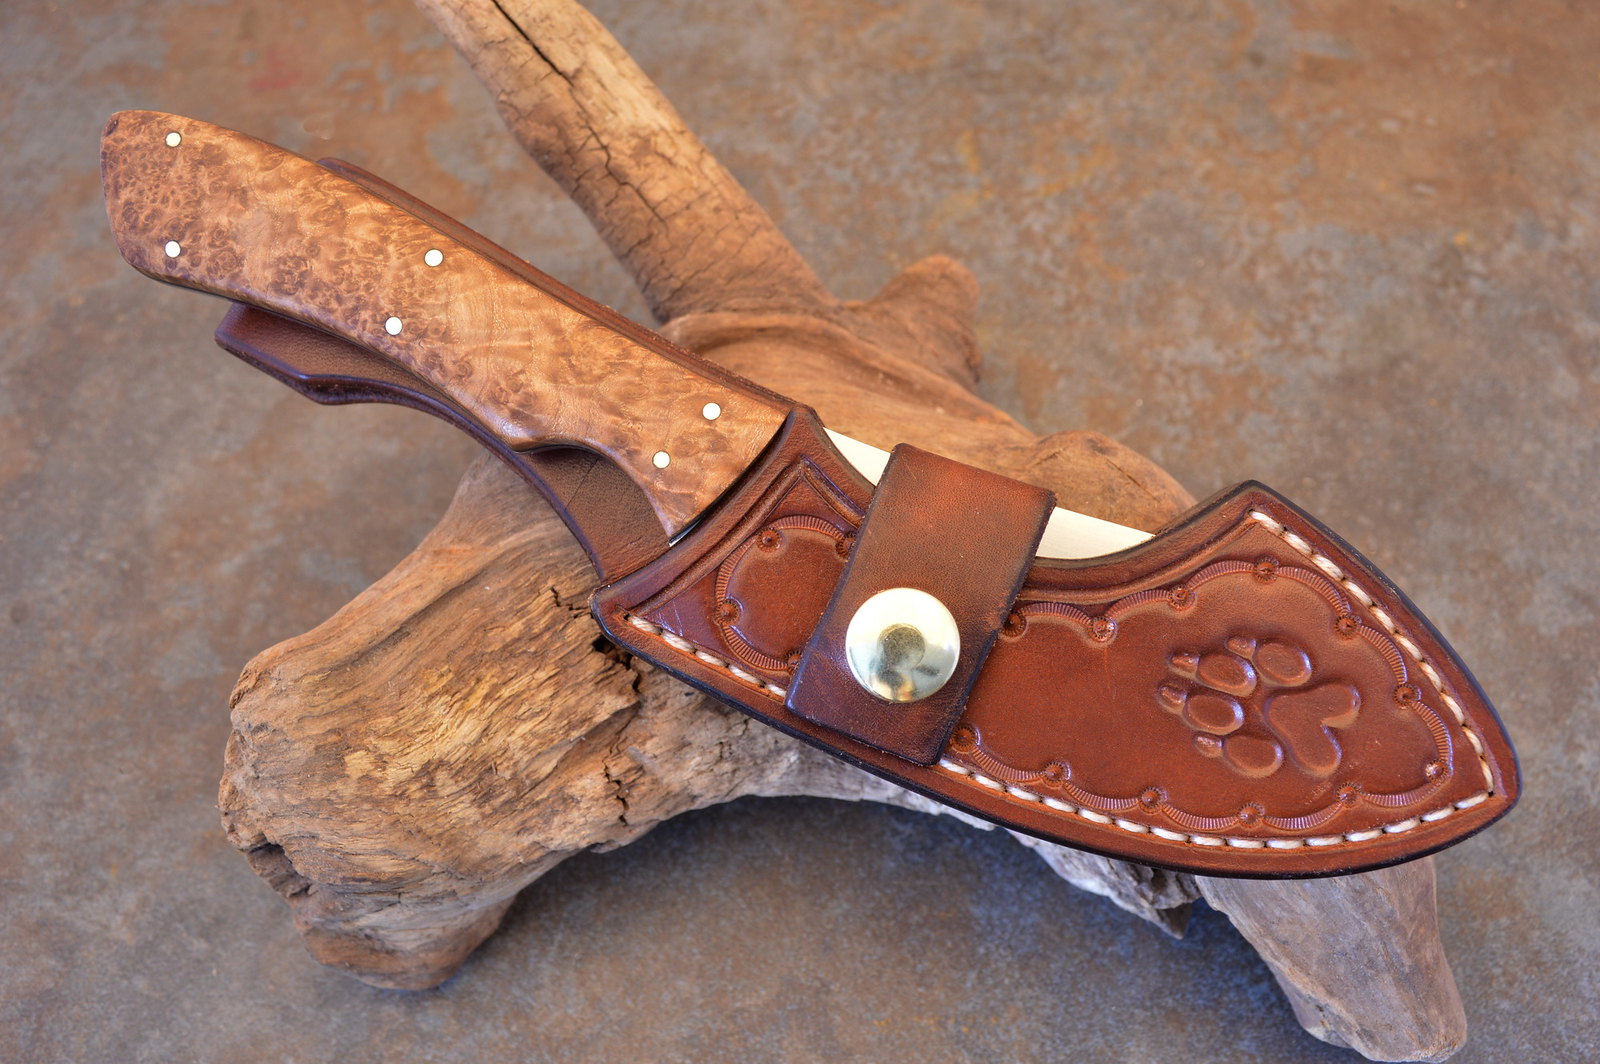
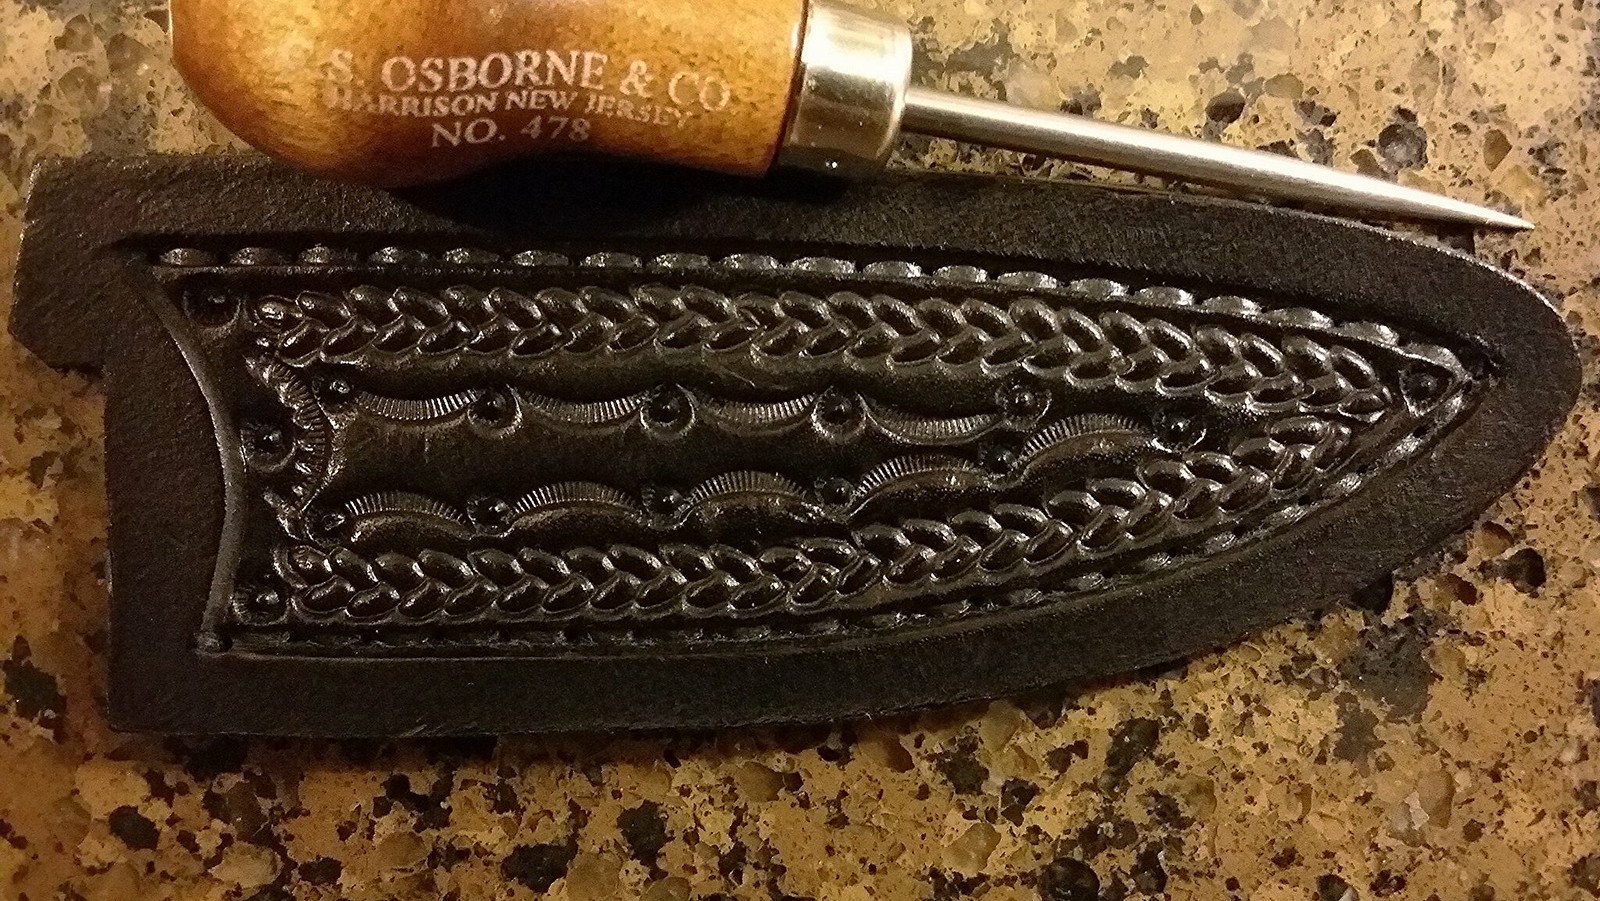
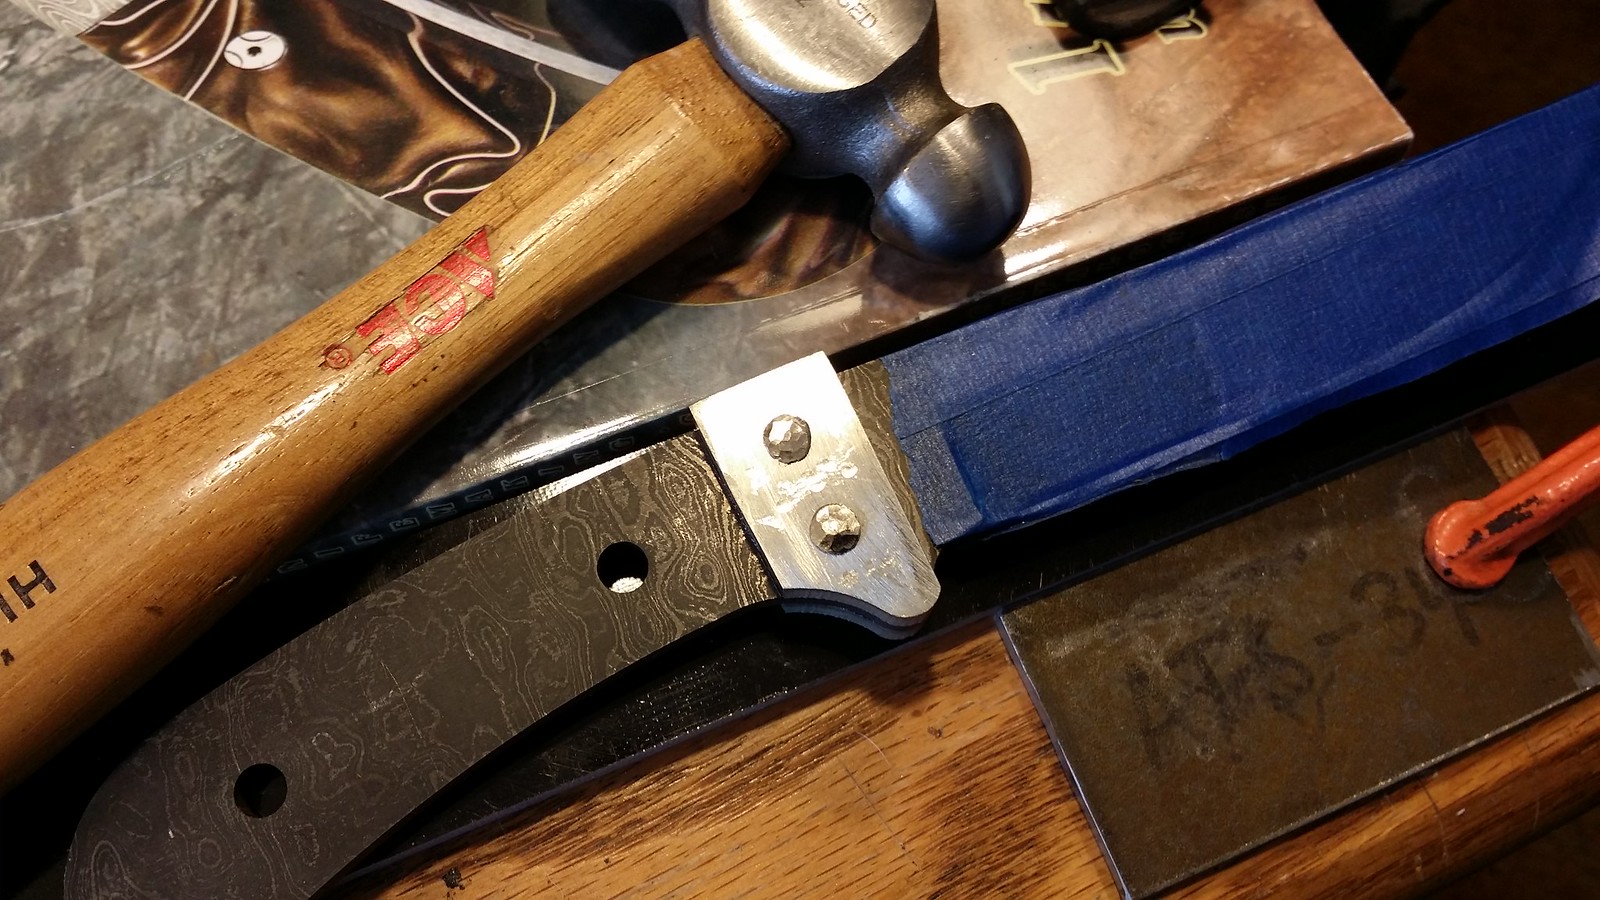
Making progress fitting and shaping that guard. Still more work to go with it though. This'll be a nice knife.
 20150102_172755 by ghostcreekmine, on Flickr
 20150102_172945 by ghostcreekmine, on Flickr
20150102_172755 by ghostcreekmine, on Flickr20150102_172945 by ghostcreekmine, on Flickr
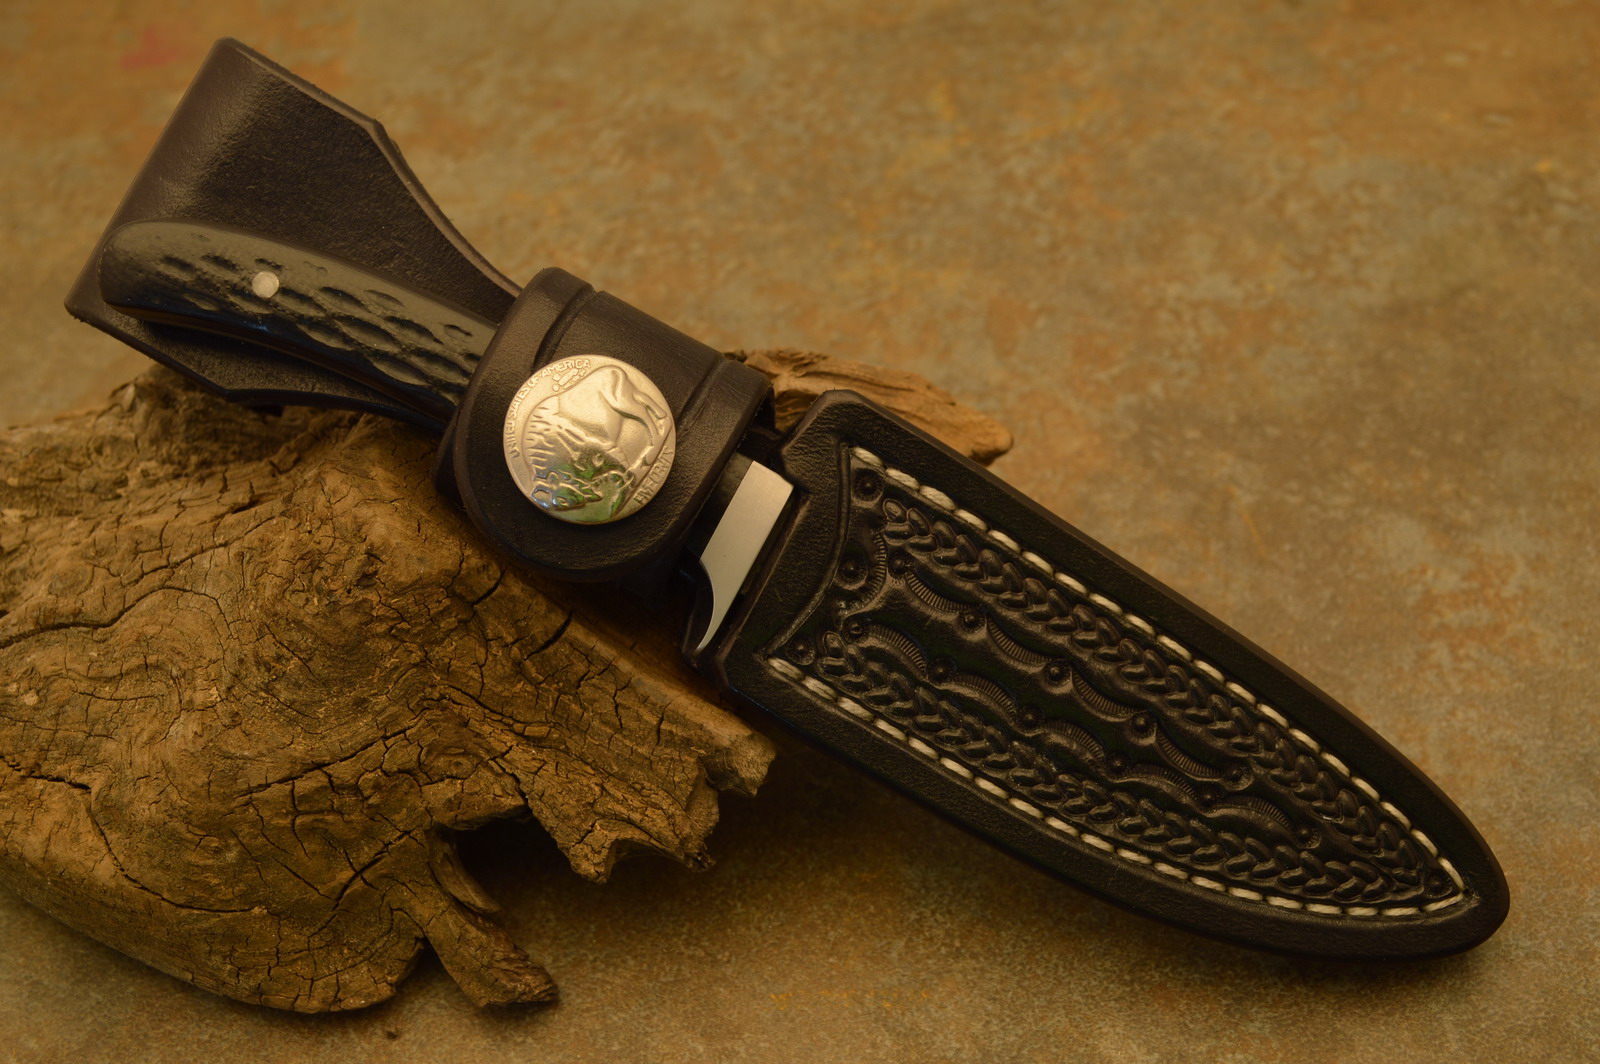
Just finished this one up. Slated for barter of goods. 
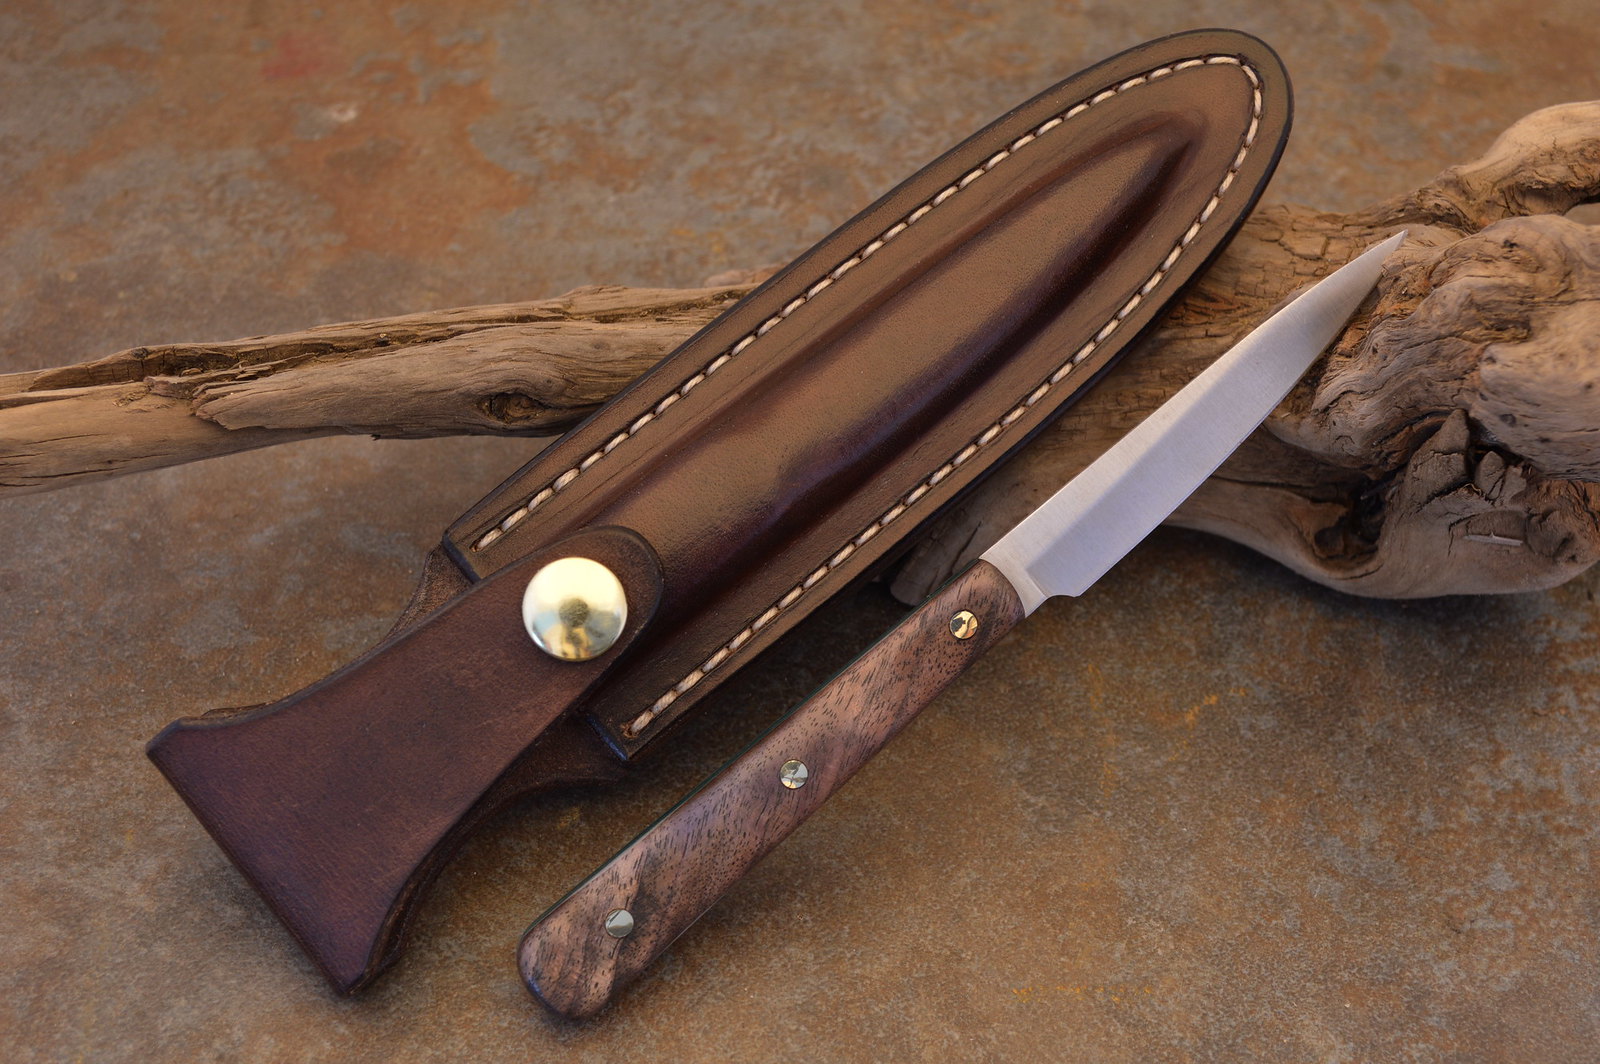
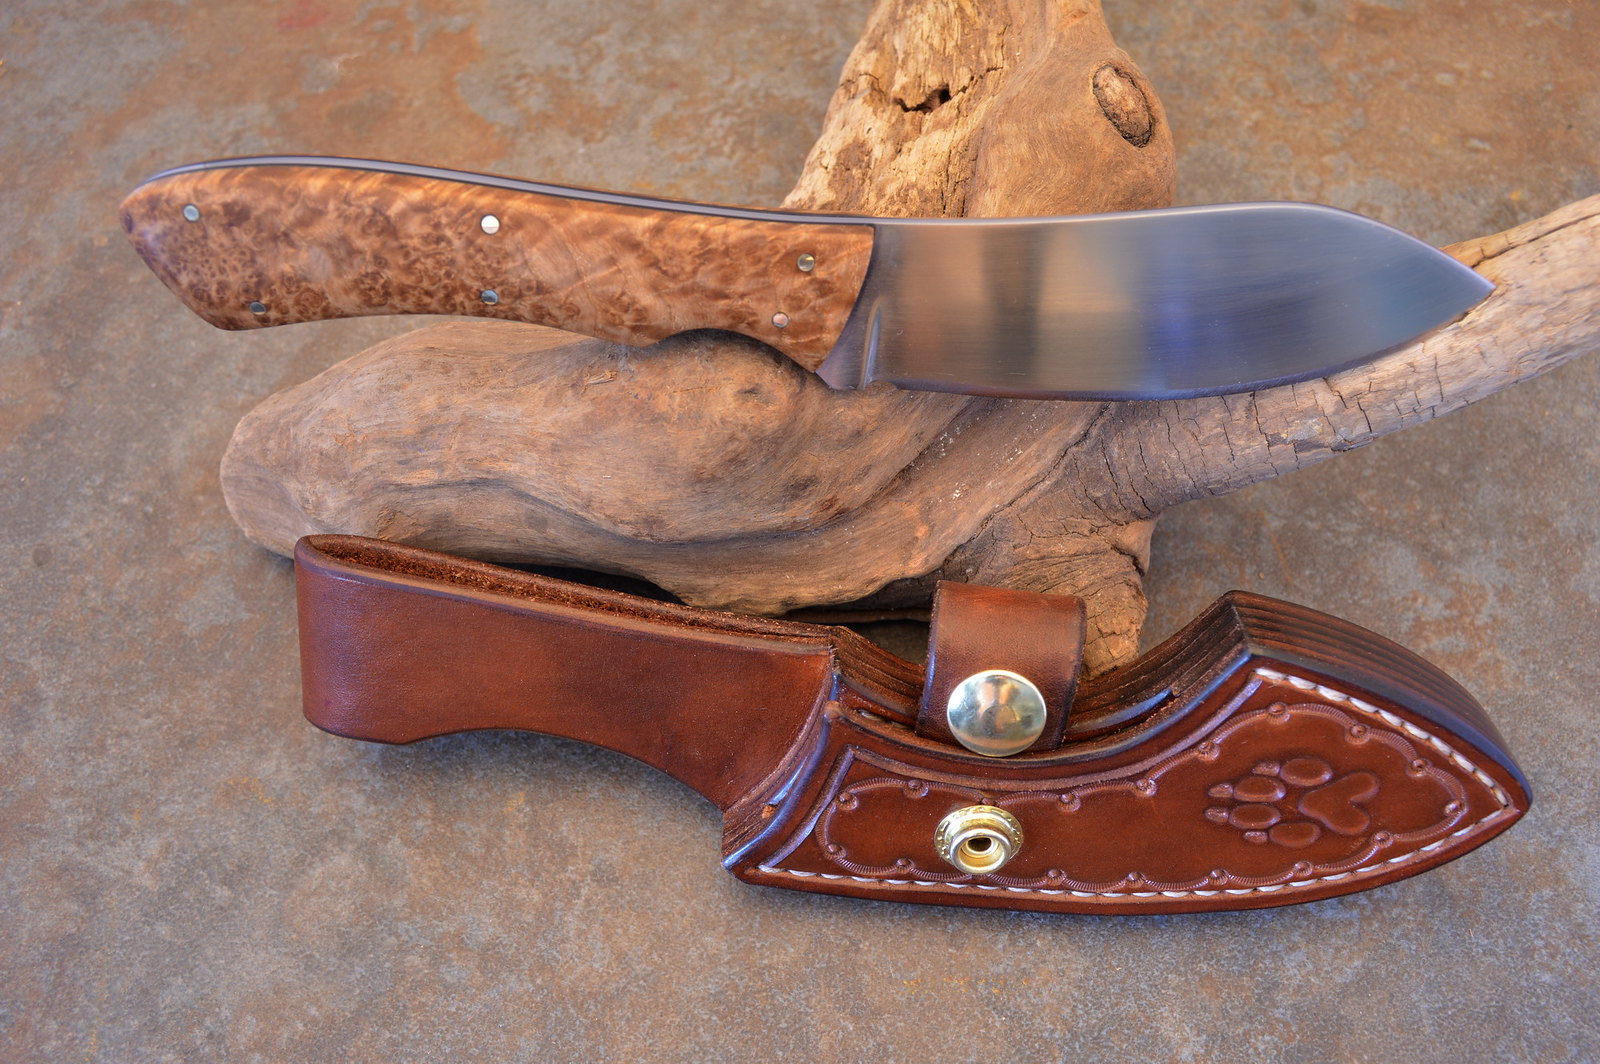
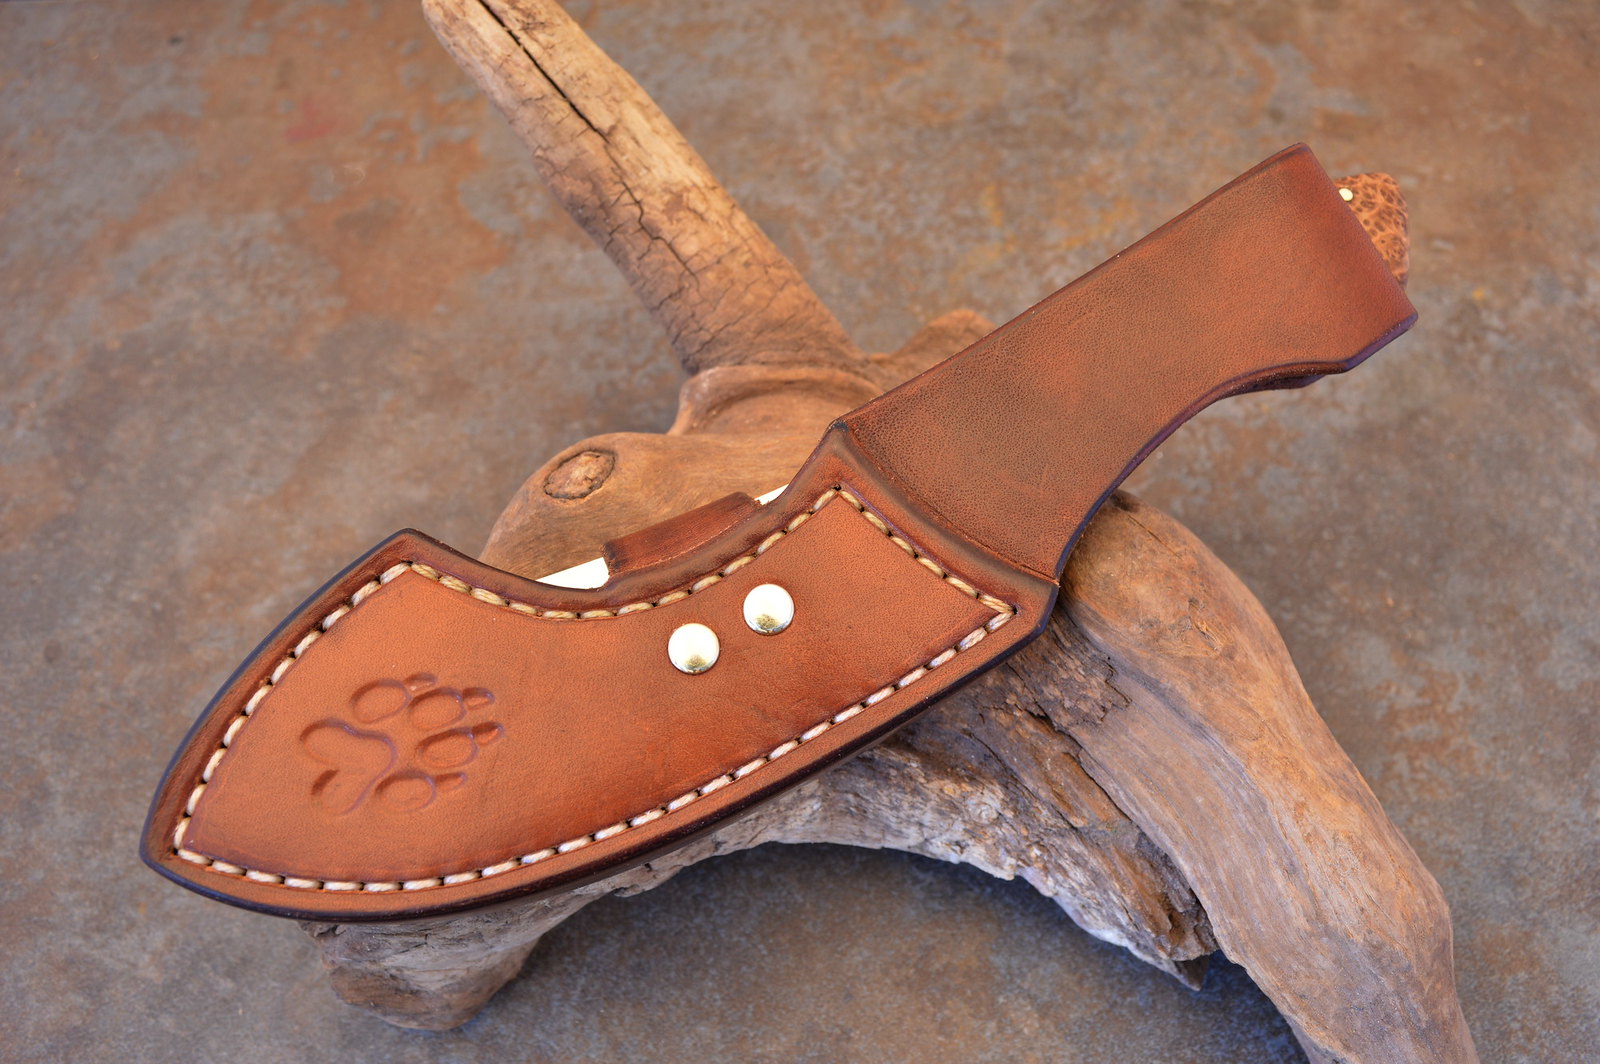
Caping Knife... or Trout & Bird Knife
IRT Stainless Steel
Walnut Scales
Green + Gray Spacers
Brass Pins
Show Brown Wet-Formed Sheath
 Caping Knife 1 by ghostcreekmine, on Flickr
 Caping Knife 2 by ghostcreekmine, on Flickr
 Caping Knife 3 by ghostcreekmine, on Flickr
 Caping Knife 4 by ghostcreekmine, on Flickr
Caping Knife... or Trout & Bird Knife
IRT Stainless Steel
Walnut Scales
Green + Gray Spacers
Brass Pins
Show Brown Wet-Formed Sheath
Caping Knife 1 by ghostcreekmine, on FlickrCaping Knife 2 by ghostcreekmine, on FlickrCaping Knife 3 by ghostcreekmine, on FlickrCaping Knife 4 by ghostcreekmine, on Flickr
Very nice Swizz and great work on that finger guard in the last post to. Both projects turned out extremely well I think! 
Thanks!
I also finished up that sheath for my Dad. I'll post up some pics of it here shortly. Gotta send him his knife back.
That guard is still giving me a few fits. Gonna be a while before I wrap that one up I think. I had to order some finer sanding belts this morning for that knife.
I also finished up that sheath for my Dad. I'll post up some pics of it here shortly. Gotta send him his knife back.
That guard is still giving me a few fits. Gonna be a while before I wrap that one up I think. I had to order some finer sanding belts this morning for that knife.
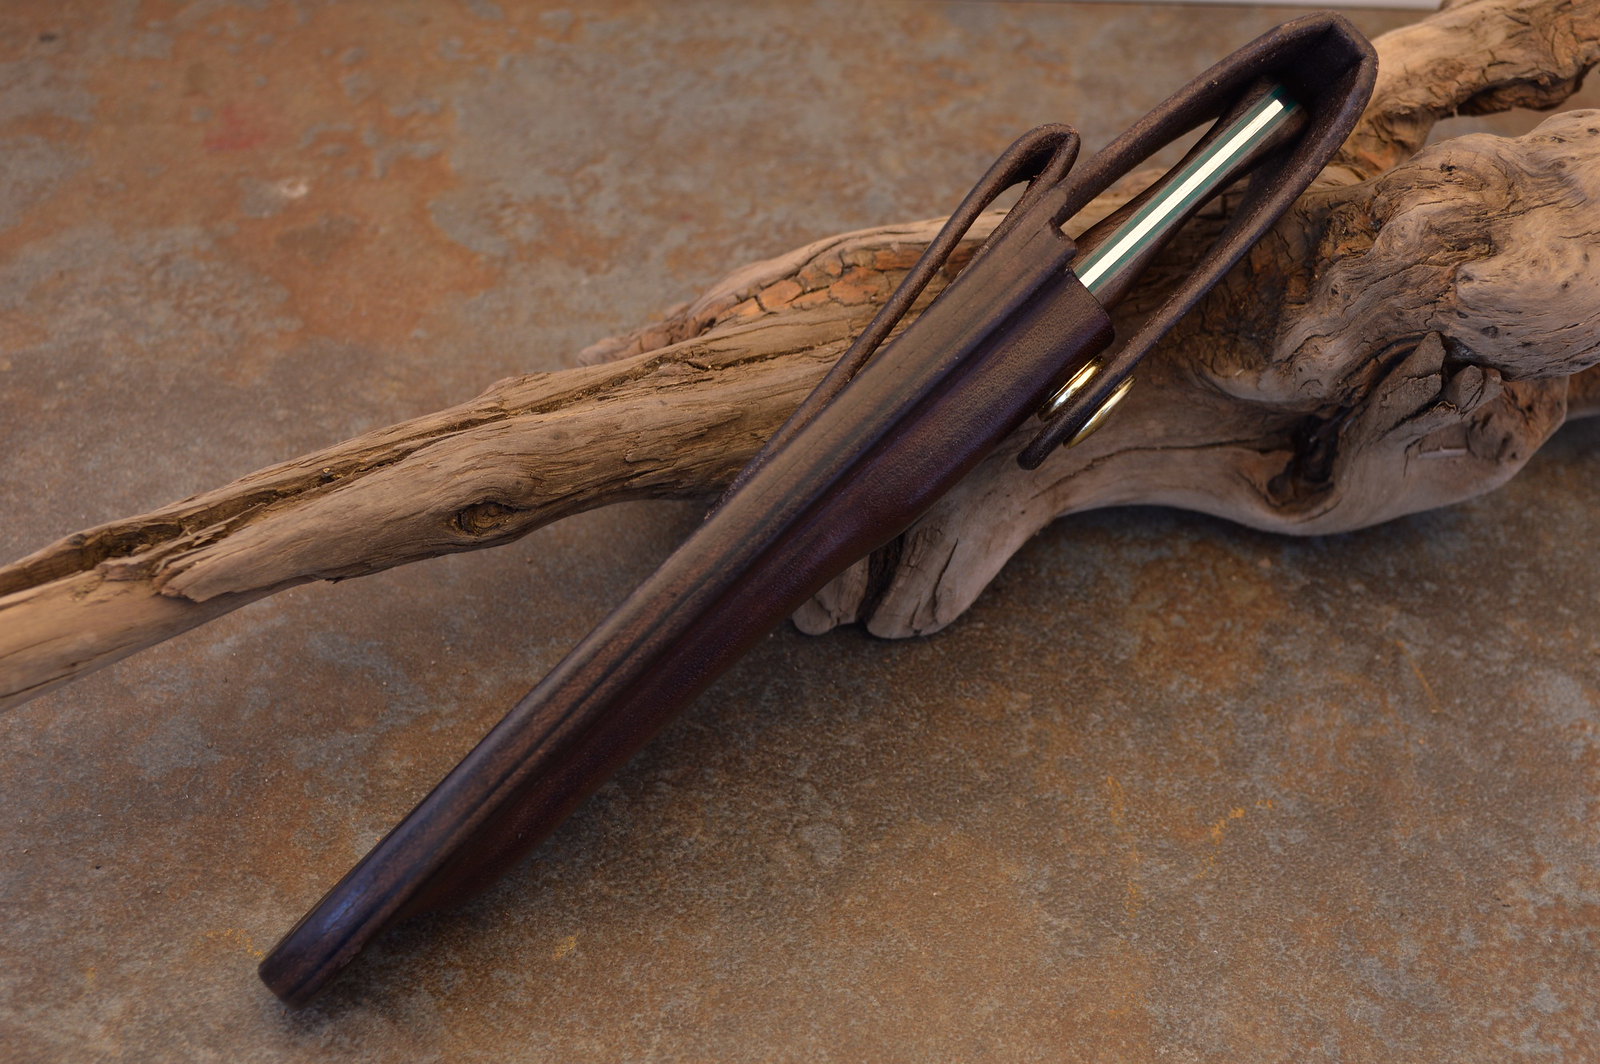
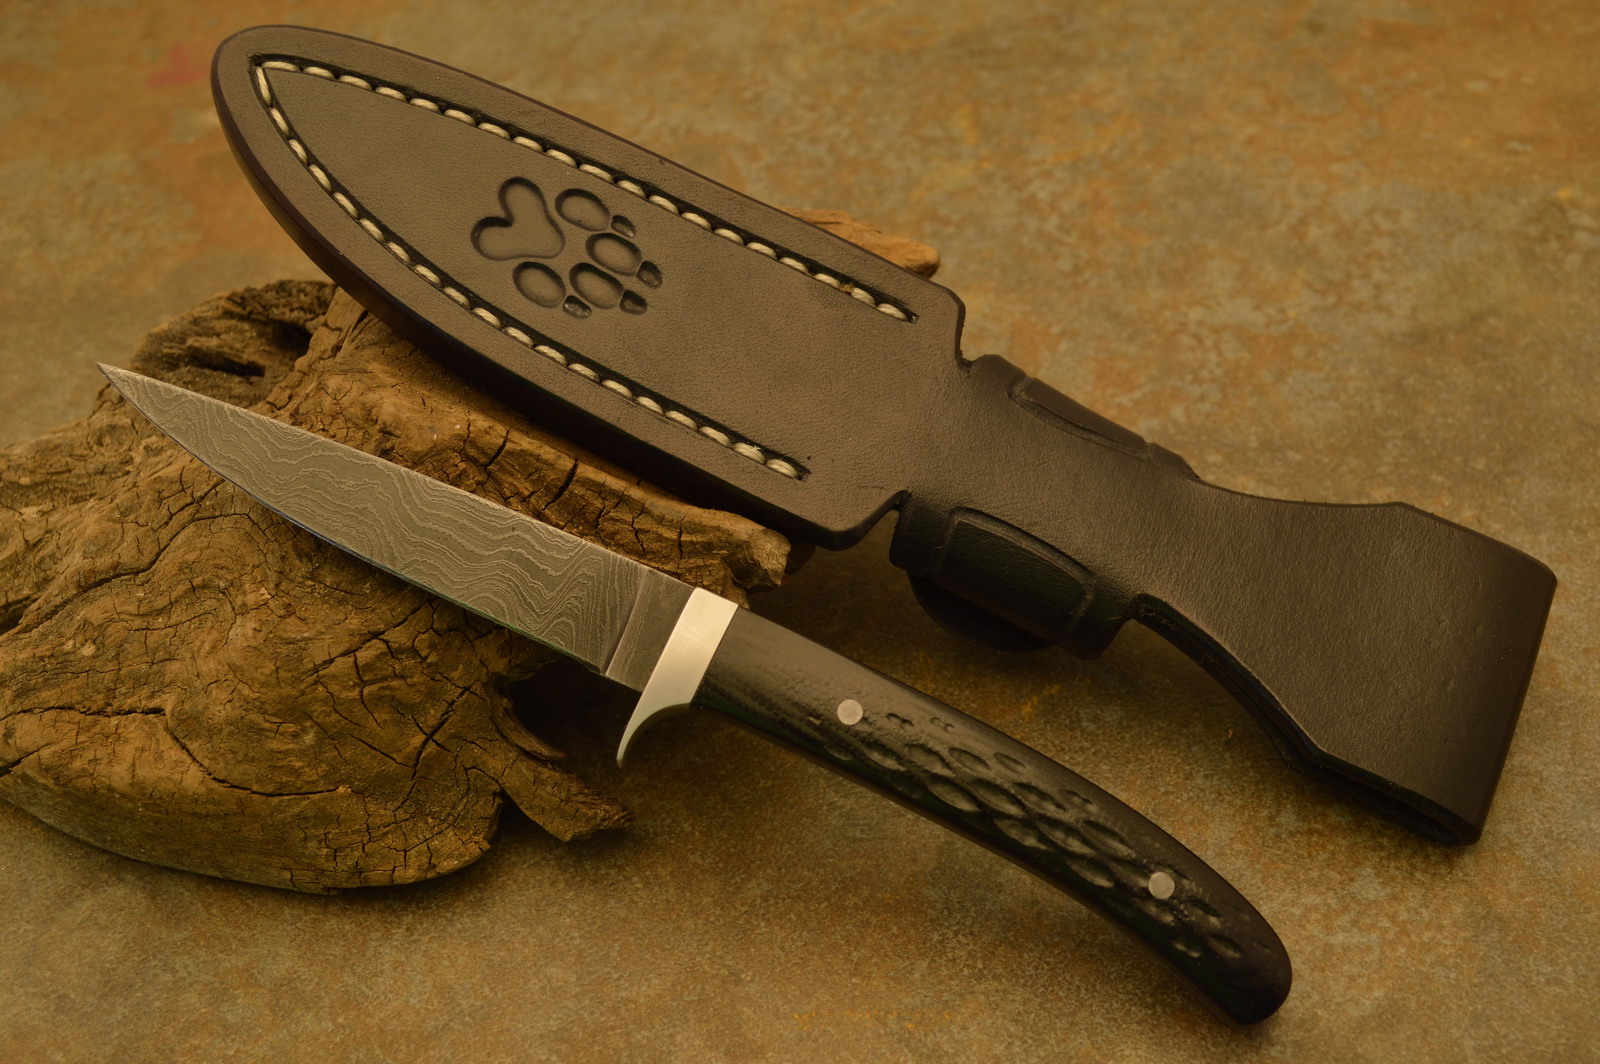
Here's the sheath for my Dad's Nessmuck. This is a blade that I designed and made from scratch for him a while back.
 Nessmuck 3 by ghostcreekmine, on Flickr
 Nessmuck 1 by ghostcreekmine, on Flickr
 Nessmuck 2 by ghostcreekmine, on Flickr
Nessmuck 3 by ghostcreekmine, on FlickrNessmuck 1 by ghostcreekmine, on FlickrNessmuck 2 by ghostcreekmine, on Flickr
works of art! (in a completely functional and durable sense of the term ;) )
You got skills my friend!
You got skills my friend!
Function is priority but the embellishment is fun too.
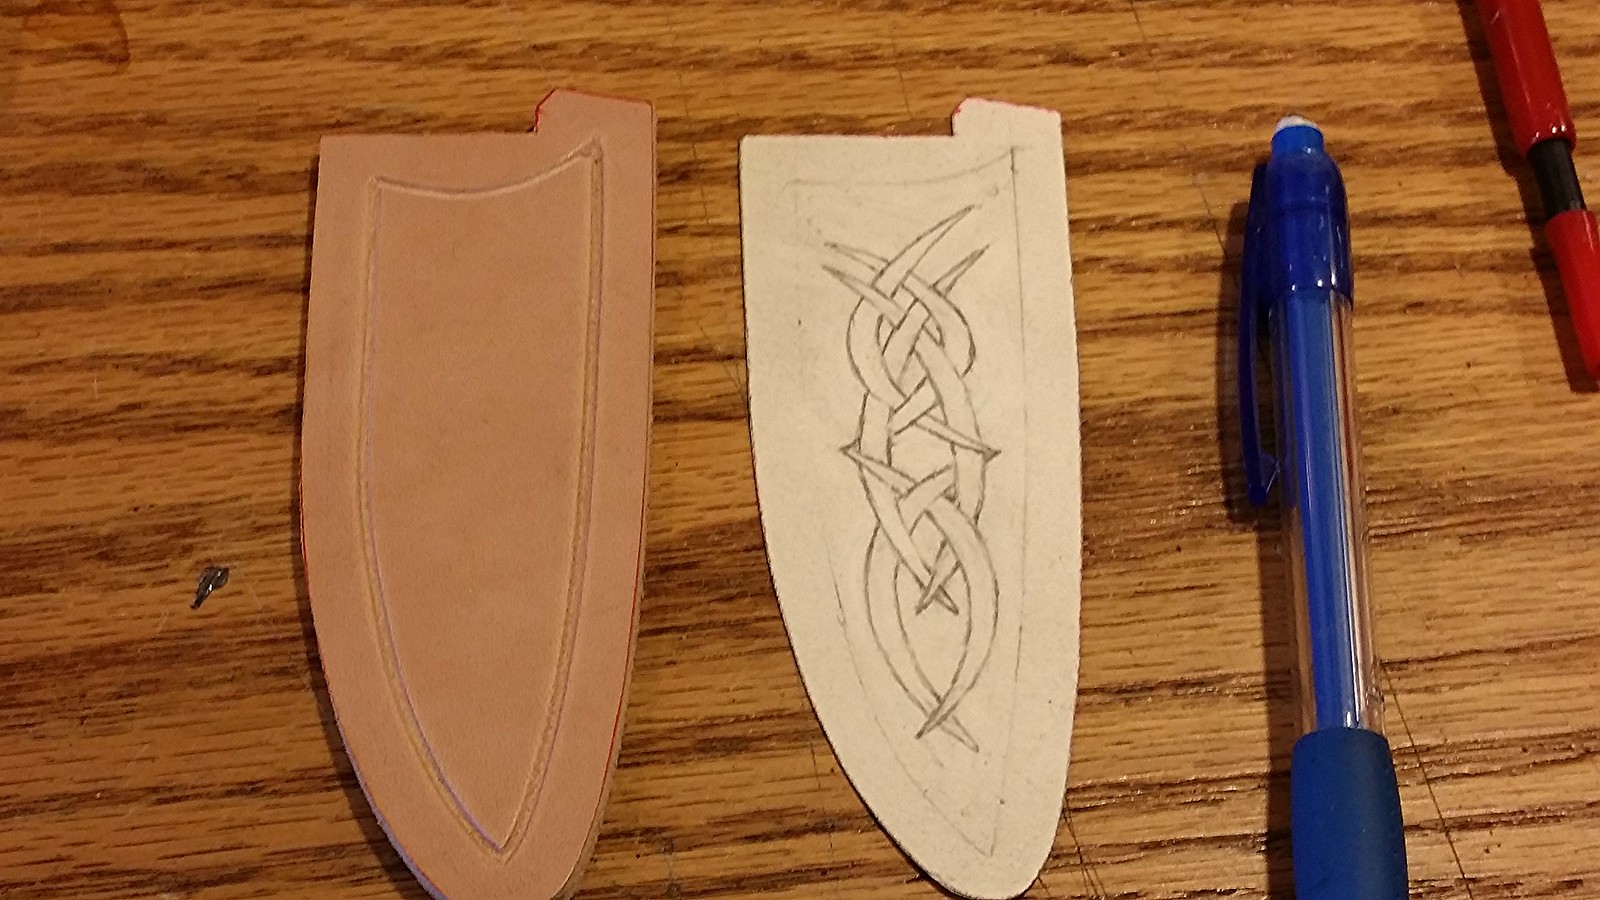
I'm going to try my hand at leather carving for the next sheath. Not sure how this will go and I don't have high expectations. Nothing to lose but a lil piece of leather.
I doodled this design this morning and will give it a try today for the heck of it.
 20150105_091630 by ghostcreekmine, on Flickr
I'm going to try my hand at leather carving for the next sheath. Not sure how this will go and I don't have high expectations. Nothing to lose but a lil piece of leather.
I doodled this design this morning and will give it a try today for the heck of it.
20150105_091630 by ghostcreekmine, on Flickr


Shoot... I just watched a few beginner carving vids and they all say I need a tool called a 'swivel knife' for carving. I'm gonna order one, they're only $10.
Meanwhile I'm gonna try and make a tool (not swivel but just the carving blade) that I can substitute just for the heck of it, I wanna try this.
Meanwhile I'm gonna try and make a tool (not swivel but just the carving blade) that I can substitute just for the heck of it, I wanna try this.
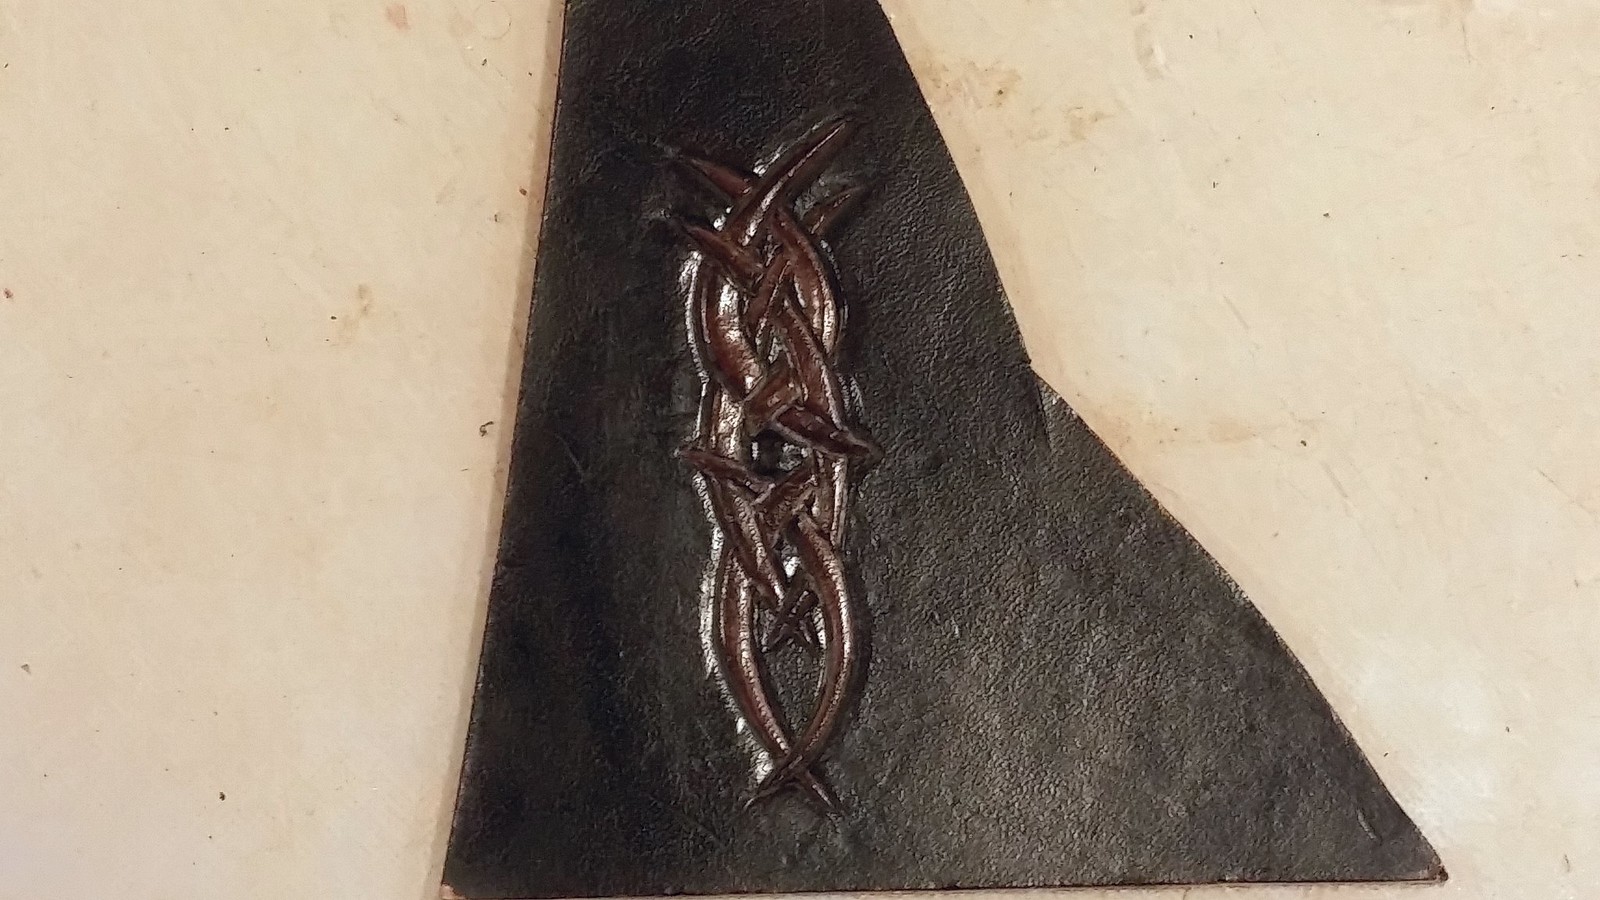
Here's my first crack at it using the two tools pictured.... neither of which are suited for that job but I'm ok with the results and it's just a scrap piece of leather. I'll be cleaner on my next try. Kinda tedious but fun.
 20150105_161027 by ghostcreekmine, on Flickr
20150105_161027 by ghostcreekmine, on Flickr
Great job for your first go at it with tools not made for the job! Is the shading just shadows or the angles of the leather? I like it!
The shapes are contoured... I rounded them but it's hard to tell from that pic. I threw some Spanish Brown dye on it and am gonna experiment with 2-tones to see it I can get it to pop. Dyes won't be dry til tomorrow though. (I got plans for ice fishing tomorrow morn.) 
Here's how it looks with dye. I'm gonna try carving this pattern on my next sheath. The practice piece taught me a lot.
 20150106_163021 by ghostcreekmine, on Flickr
20150106_163021 by ghostcreekmine, on Flickr
So the tribal is still brown and the rest is black? How do you do the 2 colors? Coat the brown with something to repel the dye?
Looks very cool!
Looks very cool!
I dyed the whole piece of leather Spanish Brown first and let that dry. (oil based leather dye)
Then I dyed everything else (except the design) black. I used a small artist brush to detail the black dye around the details of the design.
Then buffed and applied a coat of Carnuba Creme then buffed again.
The design and it's borders came out a little mashed and sloppy but I can avoid most of those mistakes on the next try I think.
 Very nice work Chris! Once you get the swivel knife, it will flow a lot smoother for you I think...especially with practice.
I've gotta wait until I get the appropriate tools for carving but it was fun to get my feet wet, and thank you!
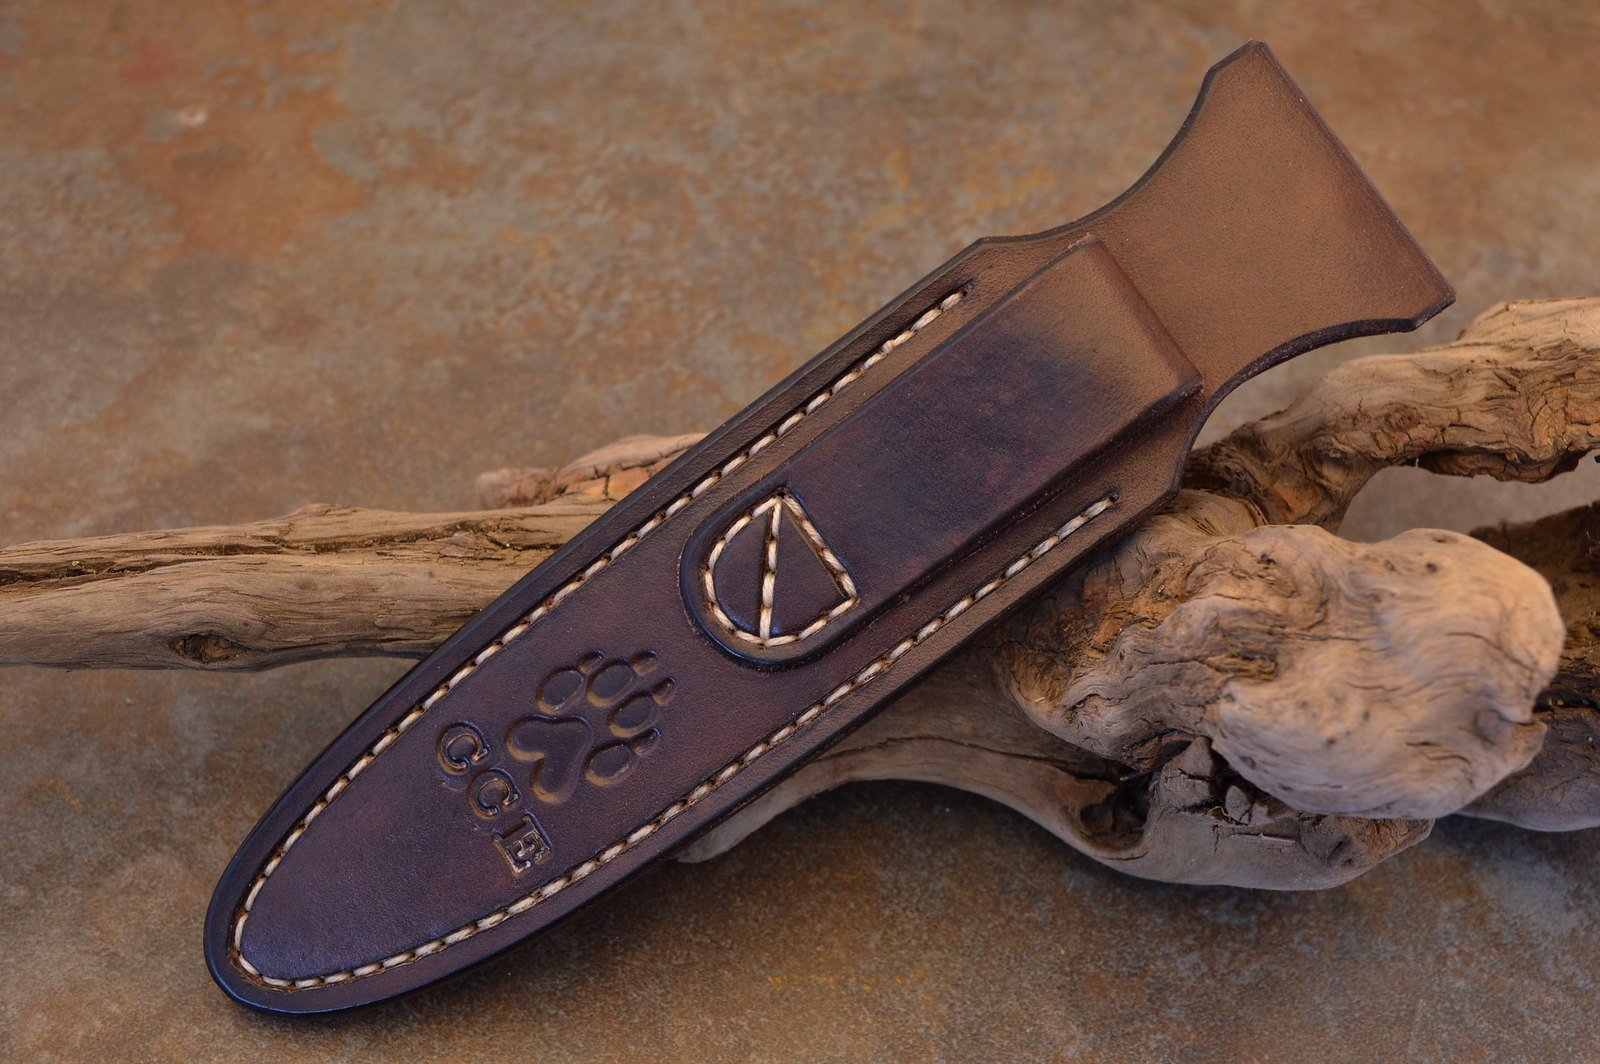
I decided to do more stamping for the next sheath.... this is what I came up with.
 20150107_184118 by ghostcreekmine, on Flickr
I decided to do more stamping for the next sheath.... this is what I came up with.
20150107_184118 by ghostcreekmine, on Flickr
That looks fantastic! It is so cool to watch your steps in learning. The trial and errors and watching you evolve into a hell of a knife/ leather worker. (I can't think of the word for one who creates knives.) Cutler perhaps? Thank you for sharing with us!
Thanks Jessie! That means a lot from a fellow artisan.
Cutler: Skilled at 'assembling' knives from pre-shaped steel, primarily attaching handle scales
Knifemaker: Does it all from scratch starting with the raw bar of steel and finishing with the sheath. Prerequisite - Cutler
I am striving to be a knifemaker and can do it all from scratch. I think I'm there but still lacking a 2X72 to be productive and an etching machine for my maker's mark but doing what I can with what I have for now.
I'm not trying to kiss your fuzzy butt by saying this: your are amazing at anything I've seen you do! From flies, charcoal sketches, photography to Cutlery. I'm in awe of your talents!
We all are, Jessie!
Lol me an artisan.... I'm not focused enough to call myself that. I pull things together from time to time.
That's very humbling Jessie, thank you. 
I think that anyone can do those things if they are of enough interest and the person has the time and patience. I might have an excess of time and patience sometimes, particularly in the winter.
I think that anyone can do those things if they are of enough interest and the person has the time and patience. I might have an excess of time and patience sometimes, particularly in the winter.
QUOTE (fenixsmom @ Jan 7 2015, 08:58 PM) 
Lol me an artisan.... I'm not focused enough to call myself that. I pull things together from time to time.
Fine, I'm gonna go with ARTIST then! You are most definitely that and I am in awe of your talents as well.
Daww, swizzle stick!! 
Add me to the list of the awestruck! The detail in that stamping is amazing!
I don't have an artistic bone in my body.
I don't have an artistic bone in my body.
Yeah, you do - but in an industrious sense!
Very impressive leather work swizz!
Thanks Mike!
I just finished this knife & sheath.
OAL: 7 1/2"
Blade Length: 3 3/8"
Steel: Jantz USA made Damascus.... 416 folded/forged layers of high carbon steels, nickel, and hp alloys. I used a diluted Ferric Chloride etch to darken the steel and bring out the layers.
Scales: G10 Sandstorm, Black
Guard and Pins: Stainless Steel with a satin finish (etched).
 Damascus Camper 1 1600 by ghostcreekmine, on Flickr
 Damascus Camper 2 1600 by ghostcreekmine, on Flickr
 Damascus Camper 3 1600 by ghostcreekmine, on Flickr
I just finished this knife & sheath.
OAL: 7 1/2"
Blade Length: 3 3/8"
Steel: Jantz USA made Damascus.... 416 folded/forged layers of high carbon steels, nickel, and hp alloys. I used a diluted Ferric Chloride etch to darken the steel and bring out the layers.
Scales: G10 Sandstorm, Black
Guard and Pins: Stainless Steel with a satin finish (etched).
Damascus Camper 1 1600 by ghostcreekmine, on FlickrDamascus Camper 2 1600 by ghostcreekmine, on FlickrDamascus Camper 3 1600 by ghostcreekmine, on Flickr
That Damascus sure is Purdy!
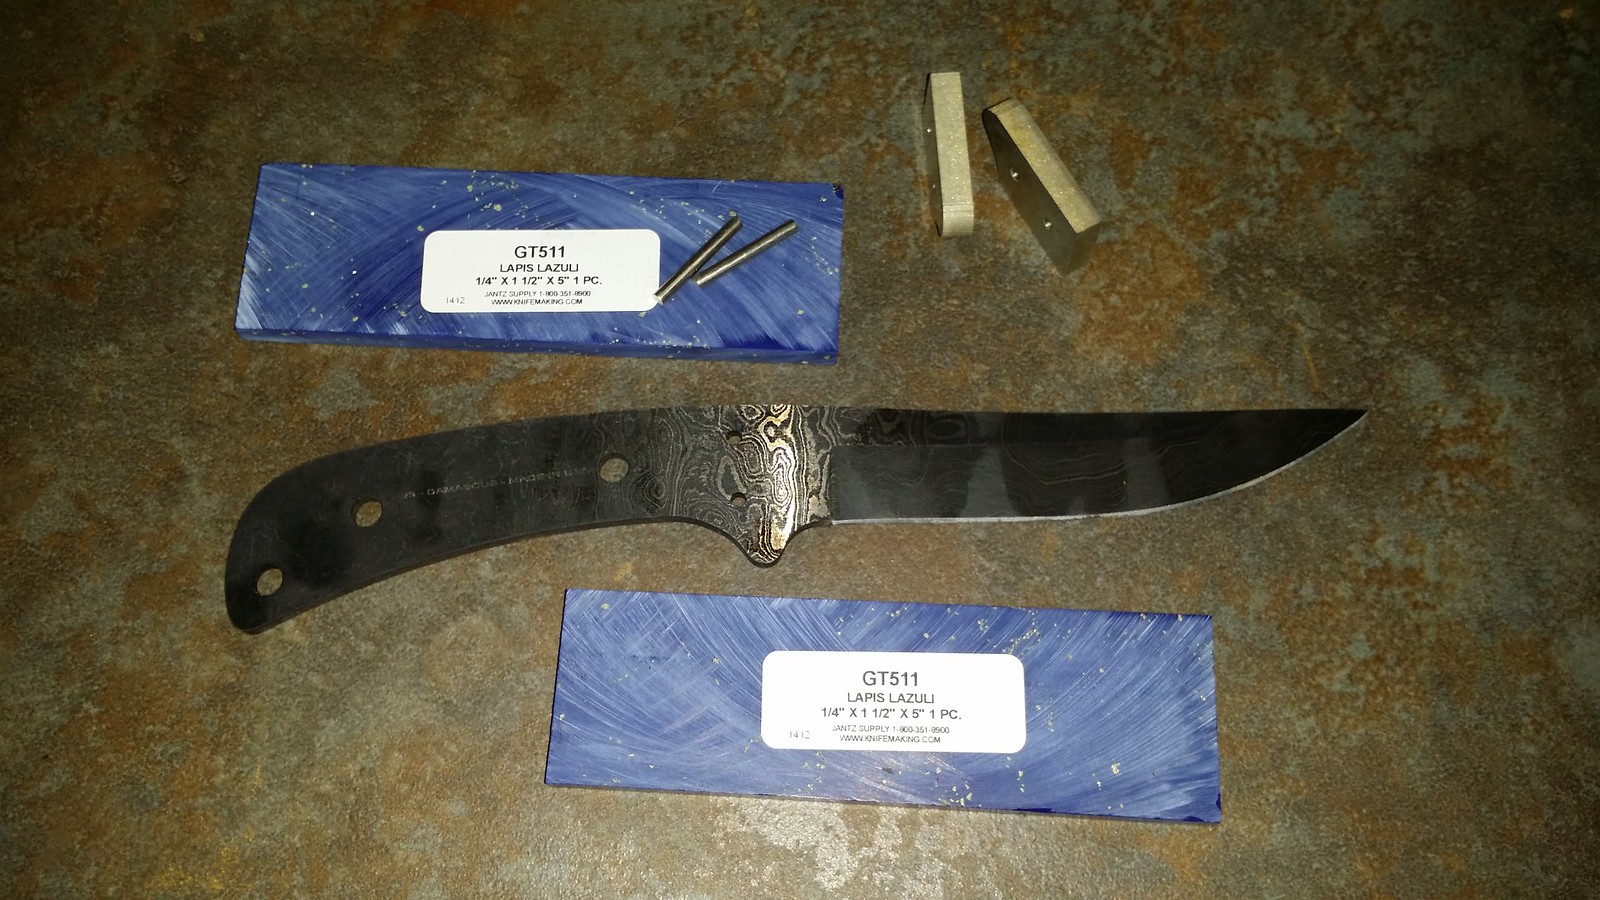
Now on the bench.... this is a Damascus cutlery project for Crusty.
416 Layer USA Jantz Damascus
Nickel Silver bolsters and pins
Lapis Lazuli scales! (expensive stuff)
 20150202_141036 by ghostcreekmine, on Flickr
416 Layer USA Jantz Damascus
Nickel Silver bolsters and pins
Lapis Lazuli scales! (expensive stuff)
20150202_141036 by ghostcreekmine, on Flickr
Woo hoo!!! Can't wait to see what you come up with! 
I shall do my best. 
Very nice turn out on the Damascus Swizz, stylin'!
Look forward to the one for Crusty too, that will be a pretty one with the lapis lazuli scales.
Look forward to the one for Crusty too, that will be a pretty one with the lapis lazuli scales.
Thanks!
Crusty's should be a nice build. I spent the morning fitting and peening the bolsters on, the neighbors might hate me now.
Bolsters look rough now but if I did this well.... the pins won't even be visible after I install the Lapis and do my finish work.
 20150204_105612 by ghostcreekmine, on Flickr
Crusty's should be a nice build. I spent the morning fitting and peening the bolsters on, the neighbors might hate me now.
Bolsters look rough now but if I did this well.... the pins won't even be visible after I install the Lapis and do my finish work.
20150204_105612 by ghostcreekmine, on Flickr
Dan or Denise..... any recommendations for type of drill bit to use on the Lapis? I'm scared to death of chipping.
We'd recommend a diamond carbide "burr" instead of a drill bit Swizz, like the ones shown/used on Denise's stone sculpture projects in that thread.
We use either a rounded ball tip or flat tipped cylinder shape to "drill" holes in a stone. The cylinder shape seems to be easier to keep straight to me though.
I'd say do a two or three stage/size drilling for the pin size hole needed. Make sure the dremel or drill used turn slowly otherwise you'll just toast off the diamond plated carbide then you'll just be rubbin' metal on the rock.
Keep it wet and go slowly, you'll get a feel for how fast to go and what is too fast real quick, especially if you check or keep a finger tip close to the hole being worked. You'll feel it get warm if you're trying to work it too quickly.
To minimize chipping, I use a depth gauge (toothpick) and just before poking through the other side you can use a light to pin point the place on the undrilled side to give it a "divot" of the same bit which seems to really help with that chip out on the break through.
We use either a rounded ball tip or flat tipped cylinder shape to "drill" holes in a stone. The cylinder shape seems to be easier to keep straight to me though.
I'd say do a two or three stage/size drilling for the pin size hole needed. Make sure the dremel or drill used turn slowly otherwise you'll just toast off the diamond plated carbide then you'll just be rubbin' metal on the rock.
Keep it wet and go slowly, you'll get a feel for how fast to go and what is too fast real quick, especially if you check or keep a finger tip close to the hole being worked. You'll feel it get warm if you're trying to work it too quickly.
To minimize chipping, I use a depth gauge (toothpick)
and just before poking through the other side you can use a light to pin point the place on the undrilled side to give it a "divot" of the same bit which seems to really help with that chip out on the break through.
Due to the fine tolerances between the pins and the Lapis I cannot use an encrusted bit. It'll have to be a precision bit with a smooth point and shaft to keep the holes perfect. I'll be using the drill press. The Lapis scales are a "gem composite" so it may not be as difficult as solid Lapis. It is Lapis Lazuli... but crushed and re-formed by an unknown process. It can be chipped as the scales came with some minor chipping on the corners. It can be shaped and sanded on my bench sander so far without too much trouble.
All that being said, hopefully it'll drill fine with a quality metal or tile bit from the hardware store?
All that being said, hopefully it'll drill fine with a quality metal or tile bit from the hardware store?
I just did a test-drill on it with a regular drill bit. The entry hole is clean and perfect but the exit hole is chipped out. If I use masking tape on the backside will it eliminate the chipping?
The burrs finish holes are actually very smooth but you will need to mic the size to fit the pins for sure. Any drill bit you'll find suited for stone will unfortunately probably have the same "encrusted" diamond carbide but I don't think that will cause an issue once you've got a burr/bit of the appropriate size picked out.
The reason burr work better is surface area to work with vs bits......burrs just have more diamond area to grind the stone which is really what it is rather than a "drilling" process.
You are keeping that stuff wet while sanding right?
The reason burr work better is surface area to work with vs bits......burrs just have more diamond area to grind the stone which is really what it is rather than a "drilling" process.
You are keeping that stuff wet while sanding right?
Don't think tape will work on the chipping problem, try the divot trick from the post above.
QUOTE (ColoradoProspector @ Feb 4 2015, 12:26 PM)
You are keeping that stuff wet while sanding right?
No. Not using lapidary equip and bench sander is not water friendly. Just taking it slow.
Quote from manufacturer:
" ... requires no special lapidary equipment to cut and shape. Will grind, drill, and polish with care, as all natural materials can break."
Dan, have a look at this! Artu Bits
I talked to my local hardware guy and he suggested trying it... said they were really talking it up at the Stock Show. I figured "what the hay". The bit was not cheap at about $6 but did the trick! I couldn't believe it.
Clean entry and exit wounds with this bit.
I talked to my local hardware guy and he suggested trying it... said they were really talking it up at the Stock Show. I figured "what the hay". The bit was not cheap at about $6 but did the trick! I couldn't believe it.
Clean entry and exit wounds with this bit.
Guess as usual, I had to be difficult lol
So excited!
So excited!
Oh ok Swizz, my bad. I'd assumed it was a solid piece of lapis lazuli but I'm with ya' now, it's a composite material not actually stone.
Huge difference then and sounds like your right on track with it. Should be more like glass to work with, much softer and not silica/quartz stone so dust must not be so hazardous. COOL!
Not a bad price on that bit either compared to similar, sounds like it did well on this project.
Huge difference then and sounds like your right on track with it. Should be more like glass to work with, much softer and not silica/quartz stone so dust must not be so hazardous. COOL!
Not a bad price on that bit either compared to similar, sounds like it did well on this project.
So far - so good. The dust is definitely unpleasant. The composite is mostly Lapis... the rest is resins. They combine to make a beautiful but surely toxic cocktail. Using a respirator for this.
This is a "lo-fi" version of our main content. To view the full version with more information, formatting and images, please click here.