Printable Version of Topic
Click here to view this topic in its original format
Colorado Prospector - Gem and mineral prospecting and mining forums _ Gem and Mineral Specimen Finds or Processes _ Rough Opal
Posted by: Mrs.CP Apr 25 2011, 05:32 PM
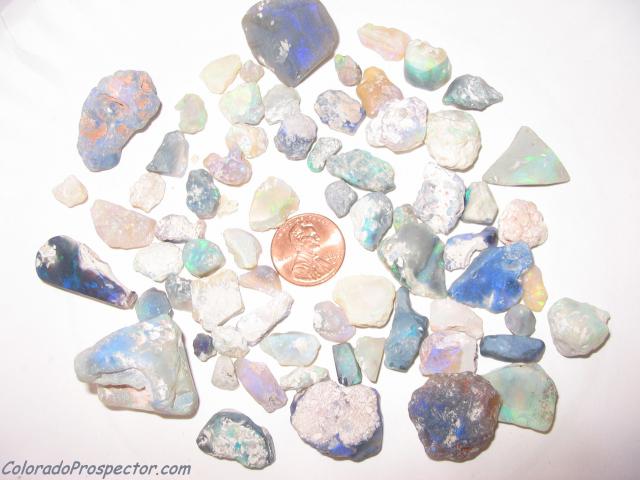
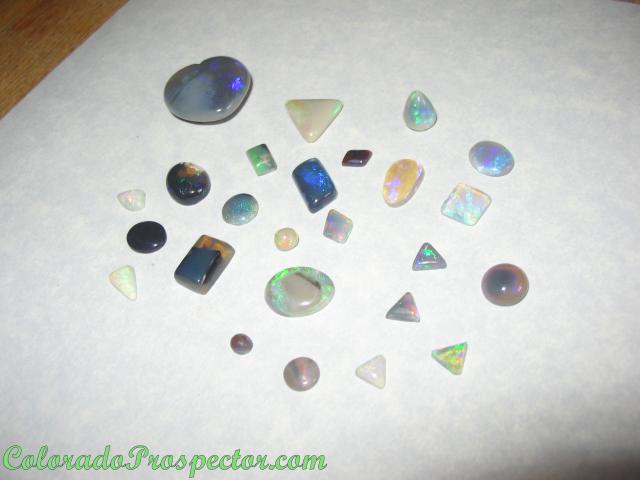
Here is a lot of Opal that was bought, and given to us to work for them.
Im sure they will be surprised what we will be able to do with these amazing stones. 
First picture is of the Opals....
|
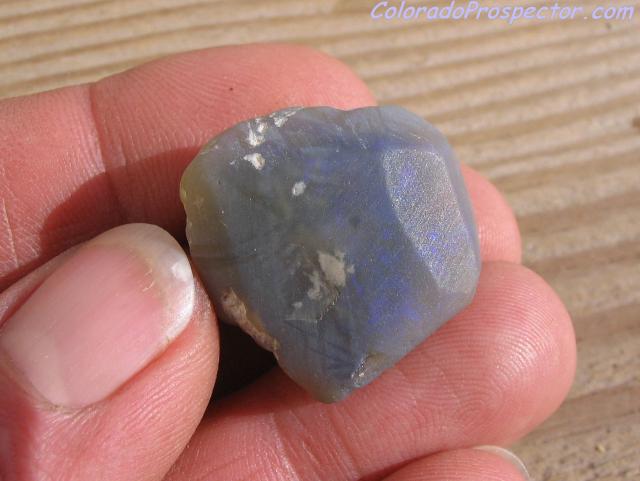
This is a closer look at the larger Opal pictured at the top of the first photo....
|
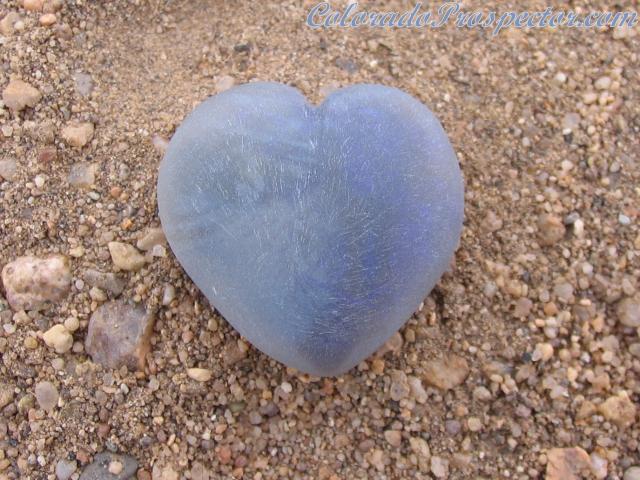
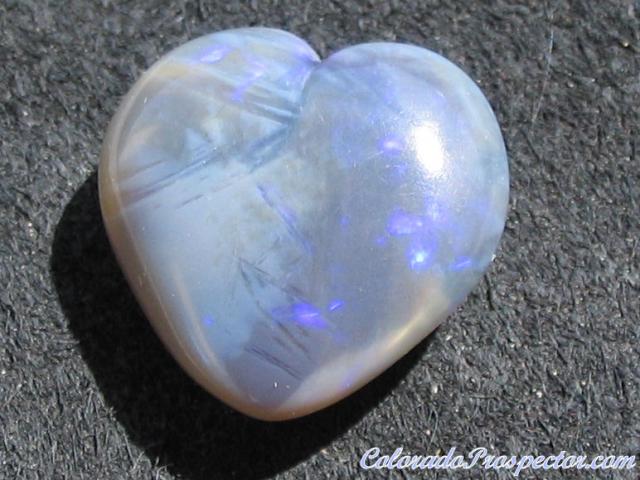
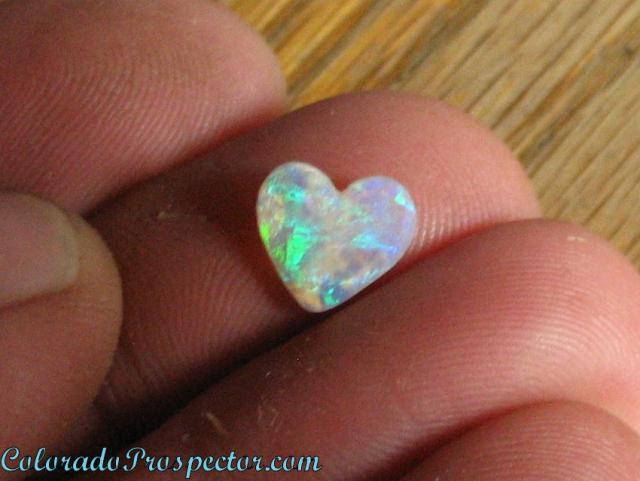
So far the "Love In Lavender" heart is coming along nicely.

Im going to try to work this one by hand, meaning only with Diamond hand files, wet/dry sandpaper and polishing grit on a cloth. Opal is a soft stone, so this will be easier than workig Agate with hand tools. As you could see by the picture above, there are several white potch marks, and a fracture on the front that needs to be worked out. This is a fantastic stone, and the whole right side has this amazing bright purple rolling flash. The more I work the stone, the more flash rolls right into the left side. I love how the left side has this almost icy look to it. The backside had several surface fracture that I was afraid would go into the stone further, but they didnt.

 I have been able to clean it up nicely.
 Right now the stone weighs 5.4 grams (26.5 ct.), but thats before the polishing. I think Im close to being done with the rough stage though except a little tip fine tuning. Remember, picture is shown of the stone dry after the rough (shaping) stage, so you cant see the color flash, but just wait till its done.
This one sure is going to be a beauty I think!

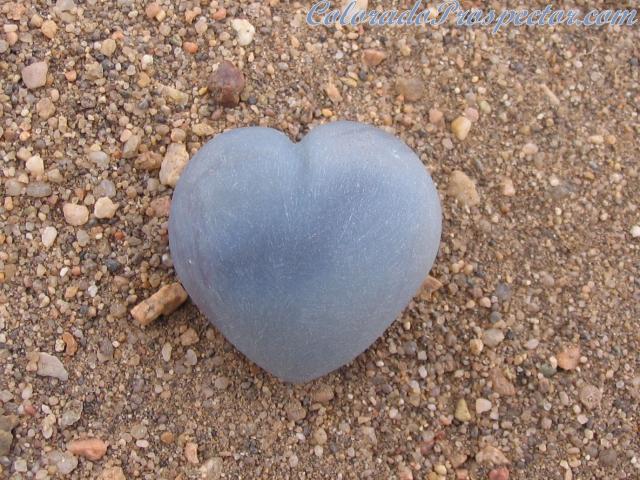
Front side....
|
Back side....
|
It will be fun to see what Dan is going to do with a few he has been eyeing up.

Posted by: Mrs.CP May 5 2011, 07:15 AM
Here is the heart, but Im not happy with the polish. After the final polish, I noticed that the stone had an almost orange peel look.
This is caused by not enough time on each grit polishing stage.  Being a perfectionist with my work, Im going to back track a few grit stages and polish this baby out right.
Natural light is obviously not the best to use to get the deep purple color properly either. 
This piece is amazing, so I want it to look its best!
|
Posted by: swizz May 5 2011, 07:20 AM
perfectionism... there is no known cure
back to the 'ol grindstone 
Posted by: Mrs.CP May 5 2011, 07:32 AM
No cure and I have it bad........  ...Its a curse I say!
No grindstone with this beauty, just wet dry sandpaper all by hand. 
This is my first attempt at handworking a stone completely, so Its no surprise I have to back track, but It will be well worth it I think.
Posted by: Mrs.CP Jun 7 2011, 07:06 AM
Well I finished the heart and its polished alot better this time. I just needed to use a heavier hand on it.
This has been the hardest Opal for me to photograph. No matter how hard I try with different settings and light, the Opal flash still turns out to look blue in the pictures instead of purple......
So I quit trying.

Posted by: swizz Jun 7 2011, 03:25 PM

So I quit trying.
oh no you don't, you're not getting off that easy.

Try different color backgrounds... black, white, and everything in between. With each background try with and without flash (tripod if you have one), you'll find that purple. Also try masking tape over the camera flash (old trick) which will still flash, but soften it a bit. Heck, try blue masking tape... ya never know.
Good luck, gemstones and Opals are really difficult to shoot. I'd like to see it!
Posted by: ColoradoProspector Jun 14 2011, 07:33 AM
Well that purple is very illusive to the cameras eye, I've tried several times myself to help get a pic showing the purple, but no matter what light or back is used the blue is what the camera sees. The blue actually got brighter in some lights and backgrounds, but still no purple in the pic.........as I was looking at in purple with my eye! 
Everyone will just have to take our word for it on this one, it does have a beautiful purple in hand but that electric blue is easy to catch obviously too.
Nice work on this one Denise, but I still think you were nuts doing it all with hand files and hand polishing techniques! 

Posted by: Mrs.CP Jun 18 2011, 06:37 AM
Guess you will just have to see it in hand at the outing Chris. Its much nicer that way anyways. 
What's nuts is Im going to do it again, but next time it's going to be a sculpture.
 Just waiting for the right piece to come along.
Tools used to work the heart........
Diamond files, grits in order ( wet dry sandpaper) 220, 320, 400, 800, 1000, and then polished with a scrap piece of leather wet with tin oxide. I would like to add a few more grit stages, but thats all I could find for now.
Posted by: Mrs.CP Dec 11 2011, 10:39 AM
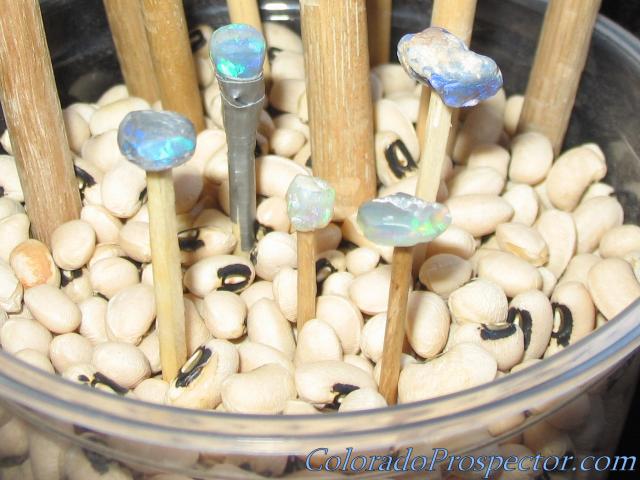
Time to work some of these lovely stones on the cabachon machine. 
Most of the stones are very tiny, so the normal dopping sticks are too big.  Time to think outside the box a bit and with a little help of super glue, tooth picks, match sticks and yes...the handy mans tool....Duct tape, we made it happen. The duct tape was CP's idea. It's the Opal pictured in the "To Cut or not to cut" thread's going. He decided to free form it into an egg shape, and to be able to polish out the bottom of this tiny lovely...that's when the match stick and duct tape came to mind for him. It's hard to dop a polished surface, so I guess it's worth a try.
Here is a picture of a few Opals dopped along side the larger dop sticks.
|
Several others are already finished and turned out amazing, it's just a matter of getting pictures of them now.
Posted by: sunspirit Dec 13 2011, 12:32 PM
Denise,
It looks like you have some good material there. Being a long time opal cutter myself, I have found super glue on a nail head to work best for any heat sensitive material. To remove all that is needed is to soak in acetone for a few hrs. and they fall right off. (sealed jar, of course) A 6 dwt. finish nail will cut down to 2 mm diameter or so. They can pull off when stuck to the polished side so use a delicate touch. Looking forward to seeing the finished stones! Later, Mark
Posted by: Mrs.CP Dec 13 2011, 08:45 PM
Hi Mark, I would love to see some of your work. These stones are turning out fantastic. Dan finished working the egg one held with duct tape tonight during the lapidary lessons in chat, and it worked great.....and WOW what a beauty!!!  There's not an angle that doesn't show amazing flash. Good job Dan, now to get pics. That's something that I need work with.
This is one pictured above that I was going to sculpt into a fish swimming over a rock. I was flushing out the soft potch in the crack, but it went deeper than I was thinking. Sad to say that there is a fracture that is going to seperate right between the fish and the rock.  Guess that plan is shot, but it will cut into some nice pieces to work.
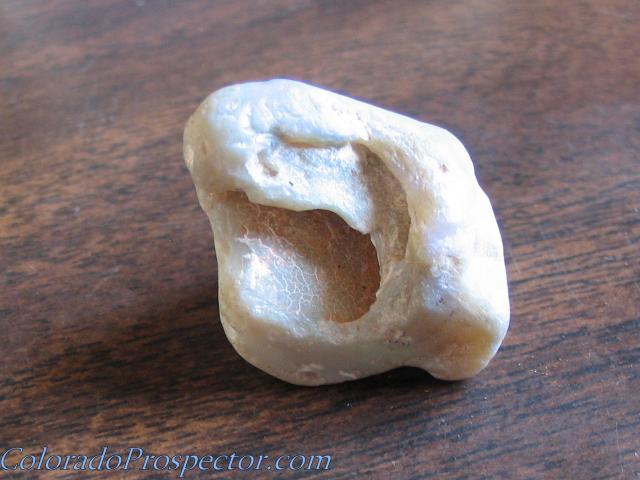
|
Posted by: sunspirit Dec 14 2011, 01:20 PM
Denise,
One day soon I will post some pics. Probably be after the Holidays as I am pretty busy right now. Getting pictures of opal is quite a challenge. An old guy (older than me anyway) told me once that you have to fool the camera into getting the play of color. The color you see isn't really there. It is just white light broken down into a spectrum like a rainbow. He used some pretty interesting lighting setups to get what he wanted but they usually came out great. I will look for the info he gave me and pass it along when I find it. Later, Mark
Posted by: Mrs.CP Jan 18 2012, 10:49 AM
That would be great Mark, I'm looking forward to it.
This finished Opal was pictured on the top right of the rough stones picture. I went with the shape it already was and it turned out pretty nice I think. The green flash rolls across the tip and can be seen from all sides, on the backside as well. Both sides are finished, but this side had the most flash. The black spot on the tip is just dirt. Size is approx. 14.1 mm.
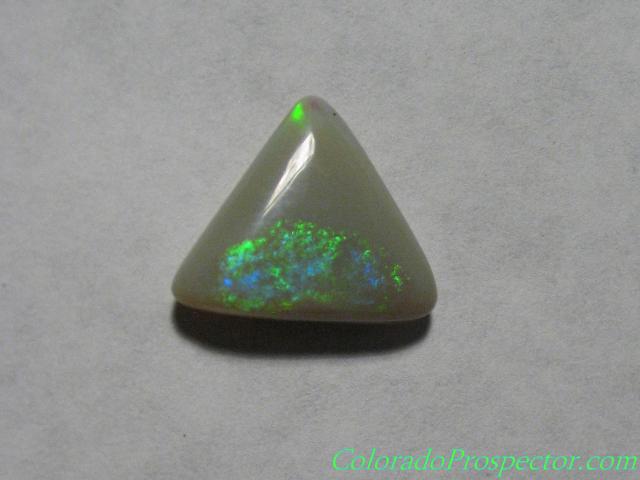
|
Posted by: ColoradoProspector Jan 30 2012, 09:22 AM
We'd all love to have/see some pic taking tips Mark. Opals are a pain when it comes to taking the photos! Post up some of your stone cuts too, we'd all love to see some of your work as well.
We've tried a bunch of things and could still use some more tips on successful pics more consistantly.
Here's a group shot that turned out a few flashes on the stones.  We used a non solid color back ground piece that seemed to help some but the light used still messes with the cam's eye.
At anyrate this pic shows some of the nice color that was in the lot. Not all stones in the lot were cut yet but this is a good portion of the lot's finished pieces. The large heart is the same one pictured earlier and it's size is approx. 22 mm X 22 mm and the smaller triangles in the group are 1/4 inch for size comparison.
|
Posted by: Mrs.CP Feb 2 2012, 02:03 PM
The group shot did seem to work best for me, but I'm still working on better Opal pictures.
Here is one that was too thin for a cabachon, but I thought it would make a sweet inlay. It measures 9x9 mm. and about 1.6 mm. in thickness...or should I say thinness. Picture is a little blury, but you can still see the flash.
|
Posted by: swizz Feb 2 2012, 07:13 PM
 BEAUTIFUL!
Posted by: sunspirit Feb 3 2012, 01:29 PM
Mrs. CP,
Very nice! One thing that works for me on thin pieces is to make a doublet. Cut the back so it is very flat and clean. (if there are any inclusions on the back they will show through the stone) Cut a piece of black material (also flat) and epoxy the two together. Then cut off the excess edge and polish. This should give the appearance of black opal. Great flash over a black background.
For the back piece I usually use black jade or black onyx, but a very opaque obsidian will also work. I have recently aquired a piece of opal from a new source and I will post the finished piece when I get it done. The attachment is a scan of the stone, I hope it comes out . (I am not much of a computer guy) Size is 7 ct. and I hope to get a 50-60 % return. Later, Mark
|
Posted by: Mrs.CP Feb 3 2012, 06:50 PM
Thanks guys!!
Hi sunspirit, very good information. This piece started off pretty flat on both sides so it would also make a great triplet. For a triplet, one would need a clear piece of quarts to place and glue on top to achieve the dome shape. I love inlays so I was thinking about using a black Opal or Jade cabachon as the piece it's inlayed into.
You did great with the picture upload Sunspirit! Thats a fantastic piece and I'm looking forward to seeing what you make from it.

Powered by Invision Power Board (http://www.invisionboard.com)
© Invision Power Services (http://www.invisionpower.com)