Printable Version of Topic
Click here to view this topic in its original format
Colorado Prospector - Gem and mineral prospecting and mining forums _ Gem and Mineral Specimen Finds or Processes _ Stone Sculpture Projects
Posted by: Mrs.CP Feb 11 2009, 03:51 PM
Seems most of the sculptures Im working on right now are smaller than a quarter.
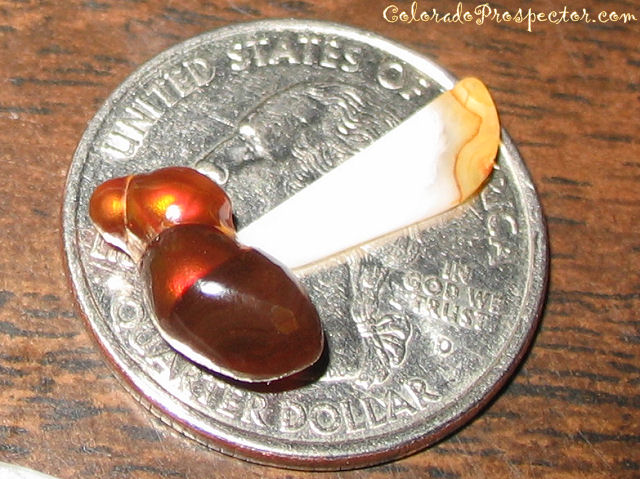
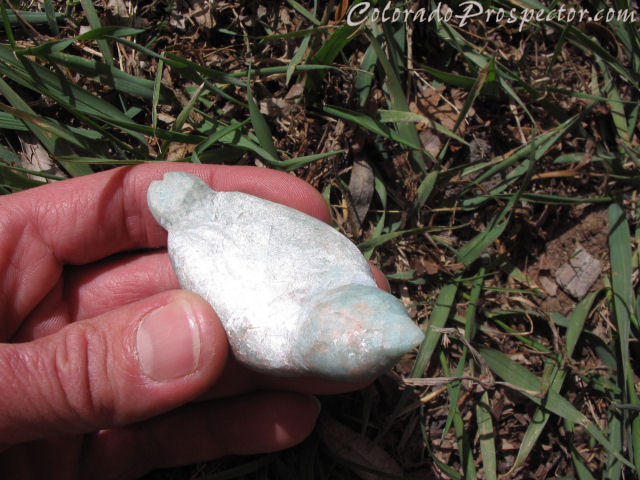
Here is an example with this California Fire Agate bee in the works. Only his right wing is showing in this picture as size example.
The wings still need to be attached, so it looks a bit like this still yet. 
Hopefully it will improve in time, and I wont snap a wing trying to put it all together.
I think Im going to forward a few of the bigger projects I have in the works, and give my fingers a break.......hehe
Have to love the challenge though right?

Posted by: jim Feb 11 2009, 04:43 PM
Wow Denice thats gonna bee awsome. I don't see how you can do such tiny things. I am working with fire agate right now also. So I know how frustrateing it can bee. Bee sure and show us the finished product. Very cool as usual.  Jim
Jim
Posted by: Mrs.CP Feb 12 2009, 08:15 AM
Thanks Jim. I will be sure to add a picture when its complete. I will be doing wing implant surgery today...hehe
I have several others that are done that I could get pics of also, but most have moved on to their new homes already. 
Posted by: thegeno Feb 12 2009, 01:10 PM
Denise, very very cool!
geno
Posted by: Mrs.CP Feb 13 2009, 07:42 AM
Thanks Geno. This is one that found a new home already, and is very "cool"....hehe.
Approx: 1 5/8" tall x 7/8" wide at the base of the snowman. Made from one piece of Rutilated Quartz,
with a Smokey Quartz top hat (seperate piece). The base its on is a Botswana Agate slab.
Posted by: jim Feb 13 2009, 09:22 AM
Really great work Denice. I bet you will miss the little guy.
Posted by: Mrs.CP Feb 14 2009, 06:47 AM
I do! But I already have another in the works, made from white Del Norte Agate.
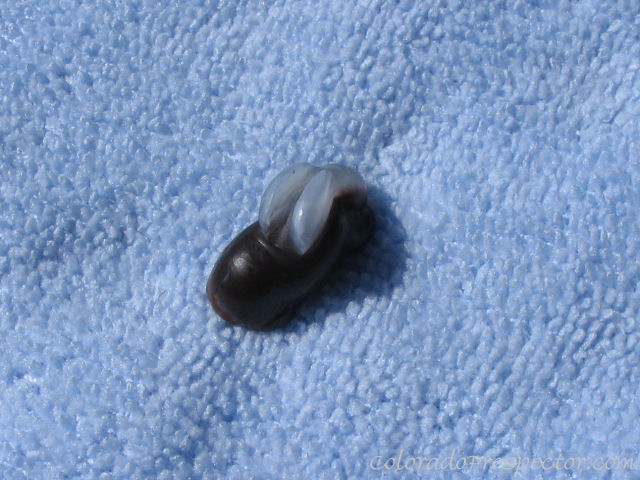
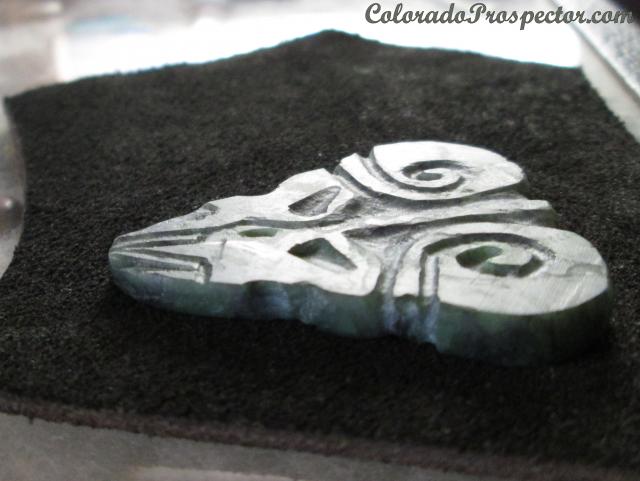
Here is an Opal Mushroom that also has a new home. Hard to see in the picture, but it has lots of opal flash on the underneath side Im showing. I left the frontside of the stem with its natural formation.
Denise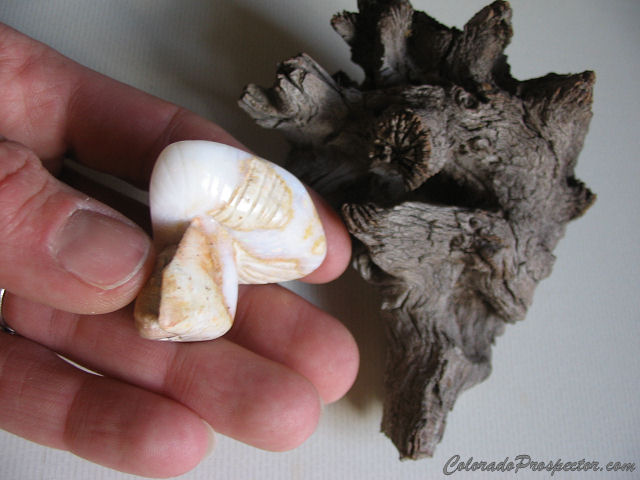
Posted by: ColoradoProspector Feb 16 2009, 11:37 AM
Nice work honey!  She's so talented.
I was "recruited" to help with the teensy tiny implants.  after careful thought of how to complete this, we rigged up the holding pattern for cure time......
 boy was this a lil' tiny project, what was she thinkin'?
 Any way, got the holdin' pattern set then implants were attatched......then wait to cure, and NO TOUCHIN'!
Second step was to then attatch him to the crystal flower.
Think all in all it turned out pretty nifty Denise.......cool project glad it all went together and I'm not in trouble for mis alignment.  All pieces involved for this art work are from the same location, Opal hill mine, Ca. Well known for it's awesome fire agate. And yes the flower has fire agate bubbles under it.
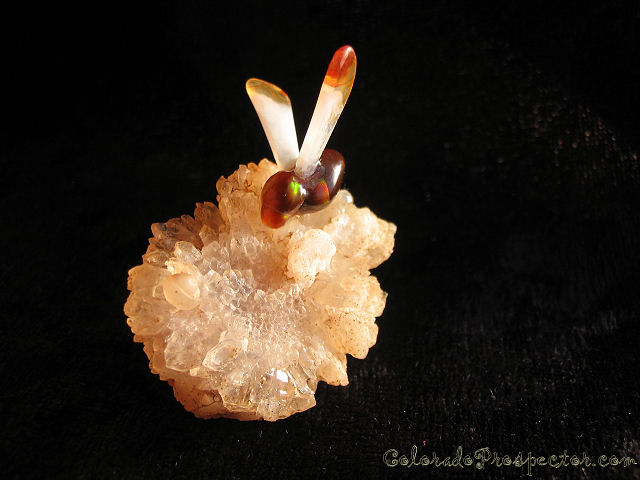
Another view/angle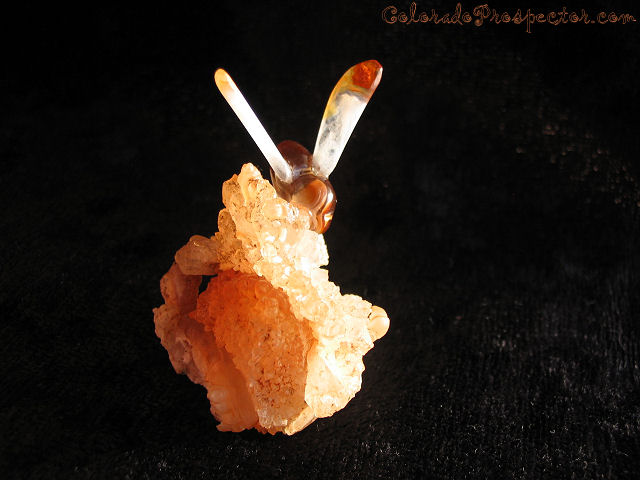
Posted by: ColoradoProspector Feb 16 2009, 02:55 PM
This one is a butterfly Denise has been carving for awhile and I was happy to be able to wrap it out for it's completion too.
Not as small as the bee....thank goodness!  Still pretty small though, he needed legs and antennie after she did such a nice carving job of his wings and body from one piece of Colorado sow belly agate. We decided he needed the twisted look to more resemble the "Blue Kramer" she used as a model for this one.
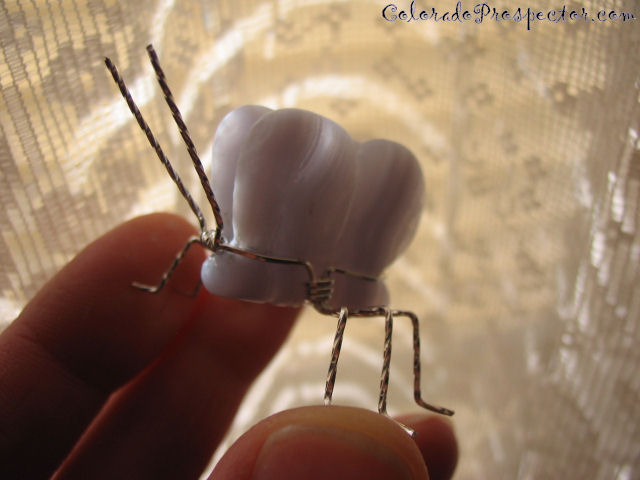
Posted by: Mrs.CP Feb 17 2009, 09:26 AM
 Thanks Dan...... You did an awesome job!!
I couldnt think of a better person to involve helping me with my art projects.
Posted by: nm jack Feb 17 2009, 10:34 AM
 Awesome stuff !!!! Sure is Purdy!!!
Posted by: Mrs.CP Feb 20 2009, 07:17 AM
Thanks Jack!
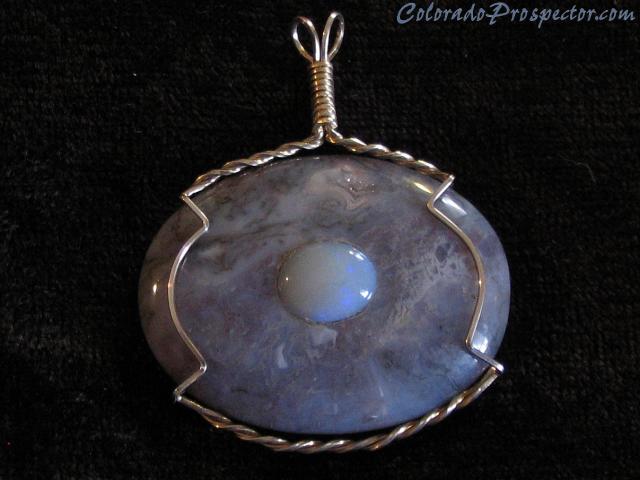
Here is one made from Boulder Opal......It also has an Opal guitar with boulder opal inlayed.
Talk about a chore to polish out!! 
Sure is hard to get the opal flash, but him and his guitar really twinkle in the sun.
I think I want to make a pendant out of him, but I cant bring myself to drill a hole in his head...hehe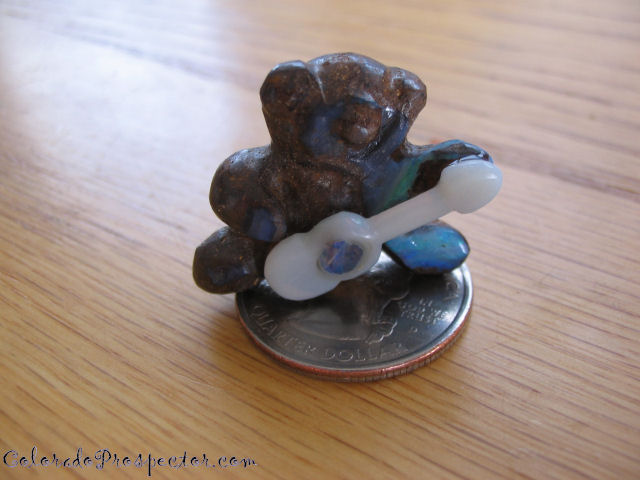
Posted by: russau Feb 21 2009, 05:37 AM
could you aply one to the back of his head or drill through the side of its head so it wont disrupt the image??
Posted by: ColoradoProspector Feb 22 2009, 12:12 PM
You're welcome honey! Glad I could help get these finished out. You did such awesome work!
Yep Russ that is what we've been discussing but any way it's done the lil' buggar is gonna have a temporary headache. There was even a thought of wrapping wire around the neck but didn't want to "hang him" noose style. 
Seems right to share a lil' bit of the "headache" with the lil' projects anyways. 
We will just have to see what happens in the end.
Posted by: Mrs.CP Feb 23 2009, 07:24 AM
Maybe I can give him an opal head set (ear phones), and plug them into his guitar.
At least that way I can attach the necklace to the head set and not his head.....Just a thought.

Posted by: jim Feb 23 2009, 03:18 PM
Thats a great idea denise. Your so resorseful.
Posted by: faaus Feb 23 2009, 04:36 PM
I'm constantly amazed at the creativity, beauty and craftsmanship of all of the pieces you and Dan make Denise! You folks are the BEST!
I have missed chatting with you folks and Jim, GAT, Scottiniski, Big Cats, and all the rest of you good people. I hope to reconnect with all of you real soon.
Heavy Pans,
faaus
Posted by: Mrs.CP Mar 7 2009, 08:56 AM
Thanks for the compliments!
I actually found myself with a piece of Opal starting to make a headset for the bear.
Wait I thought!  I was trying to move twards bigger projects?....hehe
How about a hole in his back for a stick pin? Even better, I think Im just going to leave it like it is, and let the
new owner decide if it needs anything else.
In fact, were going to be giving it away for http://www.coloradoprospector.com/forums/index.php?showtopic=2097. If interested, you might want to pay attention to that thread for more details. 
Posted by: mystic mining Mar 7 2009, 07:32 PM
Hi Denise
The mushroom you made is a great peice, will post pics next month of it and all the finds from Az.
Posted by: Mrs.CP Mar 8 2009, 07:45 AM
Glad your trip is going well Sean, cant wait to hear the details of the digs and the finds!
Glad you like the mushroom, It was one of my first.
Im still learning the art of stone sculpting, but its getting better after every piece I sculpt.
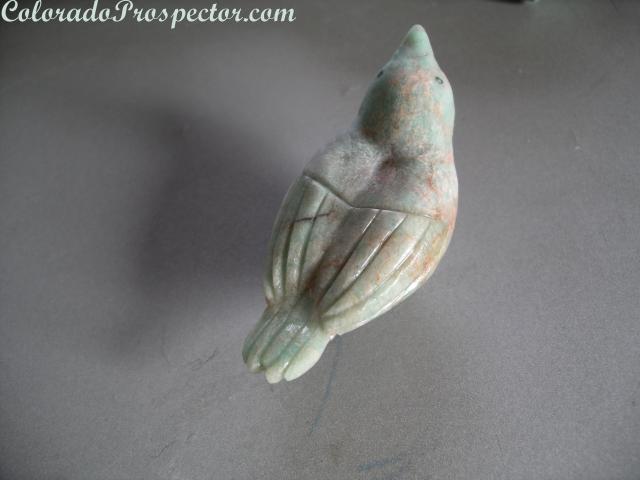
I started an Amazonite bird (palm sized), but while working it I hit a fractured spot that slowed me down.
Im going to try to stabelize it before I continue, then see how it goes.
Posted by: Mrs.CP Aug 2 2009, 05:18 AM
The bird is doing good now. Stabelizing it sure helped! Here is a picture of it in the works.
Still a very long way to go before done, but you get the idea.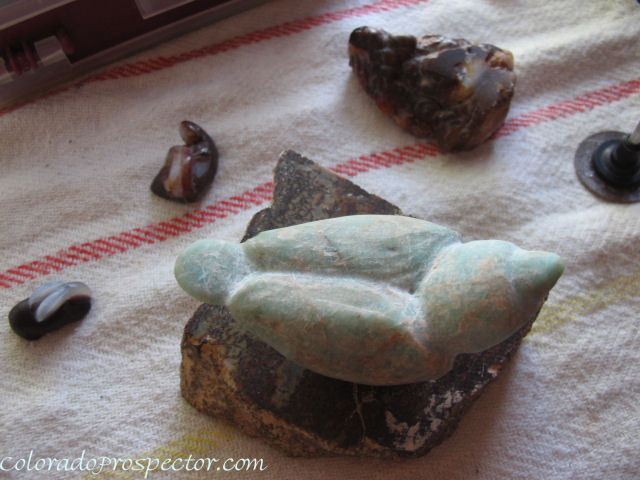
Im also working on a Fire Agate bunny. Hes cleaning his paw.
Very small, but I think it will turn out great when its all done. Still alot of work to do yet.
Here are a few pics of the work in progress. Maybe with more interest, I will show more of the sculpting process.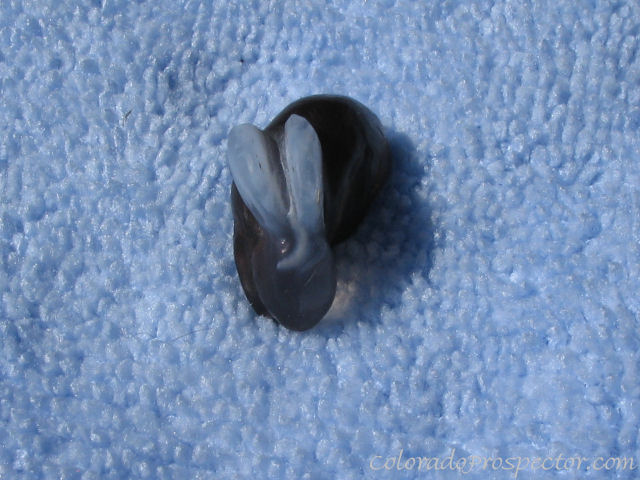
Posted by: nm jack Aug 2 2009, 01:11 PM
Wow, that's really cool!!
Posted by: ColoradoProspector Aug 22 2009, 04:41 PM
Neat projects honey, and thank goodness there ain't no epoxy planned for these little buggars either.
Several of these projects have already found new homes shortly after completion. We are happy to announce, now we've got a new section in the Miners Market for http://coloradoprospector.com/MinersMarket/FolkArt/Stone_Sculptures.html.
So far the fire agate bee and the sowbelly agate butterfly have been listed. Hopefully some of the new projects posted here will make it to the market too, so keep your eyes open for the updates on completions, they tend to go rather quickly when finished.
CP
Posted by: Mrs.CP Aug 24 2009, 07:24 AM
Thanks for the compliments guys!
I really like the little bunny cleaning its paw.
 It was a perfect piece to make him out of.
 Hopefully he will make it to the Miners Market and not into my collection.
Posted by: Mrs.CP Sep 22 2009, 08:00 AM
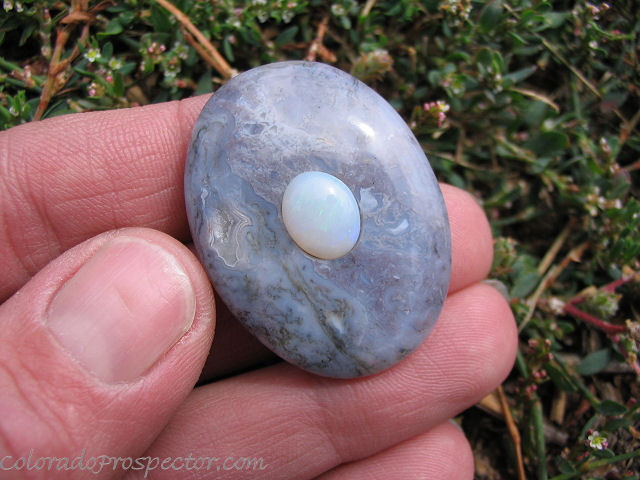
Here is a cabochon I finished, but then decided to work it more.
I was thinking it would look good carved into a flower, with a flashy white Opal for the center.
I got as far as this, and was wondering If I should just stop, and set the Opal in like it is. 
Should I keep working it, or call this piece done?  Sure looks nice as is.
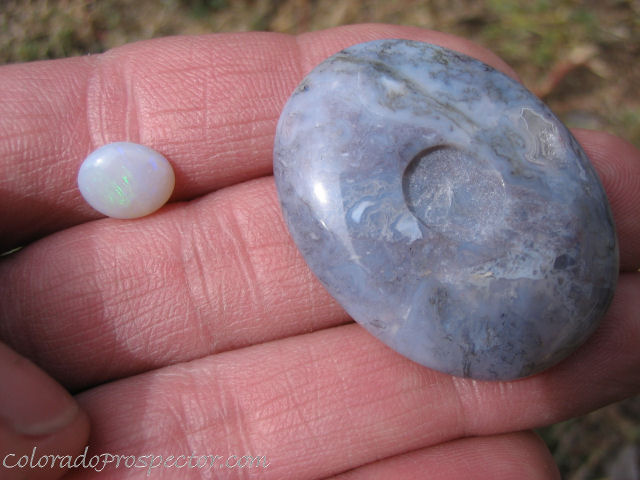
Posted by: jim Sep 30 2009, 06:18 PM
Decisions, decisions.. It would make a beautiful flower. Then again finished like it is now would be a great centerpiece for a piece of jewelry. Decisions decisions. 
Posted by: Mrs.CP Oct 10 2009, 07:55 AM
I have toyed and experimented with a piece of man made goldstone. It was a perfect piece to practice on.
I have found that sculpting or carving has been the easy part for me. Its polishing out the pieces that I think is difficult.
I tried experimenting with tumbeling this piece out, but wasnt a good plan. The piece got stuck at the bottom of the tumbler, and it wore away all the lighter carving work I did on the backside.  I felt like throwing it out the door when i saw it, but Dan wouldnt let me.
When people see it in hand, they think it looks great. Guess Im just my worst critic.
Im going to finish it out then decide what to do with it.
Here is a picture of it, with a flashy Orange Opal for the center piece.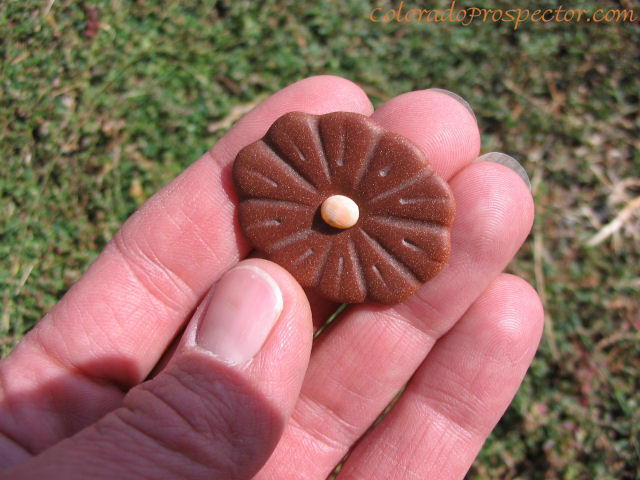
Posted by: Mrs.CP Oct 23 2009, 12:51 PM
You would hate watching this one being worked Jim.
Solid fire agate! But to get the shape Im looking for, I have to grind away some fire. The fire follows its body perfectly though!
This piece is a little over an inch long with lots of work to be done to it still. Its going to be a Salamander......
Hopefully. Theres another picture of it above with the Amazonite bird.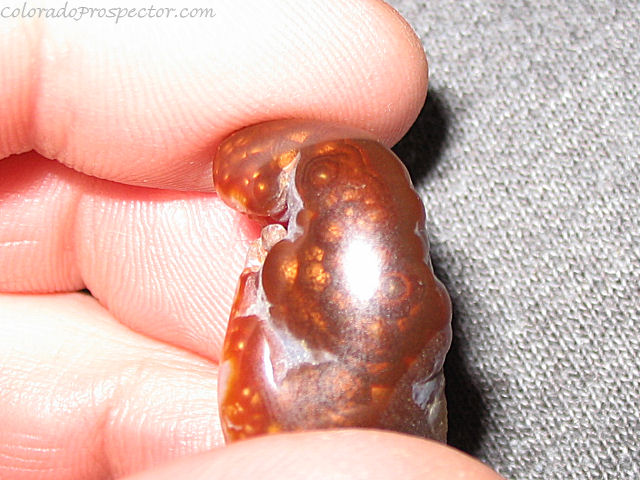
I know........My fire Agate pictures stink!
Posted by: jim Oct 23 2009, 04:47 PM
LOL Denise. What you need to do is practice. Someone told me (more than once) practice practice practice. 

You really got your work cut out for you with that piece. It's rouuugh. Have fun.
Posted by: Mrs.CP Oct 26 2009, 06:01 AM
lol Jim. I think I may have said that a time or two. It only took me about 20 pictures to get that one.
You think that piece is rough now, you should have seen it when I started! None of this carving/sculpting would be possible for me if it wasnt for the http://www.coloradoprospector.com/EquipmentPlans/Drip_Pan_Station.html Dan made me, and the diamond burr bits I use. That thing works great! Free plans for making your own drip pan station are on the http://www.coloradoprospector.com/EquipmentPlans/PlansAndTips.html of the website here. I can even drill holes without having to drill under water now. No rock dust problems at all.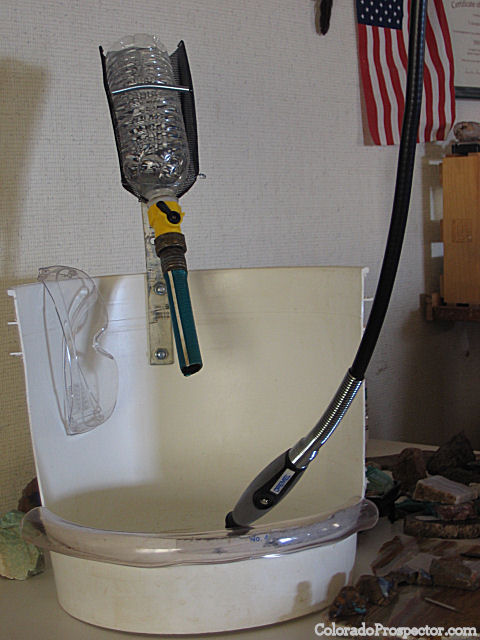
Posted by: Mrs.CP Nov 5 2009, 02:58 PM
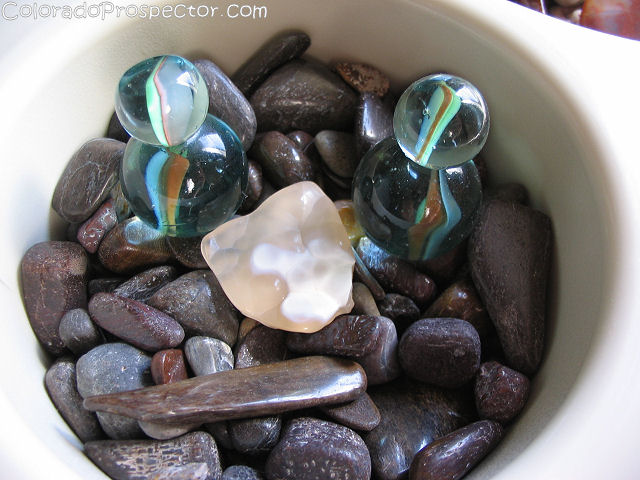
Timmy was inspired to make these after I made the Rutilated Quartz snowman.
He had a few marbles with flat sides and decided they would make good snowmen.
He was right, what a good imagination!
Posted by: Mrs.CP Jan 22 2010, 07:07 AM
Slow process......especially when I keep starting more.
The bunny is coming along great! Hes slimming down, and getting that sleek bunny look. Great fire agate flash in him!
I also started sculpting out a butterfly in a Thunderegg. Pics coming soon. Dan added a piece of foam pipe insulation to my drip system. Its much more comfortable for me to rest my wrist on for hours when working now. Thanks Dan!
Have you been working on a carving or sculpture? We would love to see.
Posted by: ColoradoProspector Jan 23 2010, 11:17 AM
You are welcome honey, glad the drip station is more comfortable to work at now.
I agree the marble snow men turned out well, Timmy's idea worked good.
We'll all be looking forward to those finished projects too, whenever they do finally get finished. 
Anyone else doing any sculpting or carvings? We'd all love to see some of your work if you have projects finished or on going.
CP
Posted by: Mrs.CP Jan 23 2010, 01:17 PM
Timmy is quite talented and creative, thats for sure!! I know, I have way to many going. I cant help myself, plus I like having several going.
If I dont want to work on one, there is always another.
Here is a pic of my next projects. I cant help but to see a howling woof and a butterfly in these Thunderegg end cuts......So quess what. 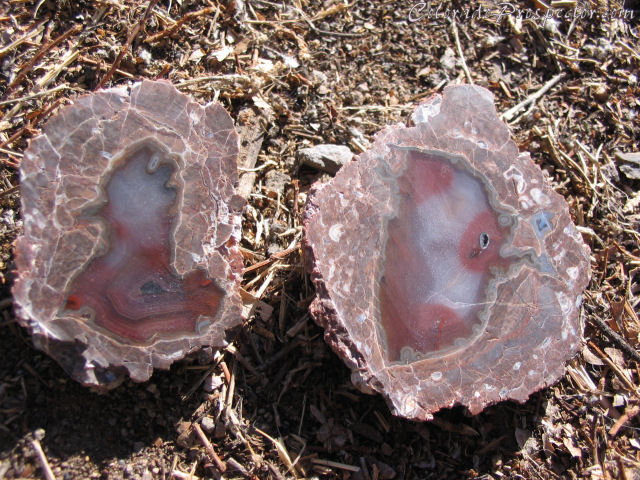
Posted by: Mrs.CP Feb 4 2010, 09:48 AM
Thought I would show another step on some of the above projects. The backsides or bottoms so to speak.
Here is the bottom of the Amazonite bird. I wasnt sure what to do with the base, so I came up with this heart look.
Its far from done, but coming along nicely. This Amazonite has the most amazing sheen to it, even working it in the rough stage.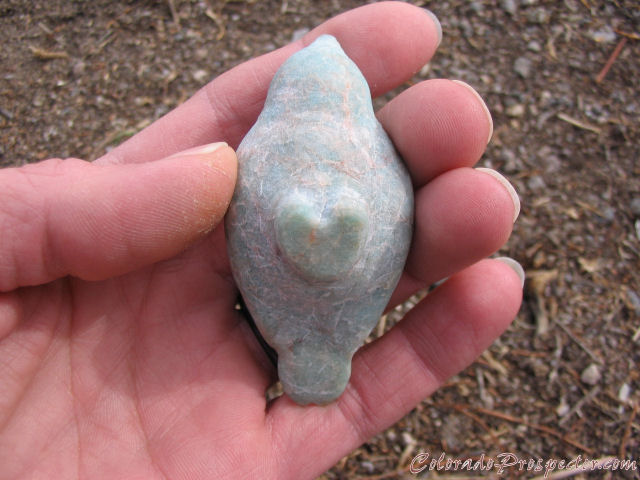
Here is the backside to the Thunderegg Butterfly.
Hard to believe this egg end nub is almost hollowed out other than the butterfly isnt it?....and good news! As of yesterday, there is 4 wing seperation. The butterfly inside is a little over 4mm tall from the background. That make sense?
More pics coming soon. 
Enjoy, and feel free to ask questions you may have about working stones.
Denise
Posted by: Mrs.CP Feb 9 2010, 06:35 AM
Ok....That was just cruel of me. Lets show the progress on the front side of the Thunderegg.
Long ways to go, but its getting there. 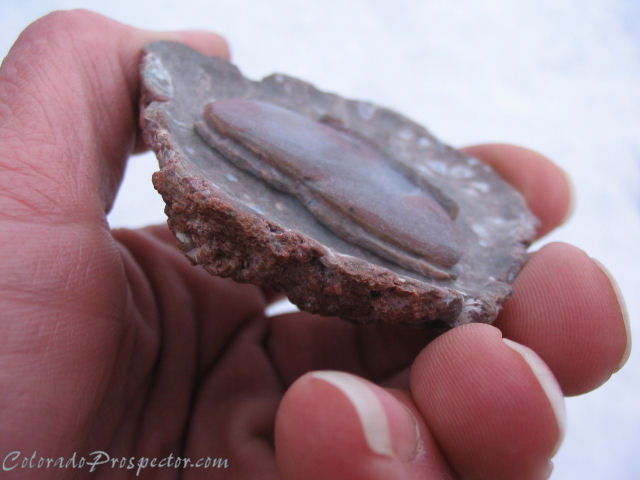
Had a dream that while I was working it, it flew away, leaving the empty Thunderegg. 
Posted by: jim Feb 9 2010, 10:59 AM
WOW Denise you sure got some patients to cut that much hard agate by hand. I have been working some with my flexshaft. The agate it seems is twice as hard as the softer stuff. From the little time that I have been using the diamond burrs and pads I can tell you it aint easy. My poor fingers go to cramping after awhile.
The thing that I have yet to figure out is how you manage to polish in such tight areas. I have gotten where I can carve or shape but how the heck do ya polish those tight spots? I'd be real interested to see the tools that you use.
Posted by: Mrs.CP Feb 10 2010, 11:14 AM
Its more of a love of working with the stone than patience for me Jim.
I hear you about fingers cramping. I sure pushed my limitations on hand sculpting with the flexshaft.
I was on a roll working that piece at around 4-5 hours straight a day for several days, only using the flexshaft.
I hold it like a pencil like when Im drawing or woodburning, but my pencil and woodburner doesnt vibrate like the flexshaft does. By the 4th day, I was loosing feeling in the right side of my hand, and I had shooting pains in my wrist going up my arm.  Dont want Carpal Tunnel syndrome, so I was forced to stop and rethink how Im working the stones.
Actually Dan forced me because I was on a roll and (stubborn) couldnt seem to stop myself. I was having way too much fun.
Hes going to mount the flexshaft so I dont have to hold it during long projects. Doing that will not only cut back on the vibration on my hands, but will give me both of my hands to hold the stone instead. I have never had this problem with the flexshaft working for shorter periods, like drilling holes or carving. But I will defiantely need to have it mounted working it on my larger projects.
For polishing, I would have to see some of the pieces your refering to first Jim. I use different techniques depending on my project. Most of the flexshaft polishing I do is with the polishing disks. Im not happy with the polishing bits they have for sale though, harder stones like Agate just seem to melt them away. I sometimes even cheat and take them to the cabochon wheels for polishing. I take my chances and ride the edge of the wheel. Warning though, one slip could cost you a finger injury or gouge your stone. I know because I have done both. Trial and error I say.
Dan Is also in the works of making me polishing bits that will be able to reach in the details (tighter spots) I grind into some of these stones. As soon as hes done making them, we will give you an update on how well they work. Hes so smart and helpful!
Posted by: Mrs.CP Apr 13 2010, 07:29 AM
Dan is still working on a few adjustments to the dremel setup I use, but you cant keep a good woman down.....
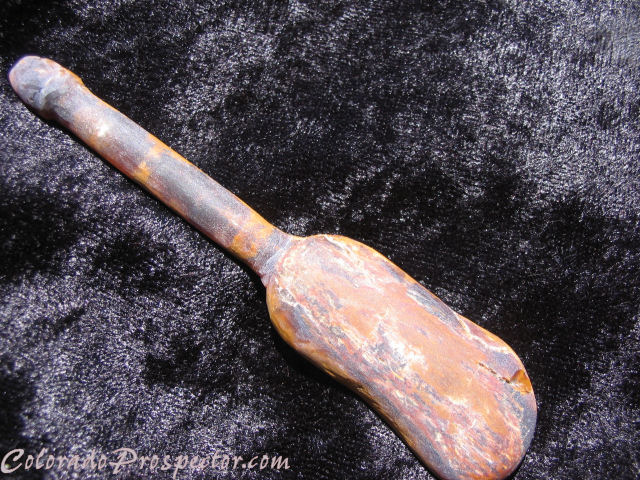
Here is a piece of South Park petrified wood. As soon as it was cut it looked like a guitar. There is still alot of work to go, but I have been roughing in the shape. Mostly on the neck of the guitar and the backside where there is a hole Im trying to work out. It was almost 4" long, but I have since shortened the body of the guitar. Not sure the exact shape yet but time will tell the more I work it. The whole neck is translucent when held up to the light.
 Dont know what I was thinking. There will need to be some pretty tiny details in this one to look like a guitar.
Plus, the diamond wheels I have been roughing it on are only 1 1/2" wide, with only 3/8" between the wheels. One slip and it could cost me the piece, so I moved onto the flex shaft dremel water drip setup. More updates coming soon.......When I decide what body shape to give it.
I havent been carving and sculpting very long, so be patient with me please, but If anyone has any questions about any of the processes just ask. It's much better to learn together.
I would love to have feedback and suggestions If anyone has any.
Posted by: ColoradoProspector Apr 15 2010, 03:55 PM
Here is a webcam shot of the proto type flex shaft mounting bracket. So far it seems to be working well to help lessen the stress of holding the whip in hand.
This bracket is adjustable so the shaft/bit can be angled or straight up and down. As you can see the drip system has been refitted with a smaller copper tube as well, enabling more pin point location of the drip to moisten the stone and bit during work.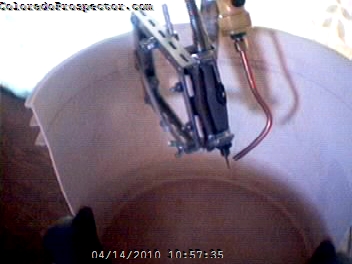
Next we'll be testing out some new home made brush accessories to carry the pre polish and polish stages through more effeciently.
Nice work honey, can't wait to see that guitar and the bird in amazonite finished out. Are they done yet?
Posted by: Mrs.CP Apr 16 2010, 02:19 PM
Thanks Dan, your awesome babe!!  It works great!!
As far as the guitar goes, it looks alot different now.....In fact so different the front is the back, and the back is the front now.
The stone must be what it wants to be. But I did notice that when Im done working on it, it is standless. 
Think you can put together a guitar stand out of wire for it Dan? That would look sweet I think!
Posted by: swizz Apr 16 2010, 07:08 PM
That guitar is looking good Denise.
I believe you have a steady set of hands and some patience to have ground the neck on that piece. I'm curious as to how you will eventually polish it. Will you use a rotary tool (Dremel Flex or similar) or are you going to polish it on a stationary wheel (scary).
Inquiring mind wants to know.
Posted by: Mrs.CP Apr 17 2010, 03:51 PM
Thanks Chris!! This guitar piece was the first cut (end) off of a piece of petrified wood, giving it the flat side. At first I started working it on the diamond wheels, but the deeper I made the neck, the harder it was to avoid the other wheel. So I kept going, but slightly turned the piece to continue on the neck. I would attempt to polish it out on the wheels, but Dan calls it "wheel abuse" or something like that.  So it looks like im going to try to polish it out on the flex shaft dremel with the new polishing brushes Dan made me. I have been working on the dremel since 8 this morning testing things out.
Brushes and dremel mount work great!!
Here is a piece I have been using to test things on. This was a test to see how well the brushes work for polishing.
Here is a before and after prepolish pic of it. Big difference! Only problem is that Im going to have to rough up the center again to glue the Opal in. 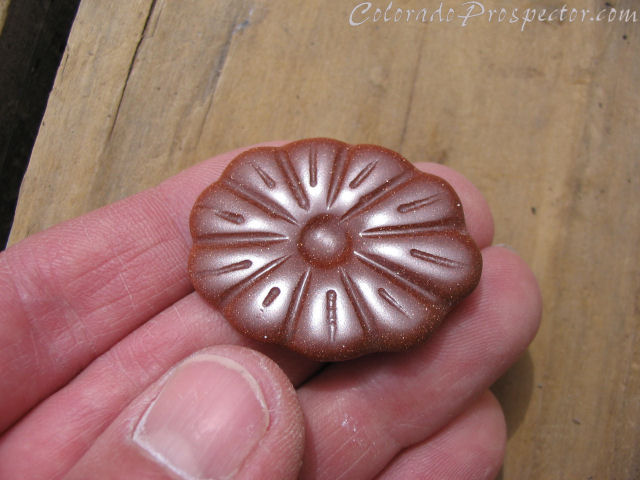
You sure can tell I have been working on guitar pick from that last picture.
You should see the look on Dans face when my finger nail hits the diamond wheels....... Sounds like fingernails on a chalk board. Poor guy, I look over and he was twitching like he was eating a lemon.
Posted by: Mrs.CP Apr 20 2010, 04:35 PM

You talking about this bird Dan?
I have been smoothing out all its rough edges getting it ready to do the detailed work (feathers) on the wings. I love the sheen Colorado Amazonite has!! The whole bird has it when you move it around. Here are 2 pictures so you can get an idea of how sheeny it is. 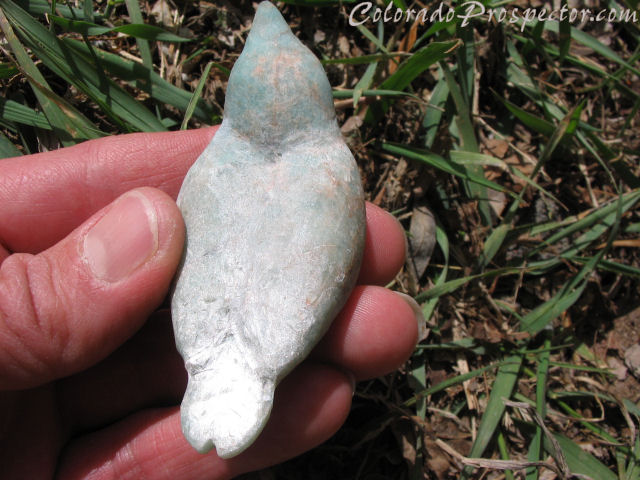
Speaking of seeing projects finished out Dan
...........Hows that Arizona perified wood sculpting coming along? Im sure everyone would love to see it.

Posted by: Mrs.CP May 3 2010, 06:25 AM
I was thinking it would look good carved into a flower, with a flashy white Opal for the center.
I got as far as this, and was wondering If I should just stop, and set the Opal in like it is.
Should I keep working it, or call this piece done?
Sure looks nice as is.Here is the piece finished. Dan did a fantastic job wrapping it and making the little Opal cabochon for the inlay!
|
Posted by: ColoradoProspector May 12 2010, 12:46 PM
Ya' that amazonite bird! Why ain't it done yet?!!
Just kiddin' honey, I know, it's getting there a little bit at a time. It's sure going to be a nice one when finished.
Here's one Denise just finished that's pictured on the last page, (butterfly tegg) and I thought everyone would like to see now. Polished out by hand with the new brush sets and mounted flex shaft dremel tool. Denise says that really helps the fatiuge on the hands and arms while carving too.
She sure got a shine on this experimental relief carving. Like she said though, what else are ya' gonna' do with a cracked egg?

Nice work honey!
Posted by: jim May 14 2010, 08:20 AM
Wow denise beautiful work. I sure wish I had you patience. Persistance too!!
Posted by: Mrs.CP May 19 2010, 07:46 AM
Thanks Jim. Patience and persistance doesnt always pay off when your learning though,  but there is always a lesson to be learned.
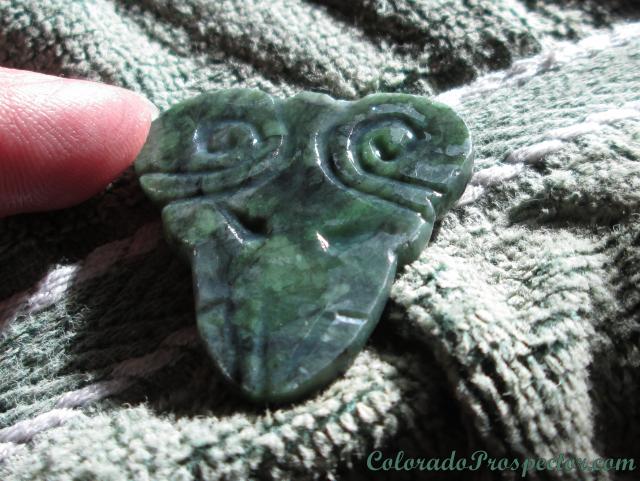
This was a set of snowflake obsidian butterflies that I was working on. I decided to use my diamond hand files for some of the finer details. I was almost done roughing in the detail on the body of the larger one when the end of the wing popped off.
I know, schist happens, but still bums me out. Maybe I can buzz off the wings, and transplant new ones? 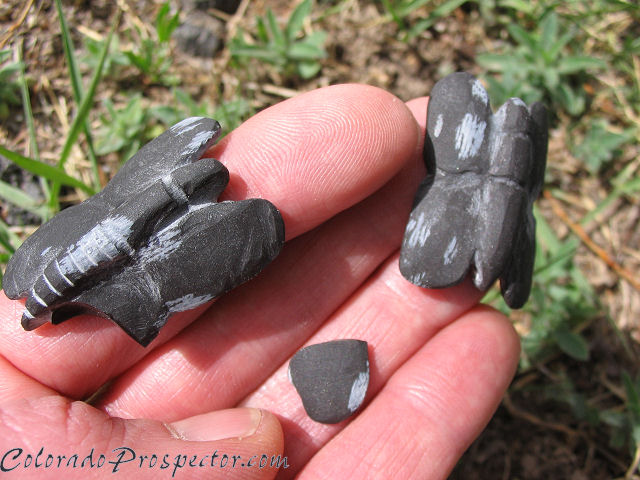
Posted by: Mrs.CP May 24 2010, 01:41 PM
With all the tiny carving and sculpting I do, its bound to happen. Im actually really lucky it hasn't happened more.
Here is a picture of the diamond files I use for the finer detail when needed. Sometimes it takes a slower more delicate pace.
I also put the smaller butterfly in the picture to show its progress with the diamond files. This time, I will try not to accidently pry the wing with the backside of the file. 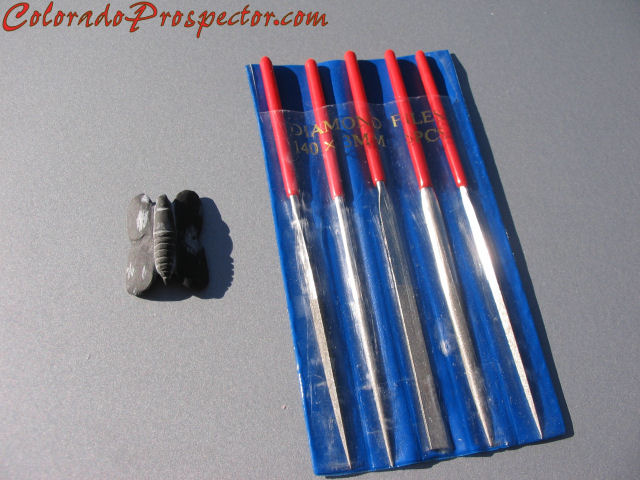
Wish me luck, I'll need it!
Posted by: Mrs.CP May 26 2010, 07:24 AM
Or not....... I finished the goldstone flower inlay, but I changed my mind about using the orange Opal. The stone was worked so thin in the center that you can see through it when held up to the light. So it gave me an idea to use that to my advantage. This is what I came up with. I know, your thinking that only a fool would add a gem grade dino bone inlay to goldstone right. But I couldnt resist after seeing how it looked. I have been working (testing) on this piece for over 3 years on and off to help me learn, and it has done just that. The goldstone also happens to be from my son Mike, so I will treasure this piece forever. Now I'm wondering what kind of amazing wrap CP is going to do with it. 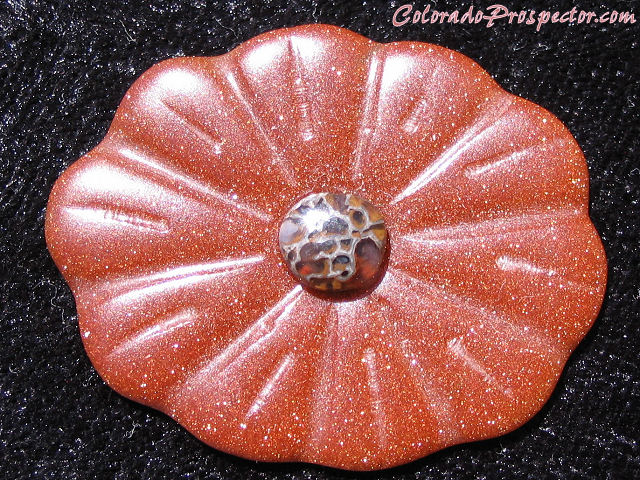
Whew!!!! Im glad to have it finally done.
Posted by: jim May 26 2010, 09:25 AM
Wow Denise that's beautiful!!! There's that patience and persistance paying off. Fine piece!!! Dan... better take your time whith this one.
Posted by: ColoradoProspector Jun 6 2010, 01:01 PM
For those interested in mounting their flex shafts into the homemade drip pan stations, I've taken a few close up pictures for details on how this proto type is put together.
In time I'll try to write up a list of parts used if anyone is interested in it.
First pic shows the front view and hose clamp mounts as well as the pvc holder, in the later pics this is covered by the foam padding.
Simply a bracket mount (bottom braced) with an adjustable top arm for multiple anlges while working.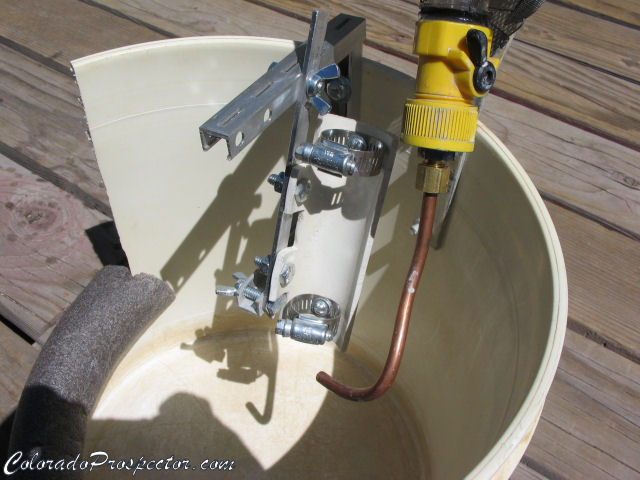
This one shows the pad added into the hose clamps which helps keep vibrations down. Even then, the hose clamps will slowly loosen with the work vibrations.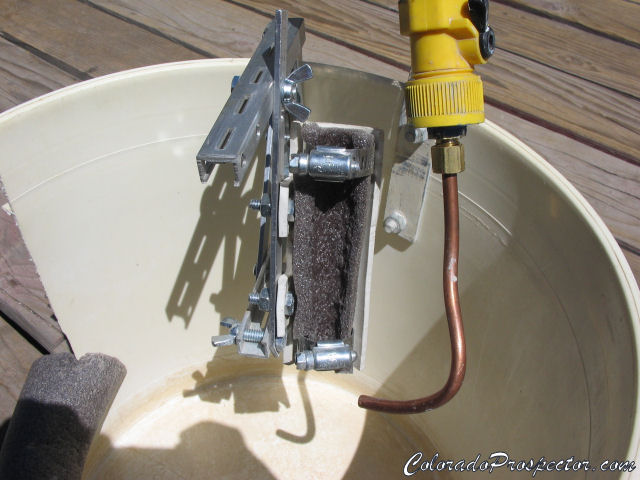
A side view of the mounting bracket
And finally with the flex shaft mounted in it. Just slide the flex shaft through both hose clamps so that you can still reach the collar nut for bit changes and the hold button for locking the shaft during bit changes. Our dremel motor is hung from a bracket above the drip pan set up to keep the shaft as straight as possible.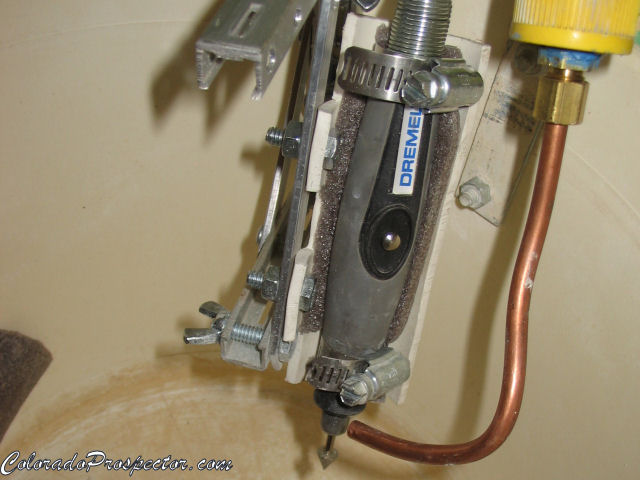
Mrs.CP can tell everyone how the home made polishing brushes work since she's got a full set from medium grits through polish now.
Happy carving and sculpting everyone.
CP
Posted by: Mrs.CP Jun 10 2010, 12:50 PM
They work great Dan, and combined with the new dremel shaft holder, it all gets a 2 thumbs up from me.
Thanks again for your help Dan! Your awesome and Im sure others will find this info handy as well.
Posted by: fourcornersrocks Jul 27 2010, 12:17 AM
I really like the work ya'll are doing, nice job!
Posted by: Mrs.CP Jul 27 2010, 07:14 AM
Thanks for the compliments! It helps to love what your doing as we do. The drip system sure helps a bunch also!!
Do you carve or sculpt yourself? If so, I would love to see some of your work .
Posted by: Mrs.CP Jul 28 2010, 04:56 PM
Here is a piece of South Park petrified wood. As soon as it was cut it looked like a guitar. There is still alot of work to go, but I have been roughing in the shape. Mostly on the neck of the guitar and the backside where there is a hole Im trying to work out. It was almost 4" long, but I have since shortened the body of the guitar. Not sure the exact shape yet but time will tell the more I work it. The whole neck is translucent when held up to the light.
Dont know what I was thinking. There will need to be some pretty tiny details in this one to look like a guitar. Plus, the diamond wheels I have been roughing it on are only 1 1/2" wide, with only 3/8" between the wheels.
One slip and it could cost me the piece, so I moved onto the flex shaft dremel water drip setup. More updates coming soon.......When I decide what body shape to give it. I havent been carving and sculpting very long, so be patient with me please,
but If anyone has any questions about any of the processes just ask. It's much better to learn together. I would love to have feedback and suggestions If anyone has any.
Sigh...............Im going to have to put this one on hold for now. Just knowing what its going to take to finish it detailed makes me think I need to keep on practicing on other projects first.
After all, practice makes perfect right?
Posted by: Boogie Jul 29 2010, 09:19 AM
Hi Mrs CP!
If you feel like making it into something else, you could always turn it into a shovel and if you could somehow add a pick to it and make it into a pin, I think that would be awsome! I'm kind of wierd that way though.
Posted by: Mrs.CP Jul 29 2010, 12:41 PM
Good eye Boogie, I can definately see that as a possibility in the stone. but.........
As much as the #2 and an Estwing are my friends, I cant see changing this stone. I saw a guitar from the first natural shape of the cut, so a guitar it needs to be.
And to CP who always says, "The stone will be what it wants to be."
Posted by: Boogie Jul 29 2010, 01:15 PM
but.........As much as the #2 and an Estwing are my friends, I cant see changing this stone. I saw a guitar from the first natural shape of the cut, so a guitar it needs to be.
And to CP who always says, "The stone will be what it wants to be."
Oops! My bad! I didn't realize....
I can't wait to see how it turns out! I'm always amazed at the items you turn out. Very high quality work.
Posted by: swizz Nov 3 2010, 09:49 AM
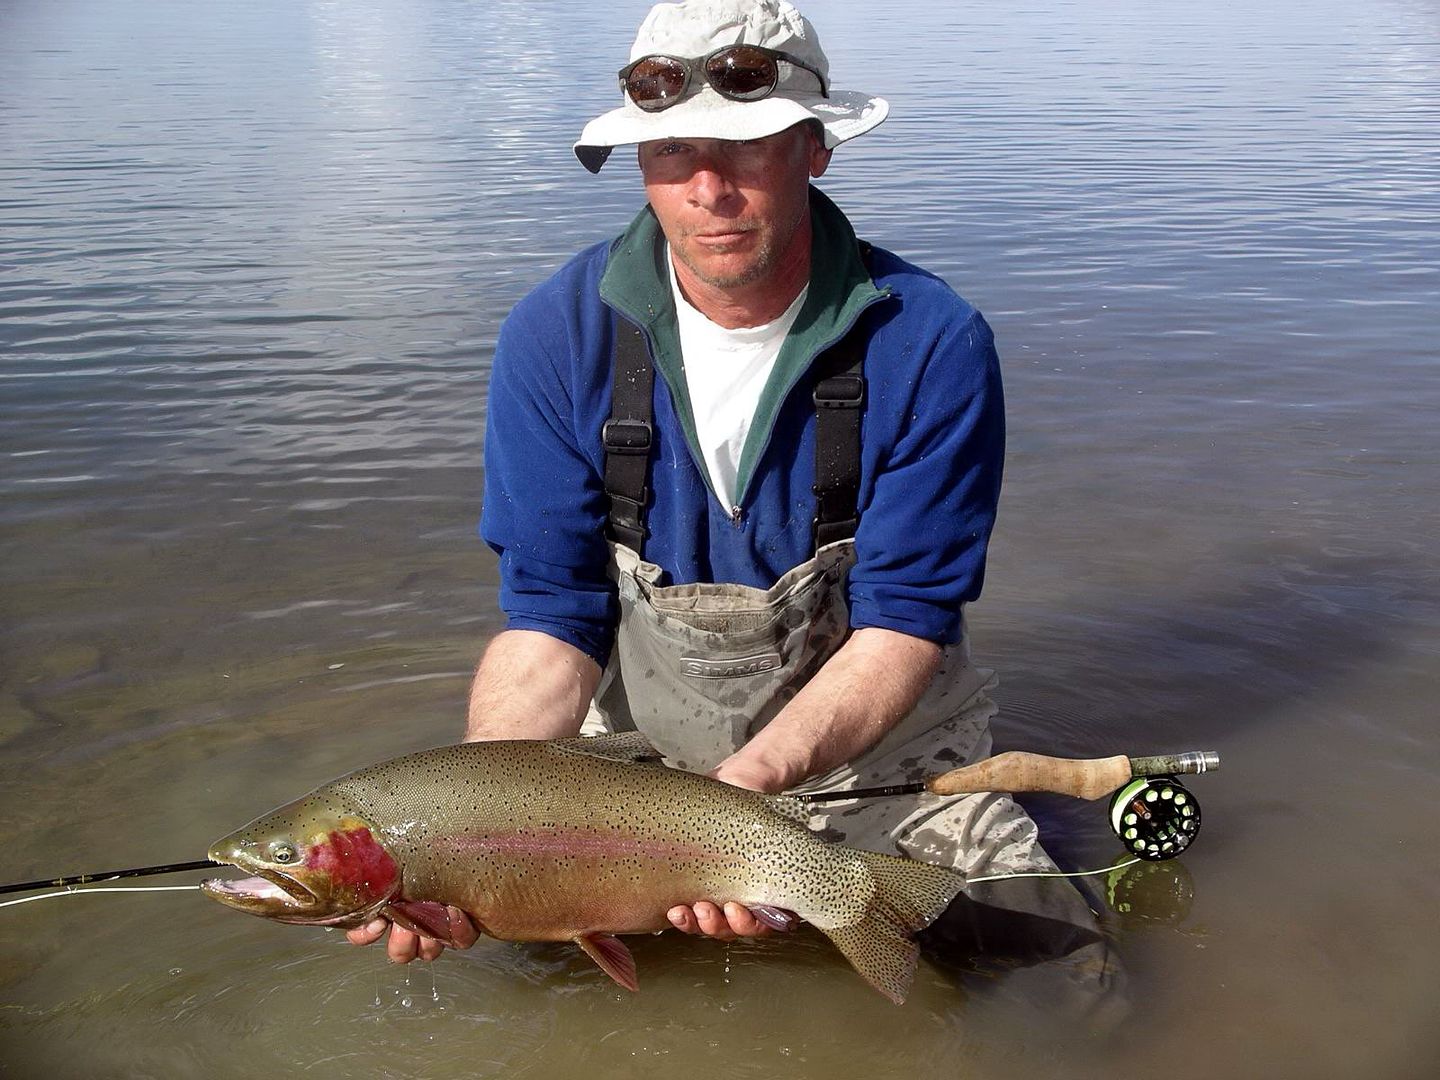
Here's a simple sculpture.
Something I did with one of my small Chrysoprase slabs leftover from the table project.
I don't have any lap gear so this could still use a polishing but turned out ok using a Dremel and a variety of diamond bit shapes and sizes.
I used the image below and photo-shopped a computer pencil sketch of the image. I captured a good outline of the fish by doing this, then reduced it in size, printed, cut pattern, and traced it onto the stone.
I wanted to capture the true shape of this Cuttbow (Rainbow/Cutthrout Hybrid) as it was a well proportioned fish. It was released within seconds of this photo to fight another day. 
Not sure what to do with this piece yet and wide open to suggestion!
Here's a crabby-face for ya Denise!
Swear ta God, I wasn't crabby, some shots just "happen" and I intentionally handled that fish out of the water for a very minimal amount of time.
.... + I'm not so photogenic 
This is my Chrysoprase rendering, with no back-light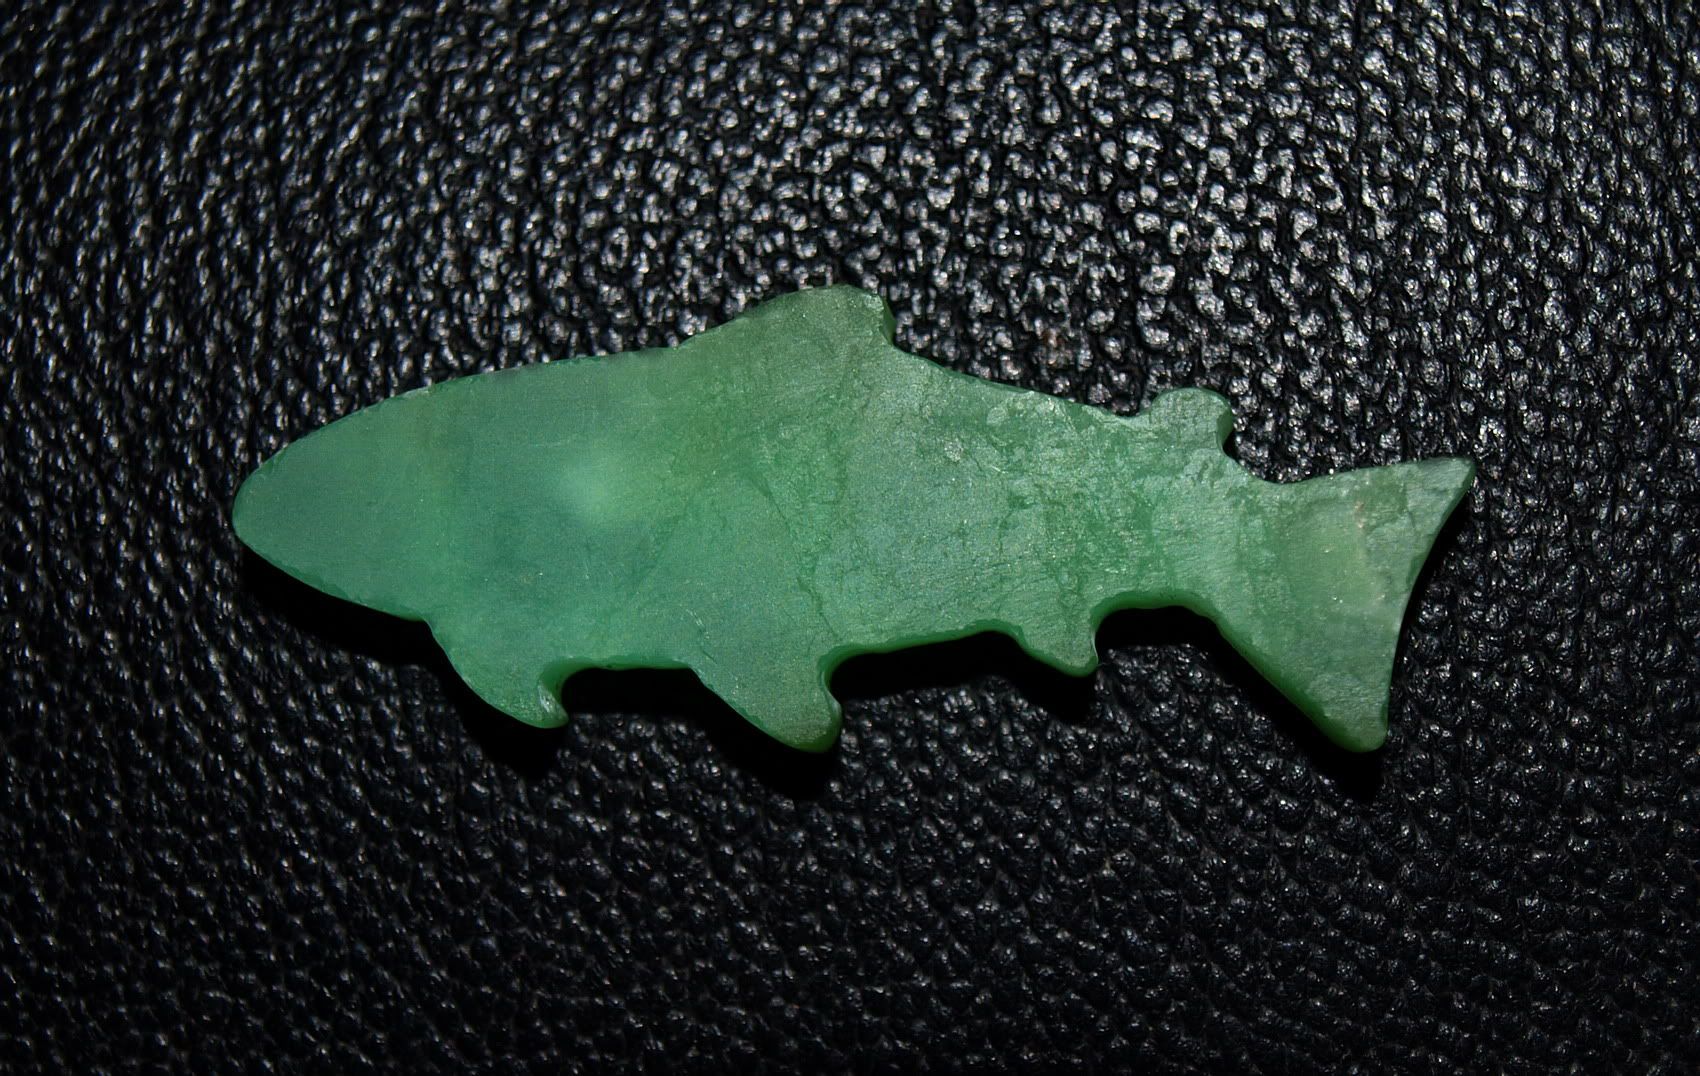
Lights up nicely...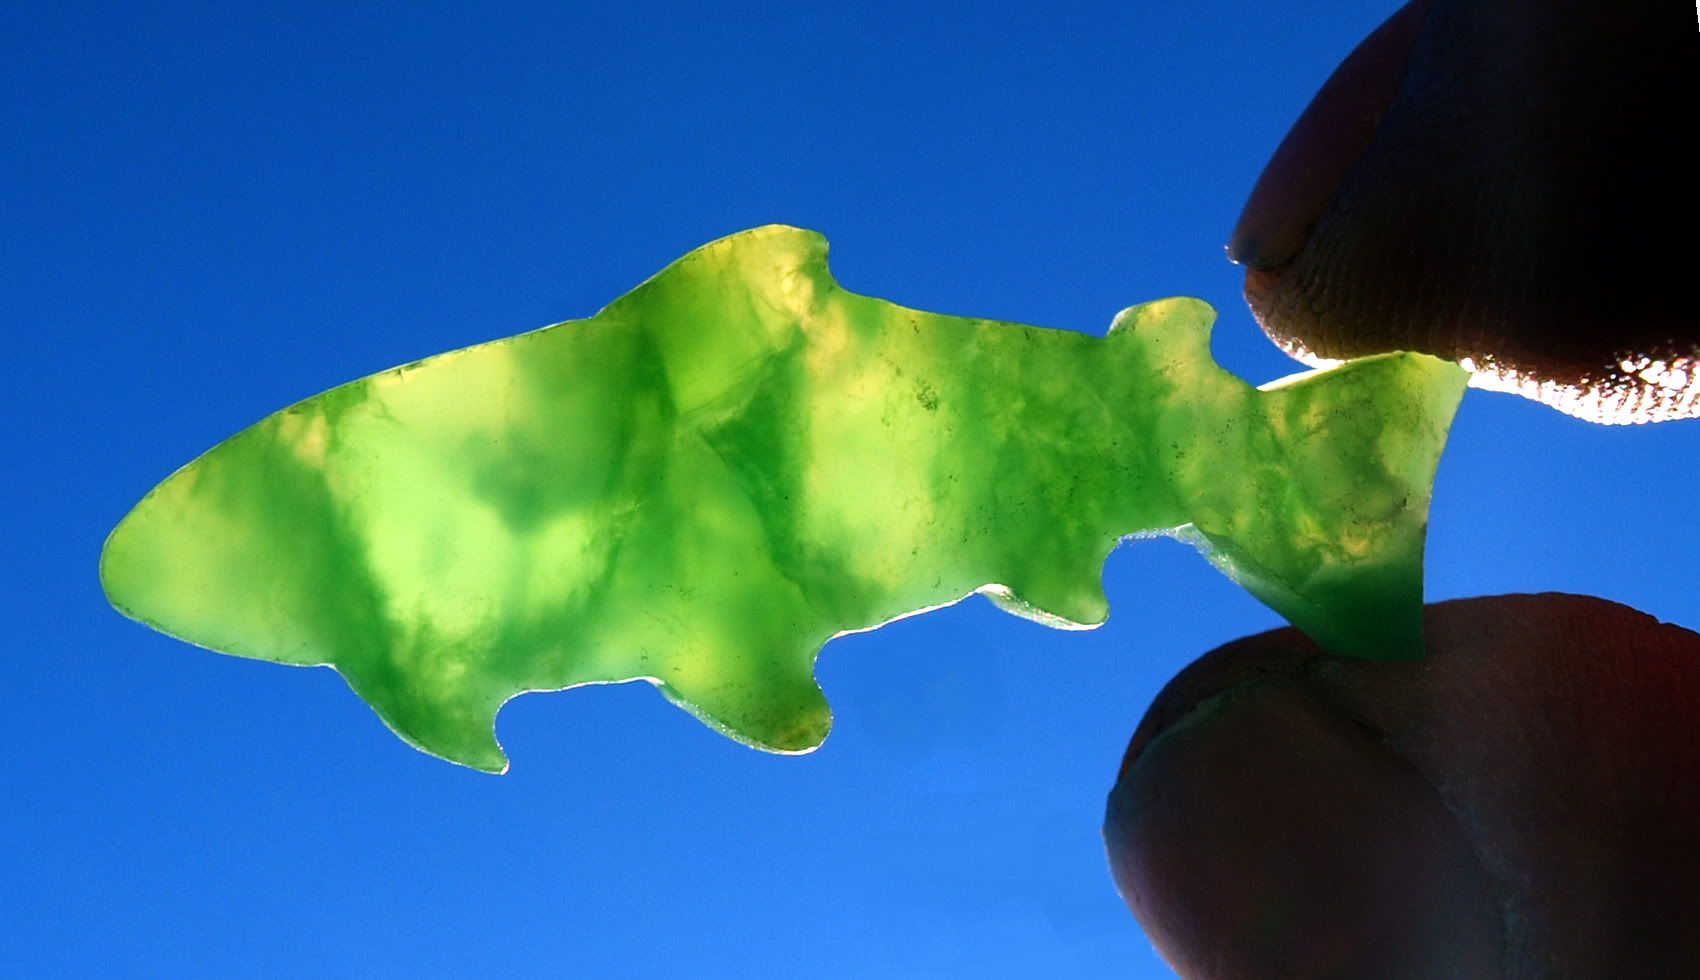
Posted by: russau Nov 4 2010, 05:40 AM
some rewards in life are so simple that a lot of people miss them!
Posted by: ColoradoProspector Nov 4 2010, 08:53 AM
Something I did with one of my small Chrysoprase slabs leftover from the table project.
I don't have any lap gear so this could still use a polishing but turned out ok using a Dremel and a variety of diamond bit shapes and sizes.
I used the image below and photo-shopped a computer pencil sketch of the image. I captured a good outline of the fish by doing this, then reduced it in size, printed, cut pattern, and traced it onto the stone.
I wanted to capture the true shape of this Cuttbow (Rainbow/Cutthrout Hybrid) as it was a well proportioned fish. It was released within seconds of this photo to fight another day.
Not sure what to do with this piece yet and wide open to suggestion!
Here's a crabby-face for ya Denise!
Swear ta God, I wasn't crabby, some shots just "happen" and I intentionally handled that fish out of the water for a very minimal amount of time.
.... + I'm not so photogenic
This is my Chrysoprase rendering, with no back-light
Lights up nicely...
Very nice Swizz!
A fine little piece to remember what a great day on the creek that was and both fish (real and chrysophase) are sweet. Man that was a nice hybird you caught and released.

Thanks for sharing with us all, we'll be looking forward to seeing what you end up doing with it too.
CP
Posted by: Mrs.CP Nov 5 2010, 06:17 AM
Fantastic job Swizz, it looks great!! You said you used your dremel to shape it. Did you use some kind of drip system, or did you just make sure the stone was wet while working it? Inquiring minds want to know.
What ever you do with it, Im sure it will make an amazing inlay....especially if the light shows through it.
Keep up the good work, and we look forward to seeing the finished project.
Posted by: swizz Nov 5 2010, 09:40 AM
Thanks! I have no good ideas for what to do with it yet. Maybe obtain some other different colored slabs that are also translucent, make more fish shapes with different colored minerals, and create a mobile or something?
I used a pencil-shaped Flex Dremel and occasionally spritzed it with water from a spray bottle. I think that the hardness is similar to Quartz (I forget) but it was pretty easy to shape as long as I had a good vise set, occasional spritz, and good lighting. I've seen your auto-drip setup which is really nice! Maybe I will give that a shot this winter.
Posted by: Mrs.CP Nov 10 2010, 07:10 AM
You would definately like using the drip system Dan created! It really helps to regulate how much water is dripped onto the stone as your working it.
Im almost pictureing a Tiffany style lamp....but Swizz style , with the fish inlayed into the wood trim (top) of the lamp, and translucent slabs as the sides, with a wooden border bottom. Can you do that?  Sounds cool though doesnt it?
Looking forward to what you do make with it Swizz.
Posted by: Mrs.CP Nov 14 2010, 08:45 AM
Warning .........The drip system Dan makes does have a lower opperating temp range, and fails to function below 33 degrees.
RATS!

Posted by: dickb Nov 14 2010, 10:38 AM
RATS!
Use RV antifreeze in it and it'll work just fine!!!!!!!!!!!!
Dick b
Posted by: ColoradoProspector Nov 15 2010, 09:56 AM
Actually Dick that's a great coolant for the larger saw which operates outdoors and can be used to as cold of a temperature as I can stand to be out in operating the saw. However since the dremel is used indoors and also splashes the user during operation quite a bit then I'd say it's better to just use water as we do. Denise was just kidding around about the lower temp operating range because the unit was stored outdoors and had some ice in the bottle. Normally there is not an issue using the dremel set up with water even in cold temps. It just needs to be done indoors, yesterday for example never reached over 40 degrees outside but yet I drilled 10 holes in seperate stones with the dremel.

CP
Posted by: dickb Nov 15 2010, 10:30 AM
Hi Cp and Mrs CP:
Sorry, That was meant as a joke. You could very likely freeze your fingers trying to work a stone with the temps below freezing. Thats why I put the laughing picture after the reply. Just have to wait till spring or move into a heated area.
By the way the rough grinder I'm building is coming along nicely and I'll post a picture when I get it done. I do have a question though. About black and green grinding wheels for preforming rough. I was under the impression that the green wheels are for grinding carbide tools and the black is for grinding stone, but the information on ebay seems to say that either type can be used for cabbing.
I plan to use a 100 / 120 and a 220 grit wheel on the grinder I'm building right now. Any thoughts would be appreciated.
Dickb
Posted by: ColoradoProspector Nov 15 2010, 12:55 PM
No worries Dick, rv antifreeze is a good idea when temps can limit cutting I think. We've been using it for a several years now in the bigger saw and it works quite well in the contained saw with a hood or lid over it. We do tend to push the limits sometimes as it were since we are so limited on space to have things indoors. Oils tend to thicken in the cold and gums up the whole works while the rv antifreeze doesn't do this in colder temps like we often experience here in Colorado.
On your new grinding machine, good luck with it and I hope it works out well for you. For the grits we use, the steps go from rough at 100 grit on upto 600 for step two and then 1200 and 3000 for steps 3 & 4 respectively then it's onto polish. I'm unsure on the difference between green or black silicon carbides but I'd venture to guess the black is an all around grinder wheel and green maybe for cabbers intended use?
I'd definately reccomend diamond carbide wheels if possible as they will not loose their shape and last for years and years of cutting. Silicon carbide on the other hand will constantly be changing shape when used because the wheels themselves will often be the same hardness or softer than what's being cut or ground. This means you will have to do what's called "dressing the wheels" or re grinding the surface to workable flat or concave which ever is desired or original.
If you can swing the same grits and set up with diamond carbides or diamond impregnated belts, I think you'll end up much happier with the finished grinder as a tool for future use.
Hope this info is helpful in your machine set up and let us know how it's works out with it.
CP
Posted by: Mrs.CP Nov 21 2010, 03:06 PM
When is it enough detail? Im still working on the bunny, but have now turned to its bottom half per say.
Here is a view of the bottom side of the bunny. While working it, a small hole/cavity popped into its chest, but can easily be left there.
Im thinking this side is almost done, and ready to be polished.
|
Posted by: ColoradoProspector Dec 2 2010, 08:35 AM
I still think he needs a smaller more rounded tail so he's not pee'in on it!
That's going to be a sweet little bunny when finished too, that is if Denise can keep ahold of it while polishing the tiny lil' buggar!
Keep up the good work honey!
Posted by: Mrs.CP Dec 7 2010, 06:47 AM
Too funny Dan, I was thinking the same thing but was getting lazy on the detail I guess.
Plus I thought it looked cute with the extra puffy tail.
Reminds me of a joke though.......
A bear was going through the woods and came upon a bunny. He asked the bunny "do you have problems with poop sticking to your fur?"...
The bunny looked at the bear and said "why no"..........So the bear grabbed the bunny and wiped his butt with him.
Ok, so back to some tail grinding and then we can see what we get. At this point, Im not even sure its a little boy.
Posted by: Mrs.CP Nov 25 2012, 04:53 PM
Here are a few updates on the Amazonite bird's roughing stage. As you can see I have started to add the detail to show feathers. I started on the bottom side and am working my way up to the top of the bird....... So far so good. I am working in the detail with diamond hand files with the stone wet.

|

|
Posted by: russau Nov 26 2012, 06:48 AM
quite the artist, you are!
Posted by: swizz Nov 26 2012, 07:01 AM
The bird sculpture is such a cool project!
Very good sculpting so far Denise and I'm anxious to see how you work the bird's head and attach it.
Keep up the great work!
Posted by: Mrs.CP Nov 26 2012, 01:10 PM
Thanks for the compliments guys! So far it looks more like those mass produced rock sculptings right now, but as the project comes along all the rough lines will be smoothed out giving it a softer look and not so blocky.
That will be easy Chris. I will just have to take a wider shot of it like this. It is made from one solid piece of Colorado Amazonite.

|
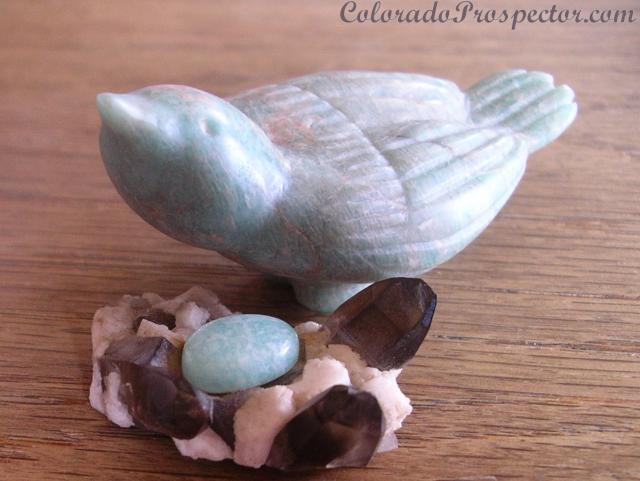
I am thinking for the eyes, I will use either small diamonds or smokey quartz chips. We were thinking it would be really cool to have her sitting on Smokey Quartz eggs nestled in between some Amazonite and smokey Quartz crystals.
Posted by: swizz Nov 26 2012, 02:53 PM
Now I see, I was looking at it upside-down. That is definitely going to be a beauty!
A bird in the hand.....
Posted by: russau Nov 26 2012, 07:31 PM
thats turning into a tweet stone sculptured bird!:)
Posted by: Mrs.CP Nov 27 2012, 09:34 PM
Is worth two in the bush!
Haha Russ, it will be a real tweet to finally have it finished. It's coming along nicely, just roughing in the lines deep enough to remain when polished out. Almost done roughing in the rest of the wings.
Posted by: Mrs.CP Nov 28 2012, 05:06 PM
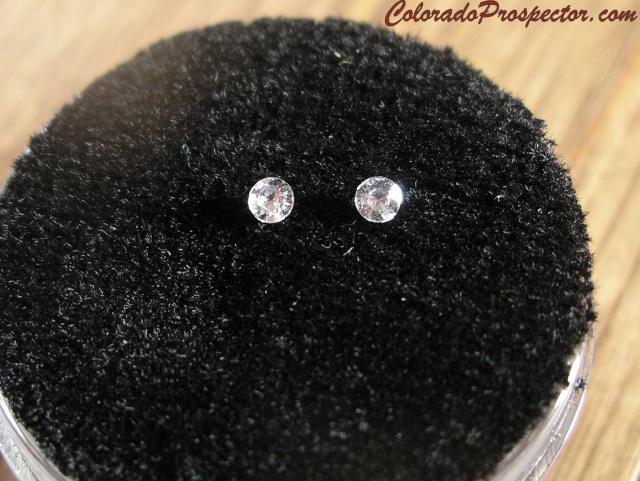
I was noticing that the last picture didn't show very good detail, so here is another picture with more progress. I really like this angle of it, you can even see where the eyes are going to go. Dan even told me he has two small matching Diamonds I could use for it if I wanted!
Now for the smaller feathers twards the top of the wings.
|
Posted by: russau Nov 29 2012, 08:28 PM
you have a good eye for this! really nice!
Posted by: Mrs.CP Nov 30 2012, 12:09 PM
Thanks Russ! I'm still learning with every step but that is one of the fun parts of it. Dan keeps telling me I should be using the Dremel with the flex shaft for the more detailed work, but one slip with that and the mistake is alot deeper than it is with the hand files. The slip factor when starting a mark in the stone is a big pain. Looks like chicken scratch till I work the mark in deep enough. I have also been using a little leather piece to ride the blade against instead of my finger.
Here is a picture of the hand files, little diamonds and the Dremel burr that I will use to make the holes for it's eyes. Just a piece of the tip will be needed to accomplish that for the eyes to sit in. We will clean the Diamonds up and get closer pictures later.

|
So far so good. Lots of fine tuning still yet before I move on to polishing it out.
We are still looking through our collection for a specimen (base) of smokey Quartz crystals for the bird to nest in.
Still rolling around ideas for what might look best, so any ideas or suggestions are welcome.
Posted by: Mrs.CP Jan 10 2013, 09:28 AM
Here is that closer picture of the little Diamonds cleaned up that will be used for the birds eyes.
With the close up picture, I can see they still need a little more cleaning.......hard though with such small stones.
|
Posted by: swizz Jan 10 2013, 06:08 PM
Absolutely beautiful work Denise. MUCH talent there. The last pic of the bird really gives a good perspective... sculpting in general is not easy, let alone with stone.
I can't wait to see the finished product! Great work!
Posted by: Voltaire Jan 17 2013, 02:40 PM
I to love the photos Denise. Great talent.
Also trying to teach myself carving, however on a more free-form basis.
These are sorta "in action" shots, documenting the process of carving a garnet using a dremel and different kind of bits and grinding media.
The rough; a close to 16+ cts colour shifting garnet in a difficult-to-facet shape.
Would have a low return. So why not try carving it instead?
http://s1209.photobucket.com/albums/cc389/Voltaire_Lapidary/Carving/?action=view¤t=032.jpg
http://s1209.photobucket.com/albums/cc389/Voltaire_Lapidary/Carving/?action=view¤t=031.jpg
I do some rough grinding at 600 grit with sintered burrs, variety "el cheapo" from China.
Then I use 600 diamond paste (homebrew variety) and a tooth pick (special burr) to level out the bumps and generally round it off. Also gives a finer finish before moving on to pre-polish.
The first side is completely free form. Notice the black pencil drawings.
Using it to mark areas which need more cutting.
The second side looks like a mushroom growing out of the bush, IMO.
http://s1209.photobucket.com/albums/cc389/Voltaire_Lapidary/Carving/?action=view¤t=045.jpg
http://s1209.photobucket.com/albums/cc389/Voltaire_Lapidary/Carving/?action=view¤t=046.jpg
I've now moved to the next step, pre-polish. I started out using 3,000 grit, but it took to long.
So once again a home brew cutting paste was made using 1200 grit diamond. (6-12 micron)
It took on an polished surface using that! I couldn't get a decent picture of the other side before finishing.
Tried using a final polish of 14,000 grit, didn't do any difference so I let it be.
http://s1209.photobucket.com/albums/cc389/Voltaire_Lapidary/Carving/?action=view¤t=cabbingdays017.jpg
This piece ended up at approx 18 mm long and 13.86 cts heavy(!!).
I hope this works, finished piece. Looks worse then it is.
Should've cleaned it before taking pics
http://s1209.photobucket.com/albums/cc389/Voltaire_Lapidary/Carving/?action=view¤t=finished004.jpg
http://s1209.photobucket.com/albums/cc389/Voltaire_Lapidary/Carving/?action=view¤t=finished001.jpg
Posted by: Mrs.CP Jan 18 2013, 08:52 PM
Sweet Garnet Voltaire, nice work! I can see the mushroom growing out of a bush as you see, but at another angle it looks like a tiny frog from the rain forest. Never thought of using a toothpick with grits for the finer detail, interesting idea. Looks great, keep up the good work and thanks for sharing pictures and techniques with us!
Posted by: Voltaire Jan 20 2013, 01:16 PM
I actually came upon the idea with toothpicks out of shear need.
Didn't find anything else suitable for applying nor working the grit with.
Now I've carved some larger sticks from wood to work larger areas more quickly.
Hope to see some more work from yours soon!
Posted by: Mrs.CP Jan 21 2013, 07:30 AM
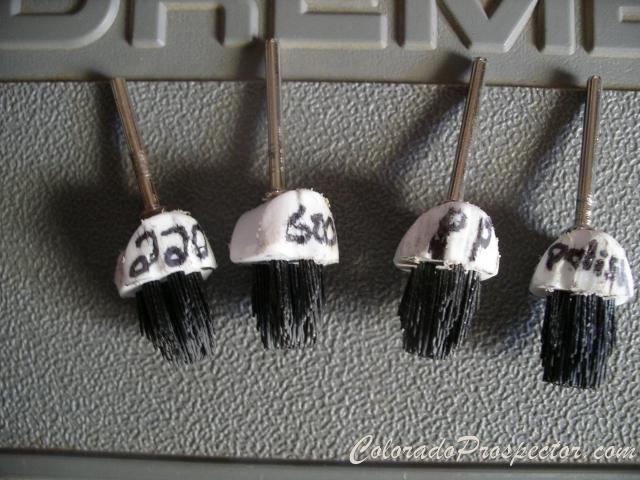
I ran into the same problem when sculpting. The diamond hand files and wet/dry sandpaper helps, but there was still something missing for fine detail. Dan made me a set of dremel bits from a rough bristled brush cut into pieces. I can then apply the grit to them and work the stone. They work good! I used them to polish out the relief carving of the butterfly in the Thunderegg. Here is a picture of the brushed CP made for me..... I also made an Opal teardrop with just wet/dry sandpaper and polish grit all by hand yesterday. Turned out great!
|
Posted by: Mrs.CP Aug 31 2013, 08:54 AM
Thanks for the toothpick tip Voltaire! I have used it with grit on direct spots that were giving me difficulties and it works great! I found the toothpick broken works best for working the grit. Smooth sides of the toothpick just rubs it off. Bird is on the pre polish stage now so it's coming along nicely. Once polished, I will add the Diamonds for the eyes. Now to figure out a base for it. Here is one idea with a nest and an egg.....hehe....Maybe set these in a nice wood base for display?
|
![confused0082[1].gif](http://www.coloradoprospector.com/forums/style_emoticons/default/confused0082[1].gif) Or maybe two smaller eggs for the nest?
Or maybe two smaller eggs for the nest?
|
Posted by: swizz Sep 1 2013, 05:59 PM
Absolutely beautiful and very creative setting! 
That is definitely an heirloom.
Posted by: Mrs.CP Sep 6 2013, 10:57 AM
Thanks Chris! I was just looking to get some ideas on how the crystals would look for the nest. I used a cabachon for the first pic in the nest and tumbled Amazonite in the second. I like the way two eggs look but I think I may actually cab out small Amazonite eggs for it. More work but I think it will look best with the piece.
Posted by: Mrs.CP Sep 10 2013, 10:19 AM
I have been modeling it to look like a http://en.wikipedia.org/wiki/Mountain_Bluebird. Now that I am at the egg stage, looking at the wiki page it shows the eggs to be light blue....Perfect!! It also says the clutch size is 4-5 eggs. I might need a bigger nest. For the size of the bird the eggs should be around 9x7 mm.
Time to make some eggs!
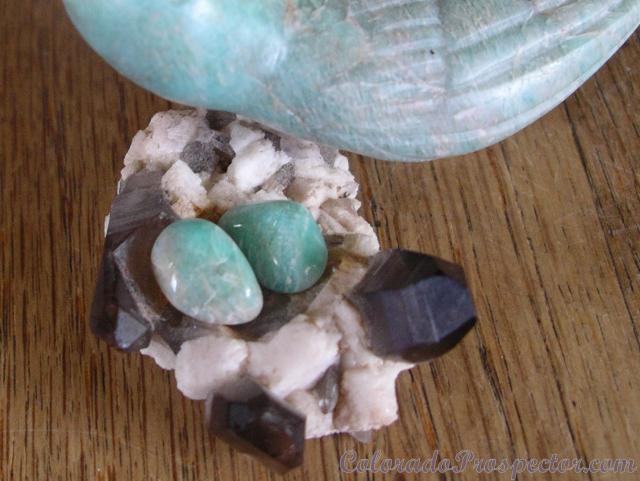
Posted by: Mrs.CP Feb 7 2014, 09:02 AM
Well I finishd the 5 wee little bird eggs but I will definately need to use a bigger nest for them.
Here is a piece I'm working on per request. Featured from the movie "Pick Of Destiny". It started off more as a guitar pick request but feels more like a sculpting project to me. Alot of work to go but it's coming along niccely. Picture shows it wet.
Thanks for looking and I always welcome the feedback.
|
Posted by: Caveman Feb 7 2014, 11:18 AM
AWESOME!
Posted by: fenixsmom Feb 7 2014, 04:32 PM
Those are all fantastic!!!
Posted by: Mrs.CP Feb 9 2014, 08:29 AM
Thanks! I forgot to mention that the pick of destiny is being made out of Jade. I have more detail in it now but it still has that "flat" look. Now for working on giving it the 2D look.
Posted by: Mrs.CP Feb 9 2014, 09:16 PM
Looking a bit better with more detail, coming along nicely I think. Here is a close side view of the progress..... Stone shown dry.
|
Posted by: Mrs.CP Apr 22 2014, 07:21 AM
I'm having problems with my Dremel. When I turn it on the low speed setting, it jolts and jerks when I'm trying to use it. Not helpful!! Must be the switch but instead of fighting with it I just went to hand polishing. Here is the Pick of destiny on it's final polish, picture taken by Tim while I was polishing it. Should take several hours doing it this way but should be done soon. No sense holding back the project when there are other ways to get it done. Good way to toughen up the hands too.
|
Posted by: Mrs.CP Apr 23 2014, 06:26 AM
I also used the piece of leather pictured above with the polish on it to finish the stone. Was actually hard to give it that old look still but worked well!
Finished Pick Of Destiny!

|
Posted by: swizz Apr 23 2014, 08:26 AM
WOW!
Excellent work Denise, your detail work is outstanding.... it looks great!
Posted by: Mrs.CP Apr 23 2014, 10:03 AM
Thanks Chris!! Detail was really difficult in this piece I think because I also had to give it that old and cracked look like the piece in the movie.
While I'm on a polish it by hand roll, I'm going to move onto the bunny. Very small piece with some deep delicate groves, so we will see how that goes. I still need to figure out how the piece will be displayed!?
Posted by: Mrs.CP May 6 2014, 06:44 AM
Almost finished polishing the bunny and the butterfly. Just need t go through 2 more polishing steps then done.
In the meantime, here is a picture of what Dan was working on........for a long time. I think it looks pretty cool!! One doesn't see too many Arizona petrified wood railroad spikes. Looking good Dan!

|
Posted by: russau May 6 2014, 08:39 AM
check your brushs on that dremel tool. you use it a lot iassume! it could be the switch as you stated but id look at the condition of the brushs first.
Posted by: Mrs.CP May 6 2014, 09:39 AM
I do use it a lot Russ....too much for Dremel brand I'm thinking. We have ripped it apart several times checking the brushes, cleaning it out for dust buildup. I was even thinking that it might have been from using it on the inverter but still did the same thing when on the generator. Using the flex shaft to use the Dremel wet, I mostly use the lowest speed setting as not to work the shaft too much. That's the setting that jerks the worst. Ever try to do intricate work when the tool your using is jerking in your hand........ .......Hands were trembling so bad from holding it tight after 5 minutes that they looked like I drank 3 Red bulls before I began. Pieces are so delicate that I didn't want to take any chances with such an unpredictable tool so I went to hand polishing.  A lot of work but will be worth it in the end I think. I am looking into getting a more commercial tool that can handle the load for this kind of work...... like a Foredom grinder.
Posted by: russau May 7 2014, 09:25 AM
when you took it apart, how did the comutator look? was there any black streaks on it or any unevenness on the copper? if not id call Dremel and ask them for their ideas on this problem. I have two of these tools and never had that problem one of them is missing the brushs and caps for the brushs, so that's why I have 2.
Posted by: ColoradoProspector May 8 2014, 10:01 AM
Yep checked that out and cleaned it along with the brushes Russ, looked good there. It's actually just a worn or dirty switch contact I think since she uses it 99% on speed 1 or 2.
The little dremel has put out many many rpm's though so it's not like it didn't do some work.
Wow I'd forgotten all about that little pet wood rail road spike carving Denise, thanks for digging up some of my unfinished work!
Posted by: russau May 8 2014, 03:28 PM
How about spraying the switch with some electrical spray cleaner, and swiching it back and forth to make sure you got it clean? OR better yet send me airfair and ill give you one of mine??:)
Posted by: ColoradoProspector May 8 2014, 04:49 PM
Thanks Russ, very kind of you to offer , but no thanks. I think what we need to do is invest in a more professional type set up like Foredom. They are supposed to be much better suited for the type of work we expect it to do over the long haul from what we've been reading, especially with the low speed usage so much of it's life.
Posted by: Mrs.CP May 9 2014, 12:19 PM
Thanks Russ very kind of you to offer! I just get so frustrated trying to use the "mechanical stuff", especially when it's malfunctioning that I always just resort back to hand work. Trusted tools! I'm still learning with ever piece I do....like work with bigger pieces to start with!! Bunny is not even the size of my finger tip.
I'm almost finished polishing the wee fire agate bunny, just fine tuning it with Tri-Tin polish on a toothpicks end. It's like trying to scratch an ant's behind without crushing it.

|
I can't help but to be puzzled at the natural heart shaped hole on it's chest. Just popped in while I was shaping the piece. I started to think it might be cool to fill with gold but it's only the size of a needles head. CP just looked at me and rolled his eyes and said "crazy woman".
 Ok, I can't argue him on that one.
Posted by: Caveman May 9 2014, 04:16 PM
I'm still learning with ever piece I do....like work with bigger pieces to start with!! Bunny is not even the size of my finger tip.I'm almost finished polishing the wee fire agate bunny, just fine tuning it with Tri-Tin polish on a toothpicks end.
It's like trying to scratch an ant's behind without crushing it. |
|
I can't help but to be puzzled at the natural heart shaped hole on it's chest. Just popped in while I was shaping the piece. I started to think it might be cool to fill with gold but it's only the size of a needles head. CP just looked at me and rolled his eyes and said "crazy woman".
Ok, I can't argue him on that one. But that would be very cool!
Posted by: russau May 10 2014, 04:08 AM
Yep I think filling it with gold would be very appropriate! how unique is that!!!
Posted by: swizz May 10 2014, 05:33 AM
The bunny is looking awesome!
Posted by: Mrs.CP May 11 2014, 06:34 AM
Thanks guys, I really appreciate the feedback!! I'm still deciding what to do with the hole if anything. So small I will need the 20x loop to fill it properly.
Posted by: Caveman May 11 2014, 11:46 AM
Please fill it - a bunny with a heart of gold would be a perfect Christmas gift. Yes, I'm interested.... if it's up for sale.....
Posted by: Mrs.CP May 11 2014, 11:49 AM
I "think" I'm finished polishing the bunny. I can see some slightly bumpy looking spots near it's ear that I may work more. Really hard to get in those grooves though with a wood stick, grit and leather. This side view is the side with all the bubbly flash but a dickens to photograph. Will have to wait for the sun to get a better picture.

|
The backside view also shows a large bubble in it's behind. Almost looks like a sun burst.....again will have to wait for the sun to get better pictures.

Most of the fire agate flash didn't even pop in till the final polish...but did!


|
Now on to finish polishing this black snowflake obsidian butterfly. Talk about a stone that shows all the flaws if not polished out properly.
Mirror finish on all of it but a few spots I'm still giving special attention to.
Posted by: Mrs.CP May 11 2014, 11:55 AM
I didn't see your post Caveman till after I posted. I was thinking about listing it but was unsure if I should give it a base or not? It looks so lonely and out in the open vulnerable all by itself.
Thanks for showing interest in the bunny! Would be perfect for you as I worked it almost like a Caveman would have. A lot of grunting, grit, leather and a good stick to rub the grit in. That had to be how they did it right?
Posted by: Caveman May 11 2014, 12:14 PM
Naw, we had squirrel cages to run a polishing wheel......*TWEEEEET* Yep, had to flag myself on that one.
That rabbit is very well done. Sometimes the by-hand methods work the best!
Posted by: Mrs.CP May 11 2014, 02:17 PM
Too funny! You crack me up...I even got a visual in my head!
Thanks Caveman, that tiny bunny sculpture has meant a lot to me from the beginning of the project. Turned out better than I pictured it in the beginning so I'm very happy with it. I even thought about keeping this one in my care but knowing it will be in good hands with you is good enough for me....... .....PM coming at ya'.
Think it needs a base or looks good standing alone? Comments welcome everyone.
Posted by: Caveman May 11 2014, 02:29 PM
I think standing alone - I'm hoping it goes on my Wife's desk after this Christmas. I think she will be picking it up off and on while it lives there.
Posted by: Mrs.CP May 13 2014, 06:06 AM
I think your wife's desk will make a great base for it.
Posted by: swizz May 13 2014, 07:37 AM
It turned out so niiiicee!!!!!!! You have the patience of Jobe and your near-vision must me impeccable! Outstanding sculpture and great attention to detail. You nailed it!
Posted by: Mrs.CP May 13 2014, 08:56 AM
Thanks Chris, I really enjoyed working on it! Actually my eye sight is slowly slipping away but I do what I can. Not bad for only one decent eye though. I must admit that I do take close up pictures while it is in process and that helps me see the smaller areas better by zooming into the picture. The heart cavity is so small, I literally can barely see it without the 20x loop.
I am a stickler for detail though! I am my worst critic when it comes to my work. Is one of the reasons I love getting the feedback so much. When I first started the bunny off, I was saying to myself that it was too small to give the underside detail, but just didn't look right to me when I was working it. I would do exactly what Caveman said his wife would do....pick it up and look at it all over, then set it down. Looking at the detail on top then flipping it over only to see a boxy look just wasn't right to me. I would even get my sight level with the table and look at how it was sitting. I'm so glad I did because when it's sitting, the rounded belly allows light to go underneath it lighting up it's tail and left back foot much better. So here it is today.
Still more polishing to go on the Snowflake obsidian butterfly. You can see in the picture where it still needs more polishing along the body. Areas that look grey in the cracks need it more till they look jet black. This side has been really hard since the body sinks down between the wings. I must admit, I have snap the wing phobia since that is what happened to it's matching mate while I was sculpting it. I don't know what I was thinking when I made the wings only around 2.5 mm. thick but sure looks cool. Just need to make sure not to put too much pressure on it while polishing it. I have also been using my fingernail with sandpaper to get in the tighter grooves, sure have taken their toll. Back to the leather, stick and polish. 

|
Posted by: russau May 13 2014, 09:52 AM
LOTS of talent shown here!
Posted by: Mrs.CP May 14 2014, 08:16 AM
Thanks Russ, I'm learning something new with every piece and loving every minute of it!  I have drawn since I could hold a crayon, but something about taking a prospecting find and turning it into a 3 dimensional figure has been a blast for me.
Posted by: Mrs.CP May 16 2014, 07:06 AM
Here is the butterfly polished out. Still trying to decide what kind of base for it. I am also wondering if it needs legs and antennas...........this will call for some delicate wire wrapping work......... Oh Dan!! 

|
Now onto polishing out the Colorado petrified wood guitar!
Posted by: ColoradoProspector May 17 2014, 02:24 PM
Dadgumit ya'll! I think I've been commissioned again. Twice!! So off to the drawing/thinkin' boards..... Gotta' stuff a teensy weensy heart full of gold and make a tiny butterfly rack/holderer......erererer..... Oh boy.....
Ok, I gotta' a couple thoughts, we'll see ifin' they work or not. 
Posted by: russau May 18 2014, 06:53 AM
|
|
Now onto polishing out the Colorado petrified wood guitar!
Your butterfly would look nice with gold wire wrap for legs on a piece of drift wood!
Posted by: Mrs.CP May 20 2014, 02:20 PM
Thanks Dan, you rock! I know you will be able to think of something really cool for it. I definitely think it would look cool on a piece of drift wood Russ. I was thinking that with the white markings in the stone, that sterling silver might accent it better. Will be fun to see what Dan comes up with. Makes the projects extra special I think when we both have a hand at working on it. I am really glad that he will be helping me with the gold filled heart on the bunny also. Sight stinks so bad these days that I dang near stepped on a green rattler the other day. Didn't even see it till it warned me with it's rattling tail. Looked down and it was right at my feet slithering away. Looked to be at least 7 years old. Was so disappointed in myself for not seeing it sooner.
Posted by: Mrs.CP May 21 2014, 12:17 PM
Nice little trade off, was bit on the back of my hand by a spider swelling it up. Put one of my "reliable tools" out of commission for now but a much better bite in my book than the rattle snake.
Posted by: Mrs.CP Jun 2 2014, 02:47 PM
Dan did heart surgery on the little bunny today filling the heart cavity with gold! Patient is recovering well but will need to remain on it's back for a few days before being able to return to it's feet. Thanks CP, you did a great job!
Posted by: swizz Jun 2 2014, 06:49 PM
Can't wait to see this!
Posted by: ColoradoProspector Jun 7 2014, 02:20 PM
You're welcome and thank you for assisting with the micro surgery nurse Denise.
I couldn't think of any make shift "gurney" for the teeny bunny during heart replacement surgery......... So I called in the special nurse assistant to hold the bunny whilst I held the 20x loop with one hand and a toothpick in the other in an "attempt" to place  several tiny grains of natural gold. Well they ended up in the heart space but not sure if placed would be the right word.....maybe "stuffed" would be better.
Gold looked a lot smaller before I was in the loop scale to work.
Any way it seemed to all work out for the good. Here's a similar angle pic to the one showing the void.
A heart of gold......the "22 kt fire agate bunny"? hmmmmmm maybe.
Nice work on the bunny Denise, that is one tiny lil' carving!

|
Posted by: swizz Jun 7 2014, 04:53 PM
Hopefully the Bunny has a fast and full recovery.... and kudos to the nurse and surgeon!
Fantastic work you guys, that is a special piece.
Posted by: Caveman Jun 10 2014, 09:34 PM
It is beautiful! Looks like I will be making a fieldtrip soon......
Posted by: Mrs.CP Jun 12 2014, 07:12 AM
Thanks guys! It did turn out pretty special. Sounds great Scott, just let me know when your ready. We decided that we definitely need a head magnifier with an led light to help with those small projects. Was a sight to see Dan with the loop right on my fingers while I held the bunny. Was breathing all over my fingers and the patient. Good thing I like him.
Powered by Invision Power Board (http://www.invisionboard.com)
© Invision Power Services (http://www.invisionpower.com)