Stone Sculpture Projects |


 Colorado Prospector - Gem and mineral prospecting and mining forums > Prospecting, Mineral Collecting and Treasure Hunting Forums > Gem and Mineral Specimen Finds or Processes
Stone Sculpture Projects |
 Feb 11 2009, 03:51 PM Feb 11 2009, 03:51 PM
Post
#1
|
|
 Master Mucker!  Group: Admin Posts: 7,190 Joined: 7-October 03 From: Colorado Member No.: 4 |
Seems most of the sculptures Im working on right now are smaller than a quarter.
Here is an example with this California Fire Agate bee in the works. Only his right wing is showing in this picture as size example. The wings still need to be attached, so it looks a bit like this still yet.  Hopefully it will improve in time, and I wont snap a wing trying to put it all together. I think Im going to forward a few of the bigger projects I have in the works, and give my fingers a break.......hehe Have to love the challenge though right?  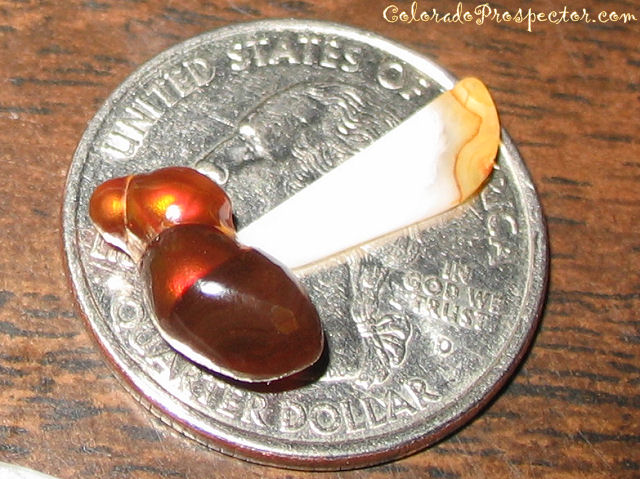
-------------------- Education is the key to the future,
and participation opens the door to opportunity. Discover your prospecting independence & success! ColoradoProspector.com Owner/Webmaster Core team member ♥  |
 |
 
|
 |
|
Jan 17 2013, 02:40 PM
Post
#2
|
|
|
Shovel Buster! Group: Members Posts: 60 Joined: 4-October 10 From: Sweden Member No.: 7,387 |
I to love the photos Denise. Great talent.
Also trying to teach myself carving, however on a more free-form basis. These are sorta "in action" shots, documenting the process of carving a garnet using a dremel and different kind of bits and grinding media. The rough; a close to 16+ cts colour shifting garnet in a difficult-to-facet shape. Would have a low return. So why not try carving it instead? [img width=100 height=99]http://i1209.photobucket.com/albums/cc389/Voltaire_Lapidary/Carving/th_032.jpg[/img] [img width=87 height=100]http://i1209.photobucket.com/albums/cc389/Voltaire_Lapidary/Carving/th_031.jpg[/img] I do some rough grinding at 600 grit with sintered burrs, variety "el cheapo" from China. Then I use 600 diamond paste (homebrew variety) and a tooth pick (special burr) to level out the bumps and generally round it off. Also gives a finer finish before moving on to pre-polish. The first side is completely free form. Notice the black pencil drawings. Using it to mark areas which need more cutting. The second side looks like a mushroom growing out of the bush, IMO. [img width=97 height=100]http://i1209.photobucket.com/albums/cc389/Voltaire_Lapidary/Carving/th_045.jpg[/img] [img width=100 height=95]http://i1209.photobucket.com/albums/cc389/Voltaire_Lapidary/Carving/th_046.jpg[/img] I've now moved to the next step, pre-polish. I started out using 3,000 grit, but it took to long. So once again a home brew cutting paste was made using 1200 grit diamond. (6-12 micron) It took on an polished surface using that! I couldn't get a decent picture of the other side before finishing. Tried using a final polish of 14,000 grit, didn't do any difference so I let it be. [img width=100 height=91]http://i1209.photobucket.com/albums/cc389/Voltaire_Lapidary/Carving/th_cabbingdays017.jpg[/img] This piece ended up at approx 18 mm long and 13.86 cts heavy(!!). I hope this works, finished piece. Looks worse then it is. Should've cleaned it before taking pics [img width=100 height=95]http://i1209.photobucket.com/albums/cc389/Voltaire_Lapidary/Carving/th_finished004.jpg[/img] [img width=100 height=95]http://i1209.photobucket.com/albums/cc389/Voltaire_Lapidary/Carving/th_finished001.jpg[/img] -------------------- Geologists are gneiss, tuff and a little wacke.
|
|
|
|
 Mrs.CP Stone Sculpture Projects Feb 11 2009, 03:51 PM
 jim Wow Denice thats gonna bee awsome. I don't see... Feb 11 2009, 04:43 PM Mrs.CP Thanks Jim. I will be sure to add a picture when i... Feb 12 2009, 08:15 AM thegeno Denise, very very cool!
geno Feb 12 2009, 01:10 PM Mrs.CP Thanks Geno. This is one that found a new home alr... Feb 13 2009, 07:42 AM jim Really great work Denice. I bet you will miss the ... Feb 13 2009, 09:22 AM Mrs.CP I do! But I already have another in the works,... Feb 14 2009, 06:47 AM ColoradoProspector Nice work honey! She's so talented.
... Feb 16 2009, 11:37 AM ColoradoProspector This one is a butterfly Denise has been carving fo... Feb 16 2009, 02:55 PM Mrs.CP Thanks Dan...... You did an awesome job!!
... Feb 17 2009, 09:26 AM nm jack Awesome stuff !!!! Sure is Purdy... Feb 17 2009, 10:34 AM Mrs.CP Thanks Jack!
Here is one made from Boulder... Feb 20 2009, 07:17 AM russau could you aply one to the back of his head or dril... Feb 21 2009, 05:37 AM ColoradoProspector You're welcome honey! Glad I could help ... Feb 22 2009, 12:12 PM Mrs.CP Maybe I can give him an opal head set (ear phones)... Feb 23 2009, 07:24 AM jim Thats a great idea denise. Your so resorseful. Feb 23 2009, 03:18 PM faaus I'm constantly amazed at the creativity, beaut... Feb 23 2009, 04:36 PM Mrs.CP Thanks for the compliments!
I actually foun... Mar 7 2009, 08:56 AM mystic mining Hi Denise
The mushroom you made is a great peice... Mar 7 2009, 07:32 PM Mrs.CP Glad your trip is going well Sean, cant wait to he... Mar 8 2009, 07:45 AM Mrs.CP The bird is doing good now. Stabelizing it sure he... Aug 2 2009, 05:18 AM nm jack Wow, that's really cool!! Aug 2 2009, 01:11 PM ColoradoProspector Neat projects honey, and thank goodness there ain... Aug 22 2009, 04:41 PM Mrs.CP Thanks for the compliments guys!
QUOTE Hopeful... Aug 24 2009, 07:24 AM Mrs.CP Here is a cabochon I finished, but then decided to... Sep 22 2009, 08:00 AM
jim Wow Denice thats gonna bee awsome. I don't see... Feb 11 2009, 04:43 PM Mrs.CP Thanks Jim. I will be sure to add a picture when i... Feb 12 2009, 08:15 AM thegeno Denise, very very cool!
geno Feb 12 2009, 01:10 PM Mrs.CP Thanks Geno. This is one that found a new home alr... Feb 13 2009, 07:42 AM jim Really great work Denice. I bet you will miss the ... Feb 13 2009, 09:22 AM Mrs.CP I do! But I already have another in the works,... Feb 14 2009, 06:47 AM ColoradoProspector Nice work honey! She's so talented.
... Feb 16 2009, 11:37 AM ColoradoProspector This one is a butterfly Denise has been carving fo... Feb 16 2009, 02:55 PM Mrs.CP Thanks Dan...... You did an awesome job!!
... Feb 17 2009, 09:26 AM nm jack Awesome stuff !!!! Sure is Purdy... Feb 17 2009, 10:34 AM Mrs.CP Thanks Jack!
Here is one made from Boulder... Feb 20 2009, 07:17 AM russau could you aply one to the back of his head or dril... Feb 21 2009, 05:37 AM ColoradoProspector You're welcome honey! Glad I could help ... Feb 22 2009, 12:12 PM Mrs.CP Maybe I can give him an opal head set (ear phones)... Feb 23 2009, 07:24 AM jim Thats a great idea denise. Your so resorseful. Feb 23 2009, 03:18 PM faaus I'm constantly amazed at the creativity, beaut... Feb 23 2009, 04:36 PM Mrs.CP Thanks for the compliments!
I actually foun... Mar 7 2009, 08:56 AM mystic mining Hi Denise
The mushroom you made is a great peice... Mar 7 2009, 07:32 PM Mrs.CP Glad your trip is going well Sean, cant wait to he... Mar 8 2009, 07:45 AM Mrs.CP The bird is doing good now. Stabelizing it sure he... Aug 2 2009, 05:18 AM nm jack Wow, that's really cool!! Aug 2 2009, 01:11 PM ColoradoProspector Neat projects honey, and thank goodness there ain... Aug 22 2009, 04:41 PM Mrs.CP Thanks for the compliments guys!
QUOTE Hopeful... Aug 24 2009, 07:24 AM Mrs.CP Here is a cabochon I finished, but then decided to... Sep 22 2009, 08:00 AM
 Mrs.CP QUOTE (Mrs.CP @ Sep 22 2009, 08:00 AM) He... May 3 2010, 06:25 AM jim Decisions, decisions.. It would make a beautiful f... Sep 30 2009, 06:18 PM Mrs.CP I have toyed and experimented with a piece of man ... Oct 10 2009, 07:55 AM Mrs.CP You would hate watching this one being worked Jim.... Oct 23 2009, 12:51 PM jim LOL Denise. What you need to do is practice. Someo... Oct 23 2009, 04:47 PM Mrs.CP lol Jim. I think I may have said that a time or tw... Oct 26 2009, 06:01 AM Mrs.CP Timmy was inspired to make these after I made the ... Nov 5 2009, 02:58 PM Mrs.CP Slow process......especially when I keep starting ... Jan 22 2010, 07:07 AM ColoradoProspector You are welcome honey, glad the drip station is mo... Jan 23 2010, 11:17 AM Mrs.CP Timmy is quite talented and creative, thats for su... Jan 23 2010, 01:17 PM Mrs.CP Thought I would show another step on some of the a... Feb 4 2010, 09:48 AM Mrs.CP Ok....That was just cruel of me. Lets show the ... Feb 9 2010, 06:35 AM jim WOW Denise you sure got some patients to cut tha... Feb 9 2010, 10:59 AM Mrs.CP Its more of a love of working with the stone than ... Feb 10 2010, 11:14 AM Mrs.CP Dan is still working on a few adjustments to the d... Apr 13 2010, 07:29 AM Mrs.CP QUOTE (Mrs.CP @ Apr 13 2010, 07:29 AM) Da... Jul 28 2010, 04:56 PM ColoradoProspector Here is a webcam shot of the proto type flex shaft... Apr 15 2010, 03:55 PM Mrs.CP QUOTE (ColoradoProspector @ Apr 15 2010, 03... Apr 20 2010, 04:35 PM Mrs.CP Thanks Dan, your awesome babe!! It ... Apr 16 2010, 02:19 PM swizz That guitar is looking good Denise.
I believe y... Apr 16 2010, 07:08 PM Mrs.CP Thanks Chris!! This guitar piece was t... Apr 17 2010, 03:51 PM ColoradoProspector Ya' that amazonite bird! Why ain't it ... May 12 2010, 12:46 PM jim Wow denise beautiful work. I sure wish I had you p... May 14 2010, 08:20 AM Mrs.CP Thanks Jim. Patience and persistance doesnt always... May 19 2010, 07:46 AM Mrs.CP With all the tiny carving and sculpting I do, its ... May 24 2010, 01:41 PM Mrs.CP Or not....... I finished the goldstone flower inla... May 26 2010, 07:24 AM jim Wow Denise that's beautiful!!! Th... May 26 2010, 09:25 AM ColoradoProspector For those interested in mounting their flex shafts... Jun 6 2010, 01:01 PM Mrs.CP They work great Dan, and combined with the new dre... Jun 10 2010, 12:50 PM fourcornersrocks I really like the work ya'll are doing, nice j... Jul 27 2010, 12:17 AM Mrs.CP Thanks for the compliments! It helps to love... Jul 27 2010, 07:14 AM Boogie Hi Mrs CP!
If you feel like making it into so... Jul 29 2010, 09:19 AM Mrs.CP Good eye Boogie, I can definately see that as a po... Jul 29 2010, 12:41 PM Boogie QUOTE (Mrs.CP @ Jul 29 2010, 12:41 PM) Go... Jul 29 2010, 01:15 PM swizz Here's a simple sculpture.
Something I did wit... Nov 3 2010, 09:49 AM russau some rewards in life are so simple that a lot of p... Nov 4 2010, 05:40 AM ColoradoProspector QUOTE (swizz @ Nov 3 2010, 09:49 AM) Here... Nov 4 2010, 08:53 AM Mrs.CP Fantastic job Swizz, it looks great!! You ... Nov 5 2010, 06:17 AM swizz QUOTE (Mrs.CP @ Nov 5 2010, 06:17 AM) Fan... Nov 5 2010, 09:40 AM Mrs.CP You would definately like using the drip system Da... Nov 10 2010, 07:10 AM Mrs.CP Warning .........The drip system Dan makes does ha... Nov 14 2010, 08:45 AM dickb QUOTE (Mrs.CP @ Nov 14 2010, 08:45 AM) Wa... Nov 14 2010, 10:38 AM ColoradoProspector Actually Dick that's a great coolant for the l... Nov 15 2010, 09:56 AM dickb Hi Cp and Mrs CP:
Sorry, That was meant as a joke... Nov 15 2010, 10:30 AM ColoradoProspector No worries Dick, rv antifreeze is a good idea when... Nov 15 2010, 12:55 PM Mrs.CP When is it enough detail? Im still working on th... Nov 21 2010, 03:06 PM ColoradoProspector I still think he needs a smaller more rounded tail... Dec 2 2010, 08:35 AM Mrs.CP Too funny Dan, I was thinking the same thing but w... Dec 7 2010, 06:47 AM Mrs.CP Here are a few updates on the Amazonite bird's... Nov 25 2012, 04:53 PM russau quite the artist, you are! Nov 26 2012, 06:48 AM swizz The bird sculpture is such a cool project!
Ve... Nov 26 2012, 07:01 AM Mrs.CP Thanks for the compliments guys! So far it loo... Nov 26 2012, 01:10 PM swizz Now I see, I was looking at it upside-down. That i... Nov 26 2012, 02:53 PM russau thats turning into a tweet stone sculptured bird... Nov 26 2012, 07:31 PM Mrs.CP QUOTE (swizz @ Nov 26 2012, 01:53 PM) A b... Nov 27 2012, 09:34 PM Mrs.CP I was noticing that the last picture didn't sh... Nov 28 2012, 05:06 PM russau you have a good eye for this! really nice! Nov 29 2012, 08:28 PM Mrs.CP Thanks Russ! I'm still learning with ev... Nov 30 2012, 12:09 PM Mrs.CP Here is that closer picture of the little Diamonds... Jan 10 2013, 09:28 AM swizz Absolutely beautiful work Denise. MUCH talent ther... Jan 10 2013, 06:08 PM Mrs.CP Sweet Garnet Voltaire, nice work! I can see th... Jan 18 2013, 08:52 PM Voltaire I actually came upon the idea with toothpicks out ... Jan 20 2013, 01:16 PM Mrs.CP I ran into the same problem when sculpting. The di... Jan 21 2013, 07:30 AM Mrs.CP Thanks for the toothpick tip Voltaire! I have ... Aug 31 2013, 08:54 AM swizz Absolutely beautiful and very creative setting... Sep 1 2013, 05:59 PM Mrs.CP Thanks Chris! I was just looking to get some i... Sep 6 2013, 10:57 AM Mrs.CP I have been modeling it to look like a Mountain Bl... Sep 10 2013, 10:19 AM Mrs.CP Well I finishd the 5 wee little bird eggs but I wi... Feb 7 2014, 09:02 AM Caveman AWESOME! Feb 7 2014, 11:18 AM fenixsmom Those are all fantastic!!! Feb 7 2014, 04:32 PM Mrs.CP Thanks! I forgot to mention that the pick of d... Feb 9 2014, 08:29 AM Mrs.CP Looking a bit better with more detail, coming alon... Feb 9 2014, 09:16 PM Mrs.CP I'm having problems with my Dremel. When I ... Apr 22 2014, 07:21 AM Mrs.CP I also used the piece of leather pictured above wi... Apr 23 2014, 06:26 AM
Mrs.CP QUOTE (Mrs.CP @ Sep 22 2009, 08:00 AM) He... May 3 2010, 06:25 AM jim Decisions, decisions.. It would make a beautiful f... Sep 30 2009, 06:18 PM Mrs.CP I have toyed and experimented with a piece of man ... Oct 10 2009, 07:55 AM Mrs.CP You would hate watching this one being worked Jim.... Oct 23 2009, 12:51 PM jim LOL Denise. What you need to do is practice. Someo... Oct 23 2009, 04:47 PM Mrs.CP lol Jim. I think I may have said that a time or tw... Oct 26 2009, 06:01 AM Mrs.CP Timmy was inspired to make these after I made the ... Nov 5 2009, 02:58 PM Mrs.CP Slow process......especially when I keep starting ... Jan 22 2010, 07:07 AM ColoradoProspector You are welcome honey, glad the drip station is mo... Jan 23 2010, 11:17 AM Mrs.CP Timmy is quite talented and creative, thats for su... Jan 23 2010, 01:17 PM Mrs.CP Thought I would show another step on some of the a... Feb 4 2010, 09:48 AM Mrs.CP Ok....That was just cruel of me. Lets show the ... Feb 9 2010, 06:35 AM jim WOW Denise you sure got some patients to cut tha... Feb 9 2010, 10:59 AM Mrs.CP Its more of a love of working with the stone than ... Feb 10 2010, 11:14 AM Mrs.CP Dan is still working on a few adjustments to the d... Apr 13 2010, 07:29 AM Mrs.CP QUOTE (Mrs.CP @ Apr 13 2010, 07:29 AM) Da... Jul 28 2010, 04:56 PM ColoradoProspector Here is a webcam shot of the proto type flex shaft... Apr 15 2010, 03:55 PM Mrs.CP QUOTE (ColoradoProspector @ Apr 15 2010, 03... Apr 20 2010, 04:35 PM Mrs.CP Thanks Dan, your awesome babe!! It ... Apr 16 2010, 02:19 PM swizz That guitar is looking good Denise.
I believe y... Apr 16 2010, 07:08 PM Mrs.CP Thanks Chris!! This guitar piece was t... Apr 17 2010, 03:51 PM ColoradoProspector Ya' that amazonite bird! Why ain't it ... May 12 2010, 12:46 PM jim Wow denise beautiful work. I sure wish I had you p... May 14 2010, 08:20 AM Mrs.CP Thanks Jim. Patience and persistance doesnt always... May 19 2010, 07:46 AM Mrs.CP With all the tiny carving and sculpting I do, its ... May 24 2010, 01:41 PM Mrs.CP Or not....... I finished the goldstone flower inla... May 26 2010, 07:24 AM jim Wow Denise that's beautiful!!! Th... May 26 2010, 09:25 AM ColoradoProspector For those interested in mounting their flex shafts... Jun 6 2010, 01:01 PM Mrs.CP They work great Dan, and combined with the new dre... Jun 10 2010, 12:50 PM fourcornersrocks I really like the work ya'll are doing, nice j... Jul 27 2010, 12:17 AM Mrs.CP Thanks for the compliments! It helps to love... Jul 27 2010, 07:14 AM Boogie Hi Mrs CP!
If you feel like making it into so... Jul 29 2010, 09:19 AM Mrs.CP Good eye Boogie, I can definately see that as a po... Jul 29 2010, 12:41 PM Boogie QUOTE (Mrs.CP @ Jul 29 2010, 12:41 PM) Go... Jul 29 2010, 01:15 PM swizz Here's a simple sculpture.
Something I did wit... Nov 3 2010, 09:49 AM russau some rewards in life are so simple that a lot of p... Nov 4 2010, 05:40 AM ColoradoProspector QUOTE (swizz @ Nov 3 2010, 09:49 AM) Here... Nov 4 2010, 08:53 AM Mrs.CP Fantastic job Swizz, it looks great!! You ... Nov 5 2010, 06:17 AM swizz QUOTE (Mrs.CP @ Nov 5 2010, 06:17 AM) Fan... Nov 5 2010, 09:40 AM Mrs.CP You would definately like using the drip system Da... Nov 10 2010, 07:10 AM Mrs.CP Warning .........The drip system Dan makes does ha... Nov 14 2010, 08:45 AM dickb QUOTE (Mrs.CP @ Nov 14 2010, 08:45 AM) Wa... Nov 14 2010, 10:38 AM ColoradoProspector Actually Dick that's a great coolant for the l... Nov 15 2010, 09:56 AM dickb Hi Cp and Mrs CP:
Sorry, That was meant as a joke... Nov 15 2010, 10:30 AM ColoradoProspector No worries Dick, rv antifreeze is a good idea when... Nov 15 2010, 12:55 PM Mrs.CP When is it enough detail? Im still working on th... Nov 21 2010, 03:06 PM ColoradoProspector I still think he needs a smaller more rounded tail... Dec 2 2010, 08:35 AM Mrs.CP Too funny Dan, I was thinking the same thing but w... Dec 7 2010, 06:47 AM Mrs.CP Here are a few updates on the Amazonite bird's... Nov 25 2012, 04:53 PM russau quite the artist, you are! Nov 26 2012, 06:48 AM swizz The bird sculpture is such a cool project!
Ve... Nov 26 2012, 07:01 AM Mrs.CP Thanks for the compliments guys! So far it loo... Nov 26 2012, 01:10 PM swizz Now I see, I was looking at it upside-down. That i... Nov 26 2012, 02:53 PM russau thats turning into a tweet stone sculptured bird... Nov 26 2012, 07:31 PM Mrs.CP QUOTE (swizz @ Nov 26 2012, 01:53 PM) A b... Nov 27 2012, 09:34 PM Mrs.CP I was noticing that the last picture didn't sh... Nov 28 2012, 05:06 PM russau you have a good eye for this! really nice! Nov 29 2012, 08:28 PM Mrs.CP Thanks Russ! I'm still learning with ev... Nov 30 2012, 12:09 PM Mrs.CP Here is that closer picture of the little Diamonds... Jan 10 2013, 09:28 AM swizz Absolutely beautiful work Denise. MUCH talent ther... Jan 10 2013, 06:08 PM Mrs.CP Sweet Garnet Voltaire, nice work! I can see th... Jan 18 2013, 08:52 PM Voltaire I actually came upon the idea with toothpicks out ... Jan 20 2013, 01:16 PM Mrs.CP I ran into the same problem when sculpting. The di... Jan 21 2013, 07:30 AM Mrs.CP Thanks for the toothpick tip Voltaire! I have ... Aug 31 2013, 08:54 AM swizz Absolutely beautiful and very creative setting... Sep 1 2013, 05:59 PM Mrs.CP Thanks Chris! I was just looking to get some i... Sep 6 2013, 10:57 AM Mrs.CP I have been modeling it to look like a Mountain Bl... Sep 10 2013, 10:19 AM Mrs.CP Well I finishd the 5 wee little bird eggs but I wi... Feb 7 2014, 09:02 AM Caveman AWESOME! Feb 7 2014, 11:18 AM fenixsmom Those are all fantastic!!! Feb 7 2014, 04:32 PM Mrs.CP Thanks! I forgot to mention that the pick of d... Feb 9 2014, 08:29 AM Mrs.CP Looking a bit better with more detail, coming alon... Feb 9 2014, 09:16 PM Mrs.CP I'm having problems with my Dremel. When I ... Apr 22 2014, 07:21 AM Mrs.CP I also used the piece of leather pictured above wi... Apr 23 2014, 06:26 AM |
| Lo-Fi Version | Time is now: 22nd June 2024 - 11:10 AM |


